Level 8: The Lion: Difference between revisions
m (Text replace - "{{Dungeon" to "{{Infobox|dungeon") |
(added gallery, improved infobox) |
||
| Line 1: | Line 1: | ||
{{Infobox|dungeon | {{Infobox|dungeon | ||
| image = [[File:Level-8-the-lion.png|200px]] | |||
|image = [[File:Level-8-the-lion.png|200px]] | | caption = The Entrance to The Lion | ||
|game = ''[[The Legend of Zelda]]'' | | game = ''[[The Legend of Zelda]]'' | ||
| | | boss = [[Gleeok (The Legend of Zelda)|Gleeok]] | ||
|miniboss = [[Manhandla (The Legend of Zelda)|Manhandla]] x3<br>[[Gohma (The Legend of Zelda)|Gohma]] x2 | | miniboss = [[Manhandla (The Legend of Zelda)|Manhandla]] x3<br>[[Gohma (The Legend of Zelda)|Gohma]] x2 | ||
| | | enemies = [[Bubble]]<br>[[Darknut]]<br>[[Gibdo]]<br>[[Keese]]<br>[[Pols Voice]]<br>[[Stone Statue]]<br>[[Zol]] | ||
|reward = [[Heart Container]]<br>[[Triforce Shard]] | | item = [[Book of Magic]]<br>[[Magical Key]] | ||
|walkthrough = [http://www.zeldadungeon.net/Zelda01-the-legend-of-zelda-walkthrough-09.php Text Walkthrough]<br>[http://www.zeldadungeon.net/Zelda01-the-legend-of-zelda-video-walkthrough-10.php Video Walkthrough] | | reward = [[Heart Container]]<br>[[Triforce Shard]] | ||
| walkthrough = [http://www.zeldadungeon.net/Zelda01-the-legend-of-zelda-walkthrough-09.php Text Walkthrough]<br>[http://www.zeldadungeon.net/Zelda01-the-legend-of-zelda-video-walkthrough-10.php Video Walkthrough] | |||
}} | }} | ||
'''Level 8: The Lion''' is the eighth and penultimate [[dungeon]] found in ''[[The Legend of Zelda]]''. This dungeon hides the final [[Triforce Shard]], which when collected and combined with the rest of the shards | '''Level 8: The Lion''' is the eighth and penultimate [[dungeon]] found in ''[[The Legend of Zelda]]''. This dungeon hides the final [[Triforce Shard]], which when collected and combined with the rest of the shards creates the full [[Triforce of Wisdom]]. [[Link]] comes here in search of that fianl shard after he has collected the first seven. Compared to dungeons before and after it, this dungeon is much easier. Its location is under a bush in eastern [[Hyrule]], and that bush must be burned by the [[Candle|Red]] or [[Candle|Blue Candle]]. This bush's location is, from the [[Starting Screen]], four screens right, two screens up, one screen right, one screen down, and finally one screen right. The [[Boss]] of this dungeon is known as [[Gleeok (The Legend of Zelda)|Gleeok]], a previous boss fought in [[Level 4: The Snake]] and [[Level 6: The Dragon]]. | ||
==Items== | ==Items== | ||
This dungeon contains two main items that can be obtained by Link. The first is called the [[Book of Magic]]. This item is actually an upgrade to the [[Magical Rod]], as with this book Link's Magical Rod | This dungeon contains two main items that can be obtained by Link. The first is called the [[Book of Magic]]. This item is actually an upgrade to the [[Magical Rod]], as with this book Link's Magical Rod creates a flame after its beam hits an object. With this object, the Red Candle becomes pretty much useless. This book is found in a side-scrolling section of the dungeon. The entrance to the underground area is found two rooms left from the start. The second item is called the [[Magical Key]]. This special key is basically a universal key that can unlock any and all Locked Doors found throughout each dungeon. This item makes all keys found or currently owned useless. This item is especially useful in [[Level 9: Death Mountain|Death Mountain]], where Locked Doors are everywhere. This key can be found be travelling six rooms up and one room right from the entrance. Beneath the staircase is the Magical Key. Oddly enough, neither of these items are required to complete the game, as both do something that another item also does. For example, the Book of Magic allows Link's Magical Rod to create a fireball, like either Candle. Also, the Magical Key unlocks door that Small Keys already could. | ||
==Enemies== | ==Enemies== | ||
| Line 30: | Line 31: | ||
==Manhandla & Gohma== | ==Manhandla & Gohma== | ||
[[File:Gohma-Sprite-LoZ.png|100px|right]] | |||
[[File:Manhandla-Sprite-LoZ.png|left]] | |||
[[File: | The [[Mini-Boss]]es of The Lion are previous bosses returning as mini-bosses. The first one, called [[Manhandla (The Legend of Zelda)|Manhandla]], is a plant-like thing that appeared in both [[Level 3: The Manji|Level 3]] and Level 4. In this dungeon, Link fights Manhandla thrice, and each time the battle is exactly the same; kill the claws and then attack the core. The second Mini-Boss that appears in this dungeon is known as [[Gohma (The Legend of Zelda)|Gohma]], and is a spider-like creature that previously appeared in Level 6. However, this verison is slightly different then the previous version. There are two differences; first, this version is blue, while the other was red. Secondly, this version takes three hits with the [[Bow]] and [[Arrow]] to kill while the previous one took only one shot. Link fights Gohma twice in this dungeon. | ||
[[File: | |||
The [[Mini-Boss]]es of The Lion are previous | |||
==Gleeok== | ==Gleeok== | ||
[[File:Gleeok-LoZ-Sprite.png|100px|right]] | [[File:Gleeok-LoZ-Sprite.png|100px|right]] | ||
Also a previous | Also a previous boss returning from a previous dungeon, Gleeok is a multi-headed dragon that guards the final Triforce Shard. This time, Gleeok has four heads in total, while the last two times it had two and three, respectively. Gleeok puts up a very good fight, as even after Link destorys one head the head starts to float around the room and shoot firebeams at Link, making it much harder. Link must destory each of the four heads in order to defeat Gleeok. Once he has, he can travel to the next room where the eighth and final Triforce Shard awaits him. | ||
==Old Man Locations== | ==Old Man Locations== | ||
There are two different [[Old Man]] locations that Link can go to in this dungeon. The first location involves the Old Man giving Link a hint about the next dungeon. He | There are two different [[Old Man]] locations that Link can go to in this dungeon. The first location involves the Old Man giving Link a hint about the next dungeon. He says, ''"SPECTACLE ROCK IS AN ENTRANCE TO DEATH."''{{Ref|LoZ|74|[[Old Man]]}} This is a reference to how the final dungeon is located behind a bombable wall in [[Spectacle Rock]]. The second location also rewards Link with a hint from the Old Man. This time, he says, ''"10TH ENEMY HAS THE BOMB."''{{Ref|LoZ|75|[[Old Man]]}} It is unkown what this means, as it was likely a translation error. | ||
==Compass & Dungeon Map== | ==Compass & Dungeon Map== | ||
| Line 51: | Line 49: | ||
===Dungeon Map=== | ===Dungeon Map=== | ||
The [[Dungeon Map]] | The [[Dungeon Map]] shows Link the layout of the dungeon after he has collected it. This assists Link explore all the rooms in the dungeon. The Dungeon Map is found in a room that contains one of the Mini-Bosses of the dungeon, a Manhandla. After Link has defeated Manhandla the Map appears on the floor. This room is found by going up five rooms from the entrance of the dungeon. | ||
==Keys & Locked Doors== | ==Keys & Locked Doors== | ||
This dungeon contains its fair share of Locked Doors and [[Small Key]]s. In total, there are six Small Keys available to be collected and only four Locked Doors that need to be unlocked. This dungeon | This dungeon contains its fair share of Locked Doors and [[Small Key]]s. In total, there are six Small Keys available to be collected and only four Locked Doors that need to be unlocked. This dungeon thus gives Link two extra keys that he can use in the next dungeon. However, because the Magical Key is found in this dungeon, all keys collected after it are not acknowledged by the game. | ||
==Gallery== | |||
<gallery> | |||
File:Compass-Lion-LoZ.png|Room with the Compass | |||
File:Map-Lion-LoZ.png|Room with the Dungeon Map | |||
File:Gleeok-Lion-LoZ.png|Room with Gleeok | |||
</gallery> | |||
{{References}} | {{References}} | ||
Revision as of 03:57, April 28, 2013

The Entrance to The Lion
Games | ||
Boss | ||
Mini-bosses | ||
Enemies | ||
Items | ||
Rewards | ||
| Guides | ||
|---|---|---|
Walkthrough | ||
Level 8: The Lion is the eighth and penultimate dungeon found in The Legend of Zelda. This dungeon hides the final Triforce Shard, which when collected and combined with the rest of the shards creates the full Triforce of Wisdom. Link comes here in search of that fianl shard after he has collected the first seven. Compared to dungeons before and after it, this dungeon is much easier. Its location is under a bush in eastern Hyrule, and that bush must be burned by the Red or Blue Candle. This bush's location is, from the Starting Screen, four screens right, two screens up, one screen right, one screen down, and finally one screen right. The Boss of this dungeon is known as Gleeok, a previous boss fought in Level 4: The Snake and Level 6: The Dragon.
Items
This dungeon contains two main items that can be obtained by Link. The first is called the Book of Magic. This item is actually an upgrade to the Magical Rod, as with this book Link's Magical Rod creates a flame after its beam hits an object. With this object, the Red Candle becomes pretty much useless. This book is found in a side-scrolling section of the dungeon. The entrance to the underground area is found two rooms left from the start. The second item is called the Magical Key. This special key is basically a universal key that can unlock any and all Locked Doors found throughout each dungeon. This item makes all keys found or currently owned useless. This item is especially useful in Death Mountain, where Locked Doors are everywhere. This key can be found be travelling six rooms up and one room right from the entrance. Beneath the staircase is the Magical Key. Oddly enough, neither of these items are required to complete the game, as both do something that another item also does. For example, the Book of Magic allows Link's Magical Rod to create a fireball, like either Candle. Also, the Magical Key unlocks door that Small Keys already could.
Enemies
There is a very good balance of enemies in this dungeon, including a varity of Darknuts, Gibdos, and Pols Voices. All the enemies are listed below.
- Enemies in Level 8: The Lion
Manhandla & Gohma
The Mini-Bosses of The Lion are previous bosses returning as mini-bosses. The first one, called Manhandla, is a plant-like thing that appeared in both Level 3 and Level 4. In this dungeon, Link fights Manhandla thrice, and each time the battle is exactly the same; kill the claws and then attack the core. The second Mini-Boss that appears in this dungeon is known as Gohma, and is a spider-like creature that previously appeared in Level 6. However, this verison is slightly different then the previous version. There are two differences; first, this version is blue, while the other was red. Secondly, this version takes three hits with the Bow and Arrow to kill while the previous one took only one shot. Link fights Gohma twice in this dungeon.
Gleeok
Also a previous boss returning from a previous dungeon, Gleeok is a multi-headed dragon that guards the final Triforce Shard. This time, Gleeok has four heads in total, while the last two times it had two and three, respectively. Gleeok puts up a very good fight, as even after Link destorys one head the head starts to float around the room and shoot firebeams at Link, making it much harder. Link must destory each of the four heads in order to defeat Gleeok. Once he has, he can travel to the next room where the eighth and final Triforce Shard awaits him.
Old Man Locations
There are two different Old Man locations that Link can go to in this dungeon. The first location involves the Old Man giving Link a hint about the next dungeon. He says, "SPECTACLE ROCK IS AN ENTRANCE TO DEATH."[1] This is a reference to how the final dungeon is located behind a bombable wall in Spectacle Rock. The second location also rewards Link with a hint from the Old Man. This time, he says, "10TH ENEMY HAS THE BOMB."[2] It is unkown what this means, as it was likely a translation error.
Compass & Dungeon Map
The Compass and Dungeon Map both appear in this dungeon.
Compass
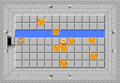
The Compass is used by Link in this dungeon to show him where the final Triforce Shard is via a blinking spot on his map. The room the Compass is found in contains a total of eight Pols Voices guarding it. This room is found only two rooms up and one room right from the entrance.
Dungeon Map
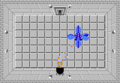
The Dungeon Map shows Link the layout of the dungeon after he has collected it. This assists Link explore all the rooms in the dungeon. The Dungeon Map is found in a room that contains one of the Mini-Bosses of the dungeon, a Manhandla. After Link has defeated Manhandla the Map appears on the floor. This room is found by going up five rooms from the entrance of the dungeon.
Keys & Locked Doors
This dungeon contains its fair share of Locked Doors and Small Keys. In total, there are six Small Keys available to be collected and only four Locked Doors that need to be unlocked. This dungeon thus gives Link two extra keys that he can use in the next dungeon. However, because the Magical Key is found in this dungeon, all keys collected after it are not acknowledged by the game.
Gallery
Room with the Compass
Room with the Dungeon Map
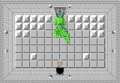
Room with Gleeok


References
- ↑ "SPECTACLE ROCK IS AN ENTRANCE TO DEATH" — Old Man, The Legend of Zelda.
- ↑ "10TH ENEMY HAS THE BOMB" — Old Man, The Legend of Zelda.