Gohma (The Legend of Zelda)

Games | ||
Dungeons | ||
Rewards | ||
Threat | ||
Attacks |
| |
Effective | ||
AIM AT THE EYES OF GOHMA |
Gohma is a boss that is encountered in Level 6: The Dragon and Level 8: The Lion in The Legend of Zelda, as the main boss of The Dragon and the mini-boss of The Lion.
First Quest
Level 6: The Dragon
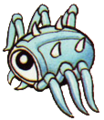
Gohma first appears in Level 6: The Dragon as the boss who is guarding the sixth Triforce fragment. Gohma's main attack is walking laterally and shooting fireballs directly down at Link, which cannot be deflected even with the Magical Shield. The best method that can be used to defeat Gohma is first be on the defensive. Link should avoid the fireballs while keeping a close eye on Gohma. Once Gohma opens its eye and reveals its weakspot, the time to attack has come. One shot with the Bow and Arrow will defeat Gohma instantly. The Bow is the only weapon that can hurt Gohma, so it is required to complete this boss fight. This particular Gohma is red, and once defeated will allow Link to collect the sixth Triforce Shard.
Level 8: The Lion
Gohma appears for the final time in Level 8: The Lion, but this time as the mini-boss instead of the boss. There are two Gohmas found in this dungeon, and they are both slightly stronger than the previous Gohma. They take three shots with the Bow to defeat, where the last Gohma only took one hit. To show this increase in strength, these Gohmas are blue, not red. These Gohmas act as simple obstacles, and once defeated Link can continue through the dungeon. Though one is blocking the room holding the Magical Key, the other is only guarding an Old Man who gives Link a clue to finding Level 9: Death Mountain. In any case, neither of them need to be faced to complete the dungeon.
Second Quest
Level 5
Gohma's first appearance in the Second Quest is in Level 5, guarding the path to the Bow. Gohma exclusively appears in its blue form in this quest, requiring three arrows to defeat. However, the door to the Bow is open, and Link will only receive a Small Key from defeating this Gohma, so he does not have to fight it if he does not want to.
Level 6
Gohma reappears as the boss of Level 6, blocking the room containing the Triforce Shard. Once again, Link will have to shoot three arrows into its eye in order to defeat the enemy and collect the next piece of the Triforce. However, this time Gohma is joined by a fireball-shooting Stone Statue in each corner of the room, making the fight more difficult for Link.
Level 7
Gohma's last appearance in the game is in the next dungeon, Level 7. This is the first time in which Gohma must be defeated even though it is not the final boss of the dungeon. Gohma is joined by a pair of Stone Statues in the middle of the room, but since the door Link uses to enter the room remains unlocked throughout the fight, he can hide in the doorway where the fireballs cannot hurt him.
Gallery

Blue Gohma artwork from Million Publications The Legend of Zelda Strategy Guide

Artwork from Kadokawa Shoten The Legend of Zelda Strategy Guide
Artwork from The Hyrule Fantasy: The Legend of Zelda Picture Book

Red Gohma sprite

Blue Gohma sprite
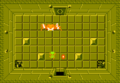
Dodging Gohma's attack
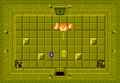
Attacking with an arrow


