Gohma: Difference between revisions
No edit summary |
No edit summary |
||
| Line 4: | Line 4: | ||
| caption = Artwork of Gohma from ''[[The Legend of Zelda]]'' | | caption = Artwork of Gohma from ''[[The Legend of Zelda]]'' | ||
| threat = 2 | | threat = 2 | ||
| attack = '''''The Legend of Zelda'''''<br/>{{H|1}} Contact<br/>{{H|1}} Fireball<br/> | | attack = '''''The Legend of Zelda'''''<br/>{{H|1}} Contact<br/>{{H|1}} Fireball<br/>'''''Link's Awakening'''''<br/>{{H|0.5}} Beam<br/>{{H|1}} Contact<br/>'''''Oracle of Seasons''''' | ||
'''''Link's Awakening'''''<br/>{{H|0.5}} Beam<br/>{{H|1}} Contact<br/> | |||
'''''Oracle of Seasons''''' | |||
| game = ''[[The Legend of Zelda]]''<br/>''[[The Legend of Zelda: Link's Awakening|Link's Awakening]]''<br/>''[[The Legend of Zelda: Ocarina of Time|Ocarina of Time]]''<br/>''[[The Legend of Zelda: Oracle of Seasons|Oracle of Seasons]]''<br/>''[[The Legend of Zelda: The Wind Waker|The Wind Waker]]''<br/>''[[The Legend of Zelda: Twilight Princess|Twilight Princess]]'' | | game = ''[[The Legend of Zelda]]''<br/>''[[The Legend of Zelda: Link's Awakening|Link's Awakening]]''<br/>''[[The Legend of Zelda: Ocarina of Time|Ocarina of Time]]''<br/>''[[The Legend of Zelda: Oracle of Seasons|Oracle of Seasons]]''<br/>''[[The Legend of Zelda: The Wind Waker|The Wind Waker]]''<br/>''[[The Legend of Zelda: Twilight Princess|Twilight Princess]]'' | ||
| dungeon = [[Level 6: The Dragon]]<br/>[[Level 8: The Lion]]<br/>[[Catfish's Maw]]<br/>[[Inside the Deku Tree]]<br/>[[Dancing Dragon Dungeon | | dungeon = [[Level 6: The Dragon]]<br/>[[Level 8: The Lion]]<br/>[[Catfish's Maw]]<br/>[[Inside the Deku Tree]]<br/>[[Dancing Dragon Dungeon]]<br/>[[Temple of Time (Dungeon)|Temple of Time]] | ||
| weapon = <u>'''''General'''''</u><br/>[[Bow]] & [[Arrow]]<br/>[[Hookshot]]<br/>[[Fairy Slingshot]]<br/>[[Deku Stick]]<br/>[[Deku Nut | | weapon = <u>'''''General'''''</u><br/>[[Bow]] & [[Arrow]]<br/>[[Hookshot]]<br/>[[Fairy Slingshot]]<br/>[[Deku Stick]]<br/>[[Deku Nut]]<br/>[[Sword]]<br/>[[Dominion Rod]]<br/><u>'''''Link's Awakening'''''</u><br/>[[Bow]] - 3 hits<br/>[[Hookshot|Hook Shot]] - 6 hits | ||
| reward = [[Heart Container]]<br/>[[Triforce Shard]]<br/>[[Kokiri's Emerald]]<br/>[[Soothing Rain | | reward = [[Heart Container]]<br/>[[Triforce Shard]]<br/>[[Kokiri's Emerald]]<br/>[[Soothing Rain]]<br/>[[Mirror Shard]] | ||
}} | }} | ||
| Line 35: | Line 32: | ||
===The Wind Waker=== | ===The Wind Waker=== | ||
{{Main|Gohma (The_Wind_Waker)}} | |||
Called the normal way, Gohma, ''The Wind Waker'' version is more scorpion-like than spider-like. It is the boss of [[Dragon Roost Cavern]], and is defeated using the [[Grappling Hook]]. | Called the normal way, Gohma, ''The Wind Waker'' version is more scorpion-like than spider-like. It is the boss of [[Dragon Roost Cavern]], and is defeated using the [[Grappling Hook]]. | ||
| Line 51: | Line 49: | ||
File:Gohma-LA.png|Gohma Sprite from ''[[The Legend of Zelda: Link's Awakening|Link's Awakening]]'' | File:Gohma-LA.png|Gohma Sprite from ''[[The Legend of Zelda: Link's Awakening|Link's Awakening]]'' | ||
File:Gohma-thumb.png|Queen Gohma from ''[[The Legend of Zelda: Ocarina of Time|Ocarina of Time]]'' | File:Gohma-thumb.png|Queen Gohma from ''[[The Legend of Zelda: Ocarina of Time|Ocarina of Time]]'' | ||
File:ArmoGhoma.png|Armogohma from ''[[The Legend of Zelda: Twilight Princess|Twilight Princess]]'' | File:ArmoGhoma.png|Armogohma from ''[[The Legend of Zelda: Twilight Princess|Twilight Princess]]'' | ||
File:Gohma-OoS.png|Gohma from ''[[The Legend of Zelda: Oracle of Seasons|Oracle of Seasons]]'' | File:Gohma-OoS.png|Gohma from ''[[The Legend of Zelda: Oracle of Seasons|Oracle of Seasons]]'' | ||
Revision as of 03:51, December 11, 2017

Games | ||
Dungeons | ||
Rewards | ||
Threat | ||
Attacks | The Legend of Zelda | |
Effective | General | |
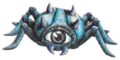
Gohma is a recurring Boss that has been seen in many The Legend of Zelda titles starting from the very beginning. It usually appears as a spider-like creature with one eye, which is its weakspot.
Appearances
The Legend of Zelda
- Main article: Gohma (The Legend of Zelda)
In The Legend of Zelda, Gohma first appears as the boss of the sixth dungeon, Level 6: The Dragon, guarding the sixth Triforce Shard. Gohma later appears as the Mini-Boss of the eighth dungeon, Level 8: The Lion.
Link's Awakening
The Gohma featured in Link's Awakening is the mini-boss of the fifth dungeon, Catfish's Maw. Arrows and the Hookshot are effective, although arrows are most effective.
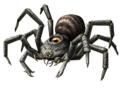
Ocarina of Time
- Main article: Queen Gohma

|
Gohma |
|---|
In Ocarina of Time, Link faced a Gohma called Parasitic Armored Arachnid, Queen Gohma. Queen Gohma act as the boss for the first Dungeon of the game, Inside the Great Deku Tree. This boss fight was the first in 3d and therefore added a lot of different battle strategies. One that was most often implemented was the use of Deku Nuts to stun it then Z-Target and jump slash to double your damage. This version also made Link to fight off Gohma Larva, which also appeared in Twilight Princess.
Oracle of Seasons
- Main article: Gohma (Oracle of Seasons)
Gohma is the boss of the Dancing Dragon Dungeon, the fourth dungeon in Oracle of Seasons.
The Wind Waker
- Main article: Gohma (The_Wind_Waker)
Called the normal way, Gohma, The Wind Waker version is more scorpion-like than spider-like. It is the boss of Dragon Roost Cavern, and is defeated using the Grappling Hook.
Twilight Princess
- Main article: Armogohma
Gohma is called Armogohma in Twilight Princess, is a very large spider that is the boss of the Temple of Time, the sixth dungeon of the game.
Trivia
- The Mini-Boss, Wart, from Majora's Mask, has a similar opening to Queen Gohma.
Gallery
Gohma Official Artwork from The Legend of Zelda

Blue Gohma Million Publishing Artwork from The Legend of Zelda

Red Gohma Sprite from The Legend of Zelda
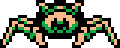
Gohma Sprite from Link's Awakening

Queen Gohma from Ocarina of Time
Armogohma from Twilight Princess

Gohma from Oracle of Seasons


