Key Cavern: Difference between revisions
Jump to navigation
Jump to search
Want an adless experience? Log in or Create an account.
m (Text replacement - "{{Listbox|Link's Awakening|Dungeons}} {{Cat|Link's Awakening Dungeons}} {{Cat|Link's Awakening Locations}}" to "{{Listbox|Link's Awakening Dungeons}} {{Cat|Link's Awakening Dungeons}}") |
mNo edit summary |
||
| Line 1: | Line 1: | ||
{{Stub}} | {{Stub}} | ||
{{Infobox|dungeon | {{Infobox|dungeon | ||
| image | | name = Level 3 - Key Cavern | ||
| caption | | image = [[File:Key_Cavern_Outside.png|240px]] | ||
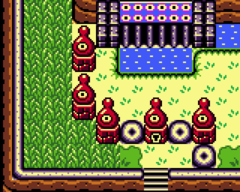
| game | | caption = Key Cavern entrance from ''[[The Legend of Zelda: Link's Awakening DX|Link's Awakening DX]]'' | ||
| | | game = ''[[The Legend of Zelda: Link's Awakening (Game Boy)|Link's Awakening]]'' (''[[The Legend of Zelda: Link's Awakening DX|DX]]'', [[The Legend of Zelda: Link's Awakening|2019 Nintendo Switch]]) | ||
| miniboss = [[Dodongo Snakes]] | | location = [[Ukuku Prairie]] | ||
| | | quest = | ||
| reward | | boss = [[Slime Eyes]] | ||
| miniboss = [[Dodongo Snakes]] | |||
| walkthrough = | | enemies = | ||
| inhab = | |||
| item = [[Pegasus Boots]] | |||
| prereq = Unlock [[Slime Keyhole]] with [[Slime Key]] | |||
| reward = [[Eight Instruments of the Sirens#Sea Lily's Bell|Sea Lily's Bell]]<br/>[[Heart Container]] | |||
| related = | |||
| walkthrough = | |||
*[https://www.zeldadungeon.net/links-awakening-walkthrough/key-cavern-game-boy-color/#c3_4 Text Walkthrough (DX)] | *[https://www.zeldadungeon.net/links-awakening-walkthrough/key-cavern-game-boy-color/#c3_4 Text Walkthrough (DX)] | ||
*[https://www.zeldadungeon.net/links-awakening-walkthrough/key-cavern/#c3_6 Text Walkthrough (Switch)] | *[https://www.zeldadungeon.net/links-awakening-walkthrough/key-cavern/#c3_6 Text Walkthrough (Switch)] | ||
| Line 21: | Line 27: | ||
==Enemies== | ==Enemies== | ||
*[[Bombite]] (Red) | *[[Bombite]] (Red) | ||
*[[Pairodd]] | *[[Pairodd]] | ||
*[[Dodongo Snakes]] (Mini-Boss) | *[[Dodongo Snakes]] (Mini-Boss) | ||
*[[Bombite]] (Green) | *[[Bombite]] (Green) | ||
*[[Mega Thwomp]] (Red) | *[[Mega Thwomp]] (Red) | ||
*[[Piranha Plant]] | *[[Piranha Plant]] | ||
*[[Slime Eyes]] (Boss) | *[[Slime Eyes]] (Boss) | ||
Revision as of 09:40, March 28, 2023
| This article is a stub. You can help the Zelda Dungeon Wiki by expanding it. |
Level 3 - Key Cavern
Games | ||
Location | ||
Boss | ||
Mini-bosses | ||
Items | ||
Prerequisite | Unlock Slime Keyhole with Slime Key | |
Rewards | ||
| Guides | ||
|---|---|---|
Walkthrough | ||
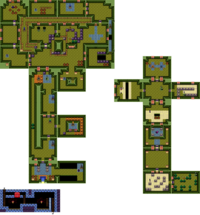
Key Cavern is the third dungeon found in Link's Awakening. It is located in the Ukuku Prairie area, which is west of Mabe Village. The dungeon, as its name suggests, is designed in the shape of two keys, one large and one small. Furthermore, this dungeon features a vast amount of Small Keys, which is another possible origin for the name.
Layout
Enemies
- Bombite (Red)
- Pairodd
- Dodongo Snakes (Mini-Boss)
- Bombite (Green)
- Mega Thwomp (Red)
- Piranha Plant
- Slime Eyes (Boss)


