This chapter covers the normal mode of Twilight Princess for the Nintendo Wii. If you are playing on the Nintendo Wii U, check out the Goron Mines – HD Version.
- Chapter 1 – Ordon Village
- Chapter 2 – The Twilight
- Chapter 3 – Faron Woods: Twilight
- Chapter 4 – Forest Temple
- Chapter 5 – Kakariko Village: Twilight
- Chapter 6 – Death Mountain
- Chapter 7 – Goron Mines
- Chapter 8 – Lanayru Province: Twilight
- Chapter 9 – Lake Hylia: Sidequests
- Chapter 10 – Lakebed Temple
- Chapter 11 – The Master Sword
- Chapter 12 – Gerudo Desert
- Chapter 13 – Arbiter’s Grounds
- Chapter 14 – Scaling Snowpeak
- Chapter 15 – Snowpeak Ruins
- Chapter 16 – Sacred Grove: Round Two
- Chapter 17 – Temple of Time
- Chapter 18 – In Search of the Sky
- Chapter 19 – City in the Sky
- Chapter 20 – Palace of Twilight
- Chapter 21 – Cave of Ordeals
- Chapter 22 – Hyrule Castle
7.1 Welcome to the Goron Mines


The dungeon will begin with a short cinema of the place. Gain control of Link and walk forward along the path engraved on the floor. Jump over to the platforms and you’ll see some lava straight ahead. Wait for the lava to settle and jump over to the other platforms. You’ll reach a platform where there is a cage like structure that seems to lead to a dead end of wooden planks. Use your sword to break these pieces of wood and then continue forward.


There is a flow of fire right passed the next wooden planks. There is also a tile switch on the floor just before the fire. The switch won’t go down with just Link standing on it, but it will if he is wearing the iron boots. Put on the iron boots, step on the switch, take off the iron boots, and then quickly run passed where the fire was.


There is more fire blocking the way as well as another tiled switch. This one is a bit trickier though. Activate the switch with the iron boots and then really quickly run passed the fire. Once you have passed it, quickly turn around and run across the gap to a platform that is outside the cage. The fire covers this part as well so you must do it quickly, before the fire comes back. If you aren’t in time, there is a ladder on this platform that leads back to the other side of the fire.
Watch out for the Fire Toadpoli that is in the lava as it will shoot a ball of flames at Link. Use the shield attack to deflect it back and defeat the enemy. Jump over a few platforms and climb the staircase here. Run straight ahead and defeat the Torch Slug here to find a treasure chest. Open it up for some extra rupees.
Backtrack to right where you climbed the ladder. Jump to a platform in the center of the room and then over to the east side of the room. If you head north you’ll see that fire is blocking the way. Defeat the Torch Slugs that are in this area and then head south. There is another tile switch here, so pull out the iron boots and press it down. Take off the boots and quickly run north and jump to where the fire used to be. Run around the corner and walk down to the lower platform.


Jump down to the lower area and defeat a few Torch Slugs and then looks towards the gate. There is a strange platform on the right. Climb back up the one you just jumped off from and then hop over to the strange platform. Put on the iron boots and the platform will lower. The gate will open so head through the door to the next room.


7.2 First Goron Elder; Dungeon Map
After a short cinema run straight ahead and you’ll see two paths, one going east and one going west. Go west for now and you’ll bump into a few Bokoblins. Defeat them and then open the treasure chest to get a small key.


Return to the middle platform and this time take the east path. There are two rotating platforms in your way here. Wait until they are flat and quickly jump across. You’ll come to a locked door on the east side of the room. Use the small key and head through.


Walk along the path on your right and you’ll find a classic Zelda enemy, a Dodongo. It will shoot a flame out, but it has very limited range. Run around to its backside and slash at its tail to defeat the Dodongo.
There are several small platforms scattered over the lava. Jump from one to another, being careful of the lava that shoots up from the ground. Over at a platform on the northwest side of the room you’ll find another Dodongo. Fight him off the same way you did the first Dodongo and then take a look straight to the east. You’ll see a large square block straight ahead. We’ll be dealing with this shortly. Jump across a few more platforms to get to the northeast portion of the room.


Fight off another Dodongo here and then you’ll see a chain that you can grab a hold of. Grab it and pull it back all the way. This chain is actually pulling that same square block we saw from the other view. Once it is pulled back all the way, quickly run back to the west platform and from there, jump across a few more to get to where the square platform was. Run passed it before it has retracted all the way. Once you make it passed in time, head through the door on the east side of the room.


You’ll see some turquoise colored stuff on the ceiling and the walls. This surface is magnetic and the iron boots can be used to stick against these walls. Drop in the water and then use the iron boots to sink to the bottom. Walk through the hole and then resurface on the other side. A bit further in the room there is another one of those tiled switches at the very bottom of the water. Use the iron boots to sink and step on the switch. It will activate a magnetic charge and Link’s boots will pull him to the ceiling of the room. Walk on the magnetic field and walk around the short ceiling to get to a higher level where you are standing upright. Enter through the door on the east side of the room.


One of the Goron elders can be found in this room. Run up to the ring and speak with him, whose name is Gor Amoto. He will give you a Key Shard. Link will need to find the other two key shards from the other Goron Elders to restore the big key to its original form. There is a treasure chest right behind Gor Amoto which contains the Dungeon Map. There is also another treasure chest in the corner of the room which contains a red rupee.


Once you’ve opened both chests, climb up the ladder that is near the dungeon map treasure chest. Walk to the other side of the room and you’ll see a bunch of pots. One of them is moving around and if you lift it, you’ll find Ooccoo. This girl seems to always get stuck in pots deep within dungeons. Ooccoo works just as before in that it will help you warp out of the dungeon if you need to do so. Now exit the room through the door to the west on this upper level.


7.3 Second Goron Elder
You are now back in the previous room, but on a higher floor. Use the iron boots to stick on to the magnetic walls on the side. Walk along the south wall as there is only one Torch Slug as oppose to two. Reach the other side and head through the door.


Walk forward and use the iron boots to step on the switch. It will create a magnetic field sending Link to the ceiling. Walk to the northwest corner of the room and release the iron boots. There is a treasure chest here so open it up and you’ll find a Piece of Heart! Now put the iron boots back on and walk along the wall and get back onto the ceiling. Defeat any of the Torch Slugs on the ceiling and make your way to the southeast corner of the room. From there, head west to get to the door that is on the west side of this room on the upper level. Open the door to return to the center room, but now you will be on a higher level.
Walk to the center of the room and defeat all the Bokoblins that are on this higher platform. Also watch out for the Fire Keese that will fly towards you. Use the iron boots and step on the tile switch on the ground. It will activate the crane and also give it a magnetic charge. Walk over to the west side of the room and when the magnetic crane comes by equip the iron boots to hook on to it. Let it take you to the platform to the north and then release the iron boots.


Walk up the caged platform and defeat a few more Fire Keese and some Bokoblins. Use the iron boots and activate another tiled switch here to move another magnetic crane. Just wait and then crane will come right over the platform you are on. The magnetic boots will pull you up towards it and then take you to the north side of the room. Release the boots and then fight off the Bokoblins that are here. Walk through the door that is nearby.


There are four Tektites that hop around the water here. Defeat them all and then jump into the water. Swim towards the west side of the room and then use your iron boots to sink to the ground. There is a treasure chest here so open it up to get a small key.


Resurface and then swim to the southeast corner of the room. There is a cage and if you look at the bottom, there is a block. Sink down using the iron boots and push the block deeper into the cage. Return to the surface inside the cage and climb onto land.


Climb up another area and use the iron boots on the tiled switch here. With the iron boots equipped, walk over to the magnetic pull that has been created and it will bring Link to the ceiling. Walk all the way north and release the iron boots to drop to a surface on the upper level of this room.


Walk to the west and step on another tiled switch with the iron boots. This will create a magnetic pull from the side of the wall. While the iron boots are equipped walk off of the caged platform on your left and you’ll fall right into the magnetic pull. This will actually pull Link to the wall on the west side of the room. Walk along the wall and then at the end of the turquoise area, release the boots to drop to a higher platform. Open the treasure chest that is here for some extra rupees.
There is a blue diamond switch on this platform as well. Slash at it with your sword and it will turn yellow. A timer will click and the door on the north end of the room will open. Quickly run through it before the diamond turns back to blue and closes.

Defeat the two Bokoblins in this room and then climb up the magnetic wall along the east side of the room. Walk along the wall with the iron boots towards the southeast corner. Release the boots and open the treasure chest here to get another Piece of Heart.


Drop down to the floor and once again climb the magnetic wall with the iron boots. This time however head to the northeast corner of the room. Release the boots to drop down to the platform. There is a handle that has ropes tied to it. Take a slash with your sword and it will cut down a large block. Drop down and you’ll see two large rotating statues in the center of the room. These enemies are known as Beamos and they will shoot lasers at you if you move too close to them. Link cannot defeat them at this moment, so just head north. Use the small key on the locked door and head through it.


You will now be back outside and there are tons of Bokoblin Archers waiting for you. Run north through the various wooden platforms. There are plenty of areas to take cover from the Bokoblin Archers but as long as you move quick enough, they should be no harm to you. You can use the slingshot to take them out. You’ll eventually reach a point where you can turn left or right, head right.


You’ll encounter a Beamos. There were two Beamos in a room before, but we just avoided them. You can pretty much avoid this guy as well. There is a treasure chest in the southwest corner of this small area. Open the chest to get a small key. Now walk to the far west portion of this outdoor room and use the small key on the locked door and head through it.
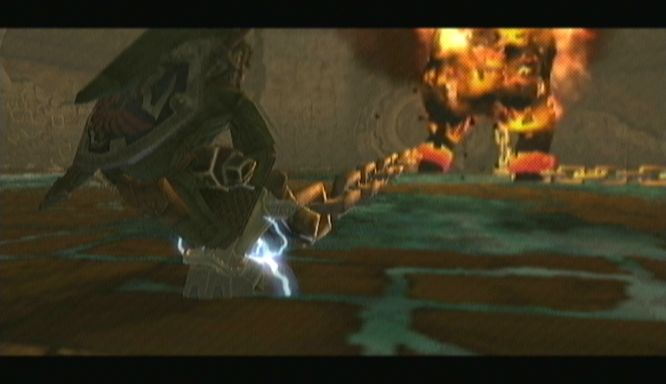
Wait for the rotating platform that is straight ahead to settle and quickly jump past it. You’ll see another much larger rotating platform on the right. Walk closer to it and you’ll notice one side has three magnetic areas while the other has just one. Wait until the side with three is facing up and quickly run to the first magnet area. Equip your iron boots and let the platform rotate around. Once it is back so you are on top of it, quickly take off the boots, run over to the next magnet area, and re-equip the boots. Repeat this process to get to the third magnetic area and then finally across the platform. Go through the door.


You’ll find Gor Ebizo, the second Goron Elder, in this room. He awards Link with the second key shard. He also mentions a new weapon that is nearby that will aid Link on his quest. There is a treasure chest at the southwest corner of the room. Open it for some rupees and then climb the ladder. Leave the room through the door at the east but on the higher level.


7.4 The Hero's Bow
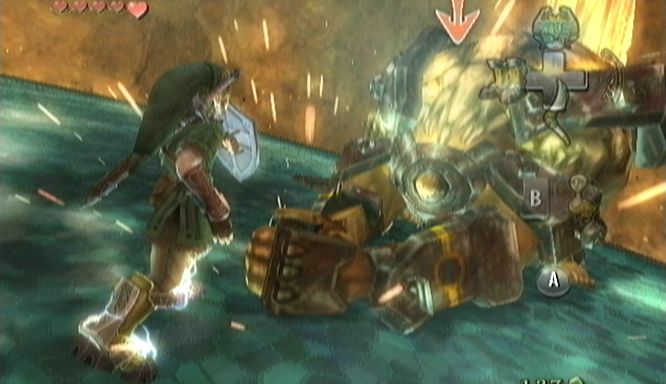
Use the iron boots and walk along the wall to get to the door on the south part of the room. Be sure to walk all the way against the west wall on the magnetic wall and then remove the iron boots to fall to the platform. Open the treasure chest that is at the northwest corner of the room for some more rupees. Open the door to face off with the dungeon mini-boss, Dangoro.

The door will lock behind you so run over to the large magnetic platform in the middle of the room. Dangoro seems rather upset and feels he must protect the treasure. I guess word hasn’t spread that Link is actually trying to help the Gorons. He will jump onto the magnetic field, causing the four chains to break and it falling to a lower area.
This mini-boss battle is really quite simple. Stand near the center of the magnetic platform at the start of the dual. Dangoro’s belly is the weak spot, but it can only be harmed when Dangoro is getting ready to attack. Simply stand right in front of him, and once he winds his arm back, just slash madly at his belly. The jump attack works most effectively, rather than using just the sword attacks. The sword attacks won’t be enough to ground him, so if you do choose this method, just move away after 2 or 3 hits to avoid his attack. His fist is quite strong and at times goes through your shield.

After Dangoro has been grounded, he will curl up into a ball and roll towards Link. At this point, equip your iron boots and grab the Goron as it rolls at you. Grab him and toss him to the side. If you are close enough to the edge, he will be tossed into the lava. After several hits, he will start using his hands as a massive club and slam right in front of his body. Just avoid his attacks and repeat the same process. Three tosses in the lava should do the trick.
Dangoro finally realizes why you are here and offers the weapon of the hero of the past. The platform rises back up and the doors open up. Run and head through the door at the south end of the room.
Run straight a head and open the chest to get the Hero’s Bow. This will allow Link to shoot arrows and more or less makes the slingshot completely useless. You can hold up to 30 arrows.
7.5 Compass; Third Goron Elder; Big Key
Face the south end of the room and use the bow and arrow to cut the rope that is holding the large block upwards. Break the rope and it will create a platform leading southward.


Watch out for the Torch Slug as you walk to the far south of this room. There is a Beamos that comes to life as you draw near. Just back up and pull out your newly acquired bow and arrow. Aim at the red dot that rotates around the top of the Beamos. Hit it once and they enemy will deactivate and become nothing more than a movable statue.
The six Beamos in the room will also activate. Take the time to defeat each one since there are some goodies behind these Beamos. Pull out the one directly to the east and the one directly to the west. Behind the Beamos to the east you will find a treasure chest with the Compass. Then behind the one on the west you’ll find a door, so head through it.


The final Goron Elder can be found here and he looks quite different than the other Gorons. He will give you the third key shard, completing the big key. Open the treasure chest that lies behind the last Goron to find a purple rupee worth 50 rupees. There is nothing left to find here so leave the room.
7.6 Finding the Boss Chamber
Back in this room, pull the dead Beamos at the south of the room and head through the door that is behind it. Run forward and defeat the Fire Keese that fly by. Roll into the fence that is straight ahead to knock it down. Jump over to the next platform and defeat the three Torch Slugs that appear. Continue onward and the next small platform holds two Dodongos. Try not to fall in the lava as you fight these two strong enemies. You can use the bow and arrow from a distance to defeat them.


Next, look northward and you’ll see a bunch of Torch Slugs hanging on the ceiling. If you try jumping over to the platform you are just going to be knocked back into the lava. So instead, use the bow and arrows to defeat them before even jump over. There is another platform that has Torch Slugs above. Repeat the same process with the arrows and then hop over. Now jump over to the longer platform that leads to the east end of the room. Fight off a few more Torch Slugs and you’ll notice the door ahead is locked.


Look above and you’ll see a magnetic area with a Dodongo. You can defeat it from the ground level by using your bow and arrow. Continue to the southeast part of the room and use the iron boots to push down the tiled switch. You’ll be sent up to the magnetic ceiling. If you haven’t, defeat the Dodongo that is on the ceiling and then walk over to just above the locked door. You’ll see a blue diamond switch in the distance that you can shoot with an arrow. Do so and it will turn yellow, which will open the gate below. Take off the iron boots and walk through the door.


Turn to the right and you’ll find a treasure chest with a purple rupee. Walk northward and use the arrow to shoot the rope and drop down the platform. Walk across and use the iron boots on top of the tiled switch. This will pull you up to the magnetic crane and take you to the north side of the room. Release the iron boots and head through the north door yet again.


The Tektites that were in this room are now gone and they will be replaced with these massive fish like enemies known as Toadpoli. They will shoot a rock like projectile which can be deflected back at them with the shield attack. Jump over to the north portion of the room and use the bow and arrow to hit the diamond switch that is on the higher ledge. This will open the gate to the north so head through. You can defeat the Bokoblins and Beamos in this room if you’d like, but then head north.


Back outside you’ll find that a new Bokoblin has spawned. As you head northward you’ll find a whole new set of Bokoblin Archers shooting flame arrows at you. Keep your distance and use the bow and arrow to take them out one by one. Now that you have the compass you’ll notice a treasure chest right near the door that heads west. It is actually underwater. Just use the iron boots to sink to the bottom of the water. Cut through some wooden planks and open the chest for a purple rupee. Resurface on the nearby platform and jump over to a few platforms and then climb the ladder to return to the higher area.


Now return to the eastern area where the Beamos is. Use the arrows to deactivate the statue and then pull it out all the way. The door will open behind the statue so climb up to get to a higher area. Defeat a few more Bokoblin Archers in the distance and walk westward. Use the iron boots and step on the tiled switch here to activate the magnetic crane. Jump down to the platform where the crane reaches and use your iron boots once again. Let the crane take you to the northeast area, but don’t just take off the iron boots. Aim with your bow and arrow and shoot the rope straight ahead to cause the platform to fall, giving Link a safe place to drop down to.


Release the iron boots the next time you are at the northeast corner. Before heading eastward, it is worth noting that there is still a treasure chest in the northwest corner of this room. However, it is unreachable at the moment as you need a future item. No worries though, since it only contains a purple rupee. Continue eastward through the next door ahead.
There are a few Bokoblins and archer Bokoblins in this room. Just keep your distance and use the arrows to defeat them. On the south side of the room, use the arrows to cut the rope, dropping the platform in place. Beware you will be rushed by a ton of Bokoblins. Just pull out your arrows, do your best Rambo impression and fire away. Once that is all over with continue southward. Use the big key and then enter into the boss’ lair.
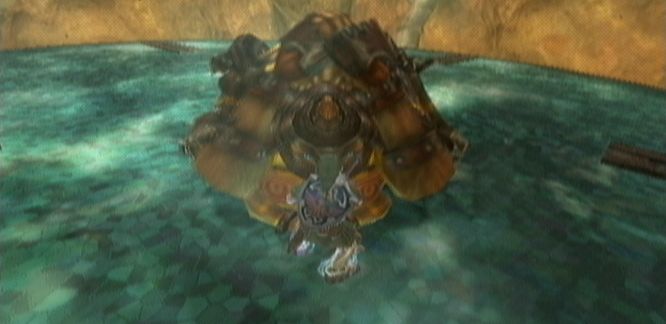
7.7 Twilit Igniter: Fyrus
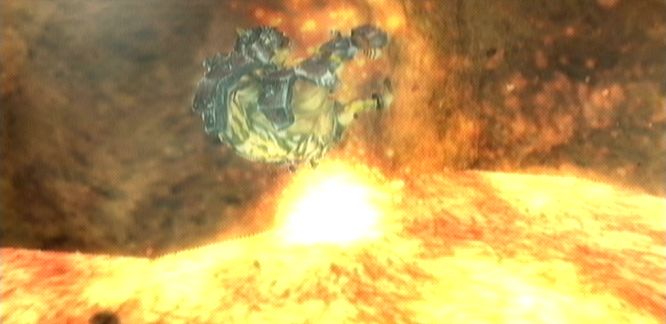
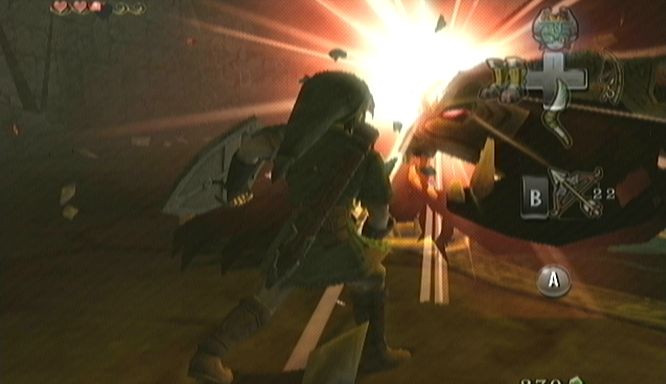
The massive monster seems harmless at first, covered in black and chained to a wall. However, an orange light is set off and this seemingly harmless creature turns into a furious monster. It will light up in flames and break away from the chains that were holding it in place. Thus begins the battle with the Twilit Igniter, FYRUS.


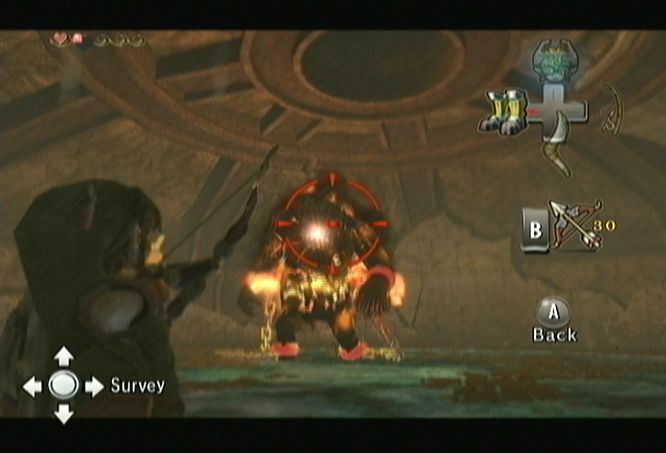
The shiny red eye on the head of Fyrus is the weak spot. Link is not able to Z-target Fyrus because of its humungous size. Instead, keep your distance and manually aim an arrow at the red eye on Fyrus’s head. Once you hit him, Fyrus will be stunned for a moment so quickly run behind him and grab the chains that are attached to his legs. Equip the iron boots and then pull back on the chain. It will tighten and then send Fyrus crashing to the floor. Now run to the head of Fyrus and Z-target him. Slash away with your sword, dealing as many shots as possible until Fyrus gets back up on his feet.

Fyrus has a few attacks, one of which is tossing his shackles towards Link. Additionally, he’ll contract air and release a fire burst in all directions that is quite damaging. The best way to avoid these attacks is simply to stay on attack. He simply is to slow and you have plenty of chances to hit him before he can even attack. Three knock downs of Fyrus, followed by sword swipes should finish him off.
After the battle, Link will be rewarded with the second Fused Shadow and a new Heart Container appears. Midna then tells you a short story about Zant and Princess Zelda. Basically, she hates Zant and doesn’t like Zelda much either. However, Midna would never wish harm on Princess Zelda. You can actually speak with the boss you just fought, as without the Fused Shadow, he has returned to normal Goron form and is now Darbus. Walk over to Midna and transport out of the mines. You will then be prompted to save your game.


- Chapter 1 – Ordon Village
- Chapter 2 – The Twilight
- Chapter 3 – Faron Woods: Twilight
- Chapter 4 – Forest Temple
- Chapter 5 – Kakariko Village: Twilight
- Chapter 6 – Death Mountain
- Chapter 7 – Goron Mines
- Chapter 8 – Lanayru Province: Twilight
- Chapter 9 – Lake Hylia: Sidequests
- Chapter 10 – Lakebed Temple
- Chapter 11 – The Master Sword
- Chapter 12 – Gerudo Desert
- Chapter 13 – Arbiter’s Grounds
- Chapter 14 – Scaling Snowpeak
- Chapter 15 – Snowpeak Ruins
- Chapter 16 – Sacred Grove: Round Two
- Chapter 17 – Temple of Time
- Chapter 18 – In Search of the Sky
- Chapter 19 – City in the Sky
- Chapter 20 – Palace of Twilight
- Chapter 21 – Cave of Ordeals
- Chapter 22 – Hyrule Castle
