North Akkala Beach Cave: Difference between revisions
mNo edit summary |
No edit summary |
||
| Line 1: | Line 1: | ||
{{Infobox|location | {{Infobox|location | ||
| image = | | image = [[File:North-Akkala-Beach-Cave.jpg|400px]] | ||
| caption = | | caption = | ||
| game = ''[[The Legend of Zelda: Tears of the Kingdom|Tears of the Kingdom]]'' | | game = ''[[The Legend of Zelda: Tears of the Kingdom|Tears of the Kingdom]]'' | ||
| Line 11: | Line 11: | ||
| quest = | | quest = | ||
| related = | | related = | ||
| type = [[Cave]] | | type = [[Cave]]<br/>[[North Akkala Beach]] | ||
}} | }} | ||
| Line 17: | Line 17: | ||
==''Tears of the Kingdom''== | ==''Tears of the Kingdom''== | ||
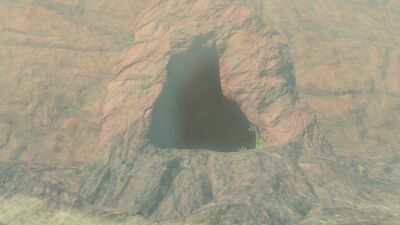
It is located on the | It is located on the [[North Akkala Beach]] in the cliffside face below the [[Akkala Ancient Tech Lab]], just south of the [[Rasiwak Shrine]], and leads across the straight to [[Lomei Labyrinth Island]]. It appears to be 'raining' in the cave, perhaps because it turns and takes you out under the ocean. | ||
Upon entering you will encounter a few [[Horriblin]]s as well as [[Ore Deposit]]s and [[Luminous Ore Deposit]]s. Go left at the first fork in the cave across a pool of water to find three [[Fairy#Tears_of_the_Kingdom|Fairies]]. | Upon entering you will encounter a few [[Horriblin]]s as well as [[Ore Deposit]]s and [[Luminous Ore Deposit]]s. Go left at the first fork in the cave across a pool of water to find three [[Fairy#Tears_of_the_Kingdom|Fairies]]. | ||
| Line 24: | Line 24: | ||
Backtrack and go left to go deeper into the cave, and you will come across a rock-spewing [[Like Like]], and past that, a [[Black Hinox]]. At the end of the cave you will be under [[Lomei Labyrinth Island]] with a man-made column to [[Ascend]] upwards, but before you do, make sure to get the [[Bubbulfrog]] that is high up on the side of this column. Ascending or climbing up brings you up into the lowest chamber of the Labyrinth, where you will immediately encounter [[Gloom Spawn]] behind the tempting [[Treasure Chest]] containing a [[Big Battery]]. | Backtrack and go left to go deeper into the cave, and you will come across a rock-spewing [[Like Like]], and past that, a [[Black Hinox]]. At the end of the cave you will be under [[Lomei Labyrinth Island]] with a man-made column to [[Ascend]] upwards, but before you do, make sure to get the [[Bubbulfrog]] that is high up on the side of this column. Ascending or climbing up brings you up into the lowest chamber of the Labyrinth, where you will immediately encounter [[Gloom Spawn]] behind the tempting [[Treasure Chest]] containing a [[Big Battery]]. | ||
===Enemies=== | |||
<gallery mode=nolines> | |||
File:Black_Horriblin_-_TotK_Compendium.png|[[Black Horriblin]] | |||
File:Blue_Horriblin_-_TotK_Compendium.png|[[Blue Horriblin]] | |||
File:Bubbulfrog_-_TotK_Compendium.png|[[Bubbulfrog]] | |||
File:Keese_-_TotK_Compendium.png|[[Keese]] | |||
File:Electric_Keese_-_TotK_Compendium.png|[[Electric Keese]] | |||
</gallery> | |||
===Bugs and Materials=== | |||
<gallery mode=nolines> | |||
File:Big_Hearty_Truffle_-_TotK_icon.png|[[Big Hearty Truffle]] | |||
File:Brightbloom_Seed_-_TotK_icon.png|[[Brightbloom Seed]] | |||
File:Brightcap_-_TotK_icon.png|[[Brightcap]] | |||
File:Giant_Brightbloom_Seed_-_TotK_icon.png|[[Giant Brightbloom Seed]] | |||
File:Hearty_Truffle_-_TotK_icon.png|[[Hearty Truffle]] | |||
</gallery> | |||
{{references}} | {{references}} | ||
{{Cat|Tears of the Kingdom Caves}} | {{Cat|Tears of the Kingdom Caves}} | ||
Revision as of 20:13, March 1, 2024
Games | ||
Enemies | ||
Items | ||
| Attributes | ||
|---|---|---|
Type | ||
North Akkala Beach Cave is a location in Tears of the Kingdom.
Tears of the Kingdom
It is located on the North Akkala Beach in the cliffside face below the Akkala Ancient Tech Lab, just south of the Rasiwak Shrine, and leads across the straight to Lomei Labyrinth Island. It appears to be 'raining' in the cave, perhaps because it turns and takes you out under the ocean.
Upon entering you will encounter a few Horriblins as well as Ore Deposits and Luminous Ore Deposits. Go left at the first fork in the cave across a pool of water to find three Fairies.
At the next fork going right leads to a dead end and the Horriblin camp where a Treasure Chest contains a Royal Halberd.
Backtrack and go left to go deeper into the cave, and you will come across a rock-spewing Like Like, and past that, a Black Hinox. At the end of the cave you will be under Lomei Labyrinth Island with a man-made column to Ascend upwards, but before you do, make sure to get the Bubbulfrog that is high up on the side of this column. Ascending or climbing up brings you up into the lowest chamber of the Labyrinth, where you will immediately encounter Gloom Spawn behind the tempting Treasure Chest containing a Big Battery.


