Level 5: The Lizard: Difference between revisions
m (Text replace - "{{Dungeon" to "{{Infobox|dungeon") |
(added gallery, improved infobox) |
||
| Line 1: | Line 1: | ||
{{Infobox|dungeon | {{Infobox|dungeon | ||
| image = [[File:Level-5-the-lizard.png|200px]] | |||
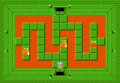
|image = [[File:Level-5-the-lizard.png|200px]] | | caption = The Entrance to the Dungeon | ||
|game = ''[[The Legend of Zelda]]'' | | game = ''[[The Legend of Zelda]]'' | ||
| | | location = Near the [[Lost Hills]] | ||
|boss = [[Digdogger (The Legend of Zelda)|Digdogger]] | | boss = [[Digdogger (The Legend of Zelda)|Digdogger]] | ||
|reward = [[Heart Container]]<br>[[Triforce Shard]] | | enemies = [[Darknut]]<br>[[Dodongo]]<br>[[Gibdo]]<br>[[Keese]]<br>[[Pols Voice]]<br>[[Stone Statue]]<br>[[Zol]] | ||
|walkthrough = [http://www.zeldadungeon.net/Zelda01-the-legend-of-zelda-walkthrough-06.php Text Walkthrough]<br>[http://www.zeldadungeon.net/Zelda01-the-legend-of-zelda-video-walkthrough-07.php Video Walkthrough] | | item = [[Recorder]] | ||
| reward = [[Heart Container]]<br>[[Triforce Shard]] | |||
| walkthrough = [http://www.zeldadungeon.net/Zelda01-the-legend-of-zelda-walkthrough-06.php Text Walkthrough]<br>[http://www.zeldadungeon.net/Zelda01-the-legend-of-zelda-video-walkthrough-07.php Video Walkthrough] | |||
}} | }} | ||
'''Level 5: The Lizard''' is the fifth [[dungeon]] found in ''[[The Legend of Zelda]]''. Known my many because of its hard-to-find location, this dungeon hides the fifth [[Triforce Shard]] of the [[Triforce of Wisdom]]. | '''Level 5: The Lizard''' is the fifth [[dungeon]] found in ''[[The Legend of Zelda]]''. Known my many because of its hard-to-find location, this dungeon hides the fifth [[Triforce Shard]] of the [[Triforce of Wisdom]]. The Lizard is one of the more difficult dungeons in the game, and basically serves as the wake-up call to the players that now this game is getting difficult. Its location is in northern [[Hyrule]], near [[Death Mountain]]. It can only be travelled to if [[Link]] first enters the [[Lost Hills]], and travels upward four times. This is the only way Link can find it. The [[Boss]] of this dungeon is called [[Digdogger (The Legend of Zelda)|Digdogger]]. Once Link has defeated Digdogger, he can collect the fifth Triforce Shard. | ||
==Items== | ==Items== | ||
As per the usual of ''The Legend of Zelda'' dungeons, there a single item Link can gain in this dungeon | As per the usual of ''The Legend of Zelda'' dungeons, there a single item Link can gain in this dungeon. It is called the [[Recorder]], and is the only musical instrument found in this game. The Recorder has some very limited uses, including to send Link back to the entrance of a random dungeon that he has completed if he plys it while in the [[Overworld]]. Also, it is required to defeat the boss of the dungeon, Digdogger. Lastly, it is used to gain access to the seventh dungeon of the game, [[Level 7: The Demon|The Demon]]. The Recorder is found in a side-scrolling area that is found, from the entrance, two rooms up, one room left, one room down, one room left, down the staircase and through the first side-scrolling section, one room left, and finally down the staircase. | ||
==Enemies== | ==Enemies== | ||
This dungeon introduces two brand new enemies | This dungeon introduces two brand new enemies, the first being a [[Pols Voice]], a rabbit-like creature that can easily be killed with the [[Bow]]. The second is called a [[Gibdo]], which appears as an undead mummy. Any [[sword]] works best on them. The rest of the enemies found in this dungeon have been seen before. Below is a list of all the enemies in the dungeon. | ||
{{Gallery|size=80|pad=5|title=Enemies in Level 5: The Snake}} | {{Gallery|size=80|pad=5|title=Enemies in Level 5: The Snake}} | ||
| Line 29: | Line 31: | ||
==Digdogger== | ==Digdogger== | ||
[[File:Digdogger-LoZ-Sprite.png|right]] | |||
[[File:Digdogger-LoZ-Sprite.png | The boss of The Lizard is known as Digdogger. This circle-shaped monster has a single eye that lies in the middle of its body. The room in which the battle takes place is directly south of the room where the Triforce Shard is located. Also, there are four [[Stone Statue]]s in the area that shoot fireballs at Link while he is fighting Digdogger. While Digdogger is still large, he cannot be defeated. In order to inflict damage, Link must play his Recorder, which shrinks Digdogger into a much smaller version of itself. Link can now attack unmercifully, until Digdogger is dead and the way to the fifth Triforce Shard is opened. | ||
The boss of The Lizard is known as Digdogger. This circle-shaped monster has a single eye that lies in the middle of its body. The room in which the battle takes place is directly south of the room where the Triforce Shard is located. Also, there are four [[Stone Statue]]s in the area that | |||
==Old Man Location== | ==Old Man Location== | ||
The [[Old Man]] yet again makes another appearance inside a dungeon. Throughout The Lizard, Link | The [[Old Man]] yet again makes another appearance inside a dungeon. Throughout The Lizard, Link meets the Old Man not once, not twice, but thrice. The first and last meetings both involve the Old Man giving Link a helpful hint. The first hint is as follows, ''"DIGDOGGER HATES CERTAIN KIND OF SOUND"''.{{Ref|LoZ|66|[[Old Man]]}} The second hint is also as follows, ''"SECRET POWER IS SAID TO BE IN THE ARROW"''.{{Ref|LoZ|65|Old Man}} The third meeting involves the Old Man presenting Link with the opportunity to increase the maximum number of [[Bomb]]s he can hold. The Old Man simply says, ''"I BET YOU'D LIKE TO HAVE MORE BOMBS"'',{{Ref|LoZ|67|Old Man}} and below him is a [[Rupee]] symbol and the number "-100" underneath it. If Link touches this Rupee symbol, his maximum bomb capacity increases. However, he also loses 100 Rupees. | ||
==Compass & Dungeon Map== | ==Compass & Dungeon Map== | ||
| Line 40: | Line 41: | ||
===Compass=== | ===Compass=== | ||
The [[Compass]] is used by Link to display the location of the Triforce Shard that is hidden in the dungeon via a blinking spot on the map. This | The [[Compass]] is used by Link to display the location of the Triforce Shard that is hidden in the dungeon via a blinking spot on the map. This basically leads Link right to his destination, which is of course the Triforce Shard. The Compass is being guarded by three Red [[Darknut]]s, and does not appear until Link has defeated all three of these Darknuts. This particular room is found three rooms up, one room right, and one room up from the entrance to the dungeon. | ||
===Dungeon Map=== | ===Dungeon Map=== | ||
The [[Dungeon Map]], once obtained, | The [[Dungeon Map]], once obtained, shows Link the entire layout of the dungeon. This allows Link to find and search through all unexplored rooms, causing him to uncover some secrets that he may have not found. The room where the map is found contains no enemies and is pitch black. This room is three rooms up from the entrance, and requires two Small Keys to reach. | ||
==Keys & Locked Doors== | ==Keys & Locked Doors== | ||
There are multiple [[Small Key]]s and Locked Doors found throughout The Lizard. There are seven total Small Keys available to be collected in this dungeon, and most require the defeat of all the enemies in a room for the key to appear. Also, there are only six Locked Doors found throughout the dungeon, but all of them must be opened to complete the dungeon. This means that if Link collects all the Small Keys, he | There are multiple [[Small Key]]s and Locked Doors found throughout The Lizard. There are seven total Small Keys available to be collected in this dungeon, and most require the defeat of all the enemies in a room for the key to appear. Also, there are only six Locked Doors found throughout the dungeon, but all of them must be opened to complete the dungeon. This means that if Link collects all the Small Keys, he has an extra key that can be used to open a Locked Door in a future dungeon. | ||
==Gallery== | |||
<gallery> | |||
File:Compass-Lizard-LoZ.png|Room with the Compass | |||
File:Map-Lizard-LoZ.png|Room with the Dungeon Map | |||
File:Digdogger-Lizard-LoZ.png|Room with Digdogger | |||
</gallery> | |||
{{References}} | {{References}} | ||
Revision as of 14:22, April 20, 2013

The Entrance to the Dungeon
Games | ||
Location | Near the Lost Hills | |
Boss | ||
Enemies | ||
Items | ||
Rewards | ||
| Guides | ||
|---|---|---|
Walkthrough | ||
Level 5: The Lizard is the fifth dungeon found in The Legend of Zelda. Known my many because of its hard-to-find location, this dungeon hides the fifth Triforce Shard of the Triforce of Wisdom. The Lizard is one of the more difficult dungeons in the game, and basically serves as the wake-up call to the players that now this game is getting difficult. Its location is in northern Hyrule, near Death Mountain. It can only be travelled to if Link first enters the Lost Hills, and travels upward four times. This is the only way Link can find it. The Boss of this dungeon is called Digdogger. Once Link has defeated Digdogger, he can collect the fifth Triforce Shard.
Items
As per the usual of The Legend of Zelda dungeons, there a single item Link can gain in this dungeon. It is called the Recorder, and is the only musical instrument found in this game. The Recorder has some very limited uses, including to send Link back to the entrance of a random dungeon that he has completed if he plys it while in the Overworld. Also, it is required to defeat the boss of the dungeon, Digdogger. Lastly, it is used to gain access to the seventh dungeon of the game, The Demon. The Recorder is found in a side-scrolling area that is found, from the entrance, two rooms up, one room left, one room down, one room left, down the staircase and through the first side-scrolling section, one room left, and finally down the staircase.
Enemies
This dungeon introduces two brand new enemies, the first being a Pols Voice, a rabbit-like creature that can easily be killed with the Bow. The second is called a Gibdo, which appears as an undead mummy. Any sword works best on them. The rest of the enemies found in this dungeon have been seen before. Below is a list of all the enemies in the dungeon.
- Enemies in Level 5: The Snake
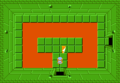
Digdogger
The boss of The Lizard is known as Digdogger. This circle-shaped monster has a single eye that lies in the middle of its body. The room in which the battle takes place is directly south of the room where the Triforce Shard is located. Also, there are four Stone Statues in the area that shoot fireballs at Link while he is fighting Digdogger. While Digdogger is still large, he cannot be defeated. In order to inflict damage, Link must play his Recorder, which shrinks Digdogger into a much smaller version of itself. Link can now attack unmercifully, until Digdogger is dead and the way to the fifth Triforce Shard is opened.
Old Man Location
The Old Man yet again makes another appearance inside a dungeon. Throughout The Lizard, Link meets the Old Man not once, not twice, but thrice. The first and last meetings both involve the Old Man giving Link a helpful hint. The first hint is as follows, "DIGDOGGER HATES CERTAIN KIND OF SOUND".[1] The second hint is also as follows, "SECRET POWER IS SAID TO BE IN THE ARROW".[2] The third meeting involves the Old Man presenting Link with the opportunity to increase the maximum number of Bombs he can hold. The Old Man simply says, "I BET YOU'D LIKE TO HAVE MORE BOMBS",[3] and below him is a Rupee symbol and the number "-100" underneath it. If Link touches this Rupee symbol, his maximum bomb capacity increases. However, he also loses 100 Rupees.
Compass & Dungeon Map
The Compass and Dungeon Map both reappear in this dungeon.
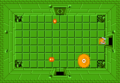
Compass
The Compass is used by Link to display the location of the Triforce Shard that is hidden in the dungeon via a blinking spot on the map. This basically leads Link right to his destination, which is of course the Triforce Shard. The Compass is being guarded by three Red Darknuts, and does not appear until Link has defeated all three of these Darknuts. This particular room is found three rooms up, one room right, and one room up from the entrance to the dungeon.
Dungeon Map
The Dungeon Map, once obtained, shows Link the entire layout of the dungeon. This allows Link to find and search through all unexplored rooms, causing him to uncover some secrets that he may have not found. The room where the map is found contains no enemies and is pitch black. This room is three rooms up from the entrance, and requires two Small Keys to reach.
Keys & Locked Doors
There are multiple Small Keys and Locked Doors found throughout The Lizard. There are seven total Small Keys available to be collected in this dungeon, and most require the defeat of all the enemies in a room for the key to appear. Also, there are only six Locked Doors found throughout the dungeon, but all of them must be opened to complete the dungeon. This means that if Link collects all the Small Keys, he has an extra key that can be used to open a Locked Door in a future dungeon.
Gallery
Room with the Compass
Room with the Dungeon Map
Room with Digdogger


References
- ↑ "DIGDOGGER HATES CERTAIN KIND OF SOUND" — Old Man, The Legend of Zelda.
- ↑ "SECRET POWER IS SAID TO BE IN THE ARROW" — Old Man, The Legend of Zelda.
- ↑ "I BET YOU'D LIKE TO HAVE MORE BOMBS" — Old Man, The Legend of Zelda.