Goron Temple: Difference between revisions
No edit summary |
No edit summary |
||
| Line 12: | Line 12: | ||
The '''Goron Temple''' is the fifth [[Dungeon]] in ''[[The Legend of Zelda: Phantom Hourglass|Phantom Hourglass]]''. It is located on [[Goron Island]] in the Southeast Quadrant of the [[World of the Ocean King]]. Access to the dungeon is granted after visiting the Goron Elder and besting him in a game of trivia as well as overcoming various obstacles including enemies and puzzles. | The '''Goron Temple''' is the fifth [[Dungeon]] in ''[[The Legend of Zelda: Phantom Hourglass|Phantom Hourglass]]''. It is located on [[Goron Island]] in the Southeast Quadrant of the [[World of the Ocean King]]. Access to the dungeon is granted after visiting the Goron Elder and besting him in a game of trivia as well as overcoming various obstacles including enemies and puzzles. | ||
==Dongorongo, Armored Lizard== | ==Dongorongo, Armored Lizard== | ||
| Line 39: | Line 27: | ||
This temple holds much of the same items featured in dungeons throughout the ''Zelda'' series. These items include [[Small Key]]s, the [[Dungeon Map]], the [[Compass]], and the [[Boss Key]]. | This temple holds much of the same items featured in dungeons throughout the ''Zelda'' series. These items include [[Small Key]]s, the [[Dungeon Map]], the [[Compass]], and the [[Boss Key]]. | ||
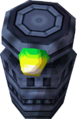
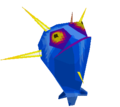
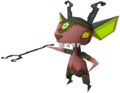
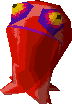
==Enemies== | |||
{{Gallery}} | |||
{{Gallery/Box|file=PH-Armos.png|link=Armos|caption=[[Armos]]}} | |||
{{Gallery/Box|file=PH-Beamos.png|link=Beamos|caption=[[Beamos]]}} | |||
{{Gallery/Box|file=PH-Blue-ChuChu.png|link=Blue_ChuChu|caption=[[Blue ChuChu]]}} | |||
{{Gallery/Box|file=PH-Hinox.png|link=Eye_Brute|caption=[[Eye Brute]]}} | |||
{{Gallery/Box|file=Eye-Slug.png|link=Eye_Slug|caption=[[Eye Slug]]}} | |||
{{Gallery/Box|file=Fire-Bubble.png|link=Fire_Bubble|caption=[[Fire Bubble]]}} | |||
{{Gallery/Box|file=Flying-Pot.png|link=Flying_Jar|caption=[[Flying Jar]]}} | |||
{{Gallery/Box|file=PH-Gel.png|link=Gel|caption=[[Gel]]}} | |||
{{Gallery/Box|file=PH-Like-Like.png|link=Like_Like|caption=[[Like Like]]}} | |||
{{Gallery/Box|file=PH-Miniblin.png|link=Miniblin|caption=[[Miniblin]]}} | |||
{{Gallery/Box|file=PH-Red-ChuChu.png|link=Red_ChuChu|caption=[[Red ChuChu]]}} | |||
{{Gallery/Box|file=Rock-ChuChu.png|link=Rock_ChuChu|caption=[[Rock ChuChu]]}} | |||
{{Gallery/Bottom}} | |||
{{Cat|Phantom Hourglass Locations}} | {{Cat|Phantom Hourglass Locations}} | ||
{{Cat|Phantom Hourglass Dungeons}} | {{Cat|Phantom Hourglass Dungeons}} | ||
Revision as of 16:18, March 6, 2019

Entrance of the Dungeon
Games | ||
Boss | ||
Items | ||
Rewards | Heart Container | |
| Guides | ||
|---|---|---|
Walkthrough | ||
In-depth guide:
Phantom Hourglass Walkthrough: Goron Temple |
The Goron Temple is the fifth Dungeon in Phantom Hourglass. It is located on Goron Island in the Southeast Quadrant of the World of the Ocean King. Access to the dungeon is granted after visiting the Goron Elder and besting him in a game of trivia as well as overcoming various obstacles including enemies and puzzles.
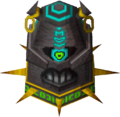
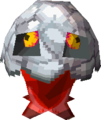
Dongorongo, Armored Lizard
- Main article: Dongorongo

The boss features the same unique mechanic permeating most of the Goron Temple, switching between Link and Gongoron. As Gongoron avoid its charge and fire breath. Periodically alter control to Link in order to defend against oncoming Eye Slugs. As Gongoron attack the boss's side and then quickly switch control to Link. Trace a path for your Bombchu on the DS touchscreen towards the beast's mouth. Repeat the process three times.
After this phase is complete Gongoron departs to retrieve the pure metal Crimsonine.
Upon crossing the bridge that appears Dongorongo heaves itself up and the next phase of battle initiates.
In this second furious stage, the beast breathes fire faster than ever before with Eye Slugs appearing more frequently. When it endeavors to suck Link in, throw a Bomb in Dongorongo's mouth to stun it. Slash away with your Sword. Repeat the process several times.
Dungeon Items
This temple holds much of the same items featured in dungeons throughout the Zelda series. These items include Small Keys, the Dungeon Map, the Compass, and the Boss Key.