Buzz Blob: Difference between revisions
No edit summary |
No edit summary |
||
| Line 1: | Line 1: | ||
{{Stub}} | {{Stub}} | ||
{{Infobox|enemy | {{Infobox|enemy | ||
| image | | image = [[File:Buzz-Blob.jpg|300px]] | ||
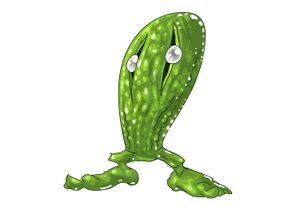
| caption = Buzz Blob Fan Artwork by Alex MegaCaveman | | caption = Buzz Blob Fan Artwork by Alex MegaCaveman | ||
| game | | game = {{Hide|''[[The Legend of Zelda: A Link to the Past|A Link to the Past]]''<br/>''[[The Legend of Zelda: Link's Awakening|Link's Awakening]]''<br/>''[[The Legend of Zelda: Oracle of Seasons|Oracle of Seasons]]''<br/>''[[The Legend of Zelda: Oracle of Ages|Oracle of Ages]]''<br/>''[[The Legend of Zelda: Four Swords Adventures|Four Swords Adventures]]''<br/>''[[The Legend of Zelda: The Minish Cap|The Minish Cap]]''<br/>''[[The Legend of Zelda: A Link Between Worlds|A Link Between Worlds]]''<br/>''[[The Legend of Zelda: Tri Force Heroes|Tri Force Heroes]]''}} | ||
| location = <u>'''''A Link to the Past'''''</u><br/>[[Light World]]<br/>[[Hyrule]]<br/>[[Lost Woods (A Link to the Past)|Lost Woods]]<br/><u>'''''Link's Awakening'''''</u><br/>[[Overworld]] | | location = <u>'''''A Link to the Past'''''</u><br/>[[Light World]]<br/>[[Hyrule]]<br/>[[Lost Woods (A Link to the Past)|Lost Woods]]<br/><u>'''''Link's Awakening'''''</u><br/>[[Overworld]] | ||
| weapon = <u>'''''Link's Awakening'''''</u><br/>[[Sword]] - 4 hits<br/>[[Seashell Sword]] - 2 hits<br/>[[Boomerang]] - 1 hit<br/>[[Bomb|Bombs]] - 1 hit<br/>[[Bow]] - 1 hit<br/>[[Hookshot|Hook Shot]] - Freezes<br/>[[Magic Rod]] - 1 hit<br/>[[Pegasus Boots]] - 1 hit<br/>[[Magic Powder]] - Transforms into [[Cukeman]] | | weapon = <u>'''''Link's Awakening'''''</u><br/>{{Hide|[[Sword]] - 4 hits<br/>[[Seashell Sword]] - 2 hits<br/>[[Boomerang]] - 1 hit<br/>[[Bomb|Bombs]] - 1 hit<br/>[[Bow]] - 1 hit<br/>[[Hookshot|Hook Shot]] - Freezes<br/>[[Magic Rod]] - 1 hit<br/>[[Pegasus Boots]] - 1 hit<br/>[[Magic Powder]] - Transforms into [[Cukeman]]}}<br/><u>'''''Oracle of Ages'''''</u><br/>[[Ember Seed]] - 1 hit | ||
| threat = 4 | | threat = 4 | ||
| attack = <u>'''''Link's Awakening'''''</u><br/>{{H|1}} Contact<br/>{{H|1}} Shock<br/><u>'''''Oracle of Seasons'''''</u><br/>{{H|0.5}} Contact<br/>{{H|1}} Electrocute | | attack = <u>'''''Link's Awakening'''''</u><br/>{{H|1}} Contact<br/>{{H|1}} Shock<br/><u>'''''Oracle of Seasons'''''</u><br/>{{H|0.5}} Contact<br/>{{H|1}} Electrocute<br/><u>'''''Oracle of Ages'''''</u><br/>{{H|0.5}} Contact<br/>{{H|1}} Electrocute | ||
| related = [[Cukeman]]<br/>[[Giant Buzz Blob]]<br/>[[Electric Blob King]]<br/>[[Electric Blob Queen]]<br/>[[ChuChu]]<br/>[[Slime]]<br/>[[Zol]]<br/>[[Bot]] | | related = {{Hide|[[Cukeman]]<br/>[[Giant Buzz Blob]]<br/>[[Electric Blob King]]<br/>[[Electric Blob Queen]]<br/>[[ChuChu]]<br/>[[Slime]]<br/>[[Zol]]<br/>[[Bot]]}} | ||
}} | }} | ||
Revision as of 03:22, December 10, 2017
| This article is a stub. You can help the Zelda Dungeon Wiki by expanding it. |
Games | ||
Location | A Link to the Past | |
Threat | ||
Attacks | Link's Awakening | |
Effective |
Link's Awakening [show] Sword - 4 hits Seashell Sword - 2 hits Boomerang - 1 hit Bombs - 1 hit Bow - 1 hit Hook Shot - Freezes Magic Rod - 1 hit Pegasus Boots - 1 hit Magic Powder - Transforms into Cukeman Oracle of Ages Ember Seed - 1 hit | |
Related | ||
Buzz Blobs are recurring enemies from The Legend of Zelda series that are similar to ChuChus. Unlike some ChuChus from other Zelda games, if Link attacks them with the sword alone, he takes damage. An easy way to defeat them is to first stun them with the Boomerang or Hookshot then defeating it with the sword.
Using Magic Powder on a Buzz Blob causes it to transform into a more goofy-looking and talkative variant called Cukeman.
Appearances
Link's Awakening
Buzz Blobs are strange green enemies made of goo. Electricity flows through their bodies, and Link will get shocked if making contact or attacking with the sword. Buzz Blobs will wander around randomly, and are not aggressive to Link. Using the boomerang, bow, or the magic rod are all effective methods of defeating a Buzz Blob. By sprinkling magic powder on a Buzz Blob it will turn into a Cukeman.
A Link Between Worlds
In A Link Between Worlds, Buzz Blobs are divided into two distinct enemies: Blobs and Buzz Blobs.
Blob
These enemies look exactly like Buzz Blobs in other games, though they have no electrical charge. They can be found almost anywhere in Hyrule, except for caves and dungeons. They can be easily defeated with the sword.
Buzz Blob
Buzz Blobs are cousins and stronger versions of regular Blobs. They appear wherever regular Blobs do, and cannot normally be defeated with the sword. To lower their defenses, Link can use the Tornado Rod on them, reverting them to Blobs for a limited time. The Lamp and Net can also be used to defeat them.
Tri Force Heroes
| This section is a stub. You can help the Zelda Dungeon Wiki by expanding it. |


