Afromsia Coast: Difference between revisions
mNo edit summary |
|||
| Line 2: | Line 2: | ||
| image = [[File:Afromsia-Coast.jpg|400px]] | | image = [[File:Afromsia-Coast.jpg|400px]] | ||
| caption = | | caption = | ||
| game = ''[[The Legend of Zelda: Breath of the Wild|Breath of the Wild]]'' | | game = ''[[The Legend of Zelda: Breath of the Wild|Breath of the Wild]]''<br/>''[[The Legend of Zelda: Tears of the Kingdom|Tears of the Kingdom]]'' | ||
| inhab = | | inhab = | ||
| pointsint = [[Tahno O'ah Shrine]] | | pointsint = [[Tahno O'ah Shrine]] | ||
| Line 9: | Line 9: | ||
}} | }} | ||
The '''Afromsia Coast''' is a location found in ''[[The Legend of Zelda: Breath of the Wild|Breath of the Wild]]''. | The '''Afromsia Coast''' is a location found in ''[[The Legend of Zelda: Breath of the Wild|Breath of the Wild]]'' and ''[[The Legend of Zelda: Tears of the Kingdom|Tears of the Kingdom]]''. | ||
==''Breath of the Wild''== | ==''Breath of the Wild''== | ||
| Line 19: | Line 19: | ||
===Animals=== | ===Animals=== | ||
<gallery mode=nolines> | |||
File:Armored_Porgy.png|[[Armored Porgy]] | |||
File:Mighty_Porgy.png|[[Mighty Porgy]] | |||
File:Ironshell_Crab.png|[[Ironshell Crab]] | |||
File:Razorclaw_Crab.png|[[Razorclaw Crab]] | |||
File:Hearty_Blueshell_Snail.png|[[Hearty Blueshell Snail]] | |||
File:Mountain-goat.jpg|[[Mountain Goat]] | |||
</gallery> | |||
===Enemies=== | ===Enemies=== | ||
<gallery mode=nolines> | |||
File:Blue-Chuchu.png|[[Chuchu|ChuChu]] | |||
File:Blue-Lizalfos.png|[[Blue Lizalfos]] | |||
File:Keese-Breath-of-the-Wild.png|[[Keese]] | |||
File:Electric-keese.jpg|[[Electric Keese]] | |||
File:Stalkoblin-Model.png|[[Stalkoblin]] | |||
File:Water-Octorok.png|[[Water Octorok]] | |||
</gallery> | |||
===Items=== | ===Items=== | ||
<gallery mode=nolines> | |||
File:Rushroom.png|[[Rushroom]] | |||
</gallery> | |||
| Line 49: | Line 49: | ||
<section begin=Seed193summary />[[File:Korok193.png|200px|thumb|left|Lift the big rock (using Stasis or an Octo Balloon), and then pick up the small rock under it.]]<section end=Seed193summary />Use the Stasis rune or an Octo Balloon to move the stone slate, then lift the small rock underneath.{{Korok Seed|Seed193}}{{Clear|left}} | <section begin=Seed193summary />[[File:Korok193.png|200px|thumb|left|Lift the big rock (using Stasis or an Octo Balloon), and then pick up the small rock under it.]]<section end=Seed193summary />Use the Stasis rune or an Octo Balloon to move the stone slate, then lift the small rock underneath.{{Korok Seed|Seed193}}{{Clear|left}} | ||
{{Cat|Breath of the Wild Locations}} | {{Cat|Breath of the Wild Lanayru Locations}} | ||
{{cat|Tears of the Kingdom Lanayru Locations}} | |||
Revision as of 16:48, June 22, 2023
Games | ||
Points of | ||
Related | ||
The Afromsia Coast is a location found in Breath of the Wild and Tears of the Kingdom.
Breath of the Wild
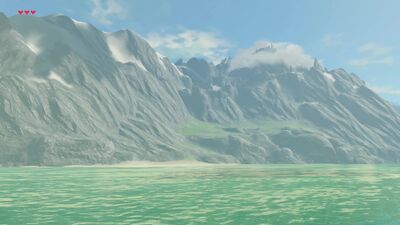
The coast is along the Necluda Sea, located southeast of the peak of Mount Lanayru. There is a steep incline up the Solewood Range to the west that leads to the Walnot Mountain. While it is a comfortable temperature at the coastline, as soon as Link begins heading even the slightest inland up the Solewood Range, the temperature drops and Link will need Cold Resistance to navigate the area.
There are numerous Ore Deposits along the coast, including Rare Ore Deposits and Luminous Ore Deposits. At the north end of the coast, there is a wooden treasure chest floating around near the shallow water and it contains a Silver Rupee.
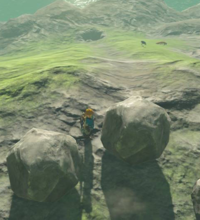
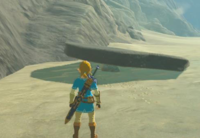
At the south end of the coast, there is a large metal block that can be removed using Stasis. Underneath there is a rock that has a Korok underneath it. Just north of the coast, there are a series of large boulders that can be rolled down the hill, and if one falls into the hole, Link will get another Korok Seed.
Animals
Enemies
Items
Nearby Korok Seeds
Roll a large boulder into the hole. You may need to use the Stasis rune if the boulder does not stop.
Use the Stasis rune or an Octo Balloon to move the stone slate, then lift the small rock underneath.


