Ocarina of Time Gold Skulltulas: Difference between revisions
No edit summary |
No edit summary |
||
| Line 18: | Line 18: | ||
|} | |} | ||
=Locations | ==Locations== | ||
{{Gallery|size=400|pad=5|align=left|margin=80}} | {{Gallery|size=400|pad=5|align=left|margin=80}} | ||
| Line 38: | Line 37: | ||
Gold Skulltula #3 - After breaking through the Spider Web and reaching the lower floor of the Great Deku Tree, look at the grating at the north end of the room to find another Skulltula.}}<section end=3 /> | Gold Skulltula #3 - After breaking through the Spider Web and reaching the lower floor of the Great Deku Tree, look at the grating at the north end of the room to find another Skulltula.}}<section end=3 /> | ||
<section begin=4 />{{Gallery/Box|file=OoT-Gold-Skulltula-004.jpg|caption='''Location''': [[Castle Town]] | |||
<section begin= | |||
'''Conditions''': Reach the [[Castle Town|Castle Market]] (Past) | '''Conditions''': Reach the [[Castle Town|Castle Market]] (Past) | ||
Gold Skulltula #4 - Once you enter Castle Market, enter the first building where you will find a Soldier. At the back of the room, roll into a wooden crate to get the Skulltula.}}<section end= | Gold Skulltula #4 - Once you enter Castle Market, enter the first building where you will find a Soldier. At the back of the room, roll into a wooden crate to get the Skulltula.}}<section end=4 /> | ||
<section begin=5 />{{Gallery/Box|file=OoT-Gold-Skulltula-005.jpg|caption='''Location''': [[Hyrule Castle]] | |||
<section begin= | |||
'''Conditions''': Reach the [[Hyrule Castle]] (Past) | '''Conditions''': Reach the [[Hyrule Castle]] (Past) | ||
Gold Skulltula #5 - Exit Castle Town towards Hyrule Castle and you'll find a lone tree nearby. Roll into it to get the Skulltula to pop out.}}<section end= | Gold Skulltula #5 - Exit Castle Town towards Hyrule Castle and you'll find a lone tree nearby. Roll into it to get the Skulltula to pop out.}}<section end=5 /> | ||
<section begin=6 />{{Gallery/Box|file=OoT-Gold-Skulltula-006.jpg|caption='''Location''': [[Kakariko Graveyard]] | |||
<section begin= | |||
'''Conditions''': An Empty [[Bottle]] and [[Bottle Bug]]s (Past) | '''Conditions''': An Empty [[Bottle]] and [[Bottle Bug]]s (Past) | ||
Gold Skulltula #6 - In the Graveyard there is a soft soil location on the left side. Drop some bugs from a bottle to get a Skulltula to pop out.}}<section end= | Gold Skulltula #6 - In the Graveyard there is a soft soil location on the left side. Drop some bugs from a bottle to get a Skulltula to pop out.}}<section end=6 /> | ||
<section begin=7 />{{Gallery/Box|file=OoT-Gold-Skulltula-007.jpg|caption='''Location''': [[Kakariko Village]] | |||
<section begin= | |||
'''Conditions''': Reach [[Kakariko Village]] (Past) (Night) | '''Conditions''': Reach [[Kakariko Village]] (Past) (Night) | ||
Gold Skulltula #7 - There is a building under construction at the center of the village. At nighttime, a Gold Skulltula will appear.}}<section end= | Gold Skulltula #7 - There is a building under construction at the center of the village. At nighttime, a Gold Skulltula will appear.}}<section end=7 /> | ||
<section begin= | <section begin=8 />{{Gallery/Box|file=OoT-Gold-Skulltula-008.jpg|caption='''Location''': [[Kakariko Village]] | ||
'''Conditions''': Reach [[Kakariko Village]] (Past) (Night) | '''Conditions''': Reach [[Kakariko Village]] (Past) (Night) | ||
Gold Skulltula #8 - At the side of the [[Skulltula House]], there is a Golden Skulltula found here at nighttime.}}<section end= | Gold Skulltula #8 - At the side of the [[Skulltula House]], there is a Golden Skulltula found here at nighttime.}}<section end=8 /> | ||
<section begin= | <section begin=9 />{{Gallery/Box|file=OoT-Gold-Skulltula-009.jpg|caption='''Location''': [[Kakariko Village]] | ||
'''Conditions''': Reach [[Kakariko Village]] (Past) (Night) | '''Conditions''': Reach [[Kakariko Village]] (Past) (Night) | ||
Gold Skulltula #9 - Right when you enter the Village, there is a tree straight ahead. Roll into the tree and a Skulltula will pop out.}}<section end= | Gold Skulltula #9 - Right when you enter the Village, there is a tree straight ahead. Roll into the tree and a Skulltula will pop out.}}<section end=9 /> | ||
<section begin= | <section begin=10 />{{Gallery/Box|file=OoT-Gold-Skulltula-010.jpg|caption='''Location''': [[Kakariko Village]] | ||
'''Conditions''': Reach [[Kakariko Village]] (Past) (Night) | '''Conditions''': Reach [[Kakariko Village]] (Past) (Night) | ||
Gold Skulltula #10 - At nighttime a Gold Skulltula will appear near the top of the watch tower. Shoot it down with your Slingshot.}}<section end= | Gold Skulltula #10 - At nighttime a Gold Skulltula will appear near the top of the watch tower. Shoot it down with your Slingshot.}}<section end=10 /> | ||
<section begin= | <section begin=11 />{{Gallery/Box|file=OoT-Gold-Skulltula-011.jpg|caption='''Location''': [[Kakariko Village]] | ||
'''Conditions''': Reach [[Kakariko Village]] (Past) (Night) | '''Conditions''': Reach [[Kakariko Village]] (Past) (Night) | ||
Gold Skulltula #11 - Found at nighttime on the side of the house located closest to the gate that leads to Death Mountain.}}<section end= | Gold Skulltula #11 - Found at nighttime on the side of the house located closest to the gate that leads to Death Mountain.}}<section end=11 /> | ||
<section begin=12 />{{Gallery/Box|file=OoT-Gold-Skulltula-012.jpg|caption='''Location''': [[Lon Lon Ranch]] | |||
<section begin= | |||
'''Conditions''': Reach [[Lon Lon Ranch]] (Past) | '''Conditions''': Reach [[Lon Lon Ranch]] (Past) | ||
Gold Skulltula #12 - Once you enter the Ranch walk forward passed the initial buildings and turn left. Roll into the nearby tree and a Skulltula will fall down from the tree.}}<section end= | Gold Skulltula #12 - Once you enter the Ranch walk forward passed the initial buildings and turn left. Roll into the nearby tree and a Skulltula will fall down from the tree.}}<section end=12 /> | ||
<section begin= | <section begin=13 />{{Gallery/Box|file=OoT-Gold-Skulltula-013.jpg|caption='''Location''': [[Lon Lon Ranch]] | ||
'''Conditions''': Reach [[Lon Lon Ranch]] (Past) (Night) | '''Conditions''': Reach [[Lon Lon Ranch]] (Past) (Night) | ||
Gold Skulltula #13 - On the outside of the corral, at the southeast part of the area. Just behind the wooden boards a Gold Skulltula can be found here at nighttime.}}<section end= | Gold Skulltula #13 - On the outside of the corral, at the southeast part of the area. Just behind the wooden boards a Gold Skulltula can be found here at nighttime.}}<section end=13 /> | ||
<section begin=14 />{{Gallery/Box|file=OoT-Gold-Skulltula-014.jpg|caption='''Location''': [[Gerudo Valley]] | |||
<section begin= | |||
'''Conditions''': An Empty [[Bottle]] and [[Bottle Bug]]s (Past) | '''Conditions''': An Empty [[Bottle]] and [[Bottle Bug]]s (Past) | ||
Gold Skulltula #14 - Grab a Cucco while in Gerudo Valley leap off the ledge towards the water below. Along the west side of the water, you'll find a Gerudo next to a soft soil location. Drop some bugs to get the Skulltula.}}<section end= | Gold Skulltula #14 - Grab a Cucco while in Gerudo Valley leap off the ledge towards the water below. Along the west side of the water, you'll find a Gerudo next to a soft soil location. Drop some bugs to get the Skulltula.}}<section end=14 /> | ||
<section begin=15 />{{Gallery/Box|file=OoT-Gold-Skulltula-016.jpg|caption='''Location''': [[Lake Hylia]] | |||
<section begin= | |||
'''Conditions''': An Empty [[Bottle]] and [[Bottle Bug]]s (Past) | '''Conditions''': An Empty [[Bottle]] and [[Bottle Bug]]s (Past) | ||
Gold Skulltula #15 - Near the Lakeside Laboratory at the northwest portion of the area you will find a soft soil location. Drop some bugs to get the Skulltula.}}<section end= | Gold Skulltula #15 - Near the Lakeside Laboratory at the northwest portion of the area you will find a soft soil location. Drop some bugs to get the Skulltula.}}<section end=15 /> | ||
<section begin= | <section begin=16 />{{Gallery/Box|file=OoT-Gold-Skulltula-015.jpg|caption='''Location''': [[Lake Hylia]] | ||
'''Conditions''': Reach [[Lake Hylia]] (Past) | '''Conditions''': Reach [[Lake Hylia]] (Past) | ||
Gold Skulltula #16 - At Lake Hylia, there is an island at the southeast corner of the map. This Gold Skulltula will only appear at nighttime.}}<section end= | Gold Skulltula #16 - At Lake Hylia, there is an island at the southeast corner of the map. This Gold Skulltula will only appear at nighttime.}}<section end=16 /> | ||
<section begin=17 />{{Gallery/Box|file=OoT-Gold-Skulltula-017.jpg|caption='''Location''': [[Kokiri Forest]] | |||
<section begin= | |||
'''Conditions''': ((Night)) (Past) | '''Conditions''': ((Night)) (Past) | ||
Gold Skulltula #17 - Found only at nighttime in the Kokiri Forest. The skulltula is on the backside of the [[Know-It-All-Brothers]]' House, located at the southwest part of the town.}}<section end= | Gold Skulltula #17 - Found only at nighttime in the Kokiri Forest. The skulltula is on the backside of the [[Know-It-All-Brothers]]' House, located at the southwest part of the town.}}<section end=17 /> | ||
<section begin= | <section begin=18 />{{Gallery/Box|file=OoT-Gold-Skulltula-018.jpg|caption='''Location''': [[Lost Woods]] | ||
'''Conditions''': An Empty [[Bottle]] and [[Bottle Bug]]s (Past) | '''Conditions''': An Empty [[Bottle]] and [[Bottle Bug]]s (Past) | ||
Gold Skulltula # | Gold Skulltula #18 - From the entrance of the Lost Woods, go left and left again. Drop some bugs into the Soft Soil and the Skulltula will pop out.}}<section end=18 /> | ||
<section begin=19 />{{Gallery/Box|file=OoT-Gold-Skulltula-019.jpg|caption='''Location''': [[Lost Woods]] | |||
<section begin= | |||
'''Conditions''': An Empty [[Bottle]] and [[Bottle Bug]]s (Past) | '''Conditions''': An Empty [[Bottle]] and [[Bottle Bug]]s (Past) | ||
Gold Skulltula # | Gold Skulltula #19 - From the entrance of the Lost Woods, go right, left, right, left, and left to find yourself in a Meadow. Walk forward and you'll find a Soft Soil location. Drop some bugs and the Skulltula will pop out.}}<section end=19 /> | ||
<section begin= | <section begin=20 />{{Gallery/Box|file=OoT-Gold-Skulltula-020.jpg|caption='''Location''': [[Kokiri Forest]] | ||
'''Conditions''': An Empty [[Bottle]] and [[Bottle Bug]]s (Past) | '''Conditions''': An Empty [[Bottle]] and [[Bottle Bug]]s (Past) | ||
Gold Skulltula # | Gold Skulltula #20 - Right behind the Kokiri Shop you will find a soft soil location. Drop some bugs to get the Skulltula.}}<section end=20 /> | ||
<section begin=21 />{{Gallery/Box|file=OoT-Gold-Skulltula-021.jpg|caption='''Location''': [[Death Mountain Trail]] | |||
<section begin= | |||
'''Conditions''': An Empty [[Bottle]] and [[Bottle Bug]]s (Past) | '''Conditions''': An Empty [[Bottle]] and [[Bottle Bug]]s (Past) | ||
Gold Skulltula #21 - Right outside of Dodongo's Cavern, there is a Soft Soil location. Drop some bugs into it and the Skulltula will appear.}}<section end= | Gold Skulltula #21 - Right outside of Dodongo's Cavern, there is a Soft Soil location. Drop some bugs into it and the Skulltula will appear.}}<section end=21 /> | ||
<section begin=22 />{{Gallery/Box|file=OoT-Gold-Skulltula-022.jpg|caption='''Location''': [[Dodongo's Cavern]] | |||
<section begin= | |||
'''Conditions''': Reach Dodongo's Cavern (Past) | '''Conditions''': Reach Dodongo's Cavern (Past) | ||
Gold Skulltula #22 - In the room without the giant staircase, climb up to the very top and walk around to the south part of the room. Use the Slingshot to defeat the Skulltula and climb up to get the token.}}<section end= | Gold Skulltula #22 - In the room without the giant staircase, climb up to the very top and walk around to the south part of the room. Use the Slingshot to defeat the Skulltula and climb up to get the token.}}<section end=22 /> | ||
<section begin= | <section begin=23 />{{Gallery/Box|file=OoT-Gold-Skulltula-023.jpg|caption='''Location''': [[Dodongo's Cavern]] | ||
'''Conditions''': [[Bomb]]s are Recommended (Past) | '''Conditions''': [[Bomb]]s are Recommended (Past) | ||
Gold Skulltula #23 - From the entrance of the dungeon, head through the southeast door to reach the room with the [[Baby Dodongo]]'s. Blast away at the wall with a bomb and head down a room where you will find the Gold SKulltula.}}<section end= | Gold Skulltula #23 - From the entrance of the dungeon, head through the southeast door to reach the room with the [[Baby Dodongo]]'s. Blast away at the wall with a bomb and head down a room where you will find the Gold SKulltula.}}<section end=23 /> | ||
<section begin= | <section begin=24 />{{Gallery/Box|file=OoT-Gold-Skulltula-024.jpg|caption='''Location''': [[Dodongo's Cavern]] | ||
'''Conditions''': [[Bomb]]s (Past) | '''Conditions''': [[Bomb]]s (Past) | ||
Gold Skulltula #24 - In the room with the [[Fire Keese]] towards the end of the dungeon there is a bombable wall at the north end of the room. Blast it open and you'll find a Gold Skulltula behind the [[Armos]] statue.}}<section end= | Gold Skulltula #24 - In the room with the [[Fire Keese]] towards the end of the dungeon there is a bombable wall at the north end of the room. Blast it open and you'll find a Gold Skulltula behind the [[Armos]] statue.}}<section end=24 /> | ||
{{Gallery/ | <section begin=25 />{{Gallery/Box|file=OoT-Gold-Skulltula-025.jpg|caption='''Location''': [[Death Mountain Trail]] | ||
'''Conditions''': [[Bomb]]s (Past) | |||
= | Gold Skulltula #25 - On the trail between [[Kakariko Village]] and [[Dodongo's Cavern]], there is a bombable wall on the side where you can hear a Gold Skulltula. Bomb the wall and defeat the skulltula for the token.}}<section end=25 /> | ||
<section begin=26 />{{Gallery/Box|file=OoT-Gold-Skulltula-026.jpg|caption='''Location''': [[Goron City]] | |||
<section begin= | |||
'''Conditions''': [[Bomb]]s (Past) | '''Conditions''': [[Bomb]]s (Past) | ||
Gold Skulltula #26 - Once you enter Goron City, bomb the three boulders on the left. This leads to a room where you should bomb the boulders along the right path. Once you reach the back of the room, roll into the wooden crate to find a Gold Skulltula.}}<section end= | Gold Skulltula #26 - Once you enter Goron City, bomb the three boulders on the left. This leads to a room where you should bomb the boulders along the right path. Once you reach the back of the room, roll into the wooden crate to find a Gold Skulltula.}}<section end=26 /> | ||
<section begin=27 />{{Gallery/Box|file=OoT-Gold-Skulltula-027.jpg|caption='''Location''': [[Death Mountain Crater]] | |||
<section begin= | |||
'''Conditions''': Reach Death Mountain Crater (Past) | '''Conditions''': Reach Death Mountain Crater (Past) | ||
Gold Skulltula #27 - At the very top of Death Mountain, enter the Death Mountain Crater and you'll find a wooden crate. Roll into it to find a Gold Skulltula.}}<section end= | Gold Skulltula #27 - At the very top of Death Mountain, enter the Death Mountain Crater and you'll find a wooden crate. Roll into it to find a Gold Skulltula.}}<section end=27 /> | ||
{{Gallery/Bottom}}</onlyinclude> | {{Gallery/Bottom}}</onlyinclude> | ||
Revision as of 23:27, December 12, 2018
This guide shows the locations of the 100 Gold Skulltulas from the Nintendo 64 version and the Nintendo 3DS version. While the Gold Skulltulas are numbered in roughly the order you can collect them in, they are broken down by locations below.
Rewards
| Name | Token) |
|---|---|
| Adult's Wallet | 10 |
| Shard of Agony (3DS) Stone of Agony (n64) |
20 |
| Giant's Wallet | 30 |
| Bombchu's | 40 |
| Piece of Heart | 50 |
| Golden Rupee | 100 |
Locations
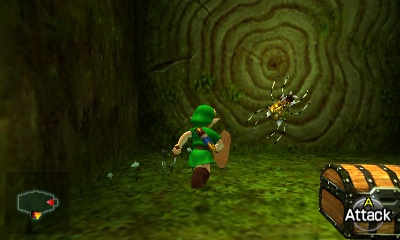
Location: Inside The Deku Tree
Conditions: Enter the Deku Tree (Past)
Gold Skulltula #1 - In the same room with Compass, raise the platforms and use them to get onto the platform on the left side. The Skulltula is right behind the treasure chest.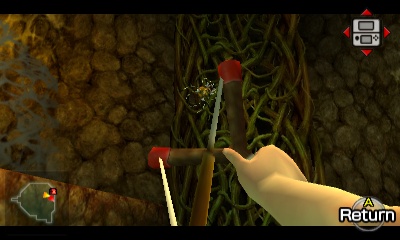
Location: Inside The Deku Tree
Conditions: Enter the Deku Tree (Past)
Gold Skulltula #2 - After breaking through the Spider Web and reaching the lower floor of the Great Deku Tree, turn back and look at the vines leading up. Shoot down the Skulltula with the Slingshot.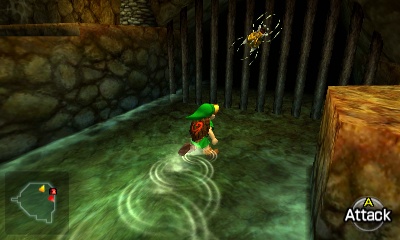
Location: Inside The Deku Tree
Conditions: Enter the Deku Tree (Past)
Gold Skulltula #3 - After breaking through the Spider Web and reaching the lower floor of the Great Deku Tree, look at the grating at the north end of the room to find another Skulltula.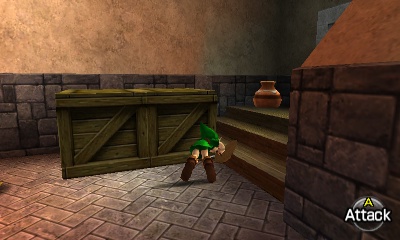
Location: Castle Town
Conditions: Reach the Castle Market (Past)
Gold Skulltula #4 - Once you enter Castle Market, enter the first building where you will find a Soldier. At the back of the room, roll into a wooden crate to get the Skulltula.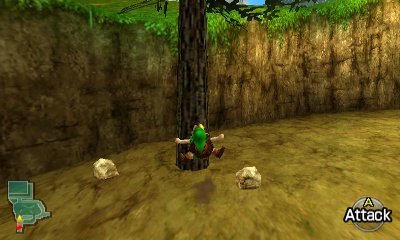
Location: Hyrule Castle
Conditions: Reach the Hyrule Castle (Past)
Gold Skulltula #5 - Exit Castle Town towards Hyrule Castle and you'll find a lone tree nearby. Roll into it to get the Skulltula to pop out.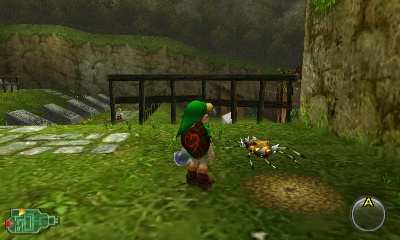
Location: Kakariko Graveyard
Conditions: An Empty Bottle and Bottle Bugs (Past)
Gold Skulltula #6 - In the Graveyard there is a soft soil location on the left side. Drop some bugs from a bottle to get a Skulltula to pop out.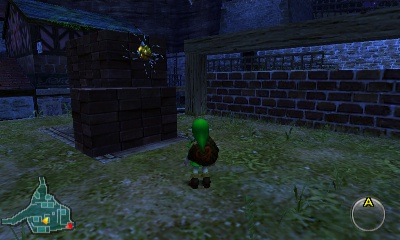
Location: Kakariko Village
Conditions: Reach Kakariko Village (Past) (Night)
Gold Skulltula #7 - There is a building under construction at the center of the village. At nighttime, a Gold Skulltula will appear.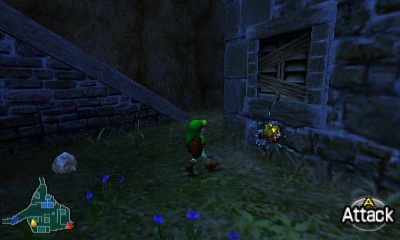
Location: Kakariko Village
Conditions: Reach Kakariko Village (Past) (Night)
Gold Skulltula #8 - At the side of the Skulltula House, there is a Golden Skulltula found here at nighttime.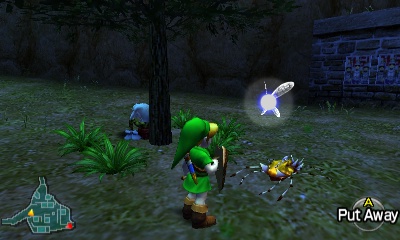
Location: Kakariko Village
Conditions: Reach Kakariko Village (Past) (Night)
Gold Skulltula #9 - Right when you enter the Village, there is a tree straight ahead. Roll into the tree and a Skulltula will pop out.
Location: Kakariko Village
Conditions: Reach Kakariko Village (Past) (Night)
Gold Skulltula #10 - At nighttime a Gold Skulltula will appear near the top of the watch tower. Shoot it down with your Slingshot.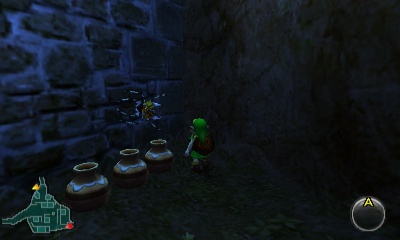
Location: Kakariko Village
Conditions: Reach Kakariko Village (Past) (Night)
Gold Skulltula #11 - Found at nighttime on the side of the house located closest to the gate that leads to Death Mountain.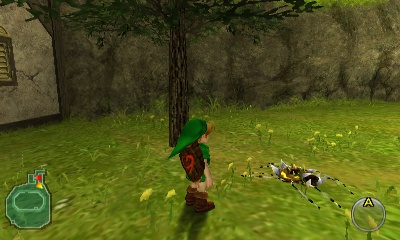
Location: Lon Lon Ranch
Conditions: Reach Lon Lon Ranch (Past)
Gold Skulltula #12 - Once you enter the Ranch walk forward passed the initial buildings and turn left. Roll into the nearby tree and a Skulltula will fall down from the tree.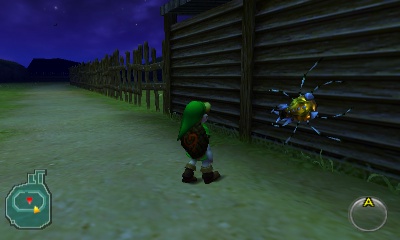
Location: Lon Lon Ranch
Conditions: Reach Lon Lon Ranch (Past) (Night)
Gold Skulltula #13 - On the outside of the corral, at the southeast part of the area. Just behind the wooden boards a Gold Skulltula can be found here at nighttime.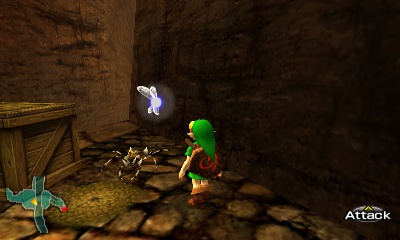
Location: Gerudo Valley
Conditions: An Empty Bottle and Bottle Bugs (Past)
Gold Skulltula #14 - Grab a Cucco while in Gerudo Valley leap off the ledge towards the water below. Along the west side of the water, you'll find a Gerudo next to a soft soil location. Drop some bugs to get the Skulltula.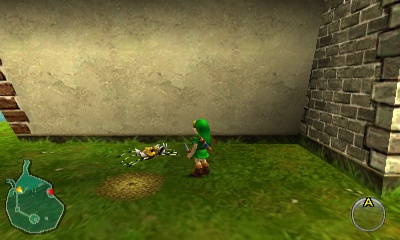
Location: Lake Hylia
Conditions: An Empty Bottle and Bottle Bugs (Past)
Gold Skulltula #15 - Near the Lakeside Laboratory at the northwest portion of the area you will find a soft soil location. Drop some bugs to get the Skulltula.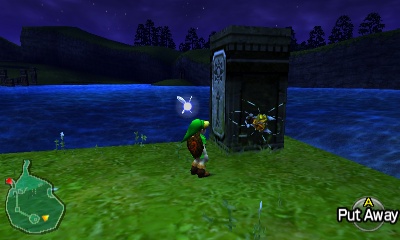
Location: Lake Hylia
Conditions: Reach Lake Hylia (Past)
Gold Skulltula #16 - At Lake Hylia, there is an island at the southeast corner of the map. This Gold Skulltula will only appear at nighttime.
Location: Kokiri Forest
Conditions: ((Night)) (Past)
Gold Skulltula #17 - Found only at nighttime in the Kokiri Forest. The skulltula is on the backside of the Know-It-All-Brothers' House, located at the southwest part of the town.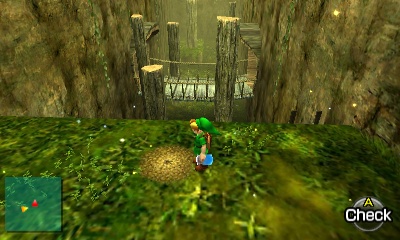
Location: Lost Woods
Conditions: An Empty Bottle and Bottle Bugs (Past)
Gold Skulltula #18 - From the entrance of the Lost Woods, go left and left again. Drop some bugs into the Soft Soil and the Skulltula will pop out.
Location: Lost Woods
Conditions: An Empty Bottle and Bottle Bugs (Past)
Gold Skulltula #19 - From the entrance of the Lost Woods, go right, left, right, left, and left to find yourself in a Meadow. Walk forward and you'll find a Soft Soil location. Drop some bugs and the Skulltula will pop out.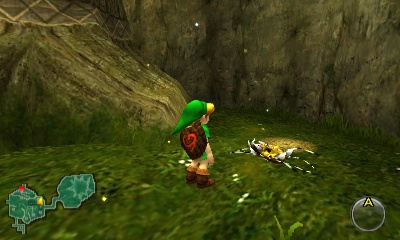
Location: Kokiri Forest
Conditions: An Empty Bottle and Bottle Bugs (Past)
Gold Skulltula #20 - Right behind the Kokiri Shop you will find a soft soil location. Drop some bugs to get the Skulltula.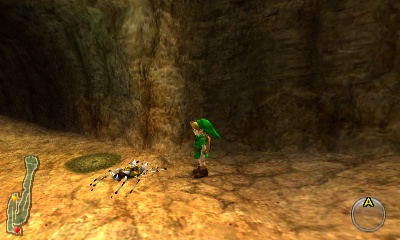
Location: Death Mountain Trail
Conditions: An Empty Bottle and Bottle Bugs (Past)
Gold Skulltula #21 - Right outside of Dodongo's Cavern, there is a Soft Soil location. Drop some bugs into it and the Skulltula will appear.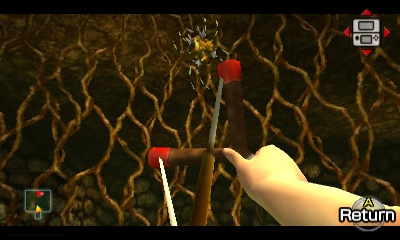
Location: Dodongo's Cavern
Conditions: Reach Dodongo's Cavern (Past)
Gold Skulltula #22 - In the room without the giant staircase, climb up to the very top and walk around to the south part of the room. Use the Slingshot to defeat the Skulltula and climb up to get the token.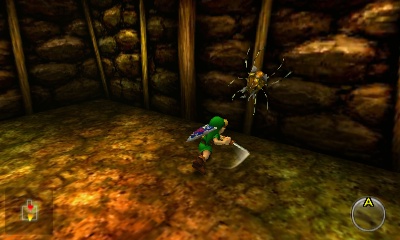
Location: Dodongo's Cavern
Conditions: Bombs are Recommended (Past)
Gold Skulltula #23 - From the entrance of the dungeon, head through the southeast door to reach the room with the Baby Dodongo's. Blast away at the wall with a bomb and head down a room where you will find the Gold SKulltula.
Location: Dodongo's Cavern
Conditions: Bombs (Past)
Gold Skulltula #24 - In the room with the Fire Keese towards the end of the dungeon there is a bombable wall at the north end of the room. Blast it open and you'll find a Gold Skulltula behind the Armos statue.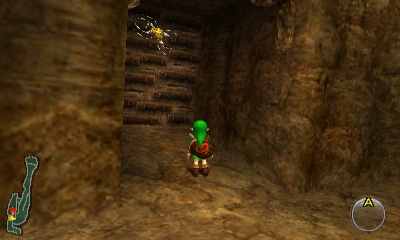
Location: Death Mountain Trail
Conditions: Bombs (Past)
Gold Skulltula #25 - On the trail between Kakariko Village and Dodongo's Cavern, there is a bombable wall on the side where you can hear a Gold Skulltula. Bomb the wall and defeat the skulltula for the token.
Location: Goron City
Conditions: Bombs (Past)
Gold Skulltula #26 - Once you enter Goron City, bomb the three boulders on the left. This leads to a room where you should bomb the boulders along the right path. Once you reach the back of the room, roll into the wooden crate to find a Gold Skulltula.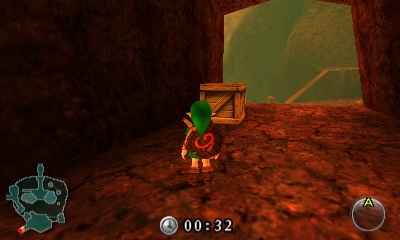
Location: Death Mountain Crater
Conditions: Reach Death Mountain Crater (Past)
Gold Skulltula #27 - At the very top of Death Mountain, enter the Death Mountain Crater and you'll find a wooden crate. Roll into it to find a Gold Skulltula.


