Walkthrough:Lightning Temple (Tears of the Kingdom): Difference between revisions
No edit summary |
mNo edit summary |
||
| (11 intermediate revisions by 4 users not shown) | |||
| Line 3: | Line 3: | ||
==Entrance== | ==Entrance== | ||
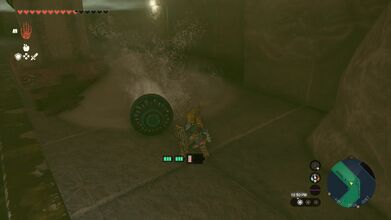
*In the first room of the temple, drop a [[Fan]] on the ground. Use it to clear the sand that is in the room. In particular, clear the sand in the center of the room and then step on the switch that appears to open the nearby door. | *In the first room of the temple, drop a [[Fan]] on the ground. Use it to clear the sand that is in the room. In particular, clear the sand in the center of the room and then step on the switch that appears to open the nearby door. | ||
* | *Pick up a nearby [[Torch]] and light it to make it easier to see. Climb down the steps and walk ahead a series of rooms. | ||
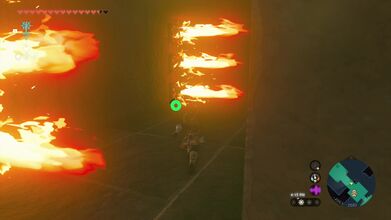
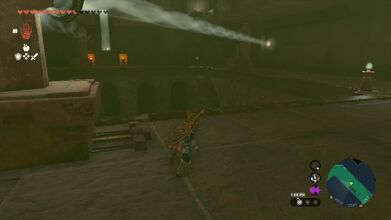
*Turn to the right and be careful of the false floor that will drop when Link steps on it. Defeat the [[Gibdo]]s here by using the flames and the torch. Up ahead, Link will find some horizontal flames. Wait for them to settle and then run through. On the other side of the flames, step on the floor switch to allow [[Riju]] to catch back up. | *Turn to the right and be careful of the false floor that will drop when Link steps on it. Defeat the [[Gibdo]]s here by using the flames and the torch. Up ahead, Link will find some horizontal flames. Wait for them to settle and then run through. On the other side of the flames, step on the floor switch to allow [[Riju]] to catch back up. | ||
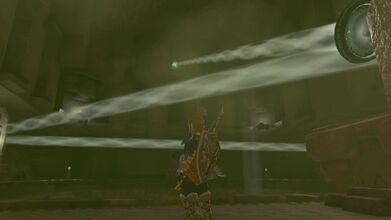
*In the next area there are massive boulders that are flowing down, preventing Link from | *In the next area there are massive boulders that are flowing down, preventing Link from passing through. Use [[Recall]] to cause the boulder to move backward. It's best to use Recall when the boulder is off in the distance. You can use Recall multiple times. Once you get by, step on the switch and head through the opening. | ||
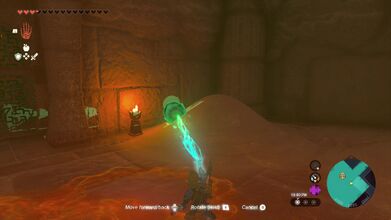
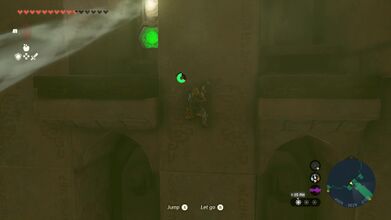
*Walk down the hallway and defeat the series of Gibdos. In the next room, Link can drop down and use [[Ultrahand]] to pull the cover to find a [[Gerudo Bow]]. In this room, defeat the Gibdo, and then use a lightning attack to destroy the [[Gibdo Hive]] to prevent more from spawning. | *Walk down the hallway and defeat the series of Gibdos. In the next room, Link can drop down and use [[Ultrahand]] to pull the cover to find a [[Gerudo Bow]]. In this room, defeat the Gibdo, and then use a lightning attack to destroy the [[Gibdo Hive]] to prevent more from spawning. | ||
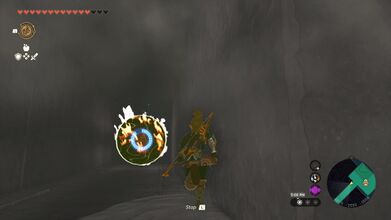
*Continue onward to enter the [[Room of Hopeful Light]]. Defeat the [[Soldier Construct]] and then pull the [[Mirror]] from the sand. Hold the mirror in the light so that it reflects at the orange circle. This will cause it to turn green and open the door. | *Continue onward to enter the [[Room of Hopeful Light]]. Defeat the [[Soldier Construct]] and then pull the [[Mirror]] from the sand. Hold the mirror in the light so that it reflects at the orange circle. This will cause it to turn green and open the door. | ||
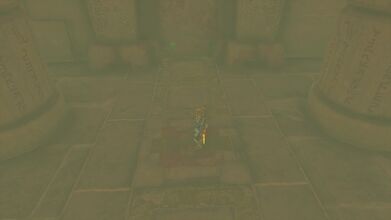
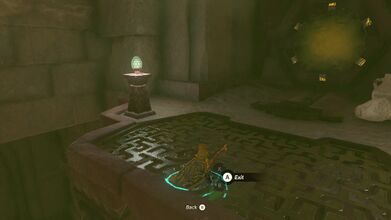
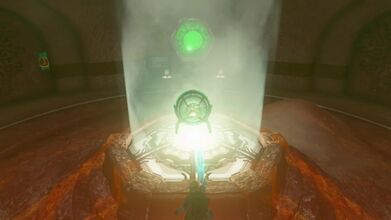
*Run up the stairs to arrive at the [[Room of Ascension]], the main chamber of the temple. Run forward and examine the pedestal. | *Run up the stairs to arrive at the [[Room of Ascension]], the main chamber of the temple. Run forward and examine the pedestal. | ||
{{Youtube|FWCohsfa8C4|360|Video Walkthrough}} | |||
{{Clear}} | |||
<gallery widths="400px" heights="220px" perrow=2> | <gallery widths="400px" heights="220px" perrow=2> | ||
File:TotK-Lightning-Temple-Walkthrough-01.jpg|Use a | File:TotK-Lightning-Temple-Walkthrough-01.jpg|Use a Fan to clear the sand in the first room | ||
File:TotK-Lightning-Temple-Walkthrough-02.jpg|A floor switch is hidden under the sand, opening the door | File:TotK-Lightning-Temple-Walkthrough-02.jpg|A floor switch is hidden under the sand, opening the door | ||
File:TotK-Lightning-Temple-Walkthrough-03.jpg|Wait until the fire subsides and quickly run | File:TotK-Lightning-Temple-Walkthrough-03.jpg|Wait until the fire subsides and quickly run past | ||
File:TotK-Lightning-Temple-Walkthrough-04.jpg|Use | File:TotK-Lightning-Temple-Walkthrough-04.jpg|Use Recall on the rolling fireball | ||
File:TotK-Lightning-Temple-Walkthrough-06.jpg|Grab the | File:TotK-Lightning-Temple-Walkthrough-06.jpg|Grab the Mirror with Ultrahand | ||
File:TotK-Lightning-Temple-Walkthrough-08.jpg| | File:TotK-Lightning-Temple-Walkthrough-08.jpg|Reflect the light onto the orange circle to open the door | ||
</gallery> | </gallery> | ||
==Battery - 1F - Northeast== | ==Battery - 1F - Northeast== | ||
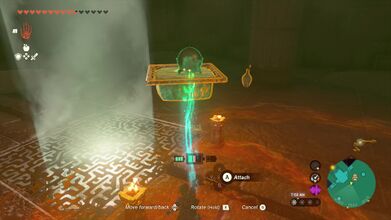
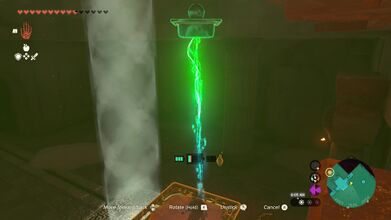
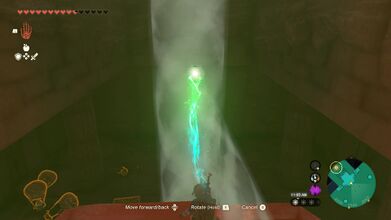
*The first battery is found straight ahead from the podium, behind a door to the northeast. Just to the right of the door, at the east side of the room, Link can use | *The first battery is found straight ahead from the podium, behind a door to the northeast. Just to the right of the door, at the east side of the room, Link can use Ultrahand to move the blocks that are here, creating a path for him and Riju to reach the battery. | ||
*On the other side of the wall, charge a lightning attack and shoot the battery with an | *On the other side of the wall, charge a lightning attack and shoot the battery with an [[Arrow]]. This will charge the battery and send the charge to the large elevator in the Room of Ascension. | ||
{{Youtube|OLwrc_nkTKo|360|Video Walkthrough}} | |||
{{Clear}} | |||
<gallery widths="400px" heights="220px" perrow=2> | <gallery widths="400px" heights="220px" perrow=2> | ||
| Line 29: | Line 35: | ||
==Battery - 3F - Northwest== | ==Battery - 3F - Northwest== | ||
*On the south side of the room, there is a massive wind geyser with a rock that is covering it. Use Ultrahand to pull the rock away, causing the wind to blow way up within the Room of Ascension. Jump and use the Paraglider to get all the way to the 5F. | *On the south side of the room, there is a massive wind geyser with a rock that is covering it. Use Ultrahand to pull the rock away, causing the wind to blow way up within the Room of Ascension. Jump and use the [[Paraglider]] to get all the way to the 5F. | ||
*Defeat the nearby Soldier Construct and head to the southeast part of the room. Climb up and enter the [[Room of Natural Light]]. | *Defeat the nearby Soldier Construct and head to the southeast part of the room. Climb up and enter the [[Room of Natural Light]]. | ||
*There is a large boulder in this room, as well as a pair of | *There is a large boulder in this room, as well as a pair of mirrors in the wall to the west. Stand the pillar up so it is vertical and then attach a mirror, facing the entranceway. Arrange the mirror and boulder so that light is shining through the opening. | ||
*Back in the Room of Ascension, | *Back in the Room of Ascension, use Ultrahand on the statue closest to where the light is coming from. Move it so that light reflects off the statue and shoots it eastward. | ||
*Now head to the southeast part of the room, and pull the statue here so it is reflecting light. Light will reflect downward, hitting the green target and opening a door. | *Now head to the southeast part of the room, and pull the statue here so it is reflecting light. Light will reflect downward, hitting the green target and opening a door. | ||
*Glide | *Glide down and head through to the [[Room of Offered Light]]. There are four Soldier Constructs in this room, including two that will shoot you from above. There is also a Gibdo Hive here that is spawning enemy Gibdos. Eliminate the hive and defeat the enemies to make this room easier. | ||
*There are two [[Hover Stone]]s, where the archers were shooting from. There is also a | *There are two [[Hover Stone]]s, where the archers were shooting from. There is also a mirror in this room at the north end, partially covered in sand. Grab the mirror and attach it to one of the Hover Stones. | ||
*Link can use [[Ascend]] to quickly get on top of one of the Hover Stones. The goal here is to use Ultrahand to get the Mirror to the top of the room. If Link attaches it to one of the Hover Stones, he can climb to the other stone, and use Ultrahand to carry the | *Link can use [[Ascend]] to quickly get on top of one of the Hover Stones. The goal here is to use Ultrahand to get the Mirror to the top of the room. If Link attaches it to one of the Hover Stones, he can climb to the other stone, and use Ultrahand to carry the mirror even higher. | ||
*Use Ascend to get up to the platform at the northwest part of the room. From here, grab the mirror and detach it from anything else. Hold it in the light in the center of the room so that it is facing to the northwest. Move it around until light shines on the green switch, opening the door. Head through and use lightning to activate the battery. | *Use Ascend to get up to the platform at the northwest part of the room. From here, grab the mirror and detach it from anything else. Hold it in the light in the center of the room so that it is facing to the northwest. Move it around until light shines on the green switch, opening the door. Head through and use lightning to activate the battery. | ||
{{Youtube|HjNsLztJCXg|360|Video Walkthrough}} | |||
{{Clear}} | |||
<gallery widths="400px" heights="220px" perrow=2> | <gallery widths="400px" heights="220px" perrow=2> | ||
File:TotK-Lightning-Temple-Walkthrough-11.jpg|Move the rock so that you can use the | File:TotK-Lightning-Temple-Walkthrough-11.jpg|Move the rock so that you can use the updraft in the main room | ||
File:TotK-Lightning-Temple-Walkthrough-12.jpg|On the 5th Floor, head to the southeast part of the room and enter the | File:TotK-Lightning-Temple-Walkthrough-12.jpg|On the 5th Floor, head to the southeast part of the room and enter the Room of Natural Light | ||
File:TotK-Lightning-Temple-Walkthrough-13.jpg|Grab the | File:TotK-Lightning-Temple-Walkthrough-13.jpg|Grab the mirror and attach it to a boulder | ||
File:TotK-Lightning-Temple-Walkthrough-14.jpg| | File:TotK-Lightning-Temple-Walkthrough-14.jpg|Set up the mirror so it is shining light through the entranceway | ||
File:TotK-Lightning-Temple-Walkthrough-15.jpg|Move the statue to reflect the light | File:TotK-Lightning-Temple-Walkthrough-15.jpg|Move the statue to reflect the light | ||
File:TotK-Lightning-Temple-Walkthrough-16.jpg|Move the second statue to shoot the light further down and | File:TotK-Lightning-Temple-Walkthrough-16.jpg|Move the second statue to shoot the light further down and unlock the door | ||
File:TotK-Lightning-Temple-Walkthrough-17.jpg|Attach a mirror to one of the | File:TotK-Lightning-Temple-Walkthrough-17.jpg|Attach a mirror to one of the Hover Stones | ||
File:TotK-Lightning-Temple-Walkthrough-18.jpg|Get on top of one of the Hover Stones and raise the mirror as high as you can | File:TotK-Lightning-Temple-Walkthrough-18.jpg|Get on top of one of the Hover Stones and raise the mirror as high as you can | ||
File:TotK-Lightning-Temple-Walkthrough-19.jpg|Use Ascend to reach the platform at the top of the room | File:TotK-Lightning-Temple-Walkthrough-19.jpg|Use Ascend to reach the platform at the top of the room | ||
| Line 53: | Line 62: | ||
==Battery - 2F - Southeast== | ==Battery - 2F - Southeast== | ||
*Once again use the | *Once again, use the updraft in the Room of Ascension to get back up to the top of the room. Make your way to the southwest part of the room and move the statue so that light shines all the way to the other side of the room. | ||
*On the northeast side of the room, we want to move the statue, but there is some sand covering it. Drop a | *On the northeast side of the room, we want to move the statue, but there is some sand covering it. Drop a fan and blow away the sand. If you do not have a fan in your inventory, you can backtrack through the dungeon to find fans that you can fuse with a shield. | ||
*Move the statue so that light reflects off of it. Then head to the northwest side of the room and move this statue as well, causing light to bounce off the mirror and up to the top of the room, opening a passageway. | *Move the statue so that light reflects off of it. Then head to the northwest side of the room and move this statue as well, causing light to bounce off the mirror and up to the top of the room, opening a passageway. | ||
*Climb up to the top of the room and then carefully drop down. Use the | *Climb up to the top of the room and then carefully drop down. Use the Paraglider to avoid the flames as you fall. Once you drop down, step on the switch to open the nearby gate. Defeat the Soldier Constructs until Riju rejoins you. Use her lightning attack to activate the battery. | ||
{{Youtube|r69UOcQGG24|360|Video Walkthrough}} | |||
{{Clear}} | |||
<gallery widths="400px" heights="220px" perrow=2> | <gallery widths="400px" heights="220px" perrow=2> | ||
File:TotK-Lightning-Temple-Walkthrough-21.jpg|Move the statue so light passes to the other side of the room | File:TotK-Lightning-Temple-Walkthrough-21.jpg|Move the statue so light passes to the other side of the room | ||
File:TotK-Lightning-Temple-Walkthrough-22.jpg|Use a | File:TotK-Lightning-Temple-Walkthrough-22.jpg|Use a fan to clear the sand | ||
File:TotK-Lightning-Temple-Walkthrough-23.jpg|Move the statue so the mirror reflects the light | File:TotK-Lightning-Temple-Walkthrough-23.jpg|Move the statue so that the mirror reflects the light | ||
File:TotK-Lightning-Temple-Walkthrough-24.jpg|Move the next statue to reflect light up to the top of the room | File:TotK-Lightning-Temple-Walkthrough-24.jpg|Move the next statue to reflect light up to the top of the room | ||
File:TotK-Lightning-Temple-Walkthrough-25.jpg|Climb up the wall to the new opening | File:TotK-Lightning-Temple-Walkthrough-25.jpg|Climb up the wall to the new opening | ||
File:TotK-Lightning-Temple-Walkthrough-26.jpg|Carefully drop down, using the | File:TotK-Lightning-Temple-Walkthrough-26.jpg|Carefully drop down, using the Paraglider to avoid the flames | ||
</gallery> | </gallery> | ||
==Battery - | ==Battery - 4F - Southwest== | ||
*Ride the wind geyser up and glide to the north side of the room. On the 4th floor, Link will find an orange light coming from a torch in the wall. Land there and walk around the corner to fight a Soldier Construct. | |||
*Walk past the rotating fans to get to the far room. The two fans are out of sync with one another. Use Recall on one of the fans to rewind it. Cancel Recall when the fan is line with the other fan, so that the opening is consistent between the two fans. The timing is not too strict and it doesn't have to be perfect. | |||
*Pull the rocks out of the back wall and light will shine through. First, it will hit the block and the gate will open. On the next pass, it will hit the green marker in the distance, opening a passage. | |||
*Glide to the southwest of the room and here you'll find spiked walls that try to squeeze Link in. Grab one of the boulders and place it in between the spikes. The spikes will claw at it, but Link will be able to pass. | |||
*In the next area, there are spikes from the ceiling. Grab the boulder from the wall and place it vertically so that it prevents the spikes from falling down to the ground. | |||
*Run ahead to the [[Room of Light and Shade]] and defeat the Soldier Constructs. Then drop down in the cracks in the ground to get to the area below. | |||
*Grab a [[Stake]] with Ultrahand. You want to stick one of the stakes in the wall, to prevent the room from turning. If you look at the wall, there are designs throughout the room. The wall should be stopped from moving so that the designs are visible. The timing is quick, so you'll have to push the stake in the wall and release quickly to get the wall to stop moving. | |||
*When done correctly, the green wall will be exposed. Use Ultrahand to grab a nearby mirror and shine the light on the green wall, causing light to beam up to the room above. | |||
*Use Ascend to get back up and grab another nearby mirror. Place this one so it is shining light by the spiked ceiling hallway. If the block is in the way, turn it vertically and make sure it is one on the sides. Light will shine to the green switch, opening the nearby gate. Run over and use lightning on the battery. Riju might have gotten stuck a few rooms back, so just backtrack to find her, charge a lightning strike, and hit the battery. | |||
{{Youtube|W0h0JCW4xT8|360|Video Walkthrough}} | |||
{{Clear}} | |||
<gallery widths="400px" heights="220px" perrow=2> | <gallery widths="400px" heights="220px" perrow=2> | ||
File:TotK-Lightning-Temple-Walkthrough-27.jpg|Glide to the torch light at the north end of the 4th floor | |||
File:TotK-Lightning-Temple-Walkthrough-28.jpg|Use Recall on the giant fan | |||
File:TotK-Lightning-Temple-Walkthrough-29.jpg|Cancel Recall so the openings of the two fans are in unison | |||
File:TotK-Lightning-Temple-Walkthrough-30.jpg|Pull the boulders from the wall | |||
File:TotK-Lightning-Temple-Walkthrough-31.jpg|Light will shine through and open the gate, opening a passage on the other side of the room | |||
File:TotK-Lightning-Temple-Walkthrough-32.jpg|Place a boulder to prevent the spikes from trapping Link | |||
File:TotK-Lightning-Temple-Walkthrough-33.jpg|Place a boulder vertically on the side to prevent the trap from crushing Link | |||
File:TotK-Lightning-Temple-Walkthrough-34.jpg|Stick a Stake in the wall so that the design on the wall is visible | |||
File:TotK-Lightning-Temple-Walkthrough-35.jpg|Hold a light to shine it on the green target | |||
File:TotK-Lightning-Temple-Walkthrough-36.jpg|Place a mirror to shine through the room, opening the gate to the battery | |||
</gallery> | </gallery> | ||
{{Tears of the Kingdom Dungeons}} | |||
{{cat|Tears of the Kingdom Walkthroughs}} | {{cat|Tears of the Kingdom Walkthroughs}} | ||
Latest revision as of 03:08, August 6, 2023
The Lightning Temple Walkthrough is a full guide to completing the Lightning Temple in Tears of the Kingdom. It includes a guide for the dungeon, including activating all four batteries, and defeating the dungeon boss, Queen Gibdo. The four batteries can be done in any order.
Entrance
- In the first room of the temple, drop a Fan on the ground. Use it to clear the sand that is in the room. In particular, clear the sand in the center of the room and then step on the switch that appears to open the nearby door.
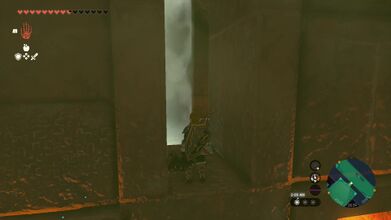
- Pick up a nearby Torch and light it to make it easier to see. Climb down the steps and walk ahead a series of rooms.
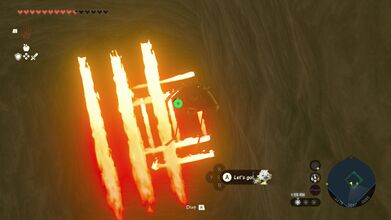
- Turn to the right and be careful of the false floor that will drop when Link steps on it. Defeat the Gibdos here by using the flames and the torch. Up ahead, Link will find some horizontal flames. Wait for them to settle and then run through. On the other side of the flames, step on the floor switch to allow Riju to catch back up.
- In the next area there are massive boulders that are flowing down, preventing Link from passing through. Use Recall to cause the boulder to move backward. It's best to use Recall when the boulder is off in the distance. You can use Recall multiple times. Once you get by, step on the switch and head through the opening.
- Walk down the hallway and defeat the series of Gibdos. In the next room, Link can drop down and use Ultrahand to pull the cover to find a Gerudo Bow. In this room, defeat the Gibdo, and then use a lightning attack to destroy the Gibdo Hive to prevent more from spawning.
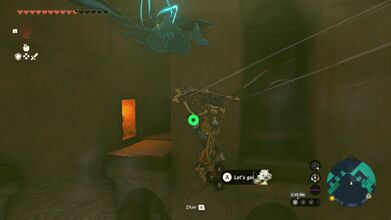
- Continue onward to enter the Room of Hopeful Light. Defeat the Soldier Construct and then pull the Mirror from the sand. Hold the mirror in the light so that it reflects at the orange circle. This will cause it to turn green and open the door.
- Run up the stairs to arrive at the Room of Ascension, the main chamber of the temple. Run forward and examine the pedestal.
Video Walkthrough

Use a Fan to clear the sand in the first room
A floor switch is hidden under the sand, opening the door
Wait until the fire subsides and quickly run past
Use Recall on the rolling fireball
Grab the Mirror with Ultrahand
Reflect the light onto the orange circle to open the door


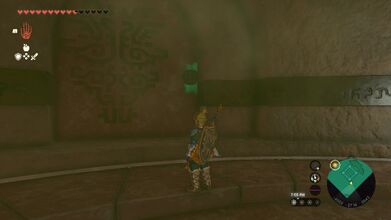
Battery - 1F - Northeast
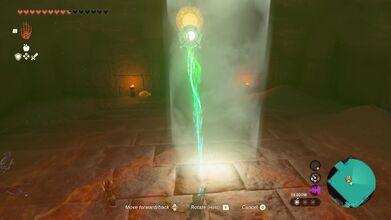
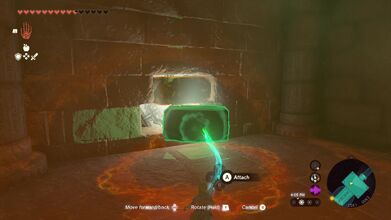
- The first battery is found straight ahead from the podium, behind a door to the northeast. Just to the right of the door, at the east side of the room, Link can use Ultrahand to move the blocks that are here, creating a path for him and Riju to reach the battery.
- On the other side of the wall, charge a lightning attack and shoot the battery with an Arrow. This will charge the battery and send the charge to the large elevator in the Room of Ascension.
Video Walkthrough
Pull the false wall on the side with Ultrahand
Strike the battery with electricity to generate power


Battery - 3F - Northwest
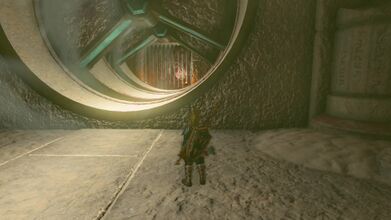
- On the south side of the room, there is a massive wind geyser with a rock that is covering it. Use Ultrahand to pull the rock away, causing the wind to blow way up within the Room of Ascension. Jump and use the Paraglider to get all the way to the 5F.
- Defeat the nearby Soldier Construct and head to the southeast part of the room. Climb up and enter the Room of Natural Light.
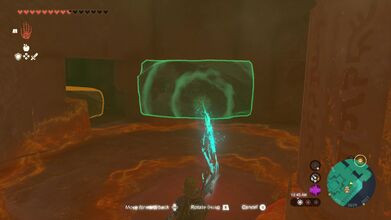
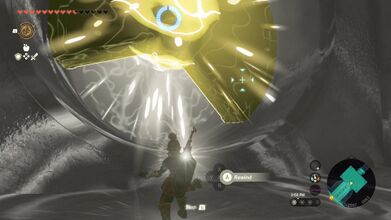
- There is a large boulder in this room, as well as a pair of mirrors in the wall to the west. Stand the pillar up so it is vertical and then attach a mirror, facing the entranceway. Arrange the mirror and boulder so that light is shining through the opening.
- Back in the Room of Ascension, use Ultrahand on the statue closest to where the light is coming from. Move it so that light reflects off the statue and shoots it eastward.
- Now head to the southeast part of the room, and pull the statue here so it is reflecting light. Light will reflect downward, hitting the green target and opening a door.
- Glide down and head through to the Room of Offered Light. There are four Soldier Constructs in this room, including two that will shoot you from above. There is also a Gibdo Hive here that is spawning enemy Gibdos. Eliminate the hive and defeat the enemies to make this room easier.
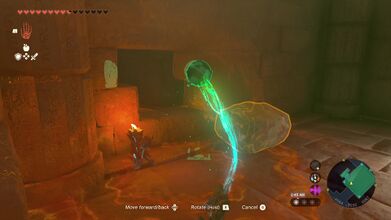
- There are two Hover Stones, where the archers were shooting from. There is also a mirror in this room at the north end, partially covered in sand. Grab the mirror and attach it to one of the Hover Stones.
- Link can use Ascend to quickly get on top of one of the Hover Stones. The goal here is to use Ultrahand to get the Mirror to the top of the room. If Link attaches it to one of the Hover Stones, he can climb to the other stone, and use Ultrahand to carry the mirror even higher.
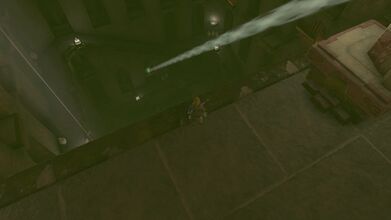
- Use Ascend to get up to the platform at the northwest part of the room. From here, grab the mirror and detach it from anything else. Hold it in the light in the center of the room so that it is facing to the northwest. Move it around until light shines on the green switch, opening the door. Head through and use lightning to activate the battery.
Video Walkthrough
Move the rock so that you can use the updraft in the main room
On the 5th Floor, head to the southeast part of the room and enter the Room of Natural Light
Grab the mirror and attach it to a boulder

Set up the mirror so it is shining light through the entranceway
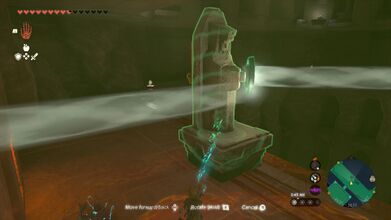
Move the statue to reflect the light
Move the second statue to shoot the light further down and unlock the door
Attach a mirror to one of the Hover Stones
Get on top of one of the Hover Stones and raise the mirror as high as you can
Use Ascend to reach the platform at the top of the room
Detach the mirror and move it so that it shines light to the northwest, activating the green switch and opening the door


Battery - 2F - Southeast
- Once again, use the updraft in the Room of Ascension to get back up to the top of the room. Make your way to the southwest part of the room and move the statue so that light shines all the way to the other side of the room.
- On the northeast side of the room, we want to move the statue, but there is some sand covering it. Drop a fan and blow away the sand. If you do not have a fan in your inventory, you can backtrack through the dungeon to find fans that you can fuse with a shield.
- Move the statue so that light reflects off of it. Then head to the northwest side of the room and move this statue as well, causing light to bounce off the mirror and up to the top of the room, opening a passageway.
- Climb up to the top of the room and then carefully drop down. Use the Paraglider to avoid the flames as you fall. Once you drop down, step on the switch to open the nearby gate. Defeat the Soldier Constructs until Riju rejoins you. Use her lightning attack to activate the battery.
Video Walkthrough

Move the statue so light passes to the other side of the room
Use a fan to clear the sand
Move the statue so that the mirror reflects the light
Move the next statue to reflect light up to the top of the room
Climb up the wall to the new opening
Carefully drop down, using the Paraglider to avoid the flames


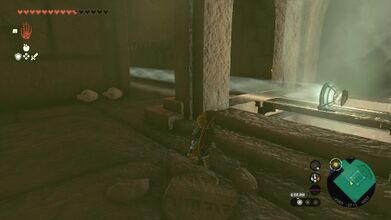
Battery - 4F - Southwest
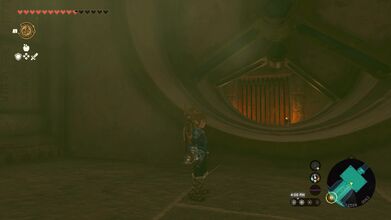
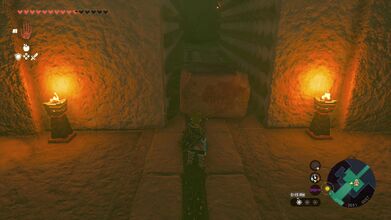
- Ride the wind geyser up and glide to the north side of the room. On the 4th floor, Link will find an orange light coming from a torch in the wall. Land there and walk around the corner to fight a Soldier Construct.
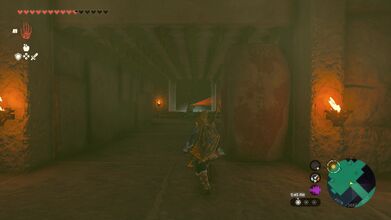
- Walk past the rotating fans to get to the far room. The two fans are out of sync with one another. Use Recall on one of the fans to rewind it. Cancel Recall when the fan is line with the other fan, so that the opening is consistent between the two fans. The timing is not too strict and it doesn't have to be perfect.
- Pull the rocks out of the back wall and light will shine through. First, it will hit the block and the gate will open. On the next pass, it will hit the green marker in the distance, opening a passage.
- Glide to the southwest of the room and here you'll find spiked walls that try to squeeze Link in. Grab one of the boulders and place it in between the spikes. The spikes will claw at it, but Link will be able to pass.
- In the next area, there are spikes from the ceiling. Grab the boulder from the wall and place it vertically so that it prevents the spikes from falling down to the ground.
- Run ahead to the Room of Light and Shade and defeat the Soldier Constructs. Then drop down in the cracks in the ground to get to the area below.
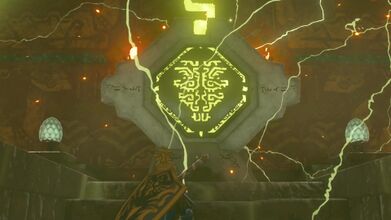
- Grab a Stake with Ultrahand. You want to stick one of the stakes in the wall, to prevent the room from turning. If you look at the wall, there are designs throughout the room. The wall should be stopped from moving so that the designs are visible. The timing is quick, so you'll have to push the stake in the wall and release quickly to get the wall to stop moving.
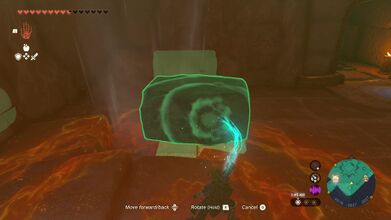
- When done correctly, the green wall will be exposed. Use Ultrahand to grab a nearby mirror and shine the light on the green wall, causing light to beam up to the room above.
- Use Ascend to get back up and grab another nearby mirror. Place this one so it is shining light by the spiked ceiling hallway. If the block is in the way, turn it vertically and make sure it is one on the sides. Light will shine to the green switch, opening the nearby gate. Run over and use lightning on the battery. Riju might have gotten stuck a few rooms back, so just backtrack to find her, charge a lightning strike, and hit the battery.
Video Walkthrough
Glide to the torch light at the north end of the 4th floor
Use Recall on the giant fan
Cancel Recall so the openings of the two fans are in unison
Pull the boulders from the wall
Light will shine through and open the gate, opening a passage on the other side of the room
Place a boulder to prevent the spikes from trapping Link
Place a boulder vertically on the side to prevent the trap from crushing Link
Stick a Stake in the wall so that the design on the wall is visible
Hold a light to shine it on the green target
Place a mirror to shine through the room, opening the gate to the battery


