Walkthrough:Fire Temple (Tears of the Kingdom): Difference between revisions
No edit summary |
mNo edit summary |
||
| (10 intermediate revisions by 2 users not shown) | |||
| Line 28: | Line 28: | ||
<gallery widths="400px" heights="220px" perrow=2> | <gallery widths="400px" heights="220px" perrow=2> | ||
File:TotK-Fire-Temple-Walkthrough-09.jpg|Strike the switch to raise the gate | |||
File:TotK-Fire-Temple-Walkthrough-10.jpg|Launch Yunobo at the red blocks to clear the path on the rails | |||
File:TotK-Fire-Temple-Walkthrough-11.jpg|Hit the green target to switch the rails | |||
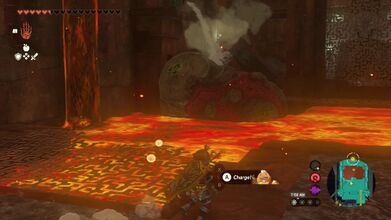
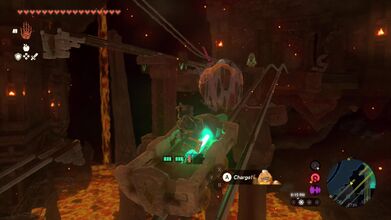
File:TotK-Fire-Temple-Walkthrough-12.jpg|Jump off the cart and fight the [[Igneo Pebblit]]s | |||
File:TotK-Fire-Temple-Walkthrough-13.jpg|Hit the switch to cause the rails to lower down | |||
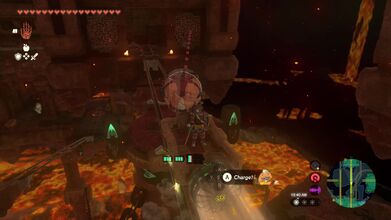
File:TotK-Fire-Temple-Walkthrough-14.jpg|Launc Yunobo at the red block in the lava | |||
File:TotK-Fire-Temple-Walkthrough-15.jpg|Use Ultrahand to attach the platforms together | |||
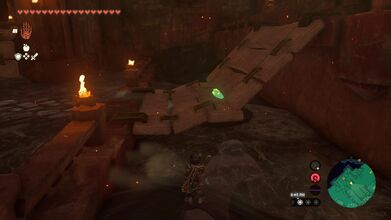
File:TotK-Fire-Temple-Walkthrough-16.jpg|Create a bridge and run across the lava | |||
</gallery> | </gallery> | ||
==Padlock 4F - North End== | |||
*After reaching the second padlock at the north end of the 2F, return to the nearby mine cart. Shoot an arrow at the switch across the gap to raise the rails. Then ride the cart up the rail to reach the 3F in the large central platform. Once you arrive here, run to the center of the room and strike the yellow switch. This creates an elevator down from the 1F, making it easier to get back up here if you fall. | |||
*At the north end of this area, there are two switches, with the one on the left rotating the rail left and right, and the one on the right changing the direction up and down. | |||
*Hit switches so that eventually the rail that is just to the right, is connected and sloped upward. Jump into the mine cart and ride it up to the 4F. | |||
*Ride the cart around the room and it will keep going in a circle. Stop the fan at the south end of this area and get off the cart. | |||
*Climb up and you'll find a large rock on the right side, with a slopped platform leading up to it. Launch Yunobo up at it to break the rock, revealing a Hydrant. | |||
*Grab a series of platforms that the hydrant makes and attach them, making a long bridge. | |||
*Grab the bridge and slope it upward towards the gong in the center of the room. Send Yunobo up it to hit the gong and release the next padlock. | |||
<gallery widths="400px" heights="220px" perrow=2> | |||
File:TotK-Fire-Temple-Walkthrough-17.jpg|Shoot an arrow at the green switch across the gap to cause the rails to turn upward, leading to the 3F | |||
File:TotK-Fire-Temple-Walkthrough-18.jpg|Hit the two switches to arrange the rails so Link can ride up to the 4F | |||
File:TotK-Fire-Temple-Walkthrough-19.jpg|Stop the cart and get off to find a red rock. Launch Yunobo at it to find a [[Hydrant]] | |||
File:TotK-Fire-Temple-Walkthrough-20.jpg|Connect platforms that the hydrant creates to make a bridge and lean it up against the gong | |||
</gallery> | |||
==Padlock 5F - Southwest== | |||
*Return to the middle platform on the 3F. Link can Paraglide over there, or simply drop down to the 1F and use the elevator shortcut to reach it. | |||
*At the southwest part of the room there is a rail, but partway along the rail, there is a gap that normally, a cart with a fan would just fall down. However, there is a nearby [[Rocket]] that Link can find. Attach a rocket to a mine cart and put it on the rail. Jump on the cart and hit the rocket, causing the cart to jump the gap and reach the higher area. | |||
*Run straight ahead and youl'l find a broken bridge with a large red block way up top on the ceiling. Use Ultrahand to attach the bridge back together. Then stand in front of it and launch Yunobo at the bridge. He will roll up the bridge and go soaring up hte wall, hitting the red block. This will cause a cube to fall down to the ground. | |||
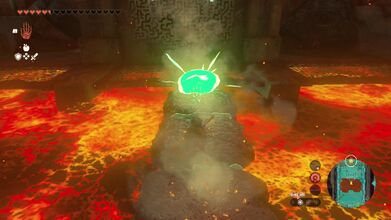
*Walk over to the cube and use [[Recall]] on it. Stand on the cube and ride it up to the top floor. Use Yunobo to hit the gong to release the padlock. | |||
<gallery widths="400px" heights="220px" perrow=2> | |||
File:TotK-Fire-Temple-Walkthrough-21.jpg|Attach a [[Rocket]] to the mine cart | |||
File:TotK-Fire-Temple-Walkthrough-22.jpg|Ride the mine cart and jump the gap | |||
File:TotK-Fire-Temple-Walkthrough-23.jpg|Use Ultrahand to attach the bridge back together | |||
File:TotK-Fire-Temple-Walkthrough-24.jpg|Launch Yunobo up the broken bridge to the red rock | |||
File:TotK-Fire-Temple-Walkthrough-25.jpg|Use [[Recall]] on the cube and climb on top of it | |||
File:TotK-Fire-Temple-Walkthrough-26.jpg|Hit the gong to release the padlock | |||
</gallery> | |||
==Padlock 1F - Northwest== | |||
*Return to the middle platform on the 3F. Link can Paraglide over there, or simply drop down to the 1F and use the elevator shortcut to reach it. | |||
*At the north side of the platform, hit the two green switches so that the platform to the right is flat and heads straight ahead. Ride along and then jump onto the adjacent minecart. Ride this platform and you'll find a large red rock. Blast it away and it will open the nearby gate. Ride a minecart to get back to the middle platform on the 3F. | |||
*At the north end of the room, strike the two switches so that the rail goes from left to right, and rises up to the higher floor. Then use the minecart on the northwest rail and activate the fan. The cart will ride all the way up to the 4F. | |||
*Defeat the Soldier Construct here and then use the next minecart to continue riding up to the 5F. Launch Yunobo at the Soldier Construct up here who is on the other minecart. Walk around the corner and cross the bridge here. Carefully drop down to the floor below. | |||
*Hit the switch to lower the rail and then hop into the minecart. While riding down, if Link looks to the South, he'll find a large red rock. Carefully launch Yunobo while on the rail at the block. If you miss the block, no worries. Just turn the rail car around and ride it back up. | |||
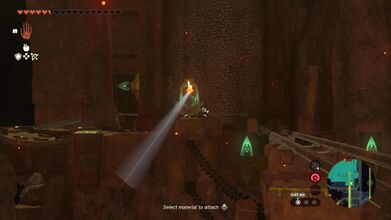
*Once Link hits the block, ride the cart back up to the top and then use [[Ascend]] to get back up to the 5F. From here Link can jump down and use his Paraglider to get through the whole that was left from the red rock. | |||
*Drop down the hole all the way to the 1F and hit the crystal switch to open the gate. Activate the gong here to release the padlock. | |||
<gallery widths="400px" heights="220px" perrow=2> | |||
File:TotK-Fire-Temple-Walkthrough-27.jpg|Ride the cart on the 3F to the north side of the temple | |||
File:TotK-Fire-Temple-Walkthrough-28.jpg|Destroy the red rock to open the nearby gate | |||
File:TotK-Fire-Temple-Walkthrough-29.jpg|Move the trails and ride the cart to get up to the 4F, and then to the 5F | |||
File:TotK-Fire-Temple-Walkthrough-30.jpg|Ride on the cart and destroy the red rock with Yunobo | |||
File:TotK-Fire-Temple-Walkthrough-33.jpg|Cross the bridge on the 5F and carefully drop down to the lower floor | |||
File:TotK-Fire-Temple-Walkthrough-31.jpg|Paraglide through the open hole and drop down to the 1F | |||
</gallery> | |||
{{Tears of the Kingdom Dungeons}} | |||
{{cat|Tears of the Kingdom Walkthroughs}} | {{cat|Tears of the Kingdom Walkthroughs}} | ||
Latest revision as of 03:08, August 6, 2023
The Fire Temple Walkthrough is a full guide to completing the Fire Temple in Tears of the Kingdom. It includes a guide for the dungeon, including unlocking all five padlocks, and defeating the dungeon boss, Marbled Gohma. The five padlocks can be done in any order, but the below order is the recommended order to doing so.
Padlock 1F - South End
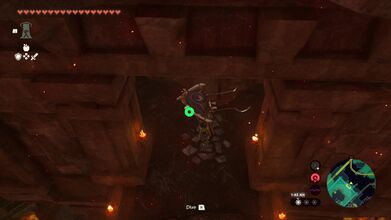
- From the activation terminal, walk to the southeast and fight off the Soldier Construct here. Carefully jump over the lava and then turn to the left to find a Hydrant. Use the Hydrant to create platforms in the lava and cross over.
- Hop into the mine cart and activate the Fan. While riding on the mine cart, launch Yunobo at the green target. This will cause the rails to shift and the cart will move forward.
- Jump off the cart and make your way around the corner to find a Fire Like. Defeat it and then grab a Hydrant from the previous area, carrying it by the Fire Like.
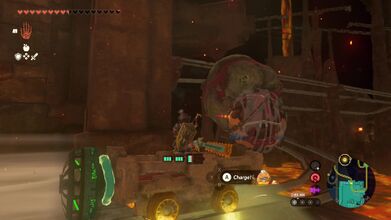
- Use the Hydrant to create platforms in the lava up ahead. Then attached the platforms onto eachother, using Ultrahand. Adjust this larger platform to create a bridge, leading to the large red rock. Launch Yunobo across to break the red block.
- In the next area, have Yunobo roll into the massive gong, causing one of the padlocks to unlock.
Hop across the lava
Use the Hydrant to create platforms

Jump into the Mine Cart and activate the Fan
Launch Yunobo at the green target to cause the tracks to rotate
Grab a hydrant and use it on the lava to create platforms
Create multiple platforms and attach them together
Create a bridge with the platforms
Launch Yunobo across to break the large red block


Padlock 2F - North End
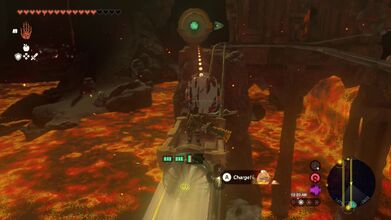
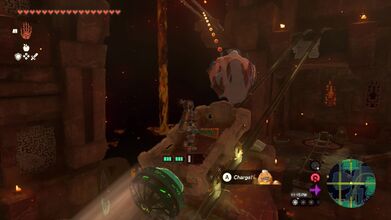
- After riding the mine cart to get the first padlock, at the south end of the 1F, return to the mine cart. Hit the yellow switch, turning it to green, which will lift the gate. Jump back into the mine cart and activate the fan. If the minecart rolled down the tracks, just grab one of the nearby minecarts. While riding the cart, use Yunobo to destroy the red block that is on the track.
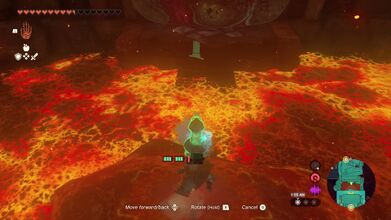
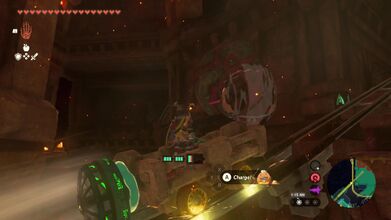
- Once the track comes to an end, jump off the mine cart and turn the cart around with Ultrahand. Link can also strike the device nearby, causing the track to spin around. Jump back on the cart and ride along, hitting the target ahead with Yunobo to get the track to shift.
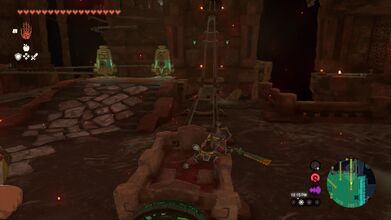
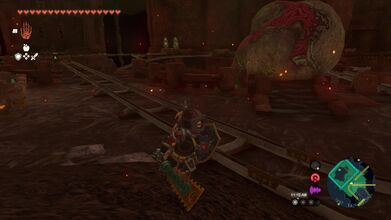
- Once the cart stops, jump off and defeat the Igneo Pebblit by launching Yunobo at them. Link can hit the switch here, causing the rails to turn and the gate to lift. Riding the cart this way eventually leads to a treasure chest that contains ten Arrows, but it is optional.
- Return to where you fought the little fire pebblit guys and jump off the cart. Walk to the west and you'll find another switch with another cart and rail. Strike the switch and it will cause the rail here to drop down. Put the cart on the rail and ride it northward.
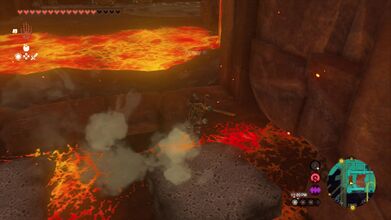
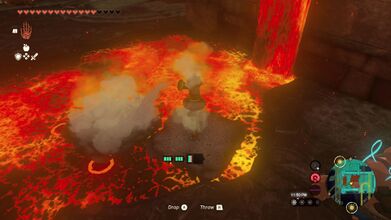
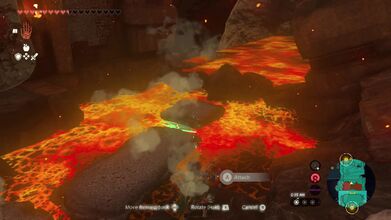
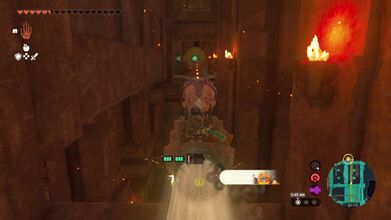
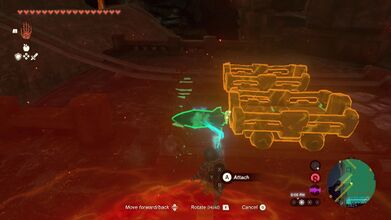
- There is lava all over and a red rock in the lava up ahead. Use Yunobo to launch an attack at the rock, breaking it. This will cause the Hydrant to spill water on the lava, creating platforms. Grab these platforms with Ultrahand and stick a bunch of them together. Eventually connect enough of them to make a bridge.
- Using the bridge that you created, walk across the lava to the north side of the room. Wrap around the wall and defeat the Soldier Construct here. Use Yunobo to activate the second padlock.
Strike the switch to raise the gate
Launch Yunobo at the red blocks to clear the path on the rails
Hit the green target to switch the rails
Jump off the cart and fight the Igneo Pebblits
Hit the switch to cause the rails to lower down
Launc Yunobo at the red block in the lava
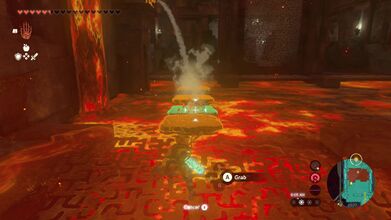
Use Ultrahand to attach the platforms together
Create a bridge and run across the lava


Padlock 4F - North End
- After reaching the second padlock at the north end of the 2F, return to the nearby mine cart. Shoot an arrow at the switch across the gap to raise the rails. Then ride the cart up the rail to reach the 3F in the large central platform. Once you arrive here, run to the center of the room and strike the yellow switch. This creates an elevator down from the 1F, making it easier to get back up here if you fall.
- At the north end of this area, there are two switches, with the one on the left rotating the rail left and right, and the one on the right changing the direction up and down.
- Hit switches so that eventually the rail that is just to the right, is connected and sloped upward. Jump into the mine cart and ride it up to the 4F.
- Ride the cart around the room and it will keep going in a circle. Stop the fan at the south end of this area and get off the cart.
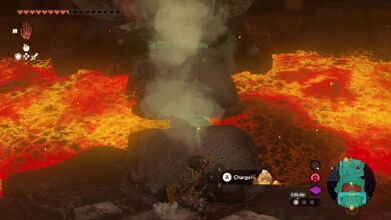
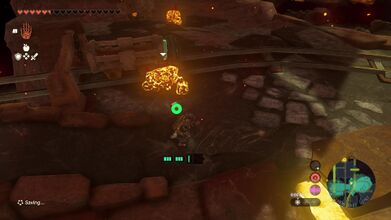
- Climb up and you'll find a large rock on the right side, with a slopped platform leading up to it. Launch Yunobo up at it to break the rock, revealing a Hydrant.
- Grab a series of platforms that the hydrant makes and attach them, making a long bridge.
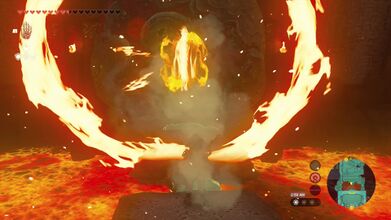
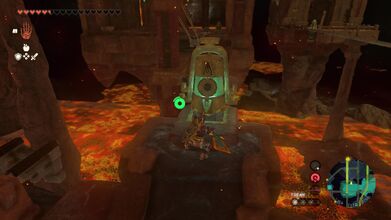
- Grab the bridge and slope it upward towards the gong in the center of the room. Send Yunobo up it to hit the gong and release the next padlock.
Shoot an arrow at the green switch across the gap to cause the rails to turn upward, leading to the 3F
Hit the two switches to arrange the rails so Link can ride up to the 4F
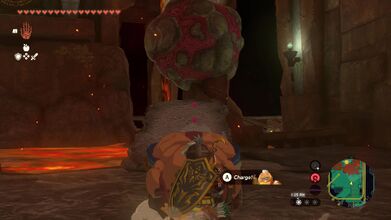
Stop the cart and get off to find a red rock. Launch Yunobo at it to find a Hydrant
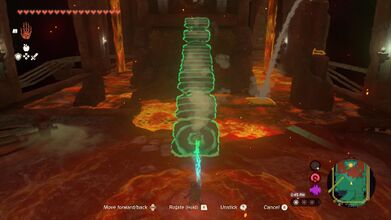
Connect platforms that the hydrant creates to make a bridge and lean it up against the gong


Padlock 5F - Southwest
- Return to the middle platform on the 3F. Link can Paraglide over there, or simply drop down to the 1F and use the elevator shortcut to reach it.
- At the southwest part of the room there is a rail, but partway along the rail, there is a gap that normally, a cart with a fan would just fall down. However, there is a nearby Rocket that Link can find. Attach a rocket to a mine cart and put it on the rail. Jump on the cart and hit the rocket, causing the cart to jump the gap and reach the higher area.
- Run straight ahead and youl'l find a broken bridge with a large red block way up top on the ceiling. Use Ultrahand to attach the bridge back together. Then stand in front of it and launch Yunobo at the bridge. He will roll up the bridge and go soaring up hte wall, hitting the red block. This will cause a cube to fall down to the ground.
- Walk over to the cube and use Recall on it. Stand on the cube and ride it up to the top floor. Use Yunobo to hit the gong to release the padlock.
Attach a Rocket to the mine cart
Ride the mine cart and jump the gap
Use Ultrahand to attach the bridge back together
Launch Yunobo up the broken bridge to the red rock

Use Recall on the cube and climb on top of it
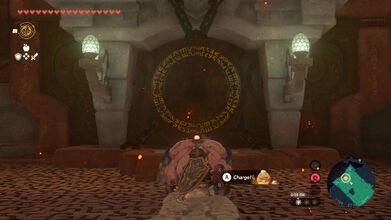
Hit the gong to release the padlock


Padlock 1F - Northwest
- Return to the middle platform on the 3F. Link can Paraglide over there, or simply drop down to the 1F and use the elevator shortcut to reach it.
- At the north side of the platform, hit the two green switches so that the platform to the right is flat and heads straight ahead. Ride along and then jump onto the adjacent minecart. Ride this platform and you'll find a large red rock. Blast it away and it will open the nearby gate. Ride a minecart to get back to the middle platform on the 3F.
- At the north end of the room, strike the two switches so that the rail goes from left to right, and rises up to the higher floor. Then use the minecart on the northwest rail and activate the fan. The cart will ride all the way up to the 4F.
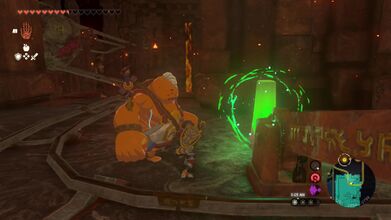
- Defeat the Soldier Construct here and then use the next minecart to continue riding up to the 5F. Launch Yunobo at the Soldier Construct up here who is on the other minecart. Walk around the corner and cross the bridge here. Carefully drop down to the floor below.
- Hit the switch to lower the rail and then hop into the minecart. While riding down, if Link looks to the South, he'll find a large red rock. Carefully launch Yunobo while on the rail at the block. If you miss the block, no worries. Just turn the rail car around and ride it back up.
- Once Link hits the block, ride the cart back up to the top and then use Ascend to get back up to the 5F. From here Link can jump down and use his Paraglider to get through the whole that was left from the red rock.
- Drop down the hole all the way to the 1F and hit the crystal switch to open the gate. Activate the gong here to release the padlock.
Ride the cart on the 3F to the north side of the temple
Destroy the red rock to open the nearby gate
Move the trails and ride the cart to get up to the 4F, and then to the 5F
Ride on the cart and destroy the red rock with Yunobo

Cross the bridge on the 5F and carefully drop down to the lower floor
Paraglide through the open hole and drop down to the 1F


