Ocarina of Time Bosses: Difference between revisions
Jump to navigation
Jump to search
Want an adless experience? Log in or Create an account.
No edit summary |
No edit summary |
||
| Line 37: | Line 37: | ||
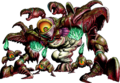
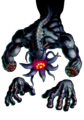
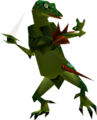
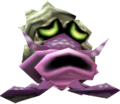
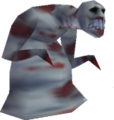
{{CD|file=Bongo-Bongo.png|link=Bongo Bongo|caption=Bongo Bongo|desc=Full Title: '''Phantom Shadow Beast: Bongo Bongo'''. Bongo Bongo is the seventh Boss, found inside the [[Shadow Temple]]. It will attack by smacking the platform below Link, which creates some difficulty in Z-Targeting. He also attacks by sweeping his hands towards Link, knocking him off the platform, grabbing and crushing, among many other maneuvers. There are several strategies associated in defeating Bongo Bongo, all of which include attacking his hands, then using the [[Lens of Truth]] to see his eye. Once his red eye is visible, it must be shot with the [[Fairy Bow]], which will stun it. Once it is stunned, Link can attack his eye with the [[Master Sword]]. The Ice Arrows obtained in the Gerudo's Fortress can be beneficial in this boss battle. Shoot one at a hand and while the other hand is trying to break the ice, you can use the Lens of Truth and stun Bongo Bongo like normal.}} | {{CD|file=Bongo-Bongo.png|link=Bongo Bongo|caption=Bongo Bongo|desc=Full Title: '''Phantom Shadow Beast: Bongo Bongo'''. Bongo Bongo is the seventh Boss, found inside the [[Shadow Temple]]. It will attack by smacking the platform below Link, which creates some difficulty in Z-Targeting. He also attacks by sweeping his hands towards Link, knocking him off the platform, grabbing and crushing, among many other maneuvers. There are several strategies associated in defeating Bongo Bongo, all of which include attacking his hands, then using the [[Lens of Truth]] to see his eye. Once his red eye is visible, it must be shot with the [[Fairy Bow]], which will stun it. Once it is stunned, Link can attack his eye with the [[Master Sword]]. The Ice Arrows obtained in the Gerudo's Fortress can be beneficial in this boss battle. Shoot one at a hand and while the other hand is trying to break the ice, you can use the Lens of Truth and stun Bongo Bongo like normal.}} | ||
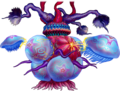
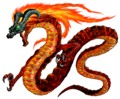
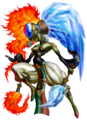
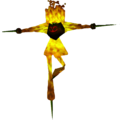
{{CD|file=Kotake-and-Koume-Artwork.png|link=Twinrova|caption=Twinrova|desc=Full Title: '''Sorceress Sisters: Twinrova'''. Twinrova is the eighth boss, located within the [[Spirit Temple]]. There are two different sections to their battle. The first involves deflecting the element that one of the sisters may fire at you (ice/fire) with the [[Mirror Shield]], and aiming it at the other. After they have been damaged enough, the second phase will begin. They will fuse together, making one single, younger entity. This round involves a similar battling style. One element will shoot, and Link must absorb the element with the [[Mirror Shield]]. He must absorb the same element three times in a row. After this has been done, it will shoot out of the shield, and will stun Twinrova. If the wrong element is absorbed, the shield will lose the element, and Link must start over. After Twinrova is stunned, she may be attacked with the [[Master Sword]].}} | {{CD|file=Kotake-and-Koume-Artwork.png|link=Twinrova|caption=Twinrova|desc=Full Title: '''Sorceress Sisters: Twinrova'''. Twinrova is the eighth boss, located within the [[Spirit Temple]]. There are two different sections to their battle. The first involves deflecting the element that one of the sisters may fire at you (ice/fire) with the [[Mirror Shield]], and aiming it at the other. After they have been damaged enough, the second phase will begin. They will fuse together, making one single, younger entity. This round involves a similar battling style. One element will shoot, and Link must absorb the element with the [[Mirror Shield]]. He must absorb the same element three times in a row. After this has been done, it will shoot out of the shield, and will stun Twinrova. If the wrong element is absorbed, the shield will lose the element, and Link must start over. After Twinrova is stunned, she may be attacked with the [[Master Sword]].}} | ||
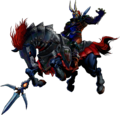
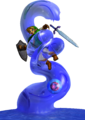
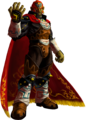
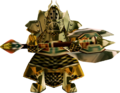
{{CD|file=Ganondorf-Ocarina.png|link=Ganon|caption=Ganondorf|desc=Full Title: '''Great King of Evil: Ganondorf'''. Ganondorf is the ninth boss, encountered at the very top of [[Ganon's Castle]]. Ganondorf will attack using the same tennis style attack as [[Phantom Ganon]], with additional attacks thrown in. Along with the electrical ball tennis attack is the collective energy ball, where he will charge a large energy ball above his head, releasing many out all at once (either shoot him with Light Arrows when he starts the attack, or deflect it with a spin attack). He will also thrust his fist against the ground, causing a wave of energy. This usually occurs when Link jumps underneath him. To defeat Ganondorf, knock back the energy ball attacks with the Sword, [[Megaton Hammer]], or a [[Bottle]] until they hit Ganondorf. He will shroud himself, coated in electrical energy. Shoot him with the [[Light Arrow]]s in order to bring him down, then strike him with the sword.}} | {{CD|file=Ganondorf-Ocarina.png|link=Ganon|caption=Ganondorf|desc=Full Title: '''Great King of Evil: Ganondorf'''. Ganondorf is the ninth boss, encountered at the very top of [[Ganon's Castle]]. Ganondorf will attack using the same tennis style attack as [[Phantom Ganon (Ocarina of Time)|Phantom Ganon]], with additional attacks thrown in. Along with the electrical ball tennis attack is the collective energy ball, where he will charge a large energy ball above his head, releasing many out all at once (either shoot him with Light Arrows when he starts the attack, or deflect it with a spin attack). He will also thrust his fist against the ground, causing a wave of energy. This usually occurs when Link jumps underneath him. To defeat Ganondorf, knock back the energy ball attacks with the Sword, [[Megaton Hammer]], or a [[Bottle]] until they hit Ganondorf. He will shroud himself, coated in electrical energy. Shoot him with the [[Light Arrow]]s in order to bring him down, then strike him with the sword.}} | ||
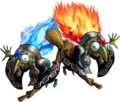
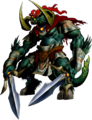
{{CD|file=Ganon-Ocarina.png|link=Ganon|caption=Ganon|desc=Ganon is the tenth and final Boss in ''Ocarina of Time''. Ganon attacks with his two giant swords, and there are varying methods in defeating Ganon. One of which is to fire Light Arrows at his head, momentarily stunning him. Another is to rapidly hit him with the Longshot while circling around him. One last way is to roll between his legs. Once behind him, Link must hit his tail with either the Megaton Hammer, the [[Biggoron's Sword]], or Light Arrows. About halfway through the battle, Ganon will fall, and get hit with a beam of light, caused by [[Zelda|Princess Zelda]]. The ring of fire will dissipate, and Link can recover the Master Sword. Once he returns to battle, Ganon will rise, and the fire will return. Link can resume fighting him in the same way, and can continue without using the Master Sword, but in order to completely defeat Ganon, he must have the Master Sword in his hands, and it must be used to deliver the final blow.}} | {{CD|file=Ganon-Ocarina.png|link=Ganon|caption=Ganon|desc=Ganon is the tenth and final Boss in ''Ocarina of Time''. Ganon attacks with his two giant swords, and there are varying methods in defeating Ganon. One of which is to fire Light Arrows at his head, momentarily stunning him. Another is to rapidly hit him with the Longshot while circling around him. One last way is to roll between his legs. Once behind him, Link must hit his tail with either the Megaton Hammer, the [[Biggoron's Sword]], or Light Arrows. About halfway through the battle, Ganon will fall, and get hit with a beam of light, caused by [[Zelda|Princess Zelda]]. The ring of fire will dissipate, and Link can recover the Master Sword. Once he returns to battle, Ganon will rise, and the fire will return. Link can resume fighting him in the same way, and can continue without using the Master Sword, but in order to completely defeat Ganon, he must have the Master Sword in his hands, and it must be used to deliver the final blow.}} | ||
{{CD/End|}} | {{CD/End|}} | ||