- Chapter 1 – Deepwood Shrine
- Chapter 2 – Cave of Flames
- Chapter 3 – Fortress of Winds
- Chapter 4 – Temple of Droplets
- Chapter 5 – Palace of Winds
- Chapter 6 – Dark Hyrule Castle
1.1 Picori Festival
Once Link has awoken, walk down the steps and head east a room to meet up with Princess Zelda. After some small talk with the Master Smith, Link will be given the Smith’s Sword. He is asked to deliver it to the minister at Hyrule Castle. After Zelda leaves the house, open up the treasure chest to get your first 20 rupees. Walk to the left a screen and exit the house.

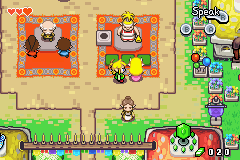
Once you are outside speak with Zelda and follow her northward to Hyrule Town. Continue following Zelda throughout the festival in town, speaking to her as she moves about. Eventually the character shaking a bell will announce a winner and it is Princess Zelda! After being presented with three options, Zelda will choose the shield. She will then give Link the Small Shield!
After gaining control of Link once again, head northward and exit Hyrule Town. Continue following Zelda northward into North Hyrule Field and you’ll run into an enemy Business Scrub that will spit nuts out at Zelda. Use your shield to deflect the nut back at the business scrub to defeat it. Continue heading northward and cross the drawbridge to enter the Hyrule Castle Garden.


Walk northward to the entrance of Hyrule Castle and Minister Potho will accept the Smith’s Sword that you were asked to deliver to the Castle. This will trigger a cut-scene where the Picori Blade is awarded to Vaati, the champion of the competition. Vaati will break the Picori Blade, open the treasure chest allowing the evil monsters to escape, and will then turn Princess Zelda to stone.
1.2 Minish Woods
After the cut-scene with Vaati, you will next appear inside of the Castle. Jump from the bed and head left a screen to meet up with Master Smith and the King. The King will send Link out on a mission to the Forest to meet up with the Picori. Link will be given the Broken Picori Blade and the Smith’s Sword. The Smith’s Sword is Link’s first weapon and it can be used to fight off evil monsters. Link’s next destination is at the Deepwood Shrine within the forest. After getting the Map of Hyrule, exit the Castle by walking down three screens. Exit the Hyrule Castle Garden to the south.


You will encounter some enemy Octoroks and Crows in North Hyrule Field. Both of these enemies can be defeated with a single sword slash. You can meet up with Carpenters if you try walking back to Hyrule Town. It appears Vaati’s attack has caused the route to Hyrule Town to crumble and the carpenters are trying to fix it up. You can walk around North Hyrule Field, slashing up bushes if you’d like to collect some rupees or if you need any recovery hearts. Afterwards, walk to the southeast part of this area, cut down the small trees, and head east to reach Lon Lon Ranch.
You will encounter some enemy Acro-Bandits here. These creatures will come up from underground and stack up on top of each other. Just slash away at the tower of enemies and then defeat them one by one. Afterwards walk southward to enter the Eastern Hills. Continue southward and then cross the bridge to the east to enter the Minish Woods.
You can see a piece of heart just to the north, but we aren’t able to reach it just yet. Walk to the right and defeat a number of octoroks in this region. Cross the bridge on the right and head down to encounter some enemy chuchu. Green ChuChu are fairly harmless and can be defeated with two simple sword slashes.


Follow the pathway downward and then to the left, defeating some chuchu along the way. After exploring this area, you’ll hear a cry for help back at an earlier part of the Minish Woods. Once you regain control of Link, walk to the left a collect Piece of Heart #1. You need to collect four of these heart pieces to get a full heart container.

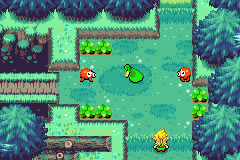
Backtrack to the area of the Minish Woods near the bridge and you’ll see the character here being attacked by two octoroks. Defeat the two octoroks to save the duck like creature. His name is Ezlo and he will be your companion for the rest of the game, giving you some advice from time to time. Once you try to walk away, Ezlo will complain that you walk too quickly and Ezlo will eventually just jump on top of your head.
With Ezlo on your head, walk back southward once again, and he’ll pop up once you reach a tree stump. Ezlo mentions that what humans refer to as the Picori, actually refer to themselves as a Minish. However, they are too small to meet in your current form. Using the tree stump here, Link can shrink down in size to Minish size. Jump on the stump and press R to shrink down to Minish size.


As a Minish there are a lot of smaller places that we can reach as well as various puzzles we can solve. Walk to the left and you’ll now be able to travel through the small tree stump found over here. There is a small pond here, but because we are Minish size, we cannot walk across it. Instead, wait for one of the lilypads to come nearby and then walk on top of it. Walk upwards and the view will become much more zoomed in. Just walk northward to enter the Minish Village.


1.3 Minish Village
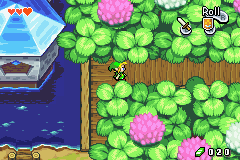
Walk northward and Ezlo will talk briefly about the Minish Village. Some Minish will come and chat with Link, but we cannot understand what the Minish are saying just yet. You can walk around the village you’d but we want to make our way over to the northeast corner of the village. Just to the right of the water, there is a wooden area that leads through the trees. Walk to the right a screen and pick up Heart Piece #2!

Go back to the Minish Village and enter the building with the blue roof at the northeast corner of the village. Speak to the Minish that is here and you’ll find he speaks the same language as you. His name is Festari and he watches the abbey and shrine to the north. Festari mentions that you will need a Jabber Nut in order to understand the language of the Minish. We can find one in the barrel house just south of here.


Exit the blue building and make your way over to the barrel house at the east end of the village. Go down the ladder to enter the Barrel House. Walk to the top of the room and push the block to the left, allowing you to pass through. Run on over and collect the Jabber Nut. Link will eat it, which now allows him to understand the words of the Minish. Exit the barrel house and you can now run around town, speaking with the Minish.


We want to speak with the Village Elder and he can be found at the northwest part of town inside of the building with a yellow roof. Ezlo will state that we need to reforge the broken Picori Blade and the elder mentions we need four mystic elements. The elder will mark the locations of the four elements on your map, one of which is located just north of where we spoke with Festari.


Exit the building and return to the blue roofed building at the northeast part of the village. Speak with Festari and he’ll move out of the way, allowing you to reach the shrine. Exit the building and then head up through the tunnel. Continue northward and enter the first dungeon of the game, the Deepwood Shrine.
1.4 Deepwood Shrine
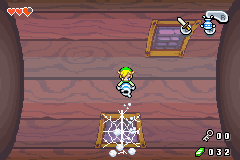
In this first room there are spider webs blocking the two doors on the sides so there is only one way to go at this point. Push the middle statue to the left and head up a screen. There are several enemy Sluggula in this room and they each can be defeated with two simple sword slashes. Step on the four switches in this room to light up the torches, causing a treasure chest to appear. Open it up to get a small key and then head up to the next room.


There are two sluggula creatures that will fall from the ceiling. Defeat them and then pull the lever at the top-right portion of the room. This will cause a bridge to extend over the water. Cross it and grab the mushroom. Hold right while grabbing the mushroom to pull it back and then stop holding right, causing Link to fling over the water to the left side of the room. Defeat the sluggula that falls and then head up to the next room.


This room has a Puffstool enemy wandering around. This creature will move about the room, occasionally jump in the air and landing on the floor, creating a pile of dust. We do not have the necessary item to defeat a Puffstool for now. Climb the ladder on the right side of the room and step on the switch, causing flames to burn the vines connecting to the large barrel. Climb down and enter the larger barrel. Walk over to the other door and head through.


Make your way to the bottom-left portion of the room and climb the steps. Push the statue to the left so it sits on the switch and then step on the other switch, causing the vines to burn once again. Jump back down and enter the barrel. You can now rotate the barrel by walking up the ramp. Roll the barrel until you can head through the door at the bottom-left part of the screen. Exit the barrel and head left a screen.


You will encounter a Red Mulldozer in this room. These creatures will dash towards Link whenever they spot him. They take three sword slashes to defeat. Walk to the left side of the room and pull back on the mushroom. You want to pull as far back as you can and then launch yourself to the top part of the screen. Climb the steps and open the large treasure chest to get the Dungeon Map. Jump off the ledge and use the mushroom again. This time only pull back a little bit, so that when you land, it is between the two bodies of water. Walk through the door and head left a screen.
Defeat the two sluggula that fall from the ceiling and you’ll also encounter an enemy Pesto. This flying creature can be defeated with two sword slashes. Afterwards push the pot from the top-left part of the room onto the switch at the top-right of the room, causing a bridge to extend across the water. Cross the bridge and head down a screen.


There are two statues here and two switches. Once both of the statues are on the switches, a treasure chest will appear in the middle of the room. Push the statue on the left onto the switch. On the right side, pull the statue out one square and then walk around the statue. Pull it in and onto the switch so that you are on the inside of the blocks. Open the treasure chest to get a small key! With the key in hand, backtrack up a screen and right two screens to get back to the barrel room.
Once you are back in the barrel room, go ahead and enter the barrel once again. This time around we want to rotate the barrel until we can exit the door at the top-right portion of the barrel. Use the small key on the locked door and head right a screen.
Use the mushroom on the right side of the room to fling yourself over the water. However, you need to land on the platform in the middle of the water area, so you’ll have to judge how far you need to pull back on the mushroom. Step on the switch at the left side of the room to extend the bridge. From here, grab onto the second mushroom in the room and use it to reach the south end of the room. Lift the pots for some goodies and then head right a screen.


Walk around the room and defeat the several sluggula that are found here. Walk to the top-right part of the room and pull the closest statue at least three squares so that is moves passed the floor switch. Now run around to the top-left part of the screen and push the second statue onto the floor switch. Go up through the door that opens up.


There are three mulldozers in this room, so defeat them and then grab the small key that drops from the ceiling. Walk left a screen, climb the stairs, and then head up a screen. Jump off the ledge to the right and defeat the two mulldozers here. Continue on and head left a screen.
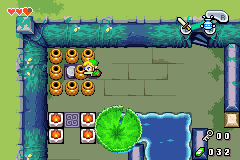
There are several puffstools found in this room, so try to avoid them. You can step on the floor switch found here to open the door at the south end of the room, allowing for quicker access to earlier parts of the dungeon. Afterwards use the small key on the locked door and then head on through to take on the dungeon miniboss, Madderpillar.


Madderpillar will slowly crawl around the room trying to make contact with Link. Just hit the nose of Madderpillar with a sword slash and he will freeze up momentarily, revealing a heart at its backside. Run around and slash at the heart with your sword. After a few moments, Madderpillar will turn red and more aggressively run around the room. The battle continues with this same pattern and it will take 16 sword slashes to its heart to defeat it. Afterwards a large treasure chest will appear so open it up to get the dungeon item, the Gust Jar. Use your newly acquired gust jar to suck up the spider webs along the walls and head down a screen.


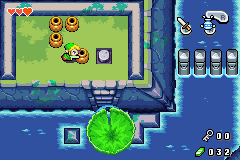
Once you head down a screen you’ll be able to collect Piece of Heart #3! Afterwards head back up a screen and right a screen. You can now use the gust jar on the puffstools to suck in their mushroom, turning them gray, and making them vulnerable to your sword. Defeat all of the puffstools in this room and then use the gust jar to suck up all the dust found within this room. Doing so reveals several floor switches, so step on them to find two hidden treasure chests. Each of them contains 10 Mysterious Shells, which we will be using later on in our quest. The other hidden floor switch creates a blue portal in the room and we will be using that a bit later as well. Afterwards, walk through to the room at the right.

Use the gust jar to clear up the dust here as well and you’ll reveal a floor switch. Step on it and open the treasure chest to get 20 mysterious shells! Afterwards walk back to the previous room. Step on fourth switch if you haven’t already and then head down to get back to the barrel room.

Back inside the barrel room, push the block to the left and use the gust jar to cleanup the dust. Step on the floor switch that is found here and then open the treasure chest to get 10 more mysterious shells. Climb down the stairs and enter the barrel. Rotate the barrel until the spider web in the middle of the floor is in the middle of the screen. Use the gust jar to pull off the spider web and then fall down to the floor below.
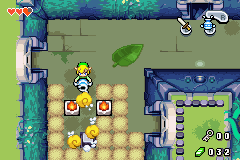
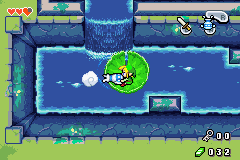
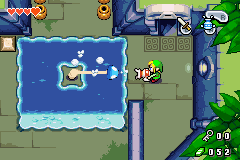
Use the gust jar to pull over the lilypad towards you. Step on the lilypad and you can now use the gust jar to push yourself across the water. Use the gust jar and drop down the waterfall below. Continue traveling on the lilypad and head right a screen. Make your way over to the staircase and climb up. What you need to do here is lift up the pots along the wall and then push one of the center pots onto the floor switch, causing the gate to remain down. Jump back on the lilypad and head up a screen.
At the top-right portion of this screen you can push the blocks out of the way and open the large treasure chest to get the Compass. At the top-left portion of the room, push one of the blocks onto the switch, causing a treasure chest to appear. Use the lilypad to reach the treasure chest and open it to get a small key.

Now that you have the small key, jump back on the lilypad and use it to go down a screen, left a screen, and then the top-left portion of this room. Use the small key on the locked door and head up a screen. Use the mushroom here to reach the top-left portion of the room. From here use the gust jar to grab the mushroom to the right and fling yourself over the water. Do the same on a series of mushrooms to reach the large treasure chest. Open it up to get the Big Key! Now step on the floor switch here and go through the red portal to get back to the entrance of the dungeon.
Back at the dungeon entrance you should have activated the blue warp portal as well, so step into it to reach a previous room. Pick up Heart Piece #4, which will give you a full heart container! Afterwards go back through the blue portal to get back to the dungeon entrance.


Use the gust jar to clear the webs found within this room and then head down the stairs along the left side. Push the block out of the way and then open the treasure chest to get 20 rupees! Go back to the previous floor and then head down the staircase on the right. Use the gust jar to grab onto the mushroom and fling yourself over to the left side of the room. Now walk to the bottom of the room and use the mushroom once to reach the locked door. Lift up the pots here to get some recovery hearts and then use the big key to open the door. Once you are ready, go in to the next room to take on the dungeon boss.

A short clip will show a Green ChuChu jumping into the Deepwood Shrine. While this is regular sized green chuchu as a human, it appears as a gigantic giant creature when you are a Minish. This begins the boss battle with the Big Green Chuchu.


The battle begins with the chuchu slowly moving toward you while occasionally jumping into the air and trying to land on top of you. Avoid the chuchu and use your gust jar to suck up its foot. The base of the chuchu will shrink and the chuchu will lose its balance. After swaying back and forth it will fall over. Once it is on the ground, slash away at its head. After a few moments the chuchu will get back on his feet.


You will need to repeat this same process a couple of times to defeat the chuchu. After enough damage has been done, the chuchu will begin jumping more frequently around the room. This will not, however, affect the battle process. Just keep using the gust jar to suck up its base and slash at its head until the big green chuchu has been defeated.


After defeating the big green chuchu, the Earth Element will float down from the ceiling. Grab the full Heart Container that is left for you and then step into the green portal to warp out of the Deepwood Shrine.


