The Legend of Zelda Door Repairs: Difference between revisions
No edit summary |
mNo edit summary |
||
| (4 intermediate revisions by 3 users not shown) | |||
| Line 1: | Line 1: | ||
<onlyinclude><section begin=0 />''[[The Legend of Zelda]]'' features many secret caves scattered across [[Hyrule]]. Upon opening the entrance to some of these caves moblins will take money for 'Door Repairs', hence the name. This page shows the Door Repair Locations, which are the same in both First Quest and Second Quest.<section end=0 /> | <onlyinclude><section begin=0 />''[[The Legend of Zelda]]'' features many secret caves scattered across [[Hyrule]]. Upon opening the entrance to some of these caves moblins will take money for 'Door Repairs', hence the name. This page shows the Door Repair Locations, which are the same in both First Quest and [[Second Quest]].<section end=0 /> | ||
[[File:DR_Map.gif|center]] | [[File:DR_Map.gif|center]] | ||
| Line 8: | Line 8: | ||
'''Location''': One screen northeast of the start screen. | '''Location''': One screen northeast of the start screen. | ||
'''Conditions''': After obtaining the [[Candle# | '''Conditions''': After obtaining the [[Candle#The Legend of Zelda|Blue Candle]] or the [[Candle#The Legend of Zelda|Red Candle]]. | ||
- From the start screen head up a screen and right a screen. | - From the start screen head up a screen and right a screen. | ||
| Line 17: | Line 17: | ||
'''Location''': South Central Forest. | '''Location''': South Central Forest. | ||
'''Conditions''': After obtaining the [[Candle# | '''Conditions''': After obtaining the [[Candle#The Legend of Zelda|Blue Candle]] or the [[Candle#The Legend of Zelda|Red Candle]]. | ||
- From the start screen head up a screen and right 3 screens. | - From the start screen head up a screen and right 3 screens. | ||
| Line 26: | Line 26: | ||
'''Location''': Southeast corner. | '''Location''': Southeast corner. | ||
'''Conditions''': After obtaining the [[Bomb | '''Conditions''': After obtaining the [[Bomb]]s. | ||
- From the start screen head right six screens. | - From the start screen head right six screens. | ||
| Line 33: | Line 33: | ||
<section begin=4 />{{Gallery/Box|file=LoZ_DR_004.png|caption='''Amount''': -20 rupees. | <section begin=4 />{{Gallery/Box|file=LoZ_DR_004.png|caption='''Amount''': -20 rupees. | ||
'''Location''': Two screens east of the [[ | '''Location''': Two screens east of the [[Lost Woods#The Legend of Zelda|Lost Woods]]. | ||
'''Conditions''': After obtaining the [[Bomb | '''Conditions''': After obtaining the [[Bomb]]s. | ||
- From the start screen head up a screen and left four screens. | - From the start screen head up a screen and left four screens. | ||
| Line 44: | Line 44: | ||
'''Location''': Northeastern corner. | '''Location''': Northeastern corner. | ||
'''Conditions''': After obtaining the [[Bomb | '''Conditions''': After obtaining the [[Bomb]]s. | ||
- From the start screen head right one screen, up five, right five, up one, and right one. | - From the start screen head right one screen, up five, right five, up one, and right one. | ||
| Line 51: | Line 51: | ||
<section begin=6 />{{Gallery/Box|file=LoZ_DR_006.png|caption='''Amount''': -20 rupees. | <section begin=6 />{{Gallery/Box|file=LoZ_DR_006.png|caption='''Amount''': -20 rupees. | ||
'''Location''': North Central [[ | '''Location''': North Central [[Death Mountain#The Legend of Zelda|Death Mountain]]. | ||
'''Conditions''': After obtaining the [[Bomb | '''Conditions''': After obtaining the [[Bomb]]s. | ||
- Exit the graveyard to the right and continue right another screen. Head up along the right side, right a screen, and up a screen. | - Exit the graveyard to the right and continue right another screen. Head up along the right side, right a screen, and up a screen. | ||
- Place a bomb against the rocks just above the top-right [[Armos# | - Place a bomb against the rocks just above the top-right [[Armos#The Legend of Zelda|Armos]].}}<section end=6 /> | ||
<section begin=7 />{{Gallery/Box|file=LoZ_DR_007.png|caption='''Amount''': -20 rupees. | <section begin=7 />{{Gallery/Box|file=LoZ_DR_007.png|caption='''Amount''': -20 rupees. | ||
'''Location''': North Central [[ | '''Location''': North Central [[Death Mountain#The Legend of Zelda|Death Mountain]]. | ||
'''Conditions''': After obtaining the [[Bomb | '''Conditions''': After obtaining the [[Bomb]]s. | ||
- Exit the graveyard to the right and continue right another screen. Head up along the right side, right a screen, up one, right three, and up a screen. | - Exit the graveyard to the right and continue right another screen. Head up along the right side, right a screen, up one, right three, and up a screen. | ||
| Line 69: | Line 69: | ||
<section begin=8 />{{Gallery/Box|file=LoZ_DR_008.png|caption='''Amount''': -20 rupees. | <section begin=8 />{{Gallery/Box|file=LoZ_DR_008.png|caption='''Amount''': -20 rupees. | ||
'''Location''': Northwest [[ | '''Location''': Northwest [[Death Mountain#The Legend of Zelda|Death Mountain]]. | ||
'''Conditions''': After obtaining the [[Bomb | '''Conditions''': After obtaining the [[Bomb]]s. | ||
- Exit the graveyard to the right and continue right another screen. Head up along the right side, right a screen, up one, left one, and up a screen. | - Exit the graveyard to the right and continue right another screen. Head up along the right side, right a screen, up one, left one, and up a screen. | ||
| Line 78: | Line 78: | ||
<section begin=9 />{{Gallery/Box|file=LoZ_DR_009.png|caption='''Amount''': -20 rupees. | <section begin=9 />{{Gallery/Box|file=LoZ_DR_009.png|caption='''Amount''': -20 rupees. | ||
'''Location''': Northwest [[ | '''Location''': Northwest [[Death Mountain#The Legend of Zelda|Death Mountain]]. | ||
'''Conditions''': After obtaining the [[Bomb | '''Conditions''': After obtaining the [[Bomb]]s. | ||
- Exit the graveyard to the right and continue right another screen. Head up along the right side, right a screen, up one, left one, up one, and left two screens. | - Exit the graveyard to the right and continue right another screen. Head up along the right side, right a screen, up one, left one, up one, and left two screens. | ||
| Line 87: | Line 87: | ||
{{Gallery/Bottom}}</onlyinclude> | {{Gallery/Bottom}}</onlyinclude> | ||
<noinclude>{{cat|The Legend of Zelda}} | |||
{{cat|Guides}}</noinclude> | |||
Latest revision as of 12:29, March 13, 2023
The Legend of Zelda features many secret caves scattered across Hyrule. Upon opening the entrance to some of these caves moblins will take money for 'Door Repairs', hence the name. This page shows the Door Repair Locations, which are the same in both First Quest and Second Quest.

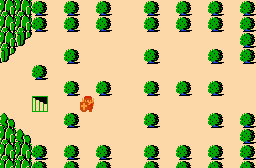
Amount: - 20 rupees.
Location: One screen northeast of the start screen.
Conditions: After obtaining the Blue Candle or the Red Candle.
- From the start screen head up a screen and right a screen.
- Use the candle to burn down the tree that is on the bottom of the two at the far left.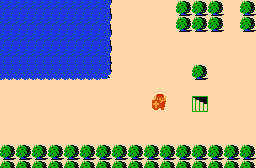
Amount: -20 rupees.
Location: South Central Forest.
Conditions: After obtaining the Blue Candle or the Red Candle.
- From the start screen head up a screen and right 3 screens.
- Use the candle to burn the bottom of the two center trees.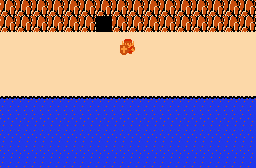
Amount: -20 rupees.
Location: Southeast corner.
Conditions: After obtaining the Bombs.
- From the start screen head right six screens.
- Place a bomb against the rocks slightly to the left of the center.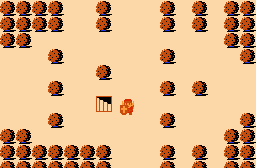
Amount: -20 rupees.
Location: Two screens east of the Lost Woods.
Conditions: After obtaining the Bombs.
- From the start screen head up a screen and left four screens.
- Use the candle to burn down the bottom of the two central trees.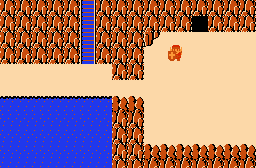
Amount: -20 rupees.
Location: Northeastern corner.
Conditions: After obtaining the Bombs.
- From the start screen head right one screen, up five, right five, up one, and right one.
- On the right side of the screen place a bomb against the rocks.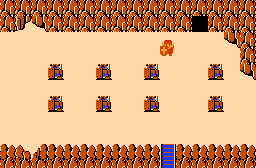
Amount: -20 rupees.
Location: North Central Death Mountain.
Conditions: After obtaining the Bombs.
- Exit the graveyard to the right and continue right another screen. Head up along the right side, right a screen, and up a screen.
- Place a bomb against the rocks just above the top-right Armos.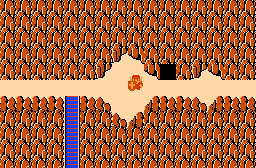
Amount: -20 rupees.
Location: North Central Death Mountain.
Conditions: After obtaining the Bombs.
- Exit the graveyard to the right and continue right another screen. Head up along the right side, right a screen, up one, right three, and up a screen.
- Place a Bomb against the rocks between the two rigid areas.
Amount: -20 rupees.
Location: Northwest Death Mountain.
Conditions: After obtaining the Bombs.
- Exit the graveyard to the right and continue right another screen. Head up along the right side, right a screen, up one, left one, and up a screen.
- Place a Bomb against the rocks on the left part of the narrow area.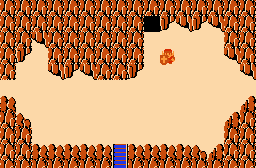
Amount: -20 rupees.
Location: Northwest Death Mountain.
Conditions: After obtaining the Bombs.
- Exit the graveyard to the right and continue right another screen. Head up along the right side, right a screen, up one, left one, up one, and left two screens.
- On the right side of this screen, place a bomb against the rocks at the top-left corner.


