Skeldritch: Difference between revisions
m (Text replace - "{{Boss" to "{{Infobox|boss") |
mNo edit summary |
||
| (11 intermediate revisions by 7 users not shown) | |||
| Line 1: | Line 1: | ||
{{Infobox|boss | {{Infobox|boss | ||
| | | name2 = Capbone | ||
|image | | image = [[File:Skeldritch.jpg|300px]] | ||
| | | title = Ancient Demon | ||
|game | | threat = 7 | ||
|dungeon = [[Sand Temple | | attack = {{H|0.5}} Boulder<br/>{{H|0.5}} Falling off Platform<br/>{{H|0.75}} Jaw | ||
| weapon = [[Sand Wand]]<br/>[[Sword]] | |||
|reward | | game = ''[[The Legend of Zelda: Spirit Tracks|Spirit Tracks]]'' | ||
| dungeon = [[Sand Temple]] | |||
| reward = [[Heart Container]]<br/>[[Bow of Light]] | |||
}} | }} | ||
'''Skeldritch''', Ancient Demon ("'''Capbone''', Ancient Demon" in the European version) is the boss of the [[Sand Temple]] in ''[[The Legend of Zelda: Spirit Tracks|Spirit Tracks]]''. Skeldritch is an extremely large skeletal demon | |||
'''Skeldritch''', Ancient Demon ("'''Capbone''', Ancient Demon" in the European version) is the [[boss]] of the [[Sand Temple]] in ''[[The Legend of Zelda: Spirit Tracks|Spirit Tracks]]''. Skeldritch is an extremely large skeletal demon whose attire consists of several pieces of armor. If [[Link (Spirit Tracks)|Link]] wishes to defeat it, he must use his [[Sand Wand]] and [[Sword]]. If Link is successful in vanquishing this demon, he will be rewarded with a [[Heart Container]] and the [[Bow of Light]]. | |||
==Strategy== | ==Strategy== | ||
Upon entering the battle area, a short cutscene will play wherein Skeldritch's skull is visible on the sand. | Upon entering the battle area, a short cutscene will play wherein Skeldritch's skull is visible on the sand. After a moment, its eyes light up and its long body lashes out of the sand. | ||
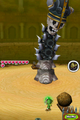
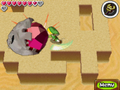
[[File:Skeldritch_1.png|200px|thumb|left|The bottom metallic portion is its weak spot.]] The battle begins with Skeldritch shooting boulders out the bottom of its body. Link must use the sand wand to block these boulders and keep them in the arena. After that, he can maneuver them so they are on top of a nearby catapult. Upon hitting the switch next to it, the boulder will spring forward and hit Skeldritch, causing it to lose a part of its body. | |||
The | |||
Skeldritch's | After losing a body part, Skeldritch will start sending three boulders out in a row. The boss will also shoot out a laser at Link that he will have to dodge. The last three parts of Skledritch's body are protected on certain sides. The next one is only vulnerable from the right side. Link can load up another boulder on one of the catapults and then run to the left. Skeldritch will always face Link; so when Link is at the left, pull out the Bow and shoot the crystal switch to the right. This will make the boulder hit Skeldritch on its right side, removing another part of its body. | ||
During the next phase, Skeldritch will shoot out red boulders which will travel through more sand barriers and come out much faster. The next body part of Skeldritch is only vulnerable at its back. Link will need to load up a boulder onto a catapult and then run all the way to the other side of the room. Upon shooting the crystal switch with an arrow, the boulder will fly into Skeldritch's back. | |||
The | |||
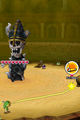
[[File:Skeldritch_6.png|200px|thumb|left|Using the Sand Wand to stop Skeldritch]] The last weak spot is a bit tricky. It is a small spot that is not quite on its left and not quite behind him, but right in the middle. It's quite difficult to reach this area with a bow and arrow, so there are three choices. One is to drop a bomb right next to the switch and then make a run to the right side. Run past the catapult here and stand in between catapults so that Skeldritch's weak spot is facing the boulder. Once the bomb explodes, the boulder will hit its weak spot. Skeldritch will now shoot four consecutive boulders out at Link. Alternatively, instead of using the bombs, you can trace a long path with the boomerang, but that leaves Link vulnerable for quite awhile. The [[Bow]] can also be used, but the shot is rather difficult. Eventually, Link will hit Skeldritch and its skull will drop to the ground. | |||
The final phase of the battle can be quite hectic. Link will need to use the sand wand and create a massive wall of sand surrounding Skeldritch. Skeldritch will begin eating away at the sand. While on top of the sand, Link must very quickly run to the backside of Skeldritch and slash away at purple spot at the back of its head. Make sure Skeldritch is completely surrounded; if it has any room to move, it will turn around. Repeat this process until Skeldritch has been defeated. | |||
==Trivia== | |||
*In the final battle phase where [[Skeldritch]]'s head is moving around the boss room is very similar to the last phase with [[Eox]] in ''[[The Legend of Zelda: Phantom Hourglass|Phantom Hourglass]]''. Eox's head also moves around the boss room and they both feature a vulnerable gem-like object on top of their heads. | |||
==Gallery== | ==Gallery== | ||
<gallery> | <gallery> | ||
File:Skeldritch. | File:Skeldritch_2.png|Once you have the boulder secured, launch the catapult. | ||
File:Skeldritch_3.png|Dodge those lasers! | |||
File:Skeldritch_4.png|Position Link to the right. | |||
File:Skeldritch_5.png|The anger and frustration are building. | |||
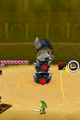
File:Skeldritch_7.png|Hit Skeldritch's exposed purple cranium and finish the fight. | |||
</gallery> | </gallery> | ||
{{Listbox|Spirit Tracks Bosses}} | |||
{{Cat|Spirit Tracks Bosses}} | {{Cat|Spirit Tracks Bosses}} | ||
Latest revision as of 16:11, April 13, 2024
Capbone

Title | Ancient Demon | |
Games | ||
Dungeons | ||
Rewards | ||
Threat | ||
Attacks |
| |
Effective | ||
Skeldritch, Ancient Demon ("Capbone, Ancient Demon" in the European version) is the boss of the Sand Temple in Spirit Tracks. Skeldritch is an extremely large skeletal demon whose attire consists of several pieces of armor. If Link wishes to defeat it, he must use his Sand Wand and Sword. If Link is successful in vanquishing this demon, he will be rewarded with a Heart Container and the Bow of Light.
Strategy
Upon entering the battle area, a short cutscene will play wherein Skeldritch's skull is visible on the sand. After a moment, its eyes light up and its long body lashes out of the sand.

The battle begins with Skeldritch shooting boulders out the bottom of its body. Link must use the sand wand to block these boulders and keep them in the arena. After that, he can maneuver them so they are on top of a nearby catapult. Upon hitting the switch next to it, the boulder will spring forward and hit Skeldritch, causing it to lose a part of its body.
After losing a body part, Skeldritch will start sending three boulders out in a row. The boss will also shoot out a laser at Link that he will have to dodge. The last three parts of Skledritch's body are protected on certain sides. The next one is only vulnerable from the right side. Link can load up another boulder on one of the catapults and then run to the left. Skeldritch will always face Link; so when Link is at the left, pull out the Bow and shoot the crystal switch to the right. This will make the boulder hit Skeldritch on its right side, removing another part of its body.
During the next phase, Skeldritch will shoot out red boulders which will travel through more sand barriers and come out much faster. The next body part of Skeldritch is only vulnerable at its back. Link will need to load up a boulder onto a catapult and then run all the way to the other side of the room. Upon shooting the crystal switch with an arrow, the boulder will fly into Skeldritch's back.

The last weak spot is a bit tricky. It is a small spot that is not quite on its left and not quite behind him, but right in the middle. It's quite difficult to reach this area with a bow and arrow, so there are three choices. One is to drop a bomb right next to the switch and then make a run to the right side. Run past the catapult here and stand in between catapults so that Skeldritch's weak spot is facing the boulder. Once the bomb explodes, the boulder will hit its weak spot. Skeldritch will now shoot four consecutive boulders out at Link. Alternatively, instead of using the bombs, you can trace a long path with the boomerang, but that leaves Link vulnerable for quite awhile. The Bow can also be used, but the shot is rather difficult. Eventually, Link will hit Skeldritch and its skull will drop to the ground.
The final phase of the battle can be quite hectic. Link will need to use the sand wand and create a massive wall of sand surrounding Skeldritch. Skeldritch will begin eating away at the sand. While on top of the sand, Link must very quickly run to the backside of Skeldritch and slash away at purple spot at the back of its head. Make sure Skeldritch is completely surrounded; if it has any room to move, it will turn around. Repeat this process until Skeldritch has been defeated.
Trivia
- In the final battle phase where Skeldritch's head is moving around the boss room is very similar to the last phase with Eox in Phantom Hourglass. Eox's head also moves around the boss room and they both feature a vulnerable gem-like object on top of their heads.
Gallery
Once you have the boulder secured, launch the catapult.
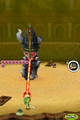
Dodge those lasers!
Position Link to the right.
The anger and frustration are building.
Hit Skeldritch's exposed purple cranium and finish the fight.


