Gooma: Difference between revisions
(Created page with "{{Stub}} {{Boss |name = Gooma |image = |threat = 7 |attack = |game = ''The Adventure of Link'' |dungeon = Ocean Palace |weapon = |r...") |
m (Linking Experience Point) |
||
| (17 intermediate revisions by 11 users not shown) | |||
| Line 1: | Line 1: | ||
{{ | {{Infobox|boss | ||
| image = [[File:Artwork-gooma.png]] | |||
| caption = | |||
| threat = 7 | |||
| attack = Contact<br/>Ball and Chain | |||
| weapon = [[Sword]] | |||
| game = ''[[Zelda II: The Adventure of Link|The Adventure of Link]]'' | |||
| dungeon = [[Palace on the Sea]] | |||
| reward = 500 Experience Points | |||
}} | |||
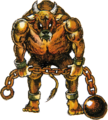
'''Gooma''' is the fifth [[Boss]] in ''[[Zelda II: The Adventure of Link|The Adventure of Link]]''. It is found at the end of the very long [[Palace on the Sea]]. It only appears in the North American version of the game; in all other versions of ''The Adventure of Link'', this boss fight is a re-match against [[Jermafenser]], the boss of the [[Midoro Palace]]. | |||
[[File:Gooma 2.gif|left]] | |||
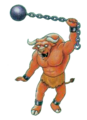
Gooma's primary attack is to use a large spiked ball, which it throws at Link. This attack causes some major damage, so Link should avoid it if he wishes to survive the fight. The best strategy to use while fighting this boss is to have the [[Jump Spell]] equipped, and optionally the [[Shield Spell]] if Link has low health. If Link approaches Gooma, it instantly tries to hit Link with the spiked ball. Thus, Link should lure Gooma into attacking, jump over the spiked ball, and then once Link lands, hit Gooma with the [[Sword]]. Gooma takes a few hits to defeat, so patience is key for this fight. Keep repeating the process and soon enough Gooma will be defeated. | |||
Once Gooma has been defeated, Link is rewarded with 500 Experience Points, and Link is given the key that opens the next room. Here, Link can place the fifth [[Crystal]] into its place. | |||
{{clear|left}} | |||
{ | ==Enemy Data== | ||
| | {| class="wikitable" style="float:left; text-align:center; width:480px;" | ||
| | |+ style="text-align:left;" | <big>Gooma</big> | ||
| | | rowspan="3" width="25%" |[[File:Gooma-AoL-Sprite.png|75px]] | ||
| | | width="25%" | [[Experience Point]]s || width="50%" | 500 | ||
| | |- | ||
| | | Item Drop || None | ||
| | |- | ||
| | | Enemy Habitat || height="90px" | [[Palace on the Sea]] | ||
}} | |- | ||
{{#vardefine:CommentBoxID|{{#if:{{#varexists:CommentBoxID}}|{{#expr:{{#var:CommentBoxID}}+1}}|1}}}} | |||
| class="{{#var:CommentBoxID}}Column0 _toggler-{{#var:CommentBoxID}}Column0 _toggler-{{#var:CommentBoxID}}Column1 _toggler-{{#var:CommentBoxID}}row" align="left" style="{{round|10}}; background:{{{buttonbackground|#F2F2F2}}}; text-align:center;"| {{{button1|Combat Data}}} | |||
| class="{{#var:CommentBoxID}}Column1 _toggler-{{#var:CommentBoxID}}Column0 _toggler-{{#var:CommentBoxID}}Column1 _toggler-{{#var:CommentBoxID}}row" align="left" style="{{round|10}}; background:{{{buttonbackground|#F2F2F2}}}; display:none; text-align: center;" | {{{button2|Hide}}} || colspan="5" style="text-align:left;" | | |||
|-class="{{#var:CommentBoxID}}row" style="display:none;" | |||
| colspan="6" | | |||
{| | |||
! colspan="2" | Defensive Stats |||| colspan="3" | Offensive Stats | |||
|- | |||
! Attack Level || Hits to Kill |||| Life Level || Contact Container Damage || Projectile Container Damage | |||
|- | |||
| 1 || 72 |||| 1 || 7 || - | |||
|- | |||
| 2 || 48 |||| 2 || 5 || - | |||
|- | |||
| 3 || 36 |||| 3 || 4 || - | |||
|- | |||
| 4 || 24 |||| 4 || 3.5 || - | |||
|- | |||
| 5 || 18 |||| 5 || 3 || - | |||
|- | |||
| 6 || 12 |||| 6 || 2.5 || - | |||
|- | |||
| 7 || 9 |||| 7 || 2 || - | |||
|- | |||
| 8 || 6 |||| 8 || 1.25 || - | |||
|} | |||
|} | |||
{{Clear|left}} | |||
''' | ==Gallery== | ||
<gallery> | |||
File:Art-and-Artificats-Gooma.png|''The Official Gooma Artwork'' | |||
File:Guma-Art-AOL.png|''Gooma Artwork from the Futabasha Guide'' | |||
File:AoL_futami_gooma.png|''Gooma Artwork from the Futami Guide'' | |||
File:Gooma 2.gif|''Gooma Sprite'' | |||
</gallery> | |||
{{Listbox|The Adventure of Link|Bosses}} | |||
{{Cat|The Adventure of Link Bosses}} | {{Cat|The Adventure of Link Bosses}} | ||
Revision as of 05:30, August 16, 2021

Games | ||
Dungeons | ||
Rewards | 500 Experience Points | |
Threat | ||
Attacks | Contact | |
Effective | ||
Gooma is the fifth Boss in The Adventure of Link. It is found at the end of the very long Palace on the Sea. It only appears in the North American version of the game; in all other versions of The Adventure of Link, this boss fight is a re-match against Jermafenser, the boss of the Midoro Palace.

Gooma's primary attack is to use a large spiked ball, which it throws at Link. This attack causes some major damage, so Link should avoid it if he wishes to survive the fight. The best strategy to use while fighting this boss is to have the Jump Spell equipped, and optionally the Shield Spell if Link has low health. If Link approaches Gooma, it instantly tries to hit Link with the spiked ball. Thus, Link should lure Gooma into attacking, jump over the spiked ball, and then once Link lands, hit Gooma with the Sword. Gooma takes a few hits to defeat, so patience is key for this fight. Keep repeating the process and soon enough Gooma will be defeated.
Once Gooma has been defeated, Link is rewarded with 500 Experience Points, and Link is given the key that opens the next room. Here, Link can place the fifth Crystal into its place.
Enemy Data
| Experience Points | 500 | ||||
| Item Drop | None | ||||
| Enemy Habitat | Palace on the Sea | ||||
| Combat Data | |||||
Gallery
The Official Gooma Artwork
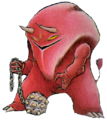
Gooma Artwork from the Futabasha Guide
Gooma Artwork from the Futami Guide
Gooma Sprite


