Cragma: Difference between revisions
m (Text replacement - "<br>" to "<br/>") |
mNo edit summary |
||
| (10 intermediate revisions by 6 users not shown) | |||
| Line 1: | Line 1: | ||
{{Infobox|boss | {{Infobox|boss | ||
| image = [[File:Cragma.png| | | name2 = Vulcano | ||
| image = [[File:Cragma.png|400px]] | |||
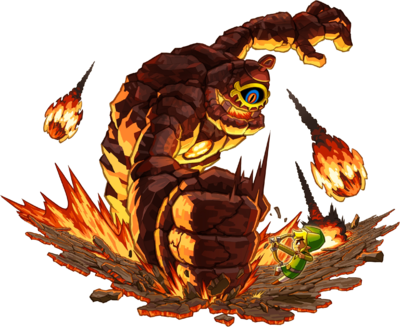
| caption = Artwork of Cragma | | caption = Artwork of Cragma | ||
| title | | title = Lava Lord | ||
| threat | | threat = 7 | ||
| attack | | attack = {{H|0.25}} Lava Boulders<br/>{{H|0.5}} Lava<br/>{{H|0.5}} Grab<br/>{{H|1}} Fist<br/>{{H|1}} Double Fist<br/>{{H|1}} Falling Rocks<br/>{{H|1}} Double Handed Grab | ||
| game | | weapon = [[Bow]]<br/>[[Sword]] | ||
| game = ''[[The Legend of Zelda: Spirit Tracks|Spirit Tracks]]'' | |||
| dungeon = [[Fire Temple (Spirit Tracks)|Fire Temple]] | | dungeon = [[Fire Temple (Spirit Tracks)|Fire Temple]] | ||
| reward = [[Heart Container]]<br/>[[Force Gem]] | |||
| reward | |||
}} | }} | ||
'''Cragma, Lava Lord''' is the boss of the [[Fire Temple (Spirit Tracks)|Fire Temple]] in ''[[The Legend of Zelda: Spirit Tracks|Spirit Tracks]]''. | '''Cragma, Lava Lord''', known as '''Vulcano, Lava Lord''' in the European/Australian version, is the [[boss]] of the [[Fire Temple (Spirit Tracks)|Fire Temple]] in ''[[The Legend of Zelda: Spirit Tracks|Spirit Tracks]]''.{{Ref|''[[The Legend of Zelda: Encyclopedia]]'', pg. 171}} It appears as a large body made up of rocks. | ||
== | ==Strategy== | ||
[[File:Cragma_Phase_1-1.png|150px|thumb|left|Shooting one of Cragma's weak spots]] When the battle begins, Cragma will try to smash Link with his right fist. This will also cause boulders of lava to fall from the ceiling. When Cragma is gearing up to punch Link, he will inadvertently reveal a glowing spot on his stomach area. Link can pull out the bow and arrow and shoot an arrow at this glowing spot. Cragma will when clutch his fists together and try to smash Link with two hands instead of one. Link will need to roll out of the way to avoid this damaging attack. | |||
The massive attack will cause a huge boulder to fall to the ground. If Link stands next to the boulder, Cragma will try to smash Link with his right fist. After Link moves aside to dodge the attack, Cragma will smash the boulder and create a circular platform. Link can pick it up and run over to the right side of the room. There is a small area where Link can toss the platform and then jump onto it. From here, he can jump onto the mine cart nearby. | |||
After | [[File:Cragma_2-3.png|150px|thumb|left|Attacking Cragma's head]] | ||
Ride around on the cart while having the Bow equipped. There are various glowing spots of Cragma's body that will appear within range while riding around the track. The shiny spots are Cragma's weak points, so Link will need to land an arrow on each weak spot. After hitting several weak spots, the cart's path will climb even higher. At this point Link will need to aim an arrow shot into the eye of Cragma, which will causing his massive body to fall to the floor. Once Link reaches the ground, he can run and slash away at Cragma's head until it gets back up. If Link misses Cragma's weak spots while riding on the cart, the boss may grab Link and toss him back to the bottom area of the room. | |||
The next phase is very similar to the first phase, but the only difference is that Cragma doesn't wait as long to smash his arms and lava boulders fall a lot more frequently. An important note is that arrows are left from falling boulders, which Link will need more for the next go around on the cart. Repeat the same process as before: hitting his weak spot, making a boulder appear, causing Cragma to break the boulder, and then lifting up the circular platform and tossing it on the lava to the right. Once on the cart, repeat the same process of hitting its weak spots and eventually hitting its eye. Cragma will come crumbling to the floor once again, at which point Link can finish him off with some sword slashes. | |||
==Reward== | ==Reward== | ||
The reward for | The reward for defeating Cragma is a [[Heart Container]] and a Red [[Force Gem]]. | ||
==Gallery== | ==Gallery== | ||
<gallery> | <gallery> | ||
File: | File:Cragma_Phase_1-2.png | ||
File:Cragma_Phase_1-3.png | |||
File:Cragma_Phase_2-1.png | |||
File:Cragma_Phase_2-2.png | |||
</gallery> | </gallery> | ||
| Line 56: | Line 39: | ||
{{Clear}} | {{Clear}} | ||
{{references}} | |||
{{Listbox|Spirit Tracks Bosses}} | |||
{{Cat|Spirit Tracks Bosses}} | {{Cat|Spirit Tracks Bosses}} | ||
Latest revision as of 16:11, April 13, 2024
Vulcano
Title | Lava Lord | |
Games | ||
Dungeons | ||
Rewards | ||
Threat | ||
Attacks |
| |
Effective | ||
Cragma, Lava Lord, known as Vulcano, Lava Lord in the European/Australian version, is the boss of the Fire Temple in Spirit Tracks.[1] It appears as a large body made up of rocks.
Strategy
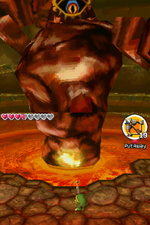
When the battle begins, Cragma will try to smash Link with his right fist. This will also cause boulders of lava to fall from the ceiling. When Cragma is gearing up to punch Link, he will inadvertently reveal a glowing spot on his stomach area. Link can pull out the bow and arrow and shoot an arrow at this glowing spot. Cragma will when clutch his fists together and try to smash Link with two hands instead of one. Link will need to roll out of the way to avoid this damaging attack.
The massive attack will cause a huge boulder to fall to the ground. If Link stands next to the boulder, Cragma will try to smash Link with his right fist. After Link moves aside to dodge the attack, Cragma will smash the boulder and create a circular platform. Link can pick it up and run over to the right side of the room. There is a small area where Link can toss the platform and then jump onto it. From here, he can jump onto the mine cart nearby.
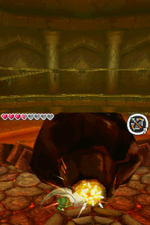
Ride around on the cart while having the Bow equipped. There are various glowing spots of Cragma's body that will appear within range while riding around the track. The shiny spots are Cragma's weak points, so Link will need to land an arrow on each weak spot. After hitting several weak spots, the cart's path will climb even higher. At this point Link will need to aim an arrow shot into the eye of Cragma, which will causing his massive body to fall to the floor. Once Link reaches the ground, he can run and slash away at Cragma's head until it gets back up. If Link misses Cragma's weak spots while riding on the cart, the boss may grab Link and toss him back to the bottom area of the room.
The next phase is very similar to the first phase, but the only difference is that Cragma doesn't wait as long to smash his arms and lava boulders fall a lot more frequently. An important note is that arrows are left from falling boulders, which Link will need more for the next go around on the cart. Repeat the same process as before: hitting his weak spot, making a boulder appear, causing Cragma to break the boulder, and then lifting up the circular platform and tossing it on the lava to the right. Once on the cart, repeat the same process of hitting its weak spots and eventually hitting its eye. Cragma will come crumbling to the floor once again, at which point Link can finish him off with some sword slashes.
Reward
The reward for defeating Cragma is a Heart Container and a Red Force Gem.
Gallery
Videos
Link fighting Cragma.
References
- ↑ The Legend of Zelda: Encyclopedia, pg. 171


