- Chapter 1 – Woodlands
- Chapter 2 – Riverside
- Chapter 3 – Volcano
- Chapter 4 – Ice Cavern
- Chapter 5 – Fortress
- Chapter 6 – The Dunes
- Chapter 7 – The Ruins
- Chapter 8 – Sky Realm
3.1 Blazing Trail
Run to the left and toss one the heroes over the lava. Grab a Boomerang and you can use it to pull the other heroes over the gap. Step on the floor switch to activate the nearby bridge. Defeat the Hardhat Beetle and then use the elevator to take you upward. Toss one of the Links across the lava and use the boomerang to pull the rest of the group. Walk to the right and enter the gateway.


Pick up one of the heroes and toss him onto the platform to the northeast. From there, allow the hero to run over to the safe block just to the north so you don’t fall into the lava. Toss the second hero up and allow him to run up to the safe area. This next part is tricky. With the one hero left behind, you’ll need to run to the left side and follow the platforms so you are just to the west of the safe platform where the other Links are. From there, quickly switch to one of the other Links and pull the third Link over.


Run to the right and follow the pathway. There is a gap that you cannot walk across. Totem up and toss one the heroes across the gap. Quickly switch over and have the hero run to safety, while also being careful that the hero that threw Link doesn’t fall into lava. This can be rather difficult if you are playing just one player. Now repeat this same process with the next hero. However, this time we have to get all three heroes across the gap. After tossing the hero across, quickly turn around and use the boomerang to pull the hero across. With all three heroes now across, step on the three floor switches to cause a bunch of enemies to appear.


Use your boomerang to defeat the Fire Keese and also to stun the Hinox enemies. Avoid slashing at the bombs or you’ll do some self-inflicting damage. After all enemies have been defeated, take the pathway to the southwest and be sure to snag the nearby rupees. Make your way all the way to the gateway and advance to the next stage.
Watch out for the falling rocks as you begin to scale the mountain. Toss a hero over to the platform that is above the lava and then use the boomerang to pull the hero over. Repeat this process to get all three heroes to the right side. Continue scaling the mountain and you’ll come to a similar situation; this time with a platform that will fall into the lava if you stand on it for too long. Be quick and make your way across. The flames block your path here, but you can totem up to hit orbs which will allow you to pass. Continue onward to the gateway.


This stage consists of a bunch of Kodongos and fire keese. You simply have to kill all the enemies that appear. The lava will go up and down, allowing you to reach new areas. You’ll have to use similar strategies to before, including tossing players across gaps and using your boomerang to pull people across. Defeat all the enemies and enter the gateway to complete the level.


3.2 Hinox Mine
After grabbing the weapons, use the boomerang to snag a bomb flower from the sides of the of the platform. Toss it at the block to crack it. Do this twice to destroy the block. Use the boomerang or the bow to hit the orb, creating a staircase.


This next section can be quite tricky if you don’t know what to do. There are three orbs here; two on the sides of the bomb flower, and a third that is on a higher ledge. The higher one will disappear if you draw near to it. This becomes a bit easier if you have the Kokiri Suit on. What you need to do is hit the two bomb flowers with arrows. Then quickly create a totem and use the bow or boomerang to hit the higher orb, while the other two activate from the bomb flowers. If you hit all three within a few seconds of each other, a platform will appear. Step on the platform and ride the platform to the gateway.


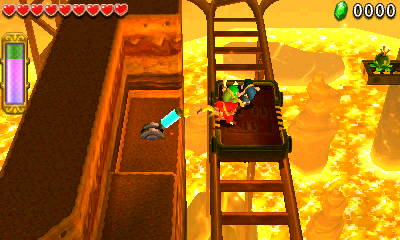
Drop into the minecart below and it will begin moving along the tracks. At the north end of the room, use the boomerang to grab one of the flowers and then quickly toss it at the large cracked block that is nearby. The next time around totem three-stories up and use the bow to hit the orb, causing the tracks to change. Ride the train to the end of the pathway and step into the gateway.


Step on the minecart and ride it around. When you get to the right side, hit the lever and the tracks will shift. As you get to the far right of the stage, use the boomerang to grab a bomb flower. Immediately toss it to the left so it lands near the flame. This will cause it to hit a number of bomb flowers and trigger an orb. Similarly, there is a bomb flower at the northeast part of the stage that you want to throw at the flame to the north. The third orb is just to the left and you can hit the bomb flowers facing southward, right when you move passed the second orb. Shoot several arrows and one of them is bound to hit a bomb flower. After all three orbs are hit, ride the cart back to the start and enter the gateway.


If you are playing single player, this stage will be your biggest challenge yet. This level is considerably easier if you have three people playing along. Step on the large mine cart and you’ll be joined by an enemy Hinox who is riding on an adjacent mine cart. The Hinox will toss bombs towards your cart. There are a couple of strategies here. First, you can grab the bombs hinox throws at you and try to toss them back so that they land inside of his mine cart. Alternatively, you can use your bow to shoot arrows at hinox. However, the arrows will explode any bombs that are nearby, so be careful. If you run low on health, there are multiple recovery hearts surrounding the tracks.
After enough hits, Hinox will be joined by a partner. During this phase, bombs are thrown much more rapidly and it can be rather difficult to keep up. The same strategies apply, but be careful. If you are playing single player I recommend keeping two of the players at one end of the cart, and your controlling player at the other end of the cart. Allow the bombs to pile up, and then switch so you control one of the other players. The bombs will explode, but as long as you switch which character you are controlling, you won’t take damage. There really aren’t any other tricks to this battle, it is just a difficult fight and you’ll take a lot of damage. Stick with it until you’ve hit the enemies enough times to defeat them.


3.3 Den of Flames
Grab the items and then use the Gust Jar to shoot one of the heroes over the gap. Use the boomerang to pull all three heroes to the right. Follow the pathway eastward and use the platform to swing yourself over to the gateway. There are a pair of treasure chests nearby that you can also snag if you’d like.


Drop down below and step on the three switches. There are several Fire Hardhat Beetles. Use the gust jar or the boomerang to stun them and then slash away. Defeat them all and then make your way to the gateway to continue onward.


Just like the first stage, use the gust jar and the boomerang to get all three heroes across the gap. Avoid the flames and maneuver over to the swinging platforms. Carry the hero that has the boomerang eastward, tossing him up whenever needed. The other heroes that have the gust jar can use it to cause the swinging platforms to move even higher. Continue scaling the area and at the very top, avoid the hardhat beetles and the flames to reach the gateway.


Leap off the ledge to the left and you’ll see a variety of enemies. The fire shooting enemies higher in the air are Fire Keeleons and the Links will need totem up to defeat it. Use the gust jar or boomerang to stun the enemy and then deliver some sword slashes. After the initial batch of enemies, some fire hardhat beetles will appear, as well as more fire keeleons. Defeat all the enemies and then head towards the gateway.


3.4 Fire Temple
Grab the items and then use the gust jar to send two of the heroes across the gap. Use the boomerang to pull the third here over the gap. Move the Links so that they are standing on the three floor switches. Be careful though, as the switches on the left and right are in the route of the fire. Continue northward to the safe platform and defeat the hardhat beetles. Further north, there are three orbs and you have to hit them within a short period of time. I recommend just using the Link with the arrows to hit all three. Run over to the gateway and onto the next stage.


A hinox will appear on a minecart and will move around the tracks, tossing bombs towards the center platform. Lift the bombs and and toss them back at the cart. Hit the hinox a number of times until he has been defeated. After enough hits a second and third mine cart will appear at the same time. Repeat the same process until they are both defeated. If you need recovery hearts, there are plenty beneath the pots in the room.


Push the large block over the third lava square to the right. Toss two of the heroes on top of the block and then use a projectile to hit the orb, creating a nearby bridge. There are also two treasure chests in this area containing rupees if you’d like to snag them.


Here you will battle with the temple boss, Moldorm. In single player mode Moldorm can be incredibly annoying as he will constantly change where he is looking, causing his weak point to disappear for a few moments. What you want to do is keep your Links separated from one another. Once Moldorm draws near, switch Links and then quickly hit its tail.


After a number of hits, Moldorm will begin to raise its tail, so you no longer can hit it from the ground floor. Instead, you’ll need to totem two-stories tall to hit the tail. I recommend having one of the heroes that has the bow be on top of the totem. Repeat the same process and shoot the tail with your arrows. After even more hits, Moldorm will raise its tail further, forcing you to use a full totem. Have the arrow Link be at the top, and shoot the tail. Since you are above Moldorm at this point, you can shoot right over his head, without worrying about your arrows being deflected. Once Moldorm is defeated, head over to the gateway to complete the Fire Temple.


