- Chapter 1 – Woodlands
- Chapter 2 – Riverside
- Chapter 3 – Volcano
- Chapter 4 – Ice Cavern
- Chapter 5 – Fortress
- Chapter 6 – The Dunes
- Chapter 7 – The Ruins
- Chapter 8 – Sky Realm
4.1 Frozen Plateau
Run to the left and maneuver around on the ice field. Make your way to the north end of the area and climb the steps. Toss one of the heroes onto the higher platform and grab the Fire Gloves. Use the fire gloves to melt the nearby ice and allow all three heroes to grab some gloves. Just to the left you can melt an ice block and light a torch, which will cause a treasure chest to appear. Use the fire gloves to melt the ice that is in the way and make your way to the gateway.


Light the torch to move the wall and then use your flame to defeat the Freezard. Step on all three switches and then take control of the hero at the upper most switch. Aim to the right and shoot a fireball to light the torch.


There are three freezards blocking your path. Walk to the right side and aim directly northward. Shoot a fireball so it hits two walls and then will melt one of the freezards. With an open path, get rid of the freezards and ice blocks that are blocking your way.
Defeat the keese and continue northward. Totem up and use the fire gloves to melt the freezards blocking your way. You can step on the leaf momentarily to ride it northward, where you can reach the lower ledge and hit the higher freezards. Enter the gateway to progress to the next stage.


Travel north along the ice tiles, using your flames to defeat the freezards. Use your flames to defeat the Ice Keese that are found here. At the north end of the stage, totem up and use your sword or your flame to defeat the Keeleon. Then use your flames to light the two torches and step into the gateway.


Run to the north and you’ll encounter some enemy Ice Wizzrobes. Some of them will appear on the ground level, while others will appear higher up and you’ll have to totem up. Use fire gloves to defeat them. Step into the gateway to complete the Frozen Plateau.


4.2 Snowball Ravine
Climb the steps while avoiding the snowballs and collect the three items. The fire gloves can be used to melt the large snow balls. One hit will shrink it, and a second hit will fully melt the balls. Further up the ravine, there is a gap that you will need to get across. Like before, toss the boomerang hero across the gap and then use his boomerang to bring the rest of the crew along. Occasionally you will encounter these massive snowballs that cannot be melted, so just avoid them.


Use the fire gloves to light the torch, causing the platforms to move. Cross the gap and defeat the hardhat beetles. Continue onward and use the boomerang to get all three heroes to the left side of the map. Have two heroes step on the floor switches, and then have the third one shoot a fireball to light the torch. Light all the torches to open the gateway.


Make your way to the right side of the stage where you’ll find a bomb flower and a cracked block. This can be rather tricky and it is a tad bit deceiving where the block actually is. Have two of the heroes totem up and have them stand just south and east of the bomb flower, at the part where the platform slightly sticks out. Have this totem face directly eastward. With the third hero, stand just northwest of the bomb flower, facing the totem heroes. Pickup a bomb flower and immediately toss it to the totem heroes. Time the throw so it explodes right near the block.


Bring all three heroes together in a large totem. Stand at the end of the ledge and use the fire gloves to light up the two torches. Climb the steps that appear and enter the gateway to advance to the next stage.


Make your way to the right, avoiding the giant snowballs. Most of this stage is fairly straight forward so continue scaling the area, avoiding the snowballs. At one point there are multiple large snowballs coming at you; use your fire gloves to melt them. Light the torch and allow the elevator to take you upward. At the end of the pathway, you’ll have to use your boomerang to get all heroes across the gap.


Here you will encounter a giant freezard known as Freezlord. Don’t get too close, otherwise you will freeze yourself. Use your fire gloves to melt both of the hands of the giant creature. You will also need to melt the giant ice block that is on the enemy’s back. You can use two heroes and switch between them, in order to quickly get to its backside.

During the next phase the giant enemy will jump around, creating a circle of ice around him. Keep your distance and when it is safe, shoot some fireballs at him. Repeat this process until the ice creature has been defeated.


4.3 Silver Shrine
Toss one of the heroes over the stakes and grab a Hammer. Smash the stakes and let all the heroes grab their item. On the left side, smash the giant Moles and then step on them. It will shoot you up to the higher platform. Follow the pathway and toss two of the heroes up to the higher ledge. Smash the mole and have both heroes launch up to the top. Use the hammer to smash the tall stakes, allowing the bottom hero to climb up. If you take the path to the left, it leads to a treasure chest containing some rupees. Otherwise head up to reach the gateway.


Reach the higher platform and you’ll encounter some enemy Terrorpins. Use the hammer to flip these enemies on their shell and then deliver a few sword slashes to finish them off. Take the elevator up and battle more terrorpins. This time, be careful that the ice doesn’t crack below you. Smash the moles and enter the gateway to continue to the next stage.


Climb the steps and you’ll find a moving platform. Smash the mole and time it so you land on the moving platform. If you smash the middle mole right when the platform is in the center of its pathway, you’ll usually land right on it. Step on the floor switch and enter the ice field. Defeat or avoid the enemies and use the moles to reach the higher ledge. Totem up two tiers high and hit the orb while also smashing the mole. Quickly totem up so all three are together and make your way up to the gateway.


Ahead you will find three enemy Deadrocks. These enemies can be stunned with either the hammer or your sword. When they are stunned, they will temporarily turn to solid rock. Quickly smash them with the hammer to defeat them. If left alone, they will reanimate. Up ahead there is an ice field with three more deadrocks. If you have the Cozy Parka outfit this part is much easier, as you want to slip on the ice. If you are playing multiplayer, this part is also much more tolerable. If you are playing single player, without the ice outfit, this part can be very unforgiving. I would suggest using the northern wall, so that when you hit an enemy you won’t slip too far away. Your best bet is to have two heroes against the northern wall. As soon as you swing your sword or your hammer to stun the enemy, switch to the other hero and deliver the finishing blow. After you’ve finally defeated all three, enter the gateway.


4.4 Ice Temple
Grab two hammers and make your way right, busing through the ice. Follow this straight pathway and defeat the terrorpins found here. Totem up two-tiers high and hit the stakes above. You’ll need to time when you hit the mole as you need to land on the moving platform. Wait until the platform just begins to move right and hit the mole. Land on the platform and ride it westward. You’ll need to bring all three Links with you, so totem up. Step on the switches and let the third hero grab the fire gloves.


Take the platform back east and use the new bridge that appears to reach the right side. Walk southward and then drop down. Use the fire gloves to melt the ice and then head right by smashing the moles. Continue eastward to reach the gateway.


This area has a handful of deadrocks. They fight exactly as they did before, but be careful as the ice platforms will fall below you. Just stand on sturdy land and you wont have to worry about the ice. Defeat the enemies and step into the gateway to reach the next stage.


Pound the pegs and head northward. Watch out for the blowing ice as it will freeze you. Toss two heroes up above and have them totem up. Use the hammer to pound the stake to the left, which will now allow the snowballs to roll eastward. The rolling snowballs will temporarily block the blowing ice, so when you have a chance, run past. Pound the mole at the end to reach the higher platform.


We have a similar puzzle to deal with here, but it is a bit more complicated. You have to hit the mole, but time it so the snowball blocks the ice by the time you jump over. I recommend doing it one at a time, so you don’t do too much damage if you mess up. You want to pound the mole just before it reaches the gap to the right.


Climb the steps and toss a hero up to the treasure chest to get some rupees. Stand at the left side of the screen use the fire gloves to light the torches above, creating a bridge. Step into the gateway to reach the final stage of the level.


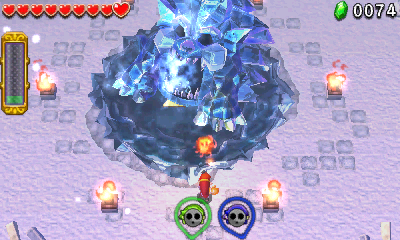
Run ahead and you’ll encounter the boss of the Ice Temple, Blizzagia. In order to defeat Blizzagia, you’ll need to use your hammer and smash its head. During this first phase, Blizzagia will only pop its head out a certain amount, so just stay back and hit it with the hammer. If you use the fire gloves on its body, it will drop magic containers so you can quickly replenish your magic. Keep smashing it with your hammer repeatedly until this phase is done.


During the second phase, Blizzagia will freeze the entire arena and will come out with its whole body. Blizzagia will move around in a circular motion, so be sure to stay on the outside of the circle to avoid being squished and taking damage. Repeat the same process of smashing its head with a hammer until its mask falls off.
The final phase has Blizzagia freely roaming around. During this phase you can use your sword or any weapon to damage its head. Be careful of its tail, as that will do the most damage. Blizzagia will try to bite you, but it is rarely successfully and its not too dangerous to get up close to it from the front. Whenever its tail draws near, switch to a different Link to keep your distance. Repeat this process until Blizzagia has been defeated.


