- Chapter 1 – Woodlands
- Chapter 2 – Riverside
- Chapter 3 – Volcano
- Chapter 4 – Ice Cavern
- Chapter 5 – Fortress
- Chapter 6 – The Dunes
- Chapter 7 – The Ruins
- Chapter 8 – Sky Realm
7.1 Illusory Mansion
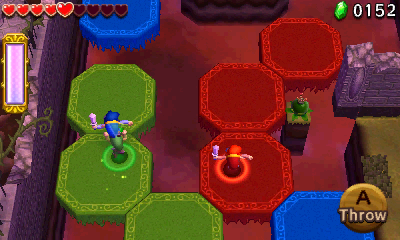
There are colored platforms and as you might guess, only that particular color of Link can step on them. If green Link steps on the red or blue platforms, he will fall down below and take damage. Have all three heroes run across the gap to snag their items.


You will encounter some enemy Ghini. These ghost-like enemies can be defeated with similar sword slashes. Have the Blue Link lift up Red Link, and then use green Link to carry both of them across the green platform. Toss Blue Link onto the platform to the right, and from there toss Red Link to the safe zones at the right. Now use a boomerang to grab Green Link and toss him over to the right as well. Lastly, use the boomerang to get Blue Link over as well.


Have the Blue Link pickup Red Link and carry him onto the platform below. Toss Red Link and have him open the treasure chest to get the small key. Carry the key back down to the platform and toss it over to Blue Link. Toss the key over to Green Link or just to the side momentarily. Use the boomerang to get Red Link back over to the left side. Use the small key and have all three heroes step into the gateway.


There are three colored ghini in this area and as you might guess, each hero can only defeat the particular ghini of the same color. Defeat all three enemies and grab the small key that is left behind.


At the north end of the stage there are six more ghini, but these ones float higher than ground level. Some of them are two-tiers high, while others are three-tiers high. You will need to totem up so that different heroes are at the top, allowing you to defeat all six of the ghini.


On the right side of the room there is a ground switch that will move a nearby gate, allowing you to reach a treasure chest with some rupees. Snag it and then step into the gateway.
Walk northward and use your boomerang to grab the bomb flower that is nearby. Take it back to the start and toss it at the large block to blast open a path. Step on the ground switch and it will create a number of colored platforms above.


Use the blue hero to lift the red hero and toss him onto the red platform. Leave him there and then toss the green hero onto the green platform. Switch over to the green hero and use the boomerang to pickup the blue hero. Take him northward and toss him over to the platform. Grab the green hero and have the blue and green stand on the safe platform above.

Use the boomerang with the red hero to snag a bomb flower. Run northward and toss it across the gap so one of the other heroes grabs it. Use this bomb to blow up the blocks above, opening the pathway. Use the boomerang to bring over the red hero and unite all three Links.


Stack the heroes so green is at the bottom, blue is in the middle, and red is on top. Toss the heroes across the moving platforms. Use the blue hero and grab the green hero. Walk to the edge where the blue and red platforms will touch. Use the red hero to grab the blue hero so you are fully totem’ed up. Toss the top hero up to the higher ledge above. Step on the floor switch and then use the staircase to reach the gateway.


Control the red hero and toss the green hero to the green platform. Then pickup the blue hero and toss him over so the green hero catches him. Then take control of the green hero and throw the blue hero onto the blue platform. Now use the blue hero and use the boomerang to bring all three heroes to the right side.


Switch between the three heroes to defeat the color ghini. This will create a treasure chest that contains some recovery hearts. Leap off the platform to the left and have each hero step on a floor switch. This will trigger a battle with new enemies known as Prankster Poes. These pesky enemies will relentlessly chase after you, and if they grab you they will pick you up and toss you into a nearby pit.
Furthermore, once they get their eyesight on a particular hero they won’t stop chasing him, even if you switch to control a different Link. So you can lose health, even if you aren’t controlling the hero that is being chased. What you will want to do is control one of the heroes and have him run right by one of the other heroes. Switch to the other hero and as soon as the prankster poes snag up the hero you were just controlling, smack away with your sword to deal some damage. These poes have quite a bit of health, so it will take a lot of hits to defeat them, but this is all there is to it.


7.2 Palace Noir
Run around the main floor and grab the three items; one is in the center, and the other two are in the upper corners. Use the fire gloves to light the torches at the north end of the room, which will illuminate part of the room.


Use the staircase at the right side of the room to reach the second floor. There is a torch below and to light it will require some trickery as it is too far away to light with just the fire gloves. If you are playing multiplayer, have the hero with the fire gloves stand just to the side of the opening. Hold the button and a fireball will stick out for a moment. Use the bow to shoot an arrow through the fireball and it will carry the flame to light the torch.
Now if you are playing single player, this is a much more difficult puzzle to figure out. I think this is bordering on being just a plain stupid puzzle. Have the hero with the fire gloves stand in the opening, facing northward. Then have the hero with the bow stand against the wall facing southward towards the opening. Use the fire gloves to shoot a fireball and it will ricochet off the wall. Immediately switch to the hero with the bow and shoot an arrow. It might take a few tries, but the arrow will catch the fireball, and carry the flame to light the torch.


There are three more torches at the left side of the room. Use the gust jar to shoot the other two heroes across the gap to the left. Then pickup the hero with the fire gloves and throw him to the left side of the room. Use the fire gloves to light the two torches here.


Drop down below and return to the staircase. Once again have the gust jar hero blow you across the gap. This time, toss the hero with the bow to the left side of the room. Stand to the left of the bottom torch and face to the right. Shoot an arrow and it will send a flame out towards the torch. With all the torches now lit, head towards the gateway.


Walk forward and have the three heroes step on the floor switch, causing a small key to drop. The key will become engulfed in flames. Have one hero stand on the moving platform that is to the left. Then send two heroes to the right side and have them stand on the moving platform, one of them being the hero with the gust jar. Totem up so that the gust jar hero is at the top. Face westward and blow the key so that it gets blown to the hero on the left side. It might take a few tries and if the key falls, no worries as it will re-spawn.


Have all three heroes take the west platform and follow it to the northeast corner of the room. Use the fire gloves to light the torch that is nearby. There is a switch above, but it’s too far away to just toss a hero or to blow a hero with the gust jar from the higher platform. Instead, you’ll need to get a bit creative. For the time being toss the key to the side. Have the gust jar Link stand on the higher ledge. Have the other two heroes totem up and stand on the lower platform just above. Now use the gust jar to send the top totem hero over to the ledge above. Step on the ground switch and the platform will begin moving.


Pickup the small key and walk over to the north end of the room. Use the key to unlock the door. Before entering the gateway, you can explore the west side of the stage where you’ll find a treasure chest.
This room has multiple Key Bandit Poes. They will be holding small keys as they run around the room. It’s a rather large room with various corridors, but nothing here is too overwhelming. Chase down the poes and slash at them to grab the key. When you are holding a key those poes will come after you, trying to snag it. If you switch to a different hero, the poes will not be able to grab the key, but they will still try.


Carry two of the keys over to the locked door at the north end of the room. The third key is a bit trickier. It is higher up and you will need to totem up two-tiers high in order to unlock the door. Do so and then step into the gateway.
Once all three heroes have stepped into the large circular room three colored poes will appear. These poes will not attack, but will float away from you as you try to draw near. They will usually move along the perimeter of the room. You want to chase them around the perimeter, and then when they walk by switch to the hero of the proper color and slash away with your sword. It takes them a few moments to change direction, so there is plenty of time to deliver those swords slashes.


After all three are defeated you’ll encounter the mini-boss, the Grim Repoe. First things first, use the fire gloves to light up the three torches in the room so that you can see the Grim Repoe. Then use the hero with the gust jar to shoot a burst of air towards the boss. This will stun him momentarily and you can deliver a number of sword slashes.


Grim Repoe will blowout the torches, so go ahead and relight them. This time the boss is floating a bit higher up. You will need to totem up two-tiers high with the gust jar hero at the top. Once again blow a burst of air towards the boss and then slash away with your sword to defeat it.
7.3 Lone Labyrinth
Hit the orb and a platform will temporarily appear. Run across with all three heroes to get the items. Hit this orb and a series of platforms appears temporarily above. These ones will last a bit longer, but there is a puzzle involved.
There are two orbs that need to be struck and a torch that needs to be lit. Hit the initial orb to create the platform and run to the left side with the hero that has the gripshot. Grab a bomb flower above and toss it towards the orb on the left side. Then quickly run to the right side and use the gripshot to trigger the second orb. On the right there is also a torch that needs to be lit use the fire gloves. With all three triggered a platform will appear, allowing you to reach the gateway.


Totem up and use the fire gloves to light the nearby torch, causing platforms to appear to the right. Drop down below and cross the moving platform with all three Links. On the higher ledge you can open the treasure chest to get some rupees and also light the torch, causing a treasure chest to appear. Use the gust jar to shoot one of the heroes across the gap to reach the treasure chest. Upon opening it platforms will appear, allowing you to get back.


Drop down to the platforms below and step on the floor switch, causing three Poes to appear. Defeat them and the platform to the right will extend. Step on the platform and two Chasupas will appear, along with three colored Poes. The platforms will appear and disappear in a clockwise fashion. Walk around the room and defeat all the enemies.


With all the enemies defeated a bridge will appear, allowing the heroes to reach the gateway.
Drop down below to the platforms that appear and run to the right. Use the fire gloves to light the torch, creating some nearby platforms. Drop down to the right and carefully make it by the Chasupa and the Poe that block your pathway. At the south end of the disappearing platforms, toss two of the heroes over to the left. Then use the gripshot to get the third hero over. Totem up so that the hero with fire gloves is at the top and then use the fire to light the nearby torch.


Make your way to the right side and drop down to the new appearing platforms. Totem up and toss two of the heroes up to the safe platform at the north end of the room. Save the gripshot hero for last and than grapple on over.


At the north end of the room use the gust jar to send two of the heroes over to the top-right corner of the room. Totem up and then use the fire gloves to light the torch on the right side of the room.
Some platforms and colored poes will appear. Walk around the platforms, switching between the three heroes to defeat the three colored poes. On the right of the screen, you will find a treasure chest that contains some rupees. With all the poes defeated, head south along the platforms that appear and drop down to reach the gateway.


You will be confronted by an enemy ReDead. These classic Zelda enemies will scream at Link when he is in range, stunning him momentarily. The ReDead will then quickly run up to Link and grab him, sucking the life out of him. If you get trapped by a ReDead quickly switch to another Link and run over and hit the enemy with your sword, or more effectively, your attached item.


In single player mode if a ReDead screams at you, just quickly switch over to another Link before the enemy grabs you. A good method to defeat ReDeads is to stun them first using your weapon, and then run in with a sword slash. After defeating the initial ReDead, four more will spawn. Defeat all four and then step into the gateway.
7.4 Grim Temple
Grab the three items and use the fire gloves to light the torch just to the north and give some light to the room. This stage, and most of the Grim Temple in general is very combat heavy with little puzzle solving. This particular room is filled with Stalfos and Rats. Be careful though, as there are several pits found throughout the level and they can be hard to see in the darker sections of the stage. After defeating all the enemies the door will open, allowing you to reach the gateway.


All three heroes will spawn at different platforms. There are appearing bridges that will connect the heroes, along with a trio of colored poes. Have each respective hero kill his colored poe and bring all three heroes together at the middle platform. After defeating the initial poes two more will appear, but these will require the heroes to totem up two-tiers high.


Run to the north and strike the orb to create a trio of appearing platforms. Run across to the north and once all three heroes have made it, one of the stone enemies will animate and you will do battle with a gibdo. Use the gripshot or the fire gloves to turn the Gibdo into a Stalfos. After it has been defeated four more Gibdos will animate, so repeat the process to defeat them. Be careful as the platforms in the center will disappear after a few moments time. Take the platform northward and step into the gateway.
Toss the hero with the boomerang over to the platform with his proper color. From there you can use the boomerang to grab the other two heroes and bring them to the higher platform. Once all three have reached the other side, some Prankster Poes will animate and start chasing the heroes. Defeat all the enemies here and a few colored platforms, along with a pair of ReDeads will also appear.


Walk the heroes to the right and carefully make your way over to the ReDeads. You can stand right at the edge of the heroes respective colored platform. From there you can grab that hero with another hero. Make your way over to the ReDead platform and battle the two enemies. Like before, use projectiles to stun the enemies and then deliver some hits. If you ever get seen by a ReDead, quickly switch to another hero and swipe away with your sword to free up the other hero. Once they are both defeated step into the gateway.
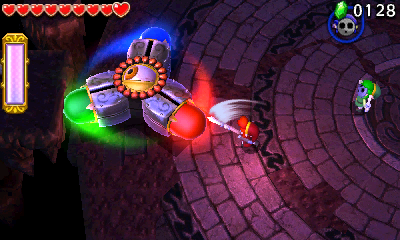
Step onto the center platform to battle with the level boss, Prismantus. As you might suspect, the glowing colors mark the bosses initial weak spot. During this first phase Prismantus will spin around and come charging towards one of the heroes. It will then slow down a bit, giving you a chance to strike it. Each colored hero must strike its respective glowing bulb. After successfully hitting all three colors Prismantus will be stunned momentarily. Totem up and toss one hero onto the boss and then slash away at its eyeball.

Prismantus will then stand up on two of its sides and begin to move around the room in its triangular fashion. After bouncing around it will come to a stop and two of the colored bulbs will be on the ground. Once again, use the corresponding colored hero to slash at its bulb. The third color remaining will always end up higher than the other two bulbs. In order to hit it, have all three heroes totem up three-stories tall. With all three colors disabled, toss a hero onto Prismantus and slash away at its eye.


During the final phase Prismantus moves more rapidly and this time, only one of the colors is accessible from the ground. Prismantus will also shoot a projectile out towards you, so be sure to keep moving. Totem up three stories tall to hit the two higher colors. With all three colors hit, once again slash away at the boss’s eye until it has been defeated.


