After Link has defeated 30 enemies, Maple will appear in the next screen Link enters in many areas of the overworld. Bumping into Maple as she flies around the screen will cause many of her and Link’s items to scatter about the screen. Although she can be avoided altogether, it is often more beneficial to bump into Maple in an attempt to gather more items than you lose, some of which are rare items such as Magical Rings, a Magic Potion, or one of the twelve Pieces of Heart. Over time Maple will improve her means of travel, ditching her broom for a vacuum and then a flying saucer. With each upgraded vehicle, Maple will be able to move much faster, making it more difficult for Link to gather more items than her.
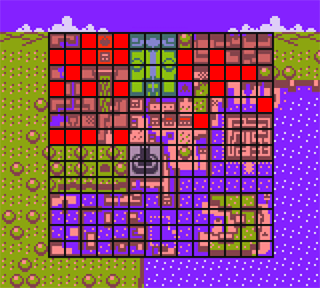
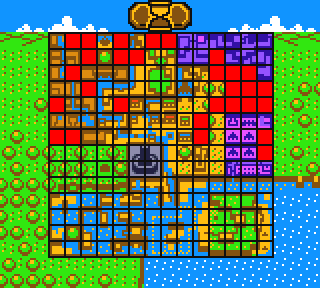
Shown above are world maps of past and present Labrynna respectively, with the screens where Maple can appear marked red. It would seem that the southern half of Labrynna containing mostly water-filled areas might explain the lack of encounters possible in that region.
Trading Sequence Item #1: Poe Clock
Up and left one screen each from Spirit’s Grave is a small, fenced-in grave with a ghost hovering near it. Use the Power Bracelet to lift the boulder blocking access to the grave and speak with Allan, who will be relieved someone has finally come to help him, then disappear. Push the headstone UP, revealing a stairwell leading underground, then enter it. Speak with Allan again, who will thank Link for moving his headstone, thus allowing him to move on to the afterlife. Follow the ghost out of the grave and speak with him one last time to receive the Poe Clock!
Soft Soil Location #2 - Yoll Graveyard (Tier 2-4)
At the west side of the Yoll Graveyard, there is a spot where we can plant a Gasha Seed. We walked by this location earlier, but Gasha Seeds were harder to come by. Since we picked one up in Spirit’s Grave, this is an opportunity to plant one. This is a less common location than the one in Lynna Village and it will produce slightly more rare rewards from the Gasha Nut.
Optional: Piece of Heart #3
One screen down from the Soft Soil location above, across the bridge, Link can now access the Piece of Heart on the left by using the Power Bracelet. Toss the boulder aside to reach Piece of Heart #3.
2.2 Fairies' Woods
Exit Yoll Graveyard to get back to the Forest of Time (if you need Ember Seeds to burn the tree leaving the Graveyard, some can be found in the bushes left of the fenced-in grave area one screen right and down from the tree). From here head up a screen, left, down, and left to return to Lynna City. If you’d like to, you can stop at the Ring Shop and appraise any Magic Rings that you’ve acquired. Otherwise, make your way to the southwest end of the city. Exit the city to the west and use the Power Bracelet to lift the rock and continue left one screen, where Link will encounter a new enemy, the Red Octorok. Continue left one and down one screen into the Fairies' Woods.
Head right, down, left, and down one screen each to reach the bottom of the woods. Continue left and up one screen each to reach a grove where the Prankster Fairies will appear, stating the forest is their “playground” and ask Link to try and find all three of them. Using their magic, the fairies will turn the forest into a maze as they each hide in separate locations.
To solve the puzzle of the forest, first head up one, down one, and up one screen. Toss the lone boulder here aside to discover the first fairy. Head right one screen to get back to the central area, then walk left two screens. Slash the leftmost bush of the bottom three to find the second fairy. Walk right one screen back to the central area once again, then go left and down one screen each. Slash the bottom of the two bushes on the left to find the final fairy. Having found them all, the fairies will put the woods back in order.
Head right one screen afterwards and lift the lone boulder. Somehow, this causes the dungeon to crumble into a pile of rocks. The Maku Tree will tell Link to head to Nayru’s House, where he may find an item that can aid him further.
Walk up passed the dungeon ruins and continue up two screens, then head right two screens to get back to Lynna City. Make your way to the Maku Tree at the northeast part of town and head right a screen. Leap off the ledge and head down, right, and up one screen to reach Nayru's House and enter. Speaking to Impa inside reveals that she believes there to be a hidden entrance somewhere in the house. Push the angel statue to the LEFT and head into this hidden room, then take the staircase down into the basement. Climb the steps to the altar where the Harp of Ages lies waiting for Link.
After obtaining the harp, a vision of Nayru will appear and teach Link the Tune of Echoes, allowing him to activate the various time portals throughout Labrynna! Exit Nayru’s House and a brief message from the Maku Tree will encourage Link to explore the recently crumbled dungeon in the past using the power of his newly obtained instrument. Take out the Harp and play the Tune of Echoes to activate the portal beside Nayru’s House, then enter it to travel back in time.
Optional: Sleeping in Nayru's Bed
Interestingly, Link can actually sleep in Nayru’s bed to recover health. In Nayru’s House, walk up to the bed and press against it to have Link hop in for a quick snooze. This trick only works if Link needs to heal-up.
2.3 Lynna Village Extras
This entire section is completely optional, so continue onward to section 2.4 to progress in the main story. With the ability to travel back and forth through time, there are some new collectibles that can be acquired in and around Lynna Village.
Trading Sequence Item #2: Stationery
Make your way back to Lynna Village. At the center of town, enter the building that is one screen north of the Mermaid Statue, which is actually Lynna Village Post Office. Speak with the Postman, who reveals he cannot deliver the mail on time seeing as how time itself has literally stopped. Give the Postman the Poe Clock in exchange for the Stationery.
Trading Sequence Item #3: Stink Bag
From the post office, head left two screens and enter the small building on the left which is apparently the only Toilet in Lynna Village. A hand reaching from the hole inside, this being simply known as ??? coming from a hole in the floor asks Link for paper, which he now has, considering he just obtained the Stationery. Trade the unknown entity the Stationery for a Stink Bag! Though there is nothing more to obtain here, Link can return to the Toilet throughout his quest to drop an assortment of items, namely different types of Seed and Bombs, down the hole to get a variety of reactions from ???.
Optional: Lynna Village Shooting Gallery
At the east side of Lynna Village, Link will find the Lynna Village Shooting Gallery. Depending on the targets hit, points are rewarded or deducted as follows: Blue Block (+30), Fairy Statue(+100), Red Block (-10), Imp Statue (-50), Strike (-50), Missed Target (-0). A good strategy is to always position Link toward hitting the blue blocks only, although hitting a red and blue will still result in additional points. Try to avoid the Imp Statues altogether as they deduct the most points of all when hit.
After 10 pitches, the game will end and Link will be given a reward depending on the number of points he has accumulated: Nothing (0-40), One Recovery Heart (50-149), 30 Rupees (150-249), One Gasha Seed (250-349), Magical Ring (350+). Though the Magical Ring won will be random, it will always be one of four rings once appraised: The Octo Ring, Blue Holy Ring, Red Luck Ring, or the most rare of them all to obtain, the Light Ring L-2. Not only is the Light Ring L-2 the most rare of the four found at the Shooting Gallery, it is also the only ring of the bunch that can only be obtained here, the others also having the chance to be found within a Gasha Nut or dropped by Maple.
2.4 Deku Forest
Make your way to the southwest portion of Lynna Village. Use the Power Bracelet to toss aside the boulders on the left, then head through this path left two screens and down one into the area known as the Deku Forest in the past.
Head right one screen along the path below the large tree on the right, then continue down one and left one more screen to reach the dungeon again. A man standing outside the dungeon believes there to be treasure inside, though he has nothing to blast the wall open to get in there. While continuing west through the forest, there are a few optional side-quests that can be done.
Optional: Gasha Seed
From outside the dungeon, head left one screen, then up one screen along the path on the right side of the gray rocks. Toss the boulders here aside and descend the stairwell to a cave area below. There are many Keese in this room, as well as Green Zols and Hardhat Beetles that can be defeated to avoid contact while attempting to access the chest in here. Of the three green rocks below the chest, push the right one DOWN, then head over to the four green blocks on the right side of the room. Push the upper-left one LEFT and the one below it DOWN to access the path at the bottom of the cave. Knock the Bumpers into the pit to dispose of them and continue along this path to reach the leftmost green block in front of the chest. Push this block DOWN, then the center one to the RIGHT and open the chest to obtain a Gasha Seed!
Optional: Piece of Heart #4
Exit the Gasha Seed cave and head down one screen, then back up one screen this time along the path on the right side of the gray rocks. Continue left one and down two screens and use an Ember Seed to burn the lone shrub in this screen, revealing a stairwell leading underground. Enter and follow the path right one screen, then walk up the next set of steps to obtain Piece of Heart #4, which should give Link a fifth, full Heart Container! Instead of continuing right, which leads to one exit from this cave, head back left and up the stairs to exit the underground cave entrance still on the west side of the forest.
After coming back out of the underground cave, go left one screen further into the forest. The bush on the far left is actually a Business Scrub selling Shields for 50 Rupees each, but pass on it if you need one and instead burn the lone shrub on the right side of this screen and head up and right one screen each along the path. A second Business Scrub selling Shields will be found here, but for the cheaper price of 30 Rupees each. Follow the path up one more screen and toss the boulders aside to access the stairwell leading to a cave area below.
Head right and cotninue along narrow path clockwise around to the lower part of the cave. Be mindful of the Spiny Beetle hiding beneath the single bush along the path and continue left one screen and up the staircase at the end to resurface in the forest. Go down one screen and swipe the Mystery Seeds from the tree, then head back down into the cave from a moment ago.
Optional: 30 Rupees and a Discounted Wooden Shield
Bypass the staircase leading back out on the upper part of the cave and continue left along the upper path. Toss aside the boulder blocking the chest and open it to obtain 30 Rupees, then continue left to another staircase leading out. A Business Scrub here will be selling Shields for only 10 Rupees a piece, cheaper than anywhere else in Labrynna, past or present.
Backtrack through the cave and up the stairs on the right, now back in the forest again, and head down one screen. Follow the path and, as Link walks by the Business Scrub, one of Queen Ambi's Guards will walk up to Link, noticing he has Mystery Seeds which the Queen has apparently been demanding. The screen will cut away as Link is taken to Ambi's Palace. A long dialogue will take place where Link meets Queen Ambi and learns through her that Nayru was the one really wanting the Mystery Seeds. As a reward, one of the guards will give Link some Bombs and see him out of the Palace. The scene will continue as Nayru, who is really Veran in Nayru’s body, is seen coming down and speaking negatively of the Mystery Seeds as if she only wanted them to get rid of them. The relationship between the disguised Veran and Queen Ambi is revealed here, as Ambi believes Nayru to be doing her a favor in creating an endless day so that the Black Tower can be completed as soon as possible.
Once outside of Ambi’s Palace, head left one and down two screens. Continue left two more and down one screen to return to the Deku Forest. Head right one screen along the lower path below the big tree, then down one and left one screen back to the location of the dungeon. Before progressing, check the optional quest below if playing a Linked Game. When ready, use a Bomb to blow open the cracked entrance and enter the Wing Dungeon.
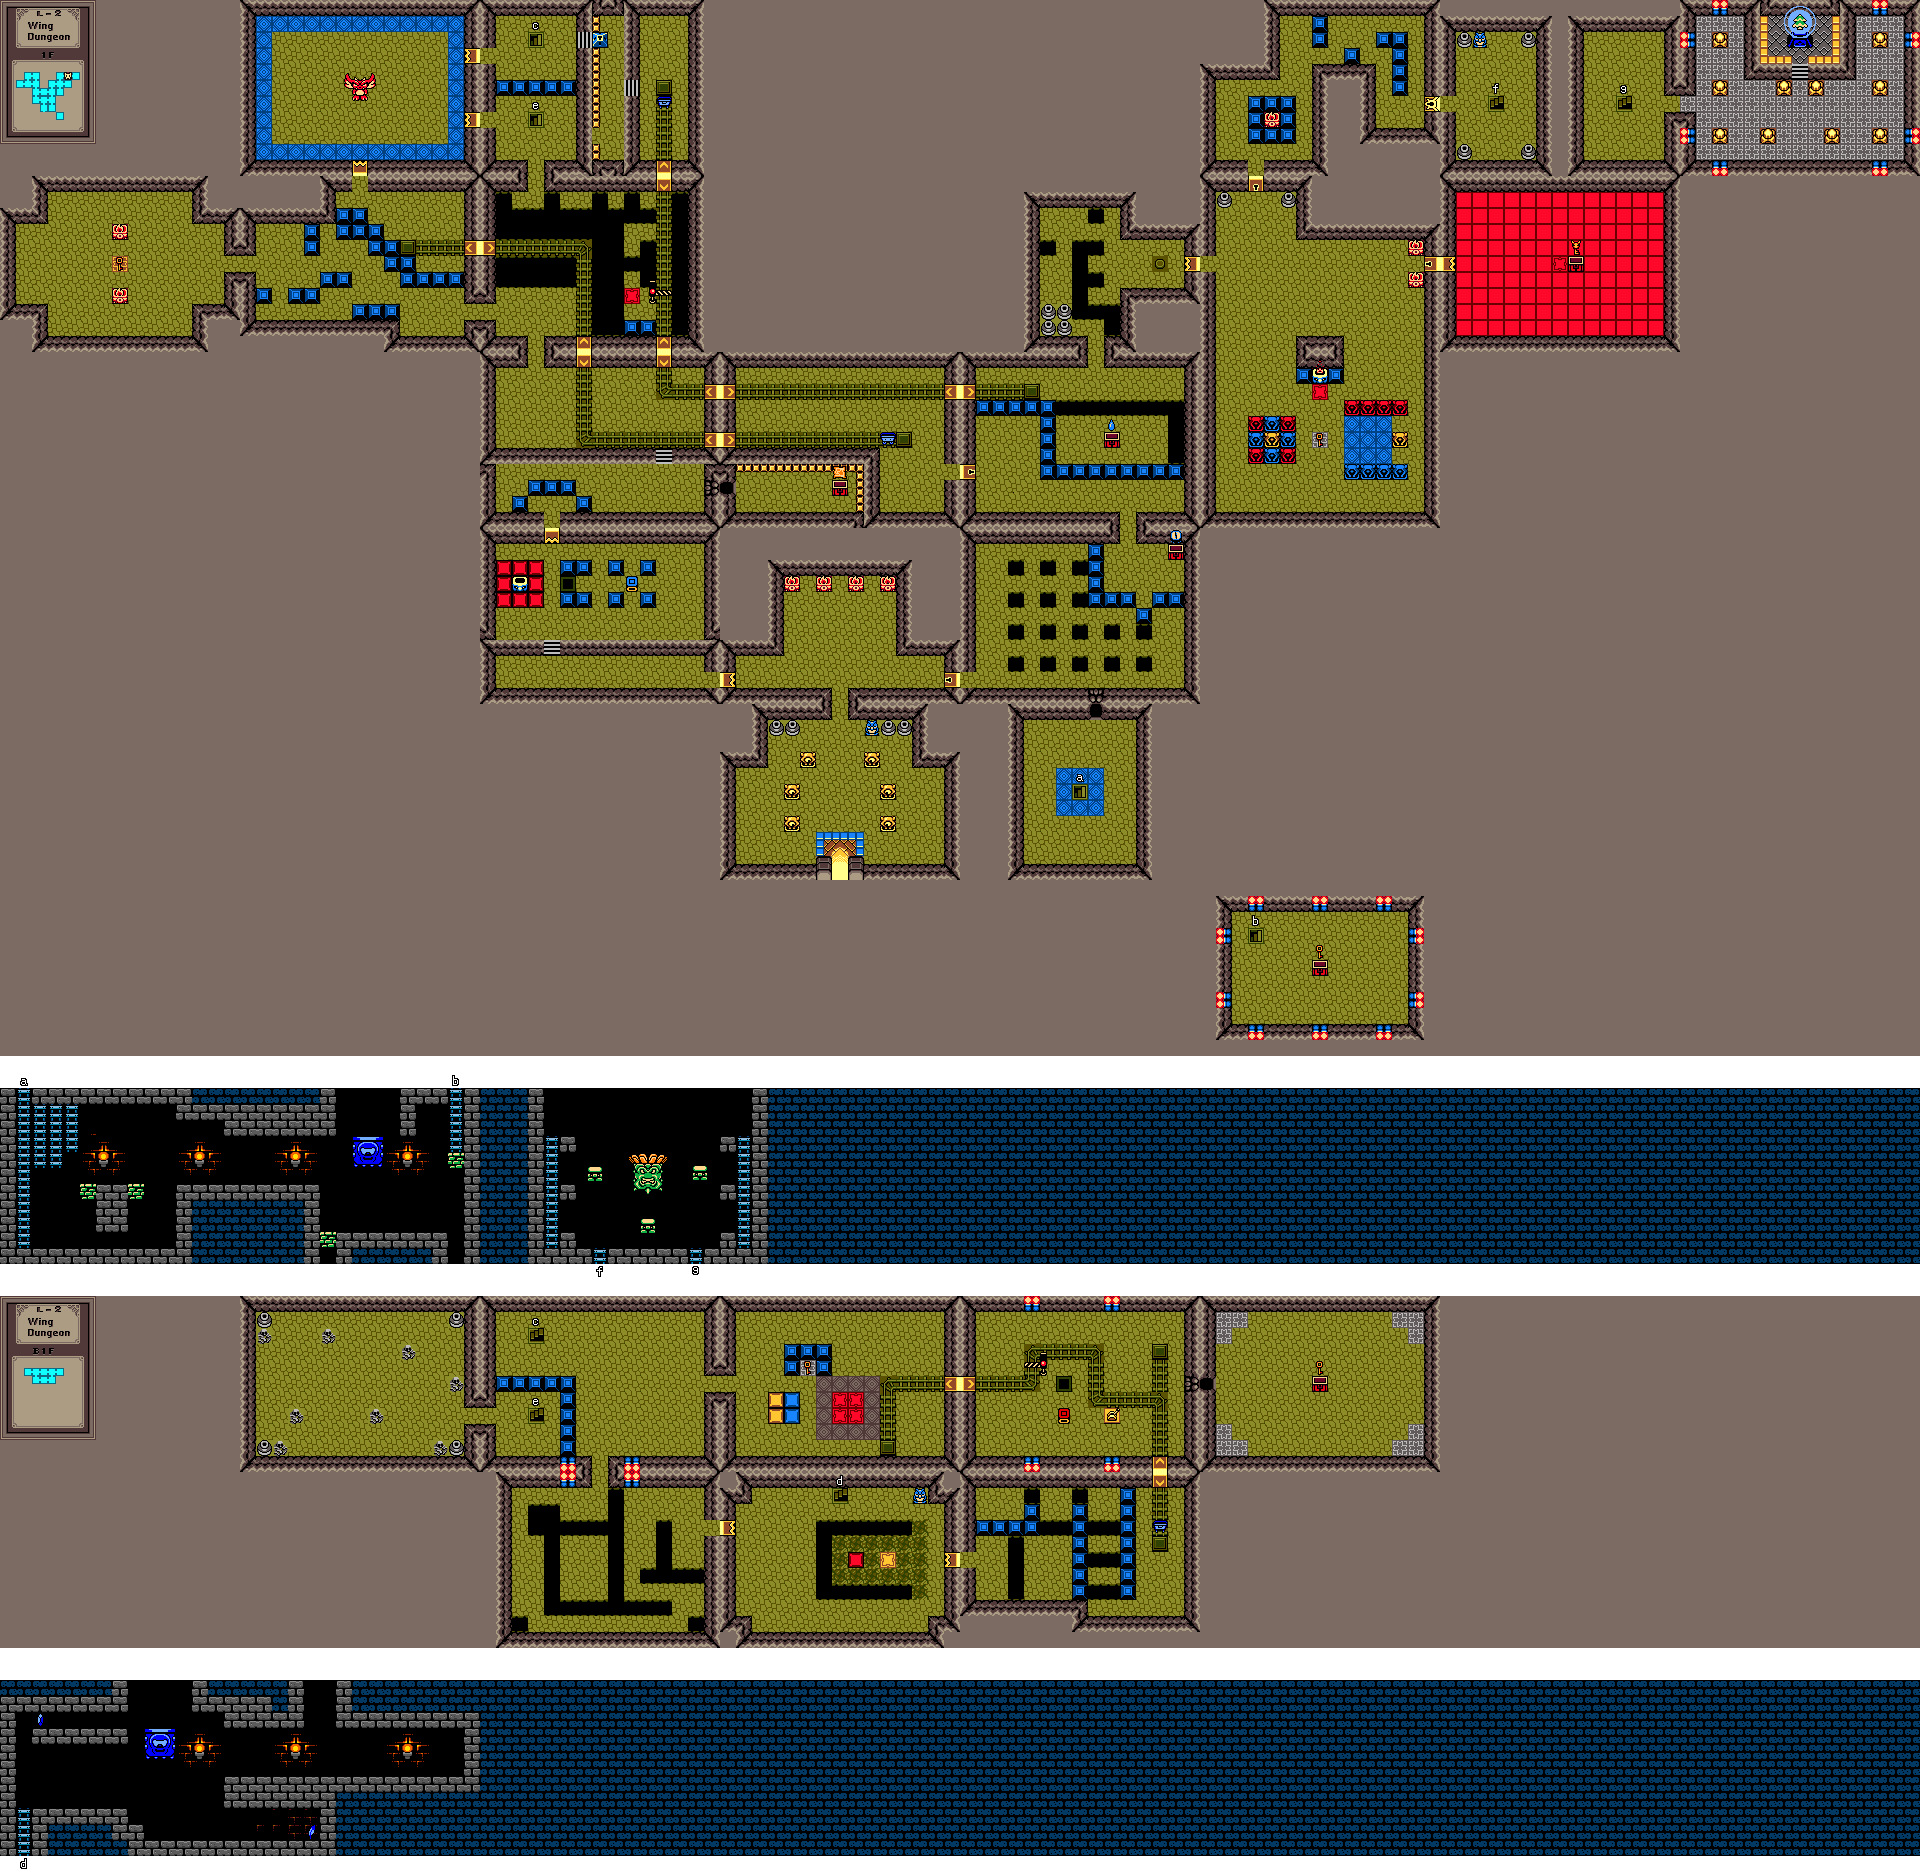
2.5 Level 2: Wing Dungeon
From the dungeon entrance, head up one screen to a room with many vases and three Spiked Beetles. Knock the enemies on their backs by using the Shield to bump them, or the Shovel to flip them over, then follow up with a sword strike to dispatch of each Spiked Beetle. Head left one screen through the newly opened doorway.
Walk up the steps on the far left side of this room, then head over to the puzzle block on the right. Push the puzzle block RIGHT(x3), DOWN(x1), LEFT(x1), UP(x1), and then push it LEFT all the way onto the black tile, lighting the special torch red and opening the doorway above. Head up one screen through this doorway.
Push the rightmost of the three horizontal blue blocks UP and head right along the ledge. Toss a bomb at the cracked portion of wall at the end of this ledge and head through. Open the chest containing the Dungeon Map and then head back left a screen.
Defeat the Ropes that will attempt to charge at Link in this room, then head down the steps and up one screen via the open path at the top-left. Continue along this path left one screen, avoiding the Sparks in here, then left another screen. In this room, defeat both Blue Pig Warriors and Keese to have a Small Key fall onto the red tile in the center. Grab the key and backtrack right two and down one screen.
Walk back up the steps onto the ledge below and over to the blue blocks on the left. Push the left and right blocks DOWN and the middle one either LEFT or RIGHT to clear a path, then head down one screen . Along the lower path here, go right one screen back to the room with the Spiked Beetles. Defeat or avoid the Beetles and head right one screen through the locked door on the far right side of this room.
Several Ropes will be swarming about in here, so it’s best to take them out while trying to navigate. Bomb the cracked portion of the lower wall and head through the opening. Avoid or defeat the Red Moblins and Red Zols in here and go down the stairwell to a dungeon area below.
Climb along the blue ladders towards the right and drop off onto the ledge. Ride the green platform moving side-to-side over to the rightmost ledge and head right one screen. In this next section of the dungeon area, ride the first moving green platform down and barely move under the Spiked Thwomp, then quickly back out of the way to avoid getting smashed. As the Thwomp is rising, walk under it and to the right where another green platform will lift Link up to a blue ladder. Climb this ladder up out of the dungeon area.
Defeat the five Ropes in this room and a chest will appear on the red tile in the center. Open the chest to obtain a Small Key, then head back down the stairwell and into the dungeon area again. Navigate this area the same as before, heading left one screen and up the blue ladders.
Go up one screen to the room with five enemy Ropes and defeat them, then push the out-of-place blue block in the upper-right corner of the room RIGHT. Grab the Compass from the chest here if needed and continue up one screen through the passage.
Defeat the two Pig Warriors and head through the opened doorway left one screen, then ride the minecart left, up, and left one screen each. Go up one screen through the passageway to enter room of the Wing Dungeon’s mini-boss, Swoop.
Swoop will fly around the room and periodically crash into the floor wherever Link is standing, creating holes in the floor of the room upon impact. If Link falls into one of these holes, he will end up in a room on the floor below, where a few enemies will be roaming about. If this happens, return to the mini-boss’ room by heading right one screen, go up the staircase, then head left one screen. The battle will start over with Swoop at full health each time the room is re-entered, so try to avoid falling through the floor at all costs.
The best strategy to defeat Swoop is to stand on the blue tiles surrounding the perimeter of the room and wait for Swoop to crash down, following up with a charged Spin Attack upon impact. These tiles cannot be broken by Swoop’s attack, thus creating no hole for Link to fall through. Listen for the sounds Swoop’s wings make while he is flying to speed up, indicating that he is about to crash down, then move slightly out of the way and unleash the spin attack on him. After taking some damage, Swoop he will become faster and bounce towards Link upon crashing into the floor instead of staying in one spot, making avoiding damage a bit more difficult. If Link can afford to take a hit or two, continue using Spin Attacks on Swoop when he lands while following up with regular sword slashes as he is bouncing towards him. Otherwise, try to stand to the side of where Swoop will land so that he will still bounce down upon impact, allowing a Spin Attack to land while also giving Link enough space to move out of the way of the attack.
After defeating Swoop, head right one screen through the upper-most open doorway and descend the stairwell to the basement first floor. Avoid the Anti-Fairiess and Shrouded Stalfos in this room and continue down one screen. Three Shrouded Stalfos will fire arrows toward Link in this room, so avoid the attacks or take the enemies out by tossing Bombs over the bottomless pit at them. Follow the narrow path clockwise and go right one screen through the passage at the end.
Climb the stairs at the top of this room to enter a dungeon area, then climb the ladder and head right. Step off the ledge onto the next lower piece sticking out, just enough to have the Thwomp crash down but avoid contact with Link, then walk under it and continue right one screen. Along this path, Link will find the Roc's Feather, granting him the ability to jump when equipped.
Optional: 30 Rupees
After grabbing the Roc’s Feather, head left one screen back to where the Thwomp is. Walk just under it to have it crash down, then walk past and use the Roc’s Feather to jump onto the small piece of ledge. When the Thwomp crashes towards Link again, jump onto the next ledge, then on top of the Thwomp’s head once it lands. Ride the Thwomp up toward the ceiling and jump off into the narrow passage on the left, where 30 rupees will be found.
Exit the dungeon area back to the room below. Hop over the yellow tile twice, being careful not to stand on the surrounding weak floor too long as it will cave in. When the yellow tile turns red, the doorway to the right will open, so head through it right one screen.
Jump across the gaps, navigating towards the right side of this room, and hop into the mine cart. Ride the cart up a screen and swipe at the yellow switch when passing by, altering the arrangement of the tracks and allowing the cart to drop Link off in this room. Toss a bomb at the cracked portion of wall on the right and go through right one screen.
Defeat the two Shrouded Stalfos and Keese here and a chest will appear on the tile in the center of the room. Open the chest to obtain a Small Key, then head back left one screen. Push the puzzle block LEFT, UP, RIGHT, and UP once each and onto the black tile, with the blue side facing up, unlocking the gate over the mine track.
Hop into the mine cart and it will take Link left one room . Here, the group of tiles on the right need to be changed to match the colored blocks on the left. Two Peahats will be swarming the area, so defeat or avoid them while completing the puzzle. Using the Roc’s Feather, jump over the left tiles, turning them yellow, and the right tiles, turning them blue, and grab the Small Key that falls into the room. Head left one screen, then up the stairs on the far left.
Walk up the steps to the right and unlock the block using a key, then walk down along the ledge and hop off via the open space on the left. Head down one screen through the opening here. Jump across the gaps onto the platforms to the right and then down to the red tile. Jump over the tile until it turns blue, opening the gate over the track to the right. Navigate back across the gaps and up and left one screen each to the mini-boss room. Take the upper passage right one screen and head over to the right side of the room and hop into the mine cart, which will carry Link down one and right two screens.
Optional: Gasha Seed
Across the gap, two Red Pig Warriors will be found guarding a chest. Hop across and defeat or avoid the Pig Warriors, then open the chest to obtain a Gasha Seed!
Go up one screen to a room with a group of vases and several Pig Warriors and Peahats swarming about. The enemies in this room can be a bit annoying, so consider defeating them all before trying to solve the puzzle. Toss aside all of the vases except for the upper-right one, then push it UP(x5) and RIGHT(x3). Hop across the gap above so Link is behind the gray vase now and push it DOWN(x2). From the left side of the room, hop across the gap so Link is standing on the left side of the vase now, then push it RIGHT(x3) onto the switch. Head through the opened doorway right one screen, then immediately down one screen.
The blue tiles to the right must be filled with all the statues surrounding them in the exact same order as the group on the left. In order to move the statues, Link must jump over the red tile at the top of the screen to change its color to whatever color statue needs to be moved. To solve this puzzle, jump over the tile and change it to blue. Of the row of blue statues, from the left, push the first one UP(x2), the second one UP(x3), and the third one UP and LEFT once each. Jump over the tile again, making it yellow, and push the yellow block LEFT(x2). Change the tile to red, then push the first and third red statues DOWN once each, then the second statue LEFT(x2), DOWN(x3), and RIGHT once. Push the final red statue DOWN(x3) and LEFT once. Change the tile blue again and push the final blue block into place to have a Small Key fall onto the gray tile between the two statue arrangements. Grab the key and head back up one screen.
Unlock the door on the right side of the room and head through right one screen. Link can change the color of all the tiles in the room by jumping over the central tile, revealing the Mini Zols for a moment before they camouflage back to the color of the floor. While they are visible, defeat all of the Mini Zols by striking them with the sword and a chest will appear containing the Boss Key!
Exit the room left one screen and continue up one screen through another locked doorway. Walk to the upper-right corner of this room and go through the locked boss door right one screen. Here, a staircase will be found that leads to the domain of the dungeon’s boss, Head Thwomp.
Equip the Bombs and Roc’s feather for this fight as both will be needed to damage the boss and climb back up the ladder if Link falls. Head Thwomp will shoot fireballs from its head towards Link at times while rotating to reveal four different colored faces, each with a different expression. Link must toss a bomb from one of the ledges at the top of the room into the boss’ head while its top is open, attempting to land the bomb right when Head Thwomp’s red face is shown, to damage it. If any other face is shown while the bomb enters the boss’ head, it will execute a different attack depending on the face at the time.
Timing the bomb throw will be fairly easy at first, but Head Thwomp will begin rotating faster after each time it takes damage. Try to stay on the upper ledge of either side of the room, tossing each bomb directly into the boss without falling as Link will have to climb up one of the ladders again, giving the boss more time to launch an attack. After four successful hits, Head Thwomp will fall to the floor below and be defeated.
Walk down to where Head Thwomp fell to obtain an additional Heart Container, then descend the blue ladder on the right side of the room and head up one screen to find the second Essence of Time, the Ancient Wood, is held. After obtaining the second essence, a message from the Maku Tree will reveal the location of the next one in the South Sea on Crescent Island and suggest he find a way there from the town’s coast…