Akita Shoten The Legend of Zelda Strategy Guide: Difference between revisions
Jump to navigation
Jump to search
Want an adless experience? Log in or Create an account.
m (Text replace - "{{Product" to "{{Infobox|product") |
m (Text replacement - "Infobox|product" to "Infobox|publication") |
||
| (6 intermediate revisions by 3 users not shown) | |||
| Line 1: | Line 1: | ||
{{Infobox| | {{Infobox|publication | ||
|name = Akita Shoten The Legend of Zelda Strategy Guide | |name = Akita Shoten The Legend of Zelda Strategy Guide | ||
|image = [[File:Akita-Shoten-The-Legend-of-Zelda-Strategy-Guide.png|250px]] | |image = [[File:Akita-Shoten-The-Legend-of-Zelda-Strategy-Guide.png|250px]] | ||
| Line 22: | Line 22: | ||
|weight = | |weight = | ||
|color = | |color = | ||
|ISBN = 4-253-11809-7<br>4253118097 | |ISBN = 4-253-11809-7<br/>4253118097 | ||
|UPC = | |UPC = | ||
|gallery = | |gallery = | ||
| Line 34: | Line 34: | ||
*Dungeons also have a screen by screen guide with screenshots and descriptions. | *Dungeons also have a screen by screen guide with screenshots and descriptions. | ||
*Complete guide for the first 6 dungeons, and only brief information on the last 3. | *Complete guide for the first 6 dungeons, and only brief information on the last 3. | ||
*No guide provided for the | *No guide provided for the [[Second Quest]]. | ||
==Artwork== | |||
<gallery> | |||
File:Akita-Shoten-Link-Sword-Shield.png | |||
File:Akita-Shoten-Link-Inventory.png | |||
File:Akita-Shoten-Link-Kneeling.png | |||
File:Akita-Shoten-Link-Mountain.png | |||
File:Akita-Shoten-Link-Running.png | |||
</gallery> | |||
==Scans== | |||
<gallery widths="140px" heights="220px"> | |||
File:Akita-Shoten-01.jpg | |||
File:Akita-Shoten-02.jpg | |||
File:Akita-Shoten-03.jpg | |||
File:Akita-Shoten-04.jpg | |||
File:Akita-Shoten-05.jpg | |||
File:Akita-Shoten-06.jpg | |||
File:Akita-Shoten-09.jpg | |||
File:Akita-Shoten-10.jpg | |||
File:Akita-Shoten-11.jpg | |||
File:Akita-Shoten-12.jpg | |||
File:Akita-Shoten-13.jpg | |||
File:Akita-Shoten-14.jpg | |||
File:Akita-Shoten-15.jpg | |||
File:Akita-Shoten-16.jpg | |||
File:Akita-Shoten-17.jpg | |||
File:Akita-Shoten-18.jpg | |||
File:Akita-Shoten-19.jpg | |||
File:Akita-Shoten-20.jpg | |||
File:Akita-Shoten-21.jpg | |||
File:Akita-Shoten-22.jpg | |||
File:Akita-Shoten-23.jpg | |||
File:Akita-Shoten-24.jpg | |||
File:Akita-Shoten-25.jpg | |||
File:Akita-Shoten-26.jpg | |||
File:Akita-Shoten-27.jpg | |||
File:Akita-Shoten-28.jpg | |||
File:Akita-Shoten-29.jpg | |||
File:Akita-Shoten-30.jpg | |||
File:Akita-Shoten-31.jpg | |||
File:Akita-Shoten-32.jpg | |||
File:Akita-Shoten-33.jpg | |||
File:Akita-Shoten-34.jpg | |||
File:Akita-Shoten-35.jpg | |||
File:Akita-Shoten-36.jpg | |||
File:Akita-Shoten-37.jpg | |||
File:Akita-Shoten-38.jpg | |||
File:Akita-Shoten-39.jpg | |||
File:Akita-Shoten-40.jpg | |||
File:Akita-Shoten-41.jpg | |||
File:Akita-Shoten-42.jpg | |||
File:Akita-Shoten-43.jpg | |||
File:Akita-Shoten-44.jpg | |||
File:Akita-Shoten-45.jpg | |||
File:Akita-Shoten-46.jpg | |||
File:Akita-Shoten-47.jpg | |||
File:Akita-Shoten-48.jpg | |||
File:Akita-Shoten-49.jpg | |||
File:Akita-Shoten-50.jpg | |||
File:Akita-Shoten-51.jpg | |||
File:Akita-Shoten-52.jpg | |||
File:Akita-Shoten-53.jpg | |||
File:Akita-Shoten-54.jpg | |||
File:Akita-Shoten-55.jpg | |||
File:Akita-Shoten-56.jpg | |||
File:Akita-Shoten-57.jpg | |||
File:Akita-Shoten-58.jpg | |||
File:Akita-Shoten-59.jpg | |||
File:Akita-Shoten-60.jpg | |||
File:Akita-Shoten-61.jpg | |||
File:Akita-Shoten-62.jpg | |||
File:Akita-Shoten-63.jpg | |||
File:Akita-Shoten-64.jpg | |||
File:Akita-Shoten-65.jpg | |||
File:Akita-Shoten-66.jpg | |||
File:Akita-Shoten-67.jpg | |||
File:Akita-Shoten-68.jpg | |||
File:Akita-Shoten-69.jpg | |||
File:Akita-Shoten-70.jpg | |||
File:Akita-Shoten-71.jpg | |||
File:Akita-Shoten-72.jpg | |||
File:Akita-Shoten-73.jpg | |||
File:Akita-Shoten-74.jpg | |||
File:Akita-Shoten-75.jpg | |||
File:Akita-Shoten-76.jpg | |||
File:Akita-Shoten-77.jpg | |||
File:Akita-Shoten-78.jpg | |||
File:Akita-Shoten-79.jpg | |||
File:Akita-Shoten-80.jpg | |||
File:Akita-Shoten-81.jpg | |||
File:Akita-Shoten-82.jpg | |||
File:Akita-Shoten-83.jpg | |||
File:Akita-Shoten-84.jpg | |||
File:Akita-Shoten-85.jpg | |||
File:Akita-Shoten-86.jpg | |||
File:Akita-Shoten-87.jpg | |||
File:Akita-Shoten-88.jpg | |||
</gallery> | |||
{{Cat|Strategy Guides}} | {{Cat|Strategy Guides}} | ||
Latest revision as of 21:59, May 3, 2022
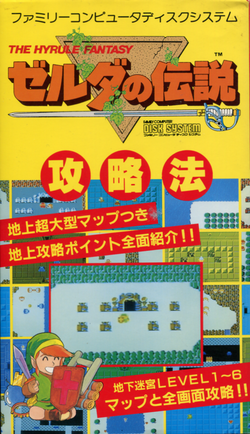
Akita Shoten The Legend of Zelda Strategy Guide

Games | ||
Cost | ¥390 (yen) | |
Release Date | May 2nd, 1986 | |
| Credits | ||
|---|---|---|
Publisher | Akita Shoten | |
| Attributes | ||
Type | ||
Language | Japanese | |
Length | 88 Pages | |
ISBN | 4-253-11809-7 | |
Features
- A large foldout map of the Overworld, showing the locations of all the dungeons.
- Very little artwork can be found, but the little artwork that is found are nice full page art pieces.
- Quick appendices for the characters, items, and enemies.
- Overworld has a screen by screen guide, with every screen getting a screenshot and short description.
- Dungeons also have a screen by screen guide with screenshots and descriptions.
- Complete guide for the first 6 dungeons, and only brief information on the last 3.
- No guide provided for the Second Quest.


