Twilight Princess Dungeons: Lakebed Temple
Posted on January 22 2013 by Axle D. Wilder
 Ahh, the Lakebed Temple. This is the water dungeon of Twilight Princess, and the third dungeon in the game. Perhaps I haven’t been around different forums enough, but I don’t ever really seem to hear that much about this dungeon, and when I do, rarely very many positive sentiments. No one seems to really like the Lakebed Temple that much particularly. I think that’s a shame; I like this dungeon quite a bit. I’ve written before about how I think that water dungeons have an unfairly bad reputation, and how I quite liked the infamous Water Temple of Ocarina of Time. The Lakebed Temple is no exception to this, and it’s actually my favorite water dungeon of the 3D Zelda games.
Conceptually, the Lakebed Temple initially comes off as a ripoff of the Water Temple in Ocarina of Time, because they’re both located at the bottom of Lake Hylia. This is very different visually in Twilight Princess, however, as you descend well below where the light shines brightly, descending into the darker depths of the lake and into a small pit where the temple entrance is located. For someone claustrophobic like me, this makes the dungeon pretty creepy right off the bat.
That creepy atmosphere is immediately continued and then carried throughout the entire dungeon by its music. This dungeon music is slow and atmospheric like the rest in the game, but in this case I think it’s absolutely freaking perfect. If there was one word I would use to describe this theme, it would be “pressure”. The song carries a sense of anxiety, certainly, which fits the dungeon well, but there’s more than that. It’s not simply that the music feels dangerous — which it does, but not overpoweringly — but that it feels like it’s weighing on you. The deep sounds and the wooden tinkling give a great impression of unreleased power, of pressure, and this fits the deep, submerged temple perfectly. There’s something dangerous — something unseen but that can still be felt — all around you. Is it only the water? The lighter cords in the song help to brighten it up slightly and give you a sense of the exotic alongside the sense of pressure, but these are heavily interspersed among other sounds, making this reprieve very brief.
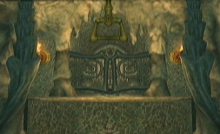
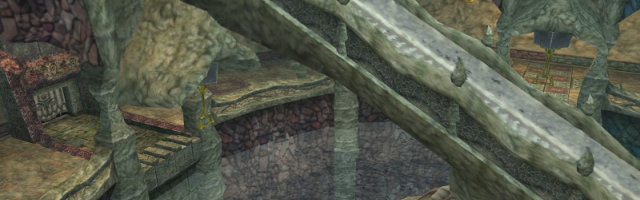
The dungeon itself, visually, is fairly straightforward but still manages to be interesting, and does carry the sense of the exotic that pops up periodically in the dungeon’s music. It’s a temple built within a natural underground, underwater cavern. There are stalactites hanging from the ceiling, coral and vines, and the like. But there are also carved and ornate stone walls, stairways, and beautiful contraptions. There’s nothing significantly original here, but there’s a lot of neat ideas that, at least for me, make the dungeon one of the most visually striking in the game. It just feels a little fresh, distinct, and interesting. If I were to think of two words that I feel fit this dungeon’s visual theme, they would be “mermaid palace”. Do not ask me to rationalize that statement; if it doesn’t make sense right away, it’s not going to!
Gameplay-wise, the Lakebed Temple is elaborate and can be tricky, but I haven’t really felt that previous water dungeons — with the possible exception of the Great Bay Temple — were overly hard, so I certainly don’t think so with this one; the Lakebed Temple is of enjoyable difficulty for me, and I think, more so than its predecessors, it doesn’t deserve any of the stigma that water dungeons tend to receive.
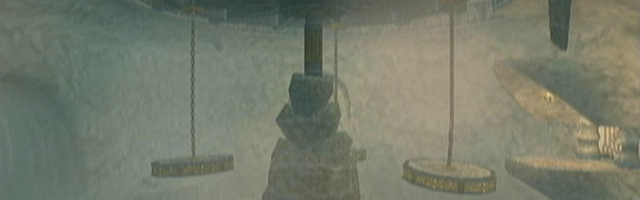
This puzzle and navigation centric dungeon has you first simply navigate through a few rooms to its central chamber. From there, it turns you loose on the rest, and you must figure out your way to one of the two main wings of the dungeon. Within these wings, you must locate and open flood gates, that send water along channels in the ground. This flow activates mechanisms and then returns to the main room, where you must typically direct it down the rotating central staircase and into the other wing of the dungeon. The dungeon item, the Clawshot, is largely only used for navigational purposes, though it does tend to be the most, or only, effective weapon against some of the dungeon’s foes. It is nice to see the dungeon make frequent use of an item that isn’t its main one; the dungeon requires frequent use of Bomb Arrows.
The design concept seems confusing, but isn’t that bad once you understand it. The hardest parts are navigating to one of the wings for the first time, and keeping all the changes in the dungeon straight as you activate the flows. Effectively, the dungeon is difficult and mind-bending because of micromanaging. But otherwise, it’s pretty simple, and the more time you spend in it the more sense it makes.
The dungeon itself has a handful of minor flaws. Like the Forest Temple, this dungeon has an abundance of vines that must be climbed, and navigating them takes far too long. There is also a moment or two where the rooms you must navigate while underwater are very small and mazelike, making it very difficult to understand where you are (though this was probably the point and maybe I shouldn’t complain). The worst flaw for me, however, is the optional backtracking. I praise most dungeons in this game for their optional chests, but in this one they just piss me off. Particularly, after opening both of the floodgates, you can go back and acquire a few new treasures back in the first wing, but none of them seemed worth the lengthy trip to me. Especially the meager reward of 50 rupees that you get for trudging all the way back to the top of the room where you activated the first floodgate.
The dungeon certainly doesn’t focus at all on combat, but nonetheless it introduces some worthwhile battles. Lizalfos appear significantly in this dungeon and can be challenging. Several of the other enemies, particularly the underwater menaces, can do a hefty bit of damage to the player if they’re not careful and have yet to acquire the Clawshot. There are a handful of other enemies — the most prominent being the somewhat obnoxious Helmasaurs — but, like I said, they’re not the biggest aspect of this dungeon; most enemies are here to distract and whittle, not to challenge. That said, not paying attention to them over extended periods of time can still deplete Link’s health, and it can be easy to get that distracted while focusing on the puzzles and navigation.
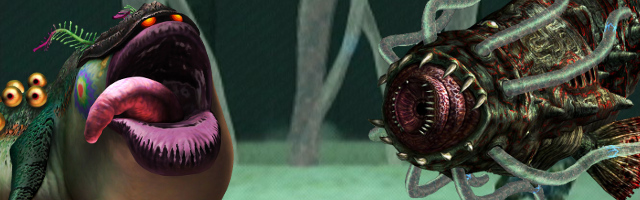
Like all of the dungeons in the game, the Lakebed Temple has a distinct and iconic miniboss. The confusingly-named Deku Toad is one of my favorites. People say it’s disturbing (even Midna is grossed out by it), and I guess it is, but oddly enough it’s never bothered me even though its real-world inspiration, the Surinam toad, has always highly disturbed me. The fight is too easy, as always, but is extremely fun regardless and you can tell the designers had some fun with it. The boss has its own music, and it’s one of my favorites of the game. It fits the battle very well, giving it a sense of power but also of heaps of weirdness.
The dungeon’s main boss, Morpheel, is both one of the best and one of the worst bosses in the game. The beast is certainly impressive, being fought within a titanic, cavernous chamber buried deep below the rest of the dungeon. This water-filled room is nearly black, blocked from all light, and is pretty creepy considering the huge drop you have to make to get to it at the end of the dungeon. After diving to its very bottom, a giant maw opens up like a Sarlacc, and the battle begins as you target its tendrils. The fight plays out very much like that of Morpha from Ocarina of Time, and the reference is obviously intentional. The fight doesn’t feel too unoriginal, however, and is actually one of the best in the game. It tends to take a while to work out how to target the eye weak point within the tendrils safely, and I at least got hit many times trying to do so. As a result, Morpheel is actually pretty challenging at first, and though he’s still fairly easy, his difficulty is about perfect for merely the third boss of the game. Had this phase had a few more attacks and lasted a bit longer, it would have been flawless.
That all changes when you get to his second phase, however. When he pulls out of the sand to reveal himself as a massive eel and swims around the chamber, he turns into an almost entirely neutral target. If he has any programming to tell him to come after you, it’s barely noticeable as he moves around the chamber seemingly at random, and his only attack is for you to accidentally stay in front of him for too long and get sucked into his mouth; he never actively tries to put you in this position, and you have ample time to escape his suction before you’re eaten. The battle is mostly just about chasing Morpheel. This is inexcusable, and the fight should have been an intense chase where you desperately have to switch the situation from running from Morpheel to chasing alongside him. Regardless, the atmosphere is still great and both the first and second battle themes communicate the appropriate moods, even if the actual second fight doesn’t fit nearly as well.
The Lakebed Temple has a halfway disappointing boss and a few other annoyances, but overall I think its design is brilliant. It has a lot of clever puzzles and some tricky challenges in just getting around, and I think it’s very well-designed. There’s a lot of synergy between the different rooms of this dungeon, particularly from the central mechanic of the water flows, making the dungeon feel connected, and all part of one big puzzle. That’s the best kind of dungeon to me, and it’s this reason that I think it’s very well-designed. The Lakebed Temple is not only my favorite dungeon of Twilight Princess, but my favorite water dungeon out of all of the 3D Zelda games.
But what did you think of the Lakebed Temple? Do you think it’s well-designed like I do, or did you find its design to be frustrating or bad in another way? How do you feel about the Deku Toad and Morpheel? Did you find them fun or disappointing? How do you feel the Lakebed Temple stacks up to previous (and following) water-themed dungeons? Tell me in the comments, and look forward to next week when I review Arbiter’s Grounds!

