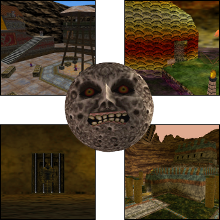
Majora’s Mask Dungeons: Mini-Dungeons
Posted on December 18 2012 by Axle D. Wilder
 Well, you’ve probably noticed that there’s been a delay in me writing this. It’s been four weeks since I reviewed Stone Tower Temple, and to be honest I wasn’t sure I was going to review Majora’s Mask’s mini-dungeons. Like I alluded to in my similar review for Ocarina of Time, some people consider certain areas in the Zelda games to be dungeons that I do not. For an area to really be a dungeon in a Zelda game, I believe it has to follow the core rules of a dungeon as set by that game and actually be acknowledged as such; the main dungeons carry a recurring formula of maps, compasses, hint statues, big keys, dungeon items, etc., but are also referred to as a dungeon in those items’ descriptions, and have a unique dungeon map screen that replaces the overworld map.
In Majora’s Mask, the only dungeons that do this are the four main temples. That said, there are enough of their traits intact in the other supposed “dungeons”, and enough people who consider them as such, that I can at least address them in a final review. So let’s get started.
First up is the Pirate’s Fortress. You visit this area as part of the pre-dungeon quest of the Great Bay region, needing to recover the stolen Zora Eggs that the Gerudos are keeping. An additional thing gotten here that, while not 100% necessary, is extremely useful, is a photo of a Gerudo, so you can trade it to the Fisherman for the Seahorse. His purposes for the photo are… unclear.
This area is overall a refinement of the Gerudo Valley portion of Ocarina of Time, generally better than that area but occasionally a little more annoying. The layout is far less confusing, leaving the player just the slightest bit clearer on where to go; there was really no need for a stealth portion like this to have been mazelike in the way that it was in Ocarina of Time, and the Pirate’s Fortress fixed that. The early parts of the fortress are contained primarily within the waterways beneath the fortress and function the most like a traditional dungeon. After completing this area, you move into the inner fortress where the familiar stealth section takes place. It’s nice that if you get spotted here, you return to the beginning of this portion and not the beginning of the entire area; it’s a refreshing and much-needed checkpoint that makes this part of the game appropriately forgiving, if not necessarily realistic (why did they only throw you out past their inner wall, and not out of the fortress entirely?)
Sneaking through this area armed with only your wits and the Bow is possible, but very challenging. It can be quite a test of your ability, but fun just the same. Bringing the Stone Mask can make it extremely easy, if you don’t care for the challenge. Sadly, collecting the eggs can be very irritating because you never seem to have enough bottles to carry all the eggs at once, forcing you to return once or twice. It’s a minor enough problem, though. Its music, if not as memorable as that of Gerudo Fortress, is dramatic enough to give you a sense of danger and make the portions of sneaking more nerve-wracking than they would have been without it. It’s a great complement to the area and its gameplay. Fighting Gerudo Warriors recycled from Ocarina of Time for its mini-bosses isn’t impressive, but it’s unoffensive.
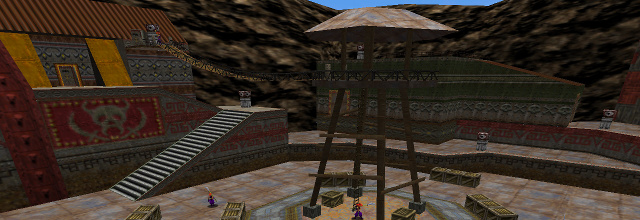
Visually, the dungeon is distinct, but not breathtaking. It’s a unique area with metal walkways and buildings, skull symbols, and visible machinery. They put a lot of work into making it, including each of its individual rooms, fresh and unique. It accomplishes its intended setting very well.
Overall, a good area and a solid part of a pre-dungeon adventure, if not as impressive as the mini-dungeons in Ocarina of Time.
The next is Beneath the Well. There isn’t exactly heaps to say about this one, because it’s brief and barely dungeon-like at all. It’s completely unlike the Bottom of the Well in Ocarina of Time, and focuses almost entirely on a sort of fetch quest or trade sequence; each door is locked until its guardian Gibdo — which can be spoken to while wearing the Gibdo Mask — is given the item it craves.
Most of the time their hints are clear enough, though one or two are pretty vague. Ultimately, however, this area is intensely annoying. Chances are you will not have the necessary item immediately, and will have to stock up ahead of time. Even after doing so, running out of these items mid-dungeon will force you to run back and forth through the maze, collecting items from rooms in one wing to appease Gibdos in another. All the while you must dodge tedious traps, waiting for them to spring so you can run through while they reload. That, or run through them recklessly to save time, burning huge amounts of hearts away.
Visually, it’s just as disappointing; it’s nothing more than a dark, nondescript set of tunnels. It’s a highly irritating area that I cite as one of the only truly bad moments in Majora’s Mask. I have no idea why Nintendo thought a lot of running around and trading of items was a good idea for an area; why couldn’t Beneath the Well have just been a creepy mini-dungeon like the Bottom of the Well from Ocarina of Time?
The only song that plays in Beneath the Well is the same song that plays in all of the dungeon-like areas that lack their own theme songs: The game’s basic cave theme. It works, but it doesn’t help save this area from being horrible.
The Ancient Castle of Ikana is easily the best alleged mini-dungeon of the game, and also easily has the most in common with traditional dungeons, since it has a lot of the traps and objects and design concepts you only find in the main dungeons, has an item reward in the form of a song (the Elegy of Emptiness), and has a totally unique boss of its own in addition to a recurring mini-boss.

Immediately following Beneath the Well, this area blows it out of the water, giving you a very intense, intimidating song that can be rather shocking after the moody and ominous tune heard throughout Ikana Valley. Like virtually every song in Majora’s Mask (especially its dungeon themes), this song is an excellent complement to the castle’s gameplay and atmosphere. It helps make your time in the dungeon feel like both a siege and an infiltration at different times.
The Ancient Castle of Ikana has some awesome storyline buildup, rooms filled with unique traps and challenges not seen elsewhere in the game, and its own style and atmosphere. Its boss, Igos du Ikana and his two Stalfos bodyguards, is a cool fight that can be pretty challenging in a fun way. It’s a really cool part of the game that, while brief, really improves the game and serves its role quite nicely as both a climax to the previous portion of Ikana and a prologue to Stone Tower Temple. I would say its only truly annoying part is being forced to bring a Powder Keg to blow a hole in the roof. I can forgive that and it’s actually a little cool to be forced to prepare for the mini-dungeon, even if you should have some indication of what to bring. The dungeon boasts some of the best presentation for a boss that I’ve ever seen, a funny easter egg if you confront him while wearing the Captain’s Hat, and a silly little paper airplane sitting on one of the pillars in the courtyard outside. What’s not to love?
Finally, the Ancient Castle of Ikana, like the Pirate’s Fortress, is very visually distinct. Its stone walls and floors are brightly colored, with odd checker patterns, ornate carvings, and other decorations. It’s a very interesting fusion of regal and tribal. I have to hand it to Nintendo for making a castle feel like a refreshing, unique, and original area aesthetically. I’ve never seen a castle quite like this, and that’s cool.
Real briefly I would like to touch on the Spider Houses. These were two areas in the game designed to continue, for the most part, the Gold Skulltula mechanics from Ocarina of Time. They were self-contained hunts for the creatures, and collecting all of them within the Spider House would reward you with a prize (the Mask of Truth for the Swamp Spider House, and the Giant Wallet for the Oceanside Spider House).
I always found the Swamp Spider House a little annoying, though it’s not really bad. The player must rely on a lot of odd little things to get through, including certain songs, bottled bugs, and things like that, so I think it was a little more haphazardly designed and demanding of resources than it needed to be; its design didn’t really feel smooth. This didn’t ruin its value to the game as an optional dungeon, and it was still fun in that role. However, the Oceanside Spider House was much cooler.

While the Swamp Spider House definitely looked distinct on the inside — like a bright Aztec shrine — the Oceanside Spider House’s design is much more my thing. Looking completely normal on the outside, it almost immediately descends into a dark cellar, and its dark innards resemble a haunted house far more than any other dungeon of the series does. It has an excellent atmosphere, and probably has the single best use of the game’s generic cave music; it feels meant for the Oceanside Spider House. I love this area and I enjoy it every time I play the game. I feel its design was way smoother than that of its predecessor, as well.
And finally, we cap off this enormous list of maybe, maybe not mini-dungeons with the game’s final one, and indeed the final dungeon of the game entirely: The Moon.
I’m sure everyone’s familiar with the surreal plain in which you encounter the infamous “Moon Children”. Wearing the masks of the dungeon bosses found throughout the game, these children take you into isolated mini-dungeons themed after the bosses and their respective areas at the price of masks. If you have all of the masks and can complete all of these mini-dungeons, you can collect the Fierce Deity Mask just before facing the final boss by speaking to the child wearing Majora’s Mask.
The symbolism of this part of the game is debated — I personally think it’s a spiritual moment representative of the Skill Kid and his regrets regarding his friendships — but I also want to talk about the design here.
As a final area, it’s barely there at all. Really, Stone Tower Temple was the game’s final dungeon; the Moon is almost entirely skippable, allowing you to merely fight Majora’s Mask and finish the game immediately. Its only purpose as an actual dungeon is as an optional one where you can acquire the Fierce Deity Mask. The individual little mini-dungeons, while cool and a little distinct, are mostly short and cheap gauntlets designs as brief challenges. The Odolwa dungeon is overly simplistic, having you simply navigate across some moving platforms with Deku Flowers in a gauntlet that is much easier than that from the Deku Palace near the beginning of the game. The Goht section is needlessly frustrating, requiring absurdly accurate use of the Goron’s rolling; you pretty much have to master it. The Zora one is a guessing and memory game as you try to navigate down branching paths in the water to find your way to your goal. And the Twinmold one is a simple mini-boss gauntlet. All of them are charming (except for the Goht one… I hate that one), but none of them impress. They’re just filler for some side content. I would never say they shouldn’t be in the game, but they’re not particularly deserving of any praise. The best part of them for me is the creepy sort-of playrooms that you find the children in at the end of each of these mini-dungeons.
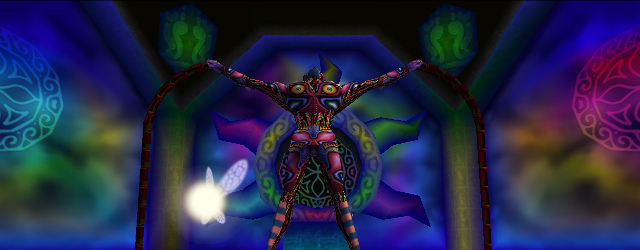
The final boss, on the other hand, is amazing. One of the best final battles against one of the coolest enemies of the series. Majora’s three forms have distinct feels not only in terms of gameplay, but in tone as well, and together they make for a very memorable finale. The fights can be resolved multiple ways, the lamest of which being with the Fierce Deity Mask, which turns them into a cakewalk. This final boss is memorable to me as the first challenging boss I cleared in any video game without any help or guides… despite using guides throughout most of the rest of Majora’s Mask. Conquering such a hard boss for the first time on my own was highly rewarding and memorable for me, and I would strongly discourage fighting him with the Fierce Deity Mask your first time against him. Even on my latest playthrough, Majora managed to be a challenge for me and was a lot of fun. An excellent way to end off the game.
All in all, Majora’s Mask’s dungeon-like areas — whether they truly qualify as dungeons or not — are as numerous as they are fun. The majority of them are compelling, with only one complete flop. Some of them are not terribly impressive, like the Moon or the Swamp Spider House, but they’re still appropriate and serve their worthy roles in the game adequately enough. I hate Beneath the Well, but I enjoyed all the rest and I loved the Ancient Castle of Ikana and the Oceanside Spider House.
And that brings my Majora’s Mask Dungeons series to a close. Be sure to tell me your thoughts on these many mini-dungeons, as well as whether or not you count them as mini-dungeons! Look forward to next week, when I start the next game in the Axle’s Dungeon Reflections series: Twilight Princess!

