This chapter covers the normal mode of the HD version of Twilight Princess for the Nintendo Wii U. If you are playing on the Nintendo Wii, check out the Palace of Twilight – Wii Version.
- Chapter 1 – Ordon Village
- Chapter 2 – The Twilight
- Chapter 3 – Faron Woods: Twilight
- Chapter 4 – Forest Temple
- Chapter 5 – Kakariko Village: Twilight
- Chapter 6 – Death Mountain
- Chapter 7 – Goron Mines
- Chapter 8 – Lanayru Province: Twilight
- Chapter 9 – Lake Hylia: Sidequests
- Chapter 10 – Lakebed Temple
- Chapter 11 – The Master Sword
- Chapter 12 – Gerudo Desert
- Chapter 13 – Arbiter’s Grounds
- Chapter 14 – Scaling Snowpeak
- Chapter 15 – Snowpeak Ruins
- Chapter 16 – Sacred Grove: Round Two
- Chapter 17 – Temple of Time
- Chapter 18 – In Search of the Sky
- Chapter 19 – City in the Sky
- Chapter 20 – Palace of Twilight
- Chapter 21 – Cave of Ordeals
- Chapter 22 – Hyrule Castle
20.1 Fun with the Double Clawshots
Back at Lake Hylia, climb out of the water and warp to Castle Town. There are a few things that we can do now that we have the double clawshots. Go to enter Castle Town and you should get a few letters from the Postman. One of them is from Purlo, the owner of the STAR mini-game in town. Enter town and go down the west road and enter the STAR mini-game.


Now that you have the double clawshots there is a second game that you can play. Pay the 15 rupees and you’ll enter the cage. The game works just as it did the first time around. It is a bit more challenging, but with the double clawshots, it isn’t that difficult. Get all the stars at the bottom first and progress your way upwards. Collect all the stars in 90 seconds and Purlo will be very surprised. For completing the game, Purlo will reward Link with the Giant Quiver, which can hold up to 100 arrows.


Leave the game and then leave Castle Town to the south. Walk down all three sets of stairs and head to the west. You’ve likely noticed this large hole in ground, but until now we could not progress here without the Double Clawshots. On the far west side of the gap you’ll find a clawshot target. Grab onto it; then continue proceeding down the hole, grabbing onto each new target. You will eventually reach a treasure chest containing the Miiverse Stamp for the Hylian Letter V.


Talk to Midna and warp to the Kakariko Gorge. Walk to the northwest portion of the gorge and look at the massive rock pillars that are in the gorge. There is a clawshot target on one of them so claw on over to it. Against the west wall you’ll see another clawshot target, so hook on over. From there, you’ll see some ivy. Claw on over and climb the ivy. Climb to the other side of the pillar and you’ll find a treasure chest. Open it to get Piece of Heart #43.


Speak with Midna and warp to the Mirror Chamber.
20.2 Entering the Palace of Twilight


Once you arrive at the mirror chamber, walk up the small steps towards the Mirror of Twilight. The Mirror shards will come together, which will break the chains and create a path to the Twilight Realm. Midna will begin speaking of the Twilight Realm, and say that it’s not as bad a place as it seems.


The sages will appear once again, and they will ask for forgiveness from Midna. The sages then refer to her as the Twilight Princess. A scene is shown where Zant turns Midna into her imp form. Midna gives a recap of some of the events of the game that have taken place; and then explains how she must now save this world as well.


After the scene, walk to the end of the Mirror and a staircase will appear, leading into the Twilight Realm. Walk to the top of the steps and press A to enter.


Once you enter, a short cinema takes place and names the area the Palace of Twilight. Midna appears and asks for one last selfish favor. She wants to hide inside of Link, embarrassed of her people to think that an imp is going to save them.


20.3 West Corridor; The Compass
There are a bunch of creatures just standing around but Link cannot interact with any of them. Cross the bridge to the west and go through the door. Walk to the north end of this room and defeat the many twilit deku babas and keese.


There is a masked enemy that transports around the room. The enemy is just a large version of the mask that Zant uses, and is thus known as a Zant Mask. The enemy will shoot fireballs towards Link which can be blocked with the shield. Z-target the Zant mask and use the shield attack to deflect the fireballs back at the mask. This will temporarily stun the mask, at which Link can then strike at it with his sword. Afterwards a treasure chest will appear; open it up to get a small key. Use the clawshot on one of the targets at the north end of the room; then go through the locked door.


Walk forward and you’ll see a huge area filled with black fog. Run into the fog and you’ll be turned into wolf Link. Activate your senses and run to the northeast part of the room. Once you are out of the fog, transform back into human Link. Face the black fog and you’ll see another Zant mask crawling around. Once it shoots a fireball towards you, use the shield attack to knock it back at him. Then run over and you’ll turn into wolf Link. Quickly attack him, using Midna’s charge attack to do more damage. You can either leave the fog and transform back into human Link to repeat this process, or wait as wolf link until the mask reappears and attack it that way.


After the mask has been defeated two treasure chests will appear in the room. Run over to the south end and open the treasure chest at the southeast corner to get the Compass. Watch out for the annoying shadow vermins that are around this area. Now run to the north end of the room and open the treasure chest here to get a small key.
Transform into human Link and look at the wall to the east. Use the clawshot onto the target and from there, claw onto the target on the ceiling. Drop down and then run southward. Fight off two twilit deku babas and open the treasure chest to get the Angry Midna Miiverse Stamp. Claw onto the target at the north wall of the room and drop down. Walk to the far north of the room and go through the locked door.


The door will close behind you and you’ll see a hand covering a crystal orb at the other end of the room. Run towards the orb and two walls of twilight will appear. An image of Zant appears known as Phantom Zant. It will summon a twilit ball that will create a warp portal from which a bunch of enemies will appear. Use the spin attack to defeat them all and chase after the image of Zant. It will keep disappearing and reappearing in other parts of the room.


Just keep following the image of Zant and once you are close enough, slash at him with your sword a few times, or attack with a dash if you are wolf link. Eventually the image of Zant will summon a second twilit ball above his head and unleash a bunch of shadow vermins. Defeat them and continue to follow the image of Zant around. After several hits, the image of Zant will vanquish and the room will fill with black fog.


Run over to the north end of the room near the orb and Midna will explain that the orb is known as a Sol. It is the equivalent of the sun of the normal world of Hyrule. Midna tells Link to take this sol to the entrance of the Palace of Twilight.
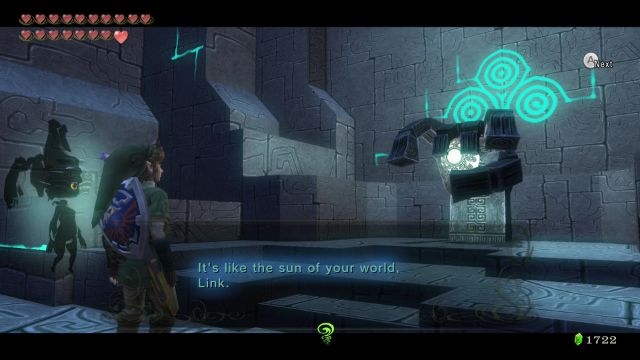

Walk up to the hand that holds the sol and slash at it with your sword. Lift up the sol from the ground and walk towards the center of the room. With the sol in hand, the black fog will disappear. As you move close to the center, the hand that held the sol will awaken. This hand, which is known as Zant’s Hand, resembles wall masters from previous Zelda titles. The hand will awaken and wants to get the sol back.
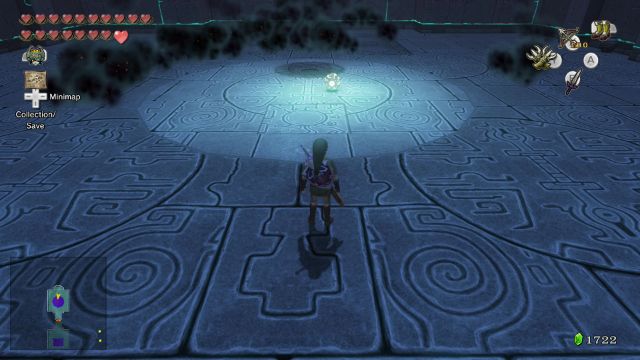

In the center of the room, place the sol in the small hole in the ground. This will create a large staircase that leads back to the south. Climb up the staircase and defeat the shadow vermins that appear. At the top of the staircase turn around and you’ll see the hand come close to the sol. If the hand picks up the sol, use your clawshot or arrows to hit the hand and it will be temporarily stunned. It takes three shots with the arrows or clawshot to stun the hand. Use the clawshot to pull the sol towards you and go through the door to the south.


Run forward and drop down to the lower area. The hand will return from the previous room. Drop the sol into the hole in the center of the room and a large staircase appears. Quickly run to the top of the staircase and pull the sol up with you. Be sure to keep an eye out for the hand. Shoot it with three arrows to stun it momentarily. At the top of the staircase toss the sol to the higher areas to the south. Then carry it all the way to the south portion of this higher ledge and jump down. Go through the door at the end of the room.


Run forward and the hand will be right behind you. Drop down and defeat the shadow babas. You’ll notice on your map that there is a passage at the west end of the room. Holding the sol near, the waterfall of black fog will disappear. Claw onto the target that is on the wall and open the treasure chest to get Piece of Heart #44.


Drop down and lift the sol once again. Carry it to the south end of the room, avoiding the keese, shadow babas, and shadow vermins in your way. Once you reach the end go through the door to the north. The creature that was right in front of you will revert to its normal Twili form. Carry the sol around and transform all the Twili back to their normal forms.


In the center circular platform there are two spots in the ground. Place the sol in one of the spots and a platform is highlighted on the east side. Midna pops out and says that there is a second sol to be found. Walk over to the block that has been highlighted. It will take you to the area at the east side of the Palace. Go through the door to reach east side of the dungeon.
20.4 East Corridor; The Dungeon Map
Defeat the keese that are flying around this area and then jump to the lower area. Use the clawshot to grab onto one of the four targets on the walls. From here, use the second clawshot to grab onto the target that is on the ceiling. Lower yourself down and land on the moving platform.


A Zant mask will appear at the north end of the room. Watch out for the fireballs that it sends shooting in your direction. Use the shield attack to knock them back at the mask to stun it momentarily. Jump across the moving platforms to get to the north side of the room. From here, you can actually defeat the Zant mask when it appears. After doing so a treasure chest will appear at the northeast corner of the room; open it to get a small key. You can also open the small treasure chest nearby to get a purple rupee. Use the key on the locked door and head north.


Run forward into the black fog and three shadow beasts will appear, as well as a wall of twilight. Use wolf Link to defeat the creatures just as you have done before. Once defeated, walk to the north end of the room and you’ll see another Zant mask. Either keep attacking it with wolf Link or use the shield technique with human Link. Once it has been defeated, three more Zant masks appear, but inside the black fog. As wolf Link use Midna’s charged attack to defeat these guys quickly. Once all three have been defeated, a treasure chest will appear at a higher ledge in the room.


Walk to the north side of the fog and clawshot towards the target on the wall. From here, use the clawshot to grab onto the ceiling target. Look at your map and you’ll notice that there are four treasure chests in this room. Use the ceiling target as well as the many targets along the wall to get to each of the treasure chests. The one on the top-right contains a purple rupee, the one on the top-left contains the Miiverse Zant Stamp, the one on the bottom-right contains a small key, and the bottom-left one contains the Dungeon Map. Once you’ve collected all the goodies, go to the north end of the room and use the small key on the locked door.


The door will shut behind you. Run forward and you’ll meet up with another Phantom Zant. Walls of twilight will form and enclose you in. The Phantom Zant will start the battle with a bunch of shadow babas. This battle is exactly the same as the first time around. Once defeated, the wall of twilight will disappear and the door will unlock.


An area of black fog will fill the center of the room. Ignore it for now and walk over to the Zant Hand at the north side of the room. Like before, slash at the wall master and it will drop the Sol. Pick it up and walk towards the center of the room, causing the Zant Hand to awaken. Place the sol in the center of the room and a staircase will appear. A shadow beast and several shadow vermins will attack you. Destroy them and climb the steps. Use the clawshot to pull over the sol and then head through the door to the south.


Run to the center of the room and drop the sol in the hole. The hand will appear through the wall and a shadow beast will appear as well. Defeat the beast as well as the keese that appear and then stun the wall master with some arrows. Use the clawshot targets along the north wall and then claw to the ceiling. Grab onto one of the targets on the east wall and then climb the steps that have been created. Climb the steps to the south end of the room and from there use the clawshot to pull up the sol. Drop down to the area below and go through the door.


Once you enter run straight and drop down into the black fog. There is a crystal at the north end of this room that will light up and create two platforms. Stand on the one to the east and it will take you to the higher area on the east side of the room. Be careful of the hand that follows you. Jump over to the treasure chest that the platform takes you to. Open the treasure chest to get the final piece of heart.


With the sol in hand, drop down to the floor and return to the crystal at the north end of the room. This time take the other platform and it will pull you up to another treasure chest on the other side of the room. Open it to get another unneeded purple rupee.
Return to the crystal at the north end of the room and let one of the platforms raise you higher. Now jump onto the other moving platform. From here, continue jump across these moving platforms with the sol above your ahead. You’ll reach a platform with two crystal switches. The sol will light them up, creating another moving platform. This will take you to the door at the south end of the room; go through it.


The Twili that is right outside the door will return to normal. Step on the square platform and ride it back to the main portion of this area. Drop the second sol into the hole and Link’s sword will fill with a golden light, creating the Light Sword. Now, Link can cut through the dark fog!


20.5 The Big Key
Now that your master sword has been infused with light, walk up to the north and you’ll see a waterfall of black fog as well as a few shadow kargaroks. Defeat the shadow kargaroks and then stand on the red embedding on the ground. Perform a spin attack and the black fog will temporarily vanish. Jump across the gap and go through the door.


Walk to the north end of the room, slashing your master sword to get rid of the black fog. Defeat the shadow keese, shadow babas, and the shadow vermins here. At the north end of the room, there are two more sols, but these are not powered with light. There are two spots for them within the black fog. Cut through the fog to find these spots and place both sols in their place. This will create a staircase in the center of the room.


Climb the staircase and you’ll see an unlit crystal. Slash at it with your master sword and it will light up. Step on the platform and it will take you to the east side of the room. Defeat the shadow baba here and you’ll see three more unlit crystals. Walk southward and you’ll see several Zant masks appear. With the master sword infused with light, a single stroke will defeat a Zant mask.


Once all the masks have been defeated a treasure chest will appear; open it up to get a small key. Walk to the middle of the three crystals and perform a spin attack. All three will light up and a new moving platform will appear under you. Stay on it and it will take you to the upper area of the west side of the room. Use the small key and go through the door.


At the end of the balcony you’ll see several shadow beasts and a ton of shadow kargaroks. Defeat them all and then perform a spin attack to hit the two crystals. Ride the moving platform that appears to get to the south island. Defeat the Zant mask enemy here and then several more will appear back on the balcony. Use the spin attack to hit the two crystal switches and ride the platform back to the balcony.


Defeat six more masks and a treasure chest will appear at the north end of this area. Open it up to get a small key. There is still another treasure chest in this area. Use the spin attack to get behind the waterfall of black fog. Defeat a few more shadow kargaroks that are resting here and then look upwards. Use the clawshot on the target and then use the double clawshot on all the other targets as you climb your way to the top of this area. At the very top, there is a target on the ceiling. Drop down from there and open the treasure chest to get the Big Key.


Perform a spin attack to get rid of the fog and then head towards the locked door at the northeast portion of this area. Enter through the door.
20.6 Usurper King: Zant
Walk forward and a wall of twilight will block your path. A few shadow beasts will also fall down. Defeat them just as you’ve been doing and the wall of twilight will disappear.


Slash through the black fog and you’ll see four crystal switches. Stand in the center and perform a spin attack. A moving platform appears below you and carries you up. Four platforms then appear in all four directions. Jump over to the next platform that is to the west. Ride it across the room and two platforms will appear, jump to the one at your right. This platform will rise straight upward and you’ll see a ledge to the west. Jump over to it and defeat the deku baba that is found here.


Jump to the platform that is at the northwest corner of the room and it will take you to the east side of the room. Use the clawshot to grab onto one of the far targets. Defeat the Zant mask that is in this area and then look up. There is a target that is at the bottom of a pillar. Grab onto it and then lower yourself onto a moving platform. This will take you back to the west side of the room. Use the clawshot to grab onto the target and then defeat the nearby Zant mask. A treasure chest will appear nearby; open it up to get a small key.


A new platform will appear near the center of the room. Jump over to it and it will take you to the highest part of the room. Use the small key to open the locked door.


Slash your way through the black fog and a wall of twilight will form. Defeat the numerous amounts of shadow beasts that fall from the ceiling. Once they are all gone the wall of twilight will disappear. Walk to the north end of the room and use the big key on the locked door. Enter to finally face off with Zant.


Walk up the steps and a lengthy cut scene will take place explaining how Zant got his power. It turns out it was Ganondorf that stored his power within Zant. After some more talk, the battle begins the Usurper King ZANT.


Zant is the final boss of the Palace of Twilight. The battle with him takes place in six different areas, with each area looking like a previous boss or mini-boss room, with the exception of South Castle Town. The attacks he performs, and the ways to defeat him depend heavily on each area, which is why all of the info, attacks, moves, and ways to defeat him, are listed below.
The first phase takes place where we fought the temple boss of the Forest Temple.


Zant will float around the room and shoot toxic balls towards Link. These rapid balls are shot at you but can be easily blocked with the Hylian Shield. After several balls are shot your way, Zant will teleport to another area and repeat the same process. Immediately when Zant teleports, Z-target him and toss the gale boomerang. Zant will fall into the liquid below and bounce towards the land. Run up to him and slash away with your sword. Just hit him a few more times and phase 1 of Zant will be complete.


The next phase takes place within the Goron Mines on the huge magnetic plate where we battled a mini-boss earlier in the game. Zant will attempt to rock the magnetic plate, trying to get Link to fall into the lava below. Equip the iron boots and you’ll stick to the ground. After he jumps madly a few times, he’ll then settle down and shoot his projectile at you once again. Block it with the shield and then take off the iron boots. Quickly run over to Zant as he is out of breath and slash at him with your sword. Repeat this process a few times and phase 2 of Zant will be complete.


The next phase takes place where we fought the temple boss of the Lakebed Temple. Equip both the Zora armor as well as the iron boots once you arrive at this third phase of the battle. Once you hit the ground a massive head mask of Zant will emerge from underground. The mask will open and Zant will be inside, shooting his standard projectiles towards Link. Z-target him and use your shield to block his attacks. Once his attacks are over, use the clawshot to pull Zant out of the mask and slash at him. He will next appear in the massive mask and it will burrow underwater. This time four masks will appear and the center ground will cave in. Only one of the masks will open that contains Zant. Repeat this same process of waiting for him to finish his attack then pull him out with the clawshot. After some more strikes with the sword phase 3 of Zant will be complete.


The next phase takes place back in the Forest Temple, but this time we are in the mini-boss room where we fought the baboon. Change back into the hero’s clothes and take off the iron boots. Zant will jump around the various pillars in this room and then finally settle at a pillar. He’ll begin to shoot his projectiles at you once again. Roll into the pillar that he is standing on twice and Zant will tumble to ground. Unleash a series of sword slashes and then the process will start over. Keep rolling into the pillar that Zant is on and unleash more sword slashes until Zant has been defeated, completing phase 4 of the battle.


The next phase takes place in the bedroom of the Snowpeak Ruins. Upon entering, Zant will super-size and fly around the room. Watch Zant’s reflection on the ice and wait for him to come crashing down to the floor. Roll out of the way and then use the ball and chain to hit Zant’s foot. Once you hit him, Zant will shrink down greatly so that he is just a fraction of the size of Link. Run on over and slash at him repeatedly. Zant will eventually grow back to his humongous size. Repeat the same process a few times until you’ve defeated him and phase 5 of Zant is complete.


The 6th and final phase takes place on the steps of Hyrule Field, just south of Castle Town. Zant grows swords as hands and begins trying to slash at Link. Zant will also begin spinning rapidly and moving towards Link. When he is just slashing at you, use the back slice to attack him. When he is spinning, just dodge out of the way. He’ll get tired from the spinning and this will allow Link to run and slash away with his sword. As the battle progresses, Zant will get faster and faster. Just keep hitting him whenever you can, and avoid his crazy spinning attacks.


Eventually Zant will fall to the ground defeated and you’ll appear back in the Palace of Twilight. Midna regains the fused shadows that were stolen by Zant earlier in the game. Zant is barely alive, sitting on his chair and he calls Link and Midna traitors. He tells Midna that she cannot return to her true form and that his God has already been reborn in this world. Midna then uses the power within her to destroy Zant.


Collect the Heart Container that is near Zant’s chair and then talk to Midna to leave the area. You’ll be taken back to the entrance of the Palace of Twilight. Return to the area where you entered the Twilight and select enter. You’ll then re-appear in the Mirror Chamber.


- Chapter 1 – Ordon Village
- Chapter 2 – The Twilight
- Chapter 3 – Faron Woods: Twilight
- Chapter 4 – Forest Temple
- Chapter 5 – Kakariko Village: Twilight
- Chapter 6 – Death Mountain
- Chapter 7 – Goron Mines
- Chapter 8 – Lanayru Province: Twilight
- Chapter 9 – Lake Hylia: Sidequests
- Chapter 10 – Lakebed Temple
- Chapter 11 – The Master Sword
- Chapter 12 – Gerudo Desert
- Chapter 13 – Arbiter’s Grounds
- Chapter 14 – Scaling Snowpeak
- Chapter 15 – Snowpeak Ruins
- Chapter 16 – Sacred Grove: Round Two
- Chapter 17 – Temple of Time
- Chapter 18 – In Search of the Sky
- Chapter 19 – City in the Sky
- Chapter 20 – Palace of Twilight
- Chapter 21 – Cave of Ordeals
- Chapter 22 – Hyrule Castle
