Twilight Princess’s Minibosses Are The Ugliest, Weirdest, and Most Engaging Collection of Minibosses In Any Zelda Game
Posted on May 27 2021 by Sean Gadus

For all the criticism leveled at Twilight Princess by fans and critics, the game has some of the best enemy designs in the entire Zelda series. The murky and somewhat more realistic art style, while often maligned by many fans, lends itself to some incredible enemy and boss presentations. The game features some massive and monstrous bosses like Diababa, Morpheel, and Stallord. These foreboding creatures are sights to be hold, even if their fights do not always live up to the high standard set by the series.
And while the bosses may look great, they don’t hold a candle to the game’s incredible minibosses. The minibosses in Twilight Princess are the best collection minibosses in any of the 3D games. Across the vast game world and nine excellent dungeons, every one of the Twilight Princess‘ minibosses slink, slither, and stalk their way into the player’s memory. Here’s a big Blood Moon tribute to some of the grossest, weirdest, and best minibosses in the entire series.
Ook
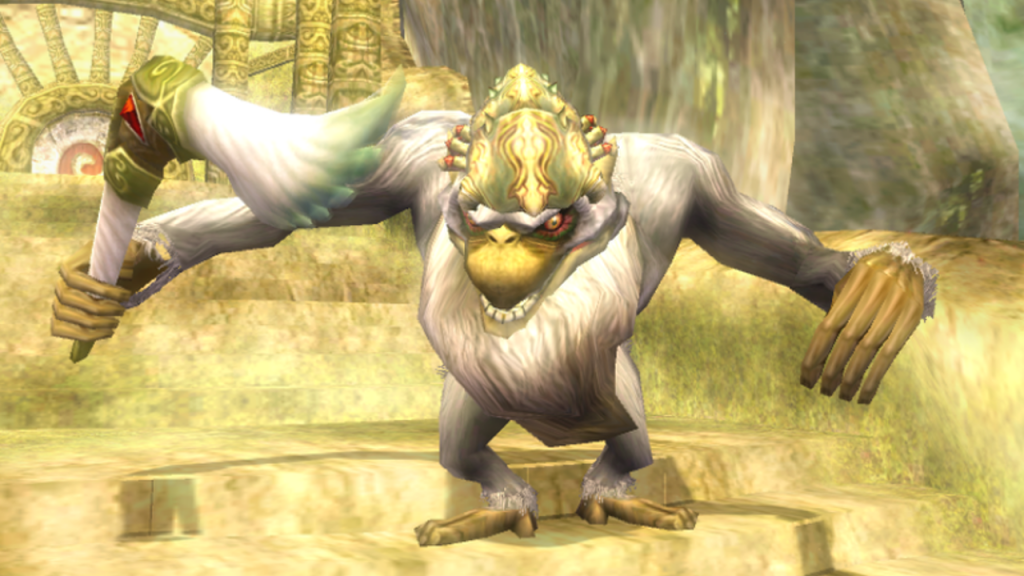
Ook is a great opening miniboss for Twilight Princess. The mischievous monkey (who is controlled by a parasite) provides a simple but frenetic initial miniboss fight for the game. With short stubby legs and skyscraping arms, Ook’s design and animations have the right amount of silly for a dungeon that sees Link rescuing helpless monkeys and using a monkey bridge to reach the dungeon’s boss. Ook is introduced early in the Forest Temple, as the monkey uses the Gale Boomerang to destroy one of the bridges that Link needs to cross. This moment establishes Ook as a key obstacle for Link to overcome and gives the player an enemy to look forward to.
The battle with Ook takes place in a wide open space with totem poles in the center of the expansive room. Link has to chase the monkey from totem pole to totem pole and then roll into the totem poles to knock Ook off his lofty perch. After sending him crashing to the ground, the player must hit Ook in the butt, which is as nonsensical as it sounds. Overall, I enjoy the tempo contrast that takes place during the fight with Ook. The player will have to nimbly avoid the Gale Boomerang as well as some Deku Baba Serpents that Ook knocks from the ceiling. The action slows down after knocking the monkey out the air. And once the player frees Ook from the parasite’s control, the embarrassed monkey will run away, only to assist Link in the boss fight against Diababa.
King Bulblin
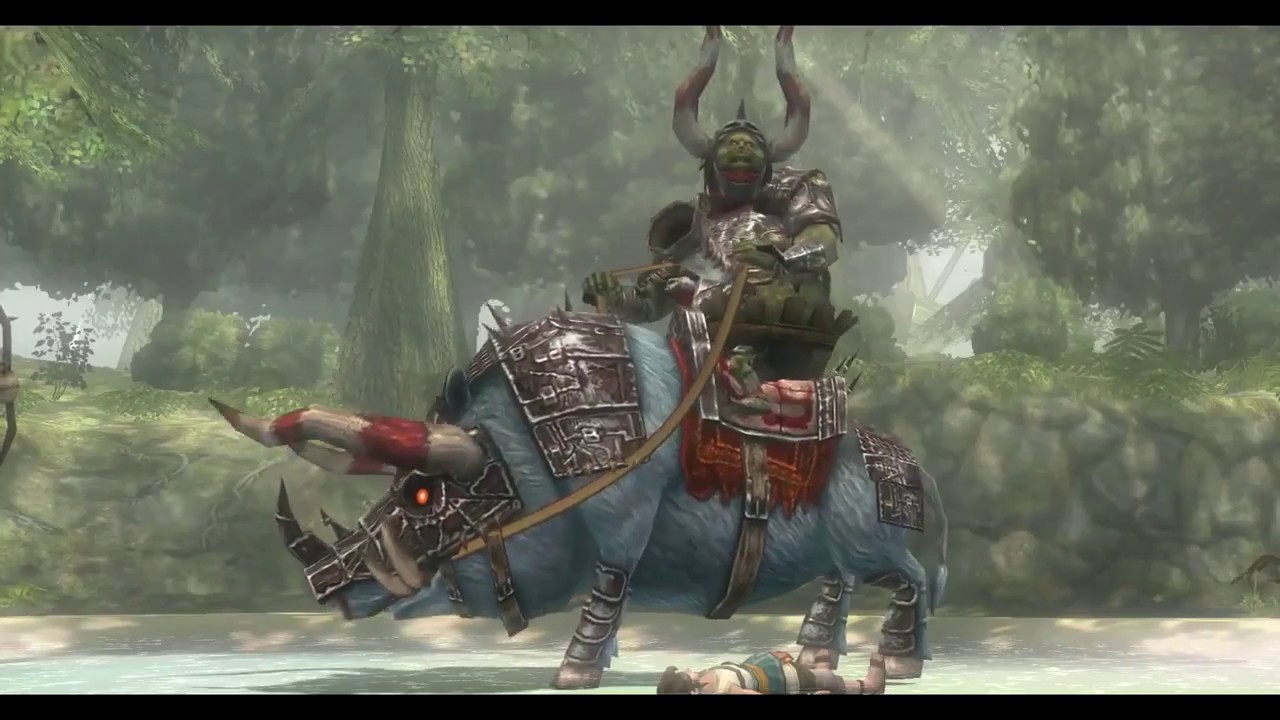
King Bulblin is one of the rare minibosses to plays a significant role in the throughline narrative of a game. Link’s large green horned nemesis makes a dramatic entry in the early hours of the game; his minions clobber Link and kidnap the children of Ordon Village. The villain’s reappearance at Kakariko Village culminates in an intense horseback battle and an epic duel on the Bridge of Eldin. This incredible fight against King Bulblin is one of the game’s most dramatic moments. Despite getting beat at the Bridge of Eldin, the King returns to hound Link on a bridge near Lake Hylia and deep in the sands of the Gerudo Desert.
Each battle frustrates Bulblin further as Link defeats him and ruins his horns; it must be hard to build an intimidating reputation when you keep getting beat by a Hylian. While the final showdown in Hyrule Castle is relatively easy, the moment when Bulblin surrenders to Link is a fantastic twist. Bublin finally acknowledges that his sworn enemy is one tough Hylian. It is a moment of levity and surprise that happens surprisingly close to Link’s final battle with Ganondorf. King Bulblin makes a final appearance in the end credit sequence, joyfully riding across Hyrule Field. Maybe old baddies can change and learn new tricks.
Dangoro

If Dangoro was just a little smarter, there might be no minboss fight in the Goron Mines; but where would the fun be in that? This hulk-like armored Goron clashes with Link as our protagonist nears the Hero’s Bow. The Dangoro fight takes place on a magnetic platform floating in a pit of lava. The uneven surface of the platform can make this fight a bit tricky the first time, but also adds some much needed uncertainty to the battle.
The fight is enjoyable because it requires the player to think about their position on the tilting platform. The Goron Mines are themed around the Iron Boots, and the fight requires Link to utilizes these items in clever ways. The player will need to nimbly position themselves close enough to strike Dangoro with the Ordon Sword. After that, the player must equip the boots to stop Dangoro’s steamroll attack. Link then uses his goat wrangling skills to hurl the guardian into lava. Choosing the correct side to toss Dangoro into lava is also important, because tossing him in the wrong direction might keep him on the platform; this mistake will make the player repeat the process all over again. The Dangoro fight requires the player to learn the steps/phases of the battle and then execute them smoothly.
Twilit Bloat
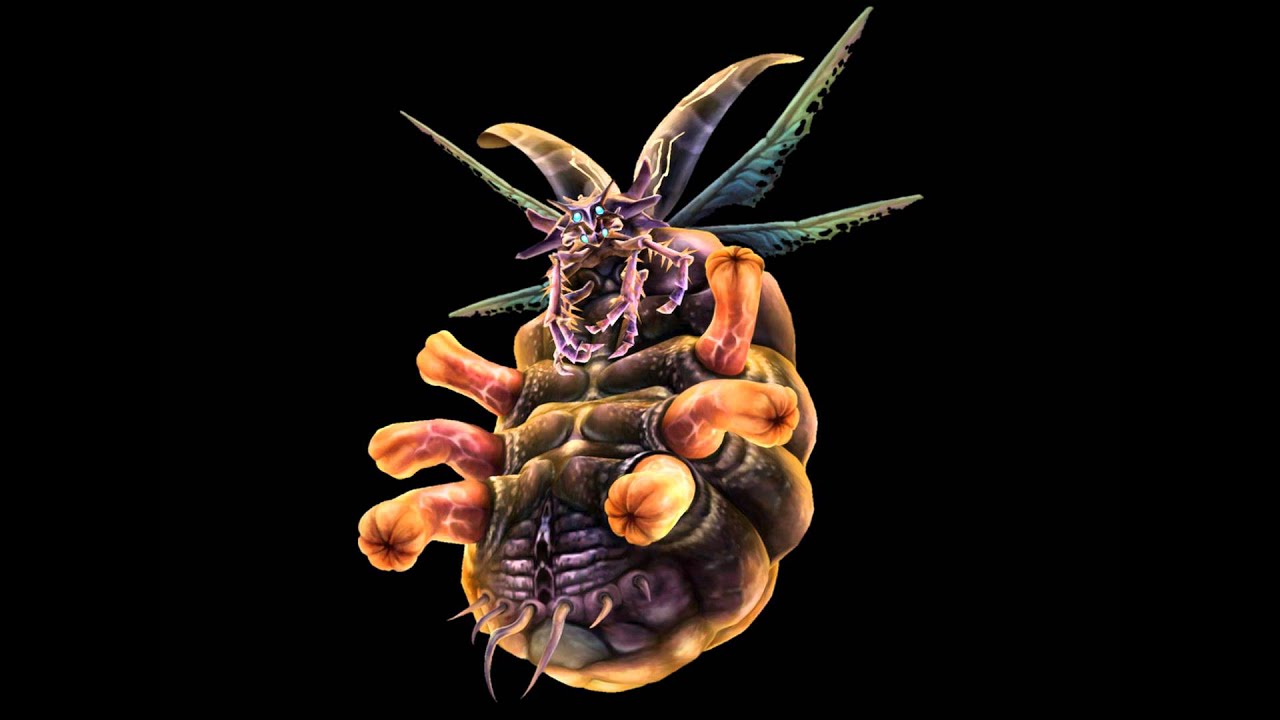
Along with the Deku Toad (see the next entry), the Twilit Bloat is a leading contender for “the most disgusting monster in Zelda history.” This bloated, pulsating, overweight lightning bug appears in the middle of Lake Hylia as the player tries to finish the Tears of Light quest. The battle feels incredibly dramatic with the game drawing you to Lake Hylia with a mysterious new map marker. As you arrive to the lake, there is a rain storm in full force. When the player finally doggy-paddles their way to the middle of the lake, the disgusting, bloated insect reveals itself.
Like the other shadow insects, the Twilit Bloat requires the player to use their wolf senses to see the creature. The water-based setting makes it difficult to maneuver because Wolf Link lacks the grace and fluidity of his Hylian form. Additionally, Wolf Link must move to and from bits of wood floating on the lake’s surface. In order to defeat the beast, Link must bite the Twilit Bloat and use the finish move on all six of its appendages. While the first step is rather easy, getting Wolf Link in position for the finishing move can be tricky due to the deep water and small wood platforms the player stands on.
Deku Toad

Another frontrunner for “the most disgusting monster in Zelda history” is Lakebed Temple’s Deku Toad. This massive, puke-green amphibian makes a disgusting opening by crashing down from the ceiling towards Link. With two beady eyes, massive lips, and a tongue reminiscent of Jabba the Hut, the Deku Toad is an unsightly creature. The Deku Toad has two main methods of attack: tadpoles and crushing Link. The first method of attack involves hatching tadpoles, which will aggressively pursue Link. Once Link dispatches these nuisances, the Deku Toad will leap into the air and crash down on him. The player must judge the shadow of the beast and position themselves so they can strike the beast’s tongue when the creature is immobile.
While the tadpoles are not extremely dangerous, they can be quite annoying. It can feel like a chore to fight them off, taking a little damage repeatedly throughout the process. However, Deku Toad’s weak point, his tongue, is a great piece of design as the player’s eye are drawn to the lolling appendage. Thus, the player can easily work out that it is the beast’s weak point. Overall, fighting the Deku Toad can feel like the player cleaning a dirty room; it isn’t fun but it has to be done. To add insult to injury, the battle concludes with the Deku Toad puking up a chest containing the dungeon item. That is one chest that Link probably did not want to touch.
Skull Kid
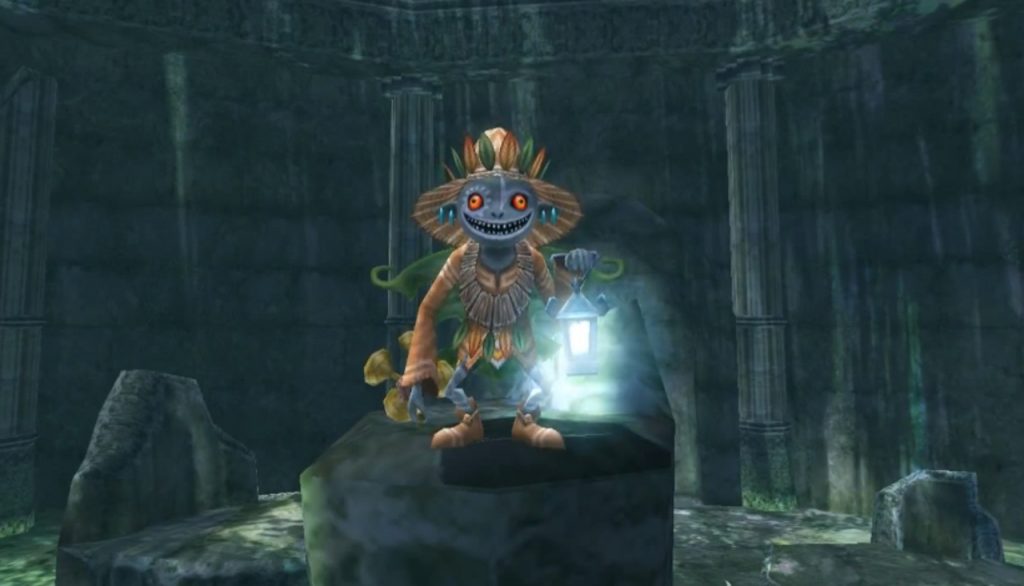
Can an enemy be playful? That is a key question with Skull Kid’s appearance in Twilight Princess. In this game, Skull Kid has large orange eyes, a scarecrow’s hat, a glowing lantern, and a unique musical instrument. The mysterious Sacred Grove, a spiritual successor to The Lost Woods from A Link To The Past and Ocarina of Time, serves as Skull Kid’s playground. As the player goes through the twisted game of hide and seek with the tiny terror, they are confronted by his creepy wooden puppets and his mischievous laughter.
As the player progresses through the mysterious forest ruins, they might get the sense that this is nothing more than a game for Skull Kid’s own amusement. The first encounter, which takes place while Link is in wolf form, leads to the Master Sword. A second game of hide and seek with Skull Kid leads to the secret entrance to The Temple of Time. As Skull Kid departs for the last time, he bids the player adieu by saying, “That was fun!” The concept of having a miniboss fight and not having to kill the enemy is refreshing and helps show that not everything needs to be killed. This idea is something that the development team would reuse later in Twilight Princess with King Bulblin.
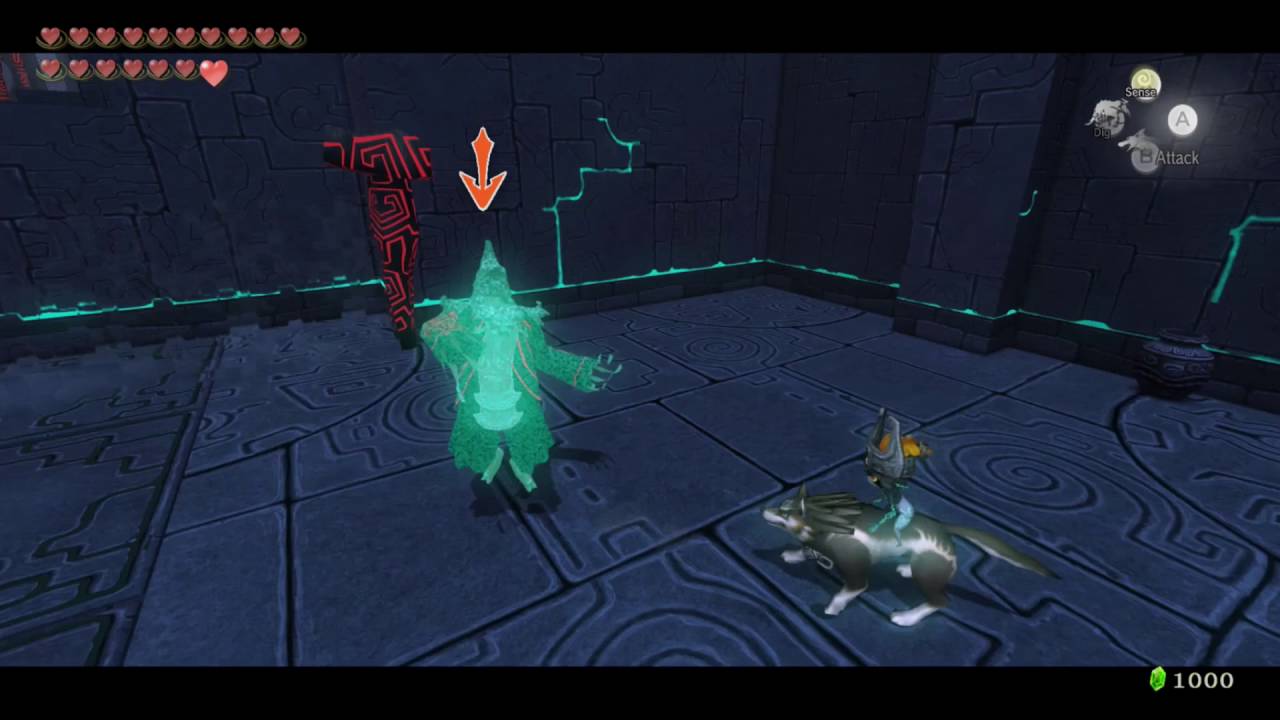
Death Sword
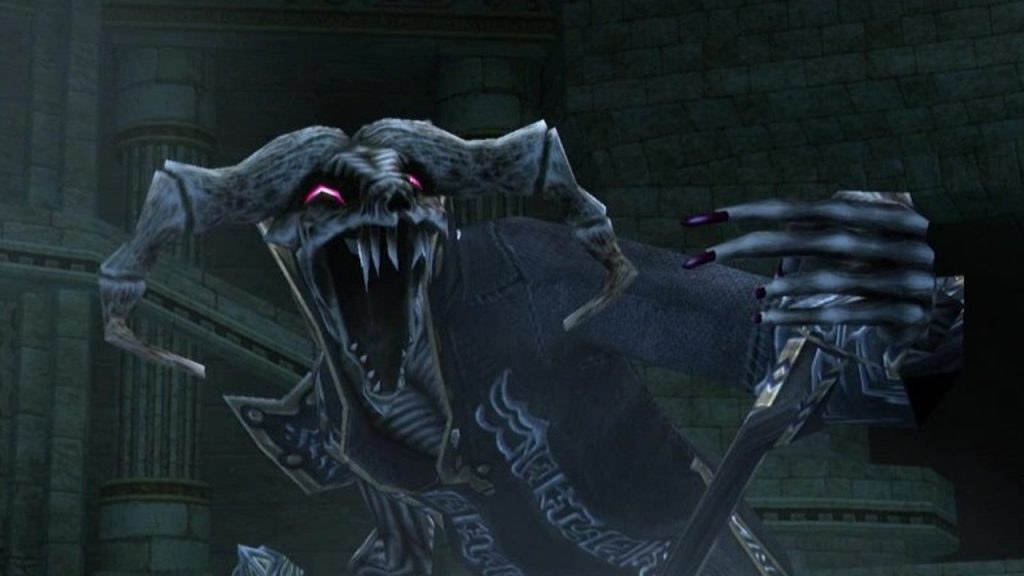
The Arbiter’s Grounds is one of the most iconic and nightmarish dungeons in the series. This sand drenched hellscape is home to a throng of death traps, ghouls, and zombies. The most memorable of these nether spirits is Death Sword, a spectral nightmare that protects the dungeon’s item. The presentation for this miniboss is impeccable, with Link entering a darkened chambers and being forced to free the monster himself by cutting imprisoning ropes away from a mysterious blade. The massive sword is made of black metal and glows with blood-red runes. Once Link uses his wolf senses, it is revealed that Death Sword is a relative of the grim reaper with massive horns, sharp teeth, and a blood curdling scream.
The monster requires Link to switch between his wolf form and Hylian form, which is a progression of what Link has already done with the Poes in the Arbiter’s Grounds. The player must use the wolf’s advanced senses to reveal the monster and attack Death Sword. Once Death Sword reveals itself, Link must avoid the wailing specter’s massive sword and use the bow or sword to damage it. The monster will speed through the air around Link in a circle and smash Link with its sword. Overall, this fight leans in to the nightmarish atmosphere of the Arbiter’s Grounds and presents a suitably nightmarish foe. The way Death Sword floats above the arena is suitably eerie, and the way he quickly spins around Link can sneak up on the player. Additionally, the song for Death Sword is one of the most memorable themes in the game, a creepy, methodical battle theme that keeps the player on edge.
Darkhammer
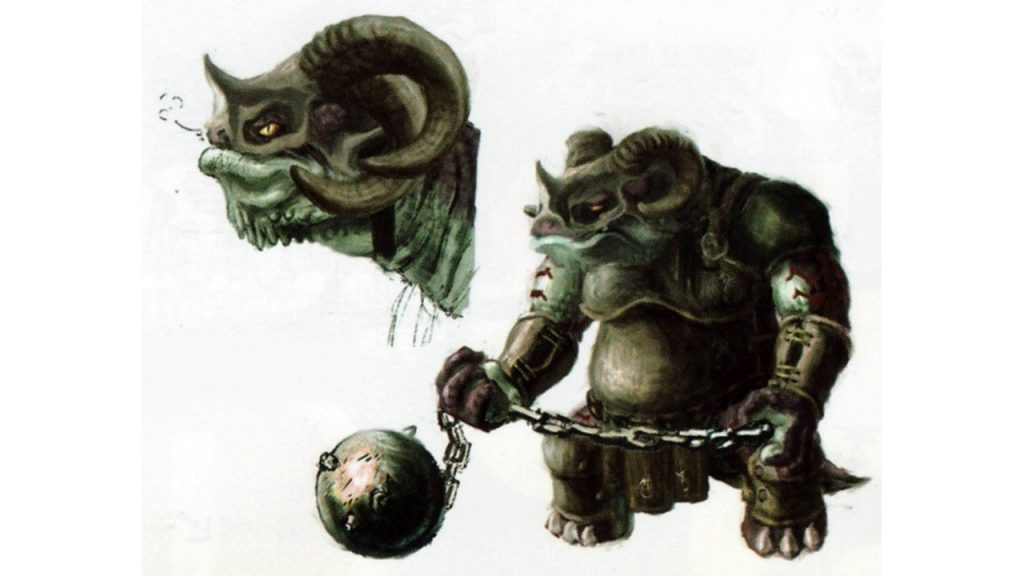
Snowpeaks Ruins has one of the most intriguing pacing structures for a dungeon. Link must explore the dungeon in three segments, searching for the Yeta and Yeto’s Bedroom Key. Each wild goose chase reveals a bit more of the chilly manor and provides more challenges for Link to overcome. The pivot point in the dungeon is where Link must confront the massive Darkhammer and gain the Ball and Chain from it. This massive, armored foe makes a grand entrance by smashing a huge suit of armor close to Link. The imposing brute battles Link in a narrow corridor that restricts the player’s movement and offers no way to retreat.
Overall, the fight with Darkhammer forces the player to think carefully about spacing because the Ball and Chain has an incredible range. If the player gets too close to the spinning weapon, it will knock Link away. If the player gets too far away, they risk Darkhammer sending the weapon across the room towards Link. In order to avoid the massive weapon, Link can use the Clawshot to grapple to the ceiling and avoid the incoming Ball and Chain attacks. This is an effective way to get Link behind the creature. The fight is like a game of medieval chicken, requiring the player to bait the enemy into using his weapon, which leaves the enemy exposed.
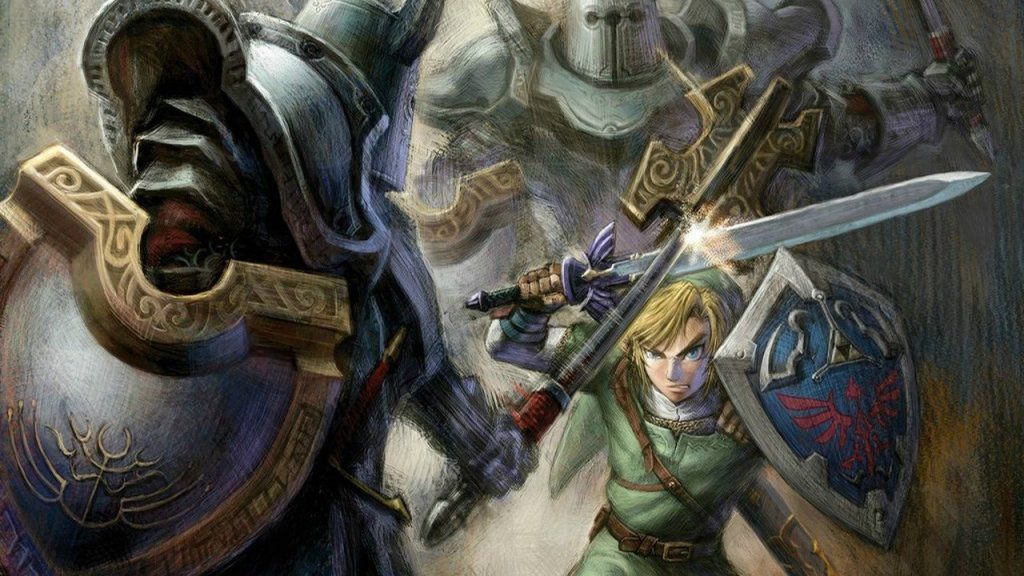
Darknut
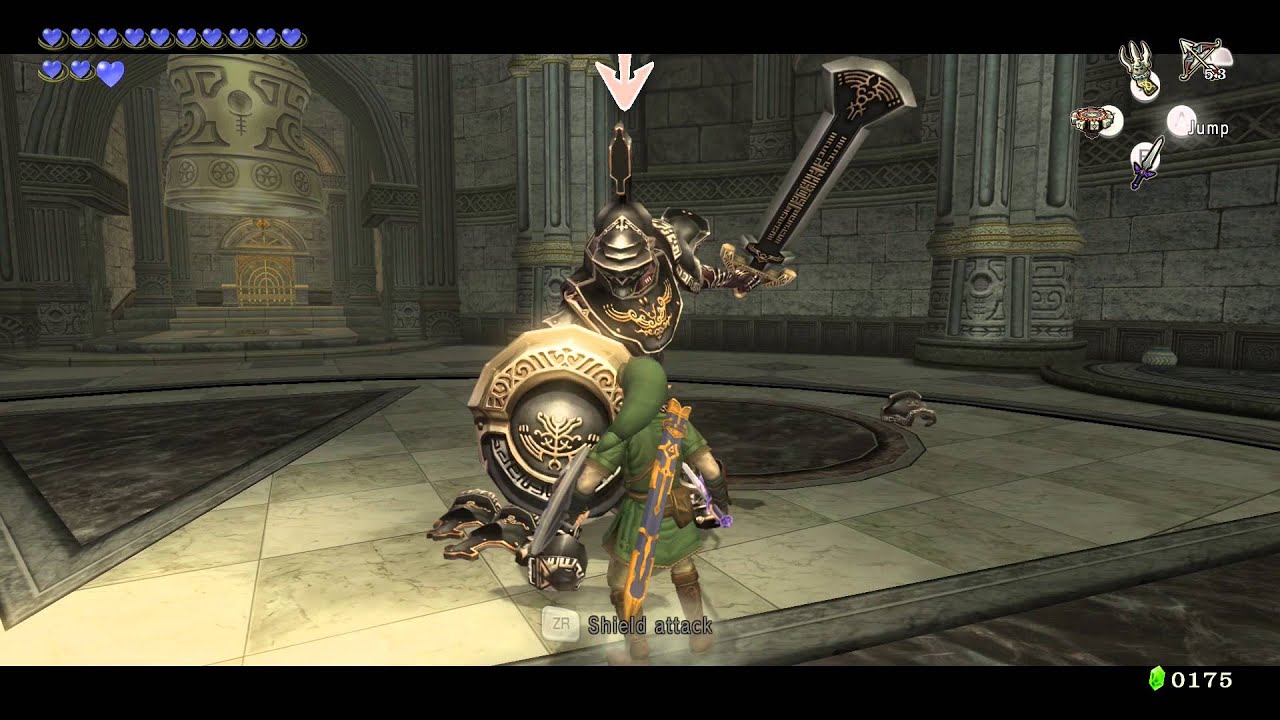
The Temple of Time is a linear dungeon. The player starts at the bottom of the sprawling dungeon, working their way to the top. At the temple’s zenith, one of the best enemies in the history of Zelda is waiting for Link. Twilight Princess‘ first Darknut is one of the best designed enemies in the game. Adorned with ornate black plate armor, lavish gold accents, and a massive sword, the Darknut is a visually stunning enemy that fits perfectly in the opulent Temple of Time. The expansive arena gives Link and the Darknut enough space to move freely across the room, engaging in a dangerous dance of swords.
Without a doubt, the Darknut miniboss battle is one of the greatest sword fights in Zelda history. The massive knight requires the player to fully utilize the hidden skills that Link learns throughout his journey. In the first stage of the duel, the player can use the Helm Splitter, Shield Bash, and Back Slash to outmaneuver the massive knight while avoiding the Darknut’s own shield bashes and massive overhead strikes. Once the player chips away at the Darknut’s armor, the knight hurls his sword at the player and aggressively pursues Link across the arena. The Darknut is much faster and more agile in the second stage, wielding a longsword against Link. Our hero will have to hammer the Darknut until the enemy’s sword is knocked out of position, leaving the knight vulnerable to attacks. When the Darknut finally collapses into a heap, the player can feel satisfied with their hard-fought victory.
Aeralfos

The City in the Sky, one of the game’s most challenging dungeons, is all about verticality. The dungeon having an aerial miniboss makes perfect sense. The Aeralfos, agile winged lizards, make a dramatic entrance by swooping in on Link to start the fight. The sword wielding fliers will build up steam and dive-bomb Link with abandon. The Aeralfos appear individually first, then as a pair later in the dungeon. The battle requires the player to use their Clawshot to drag the lizards towards Link and then attack them with their sword.
This fight requires the player to make some quick decisions and pay attention to Aeralfos’ aerial surroundings. The goal of the fight is use the Clawshot to ground the flying lizards and use all of Link’s sword skills to take them out. The fight’s real wrinkle is that the player has to keep track of different entry points that the Aeralfos can swoop in from during the second phase of the battle. This gives the fight a great sense of suspense and unpredictability. This foe also reappears in Hyrule Castle, which smartly reuses several minibosses from across the game.
Phantom Zant
Phantom Zant is the last new miniboss in Twilight Princess and a great aesthetic fit for the Palace of Twilight, which is a personal favorite of mine. The Palace of Twilight has an eerie science fiction/fantasy atmosphere, with some gorgeous but disquieting vistas. The dungeon requires Link to retrieve two Sols (light orbs) in order to get to the Palace proper. Before getting each light orb, Link must face off against a phantom version of secondary antagonist Zant. A glowing blue-green hologram, Phantom Zant zips around the wide stage, summoning enemies to bother Link. Depending on the situation, Zant will summon Shadow Keese, Shadow Deku Baba, or Shadow Beasts.
Overall, this battle is not that difficult because the enemies Phantom Zant summons are pretty weak at this point in the game, but it can present an interesting challenge as the miniboss teleports around the arena. Depending on what enemies Phantom Zant summons, the fight can feel very different. The Shadow Beasts and Shadow Keese will aggressively pursue the player, while the Shadow Deku Baba impede Link’s movements. The final reward for defeating Phantom Zant and retrieving the Sols is an upgraded Master Sword that can sweep away dark fog and kill Shadow Beasts in a single hit.
Conclusion
Twilight Princess is one of my favorite games because its enemies are extremely memorable. While the bosses are well designed, the miniboss completely steal their thunder. Each one feels distinct from the other and distinct from most other enemies in the Zelda series. Foes like King Bulblin, Death Sword, and Darknuts will stick in your memories long after you have finished the epic adventure. Much like the bosses, the battles that Link has with the minibosses help convince the player that Link is progressively growing stronger, becoming the Hero of Twilight. Even if you don’t love Twilight Princess, you should still be able to appreciate this motley crew of midpoint enemies.
Sean Gadus is an Associate Editor at Zelda Dungeon. His first Zelda game was Ocarina of Time and he loves the classic 3D Zelda games from 1998-2011. He is currently of the opinion that Omega from The Bad Batch is a better character than Baby Yoda. He is also excited for the NBA playoffs and Cleveland baseball season. He wants to help build a kinder, more compassionate world.

Sean Gadus is a Senior Editor at Zelda Dungeon. His first Zelda game was Ocarina of Time, and he loves all of the 3D Zelda games from 1998-2011. The final battle of Tears of the Kingdom is one of his favorite final battles in the entire series. He wants to help build a kinder, more compassionate world. You can check out his other written work at The-Artifice.com.
