Revisiting Phantom Hourglass: Prelude to the Temple of Courage
Posted on April 17 2016 by Mark Olson
 Welcome back to Revisiting Phantom Hourglass, the series in which I go through this oft-forgotten DS title with a critical eye, looking for not only why it was forgotten, but why it should be remembered. In this installment, we make another trek through the Temple of the Ocean King, yell at an elderly gentleman, and spin some statues on our way to the Temple of Courage and, with it, the final spirit we need.
With the Temple of Winds’ cephalopod guardian down for the count, we seize the Spirit of Wisdom. However, Link has no time for a vacation as Ciela quickly nags our way all the back to Mercay Island. A few lines of dialogue have been altered in our homeport as a dockside denizen treats us to information regarding treasure hunting, but nothing substantial has occurred here so far.
Back at the northern end of the island, we get to plunge the briny depths of the Temple of Ceaseless Padding the Ocean King once more. Though my last joke may have been a bit of an exaggeration, it’s not much of one. When people say that you have to backtrack through the whole temple to get to new sections, they aren’t kidding. The only thing that expedites this process is the implementation of a couple of shortcuts that, Metroidvania style, can be unlocked with the use of a shiny new item. In the case of this expedition, that would mean using bombs to blow holes in walls that let you skip sections of a floor or a certain puzzle. In certain cases, such as the first floor (which permits you to skip almost the entirety of the floor using your bombs), these are rather useful. In others, such as the third floor, they are borderline-useless, barring the collection of a few extra goodies. On a side note, extra collectibles scattered throughout a temple are all well and good, but due to the time limit on the Temple of the Ocean King coupled with its dank, dark, and oppressive atmosphere, the collectibles feel a little bit out of place here. It’s not a massive deal, since paranoid players such as yours truly can simply skip the extra chests, but it is disappointing when I expect to find a nice shortcut through the floor only to be rewarded for my troubles with a power gem.
That aside aside, once we get through to the second main section of the Temple, we are introduced to a new gameplay mechanic: the Phantom Eyes. These disgusting, floating creatures can spot Link and latch onto him like a face hugger from Alien, alerting all Phantoms on the floor to the intruder (until players make a mad dash into a safe zone, that is). Unlike Phantoms, they can’t do any damage to Link and, also unlike Phantoms, Link can damage them by stunning them with the boomerang and then going in for the kill with their sword. This creates some interesting scenarios where players have to decide whether going in for a hit on the Phantom Eye is worth risking being spotted by their big brothers.
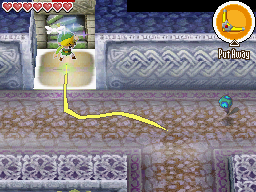
In addition to the Phantom Eyes, this trip to our friendly local temple also grants us with what I consider to be the first “big” puzzle of the dungeon. It takes place in the final floor of this excursion (basement six) and involves identifying four different tablets placed in the corners of the room so as to draw a shape on the necessary door and get through to claim our prize. As a side note, I will give you one solitary guess as to what that shape is.
Now that we’re through the next three stages, we are given a sea chart. Well, kind of. It looks oddly familiar to something we’ve seen before, and the seal of courage is marked on the map. Enter another totally rad gimmick that I swear did NOT require me to look up a guide on the site that I write for.
The map is an inverted version of the southwest sea chart, and by pulling up your own sea chart and closing your DS system, the marking will rub off onto your map and, with nothing but lost time and a cryptic clue to show for it, we are done with this return trip to the Temple of the Ocean King.
Back at the port, Linebeck states his belief that this is a map to buried treasure! To get it, however, we’ll need a salvage arm fitted onto the SS Linebeck. Conveniently, the nice man by the dock just won’t shut up about it, and the mailman delivers us a letter saying that Edo just finished one up and is selling it to the first buyer. To Cannon Island it is!
Edo tells us that, even though we were the first ones there, he’ll need proof that we REALLY want to buy it. We’ll need to purchase with panache, and he’ll judge our enthusiasm by how loudly we yell at him. One awkward minute later, and the salvage arm is ours.
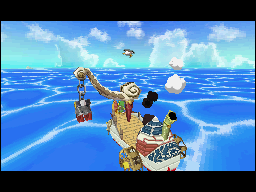
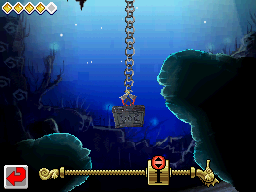
Out in the big blue sea, the SS Linebeck stops at the spot marked on the map and we are introduced to the salvage arm minigame, in which players must maneuver their salvage arm around octomines and latch onto their prize only to bring it back up without hitting anything. As far as mini games go, I’m quite fond of this one. It adds a little bit of extra work to finding fortune that wasn’t present in The Wind Waker. Once we have the chest, we open it up to find a tile in the shape of the sun, perfect for sticking into holes in doors.
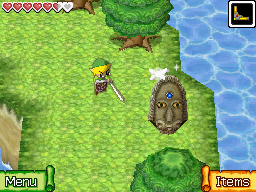
On nearby Molida Island, players have to backtrack through the cave system that we explored when trying to find our way through that infernal mist two installments ago. The mysterious, yellow and red door that blocked our path before can now be opened with the lovely Sun Key, revealing a passageway to the back end of the island. Back on the surface, we find our path blocked yet again by a door, and a message: bring the light of the statues to this door. After a brief stint of exploration in the lone untouched section of the island, we come across a stone statue with a blue gem embedded in the forehead. Enacting the only solution Link knows, he whacks it and in doing so springs forth a beam of light and an option to turn the statue left or right. Conveniently, the light is marked on your map, so there is never a doubt as to if you are hitting your mark or not. This process is repeated twice, once preceded by a mandatory scuffle with two Zora warriors, and once by a bit of a brain teaser: reaching the third statue is impossible, but astute players may realize that it is already pointed in the right direction and it only needs to be hit and shown its place before it will do our bidding; Link’s boomerang makes quick work of that puzzle, and the door to the Temple of the Courage is opened!
This section of the game was okay; it didn’t do anything particularly special, but unlike the lead-up to the Wind Temple, it wasn’t painfully, unendurably, torturously long either. It was just enough time for players to catch their breath before going in for the next major leg of the adventure. Even though visiting the Temple of Ocean King is hardly a pleasant experience, I was particularly fond of, as always, the odd little gimmicks that were thrown into the game, as well as the new Salvage Arm mini-game.
In the next installment of this series, I will be visiting the temple that was just opened, so I hope you will continue to follow my journey when that comes out. Until then, what did you think of this part of the game or, for that matter, Phantom Hourglass as a whole? Share your thoughts in the comments!
