- Chapter 2 – Dodongo’s Cavern
- Chapter 3 – Inside Jabu Jabu’s Belly
- Chapter 4 – Forest Temple
- Chapter 5 – Fire Temple
- Chapter 6 – Ice Cavern
- Chapter 7 – Water Temple
- Chapter 8 – Bottom of the Well
- Chapter 9 – Shadow Temple
- Chapter 10 – Spirit Temple
- Chapter 11 – Gerudo Training Grounds
- Chapter 12 – Ganon’s Castle
2.1 Dodongo's Cavern
Grab one of the bomb plants and blow away the wall in front of you to get your first look at Dodongo’s Cavern. You have a room filled with lava, three rising and falling platforms surrounding a large platform in the middle. In the center is a lone bomb plant. Hanging on the far wall is a giant Dodongo skull. In a raised alcove to the left you can see a chest but you cannot claim it, and both the left and right walls have rock walls you can destroy. There are also two Deku Business Scrubs on the right who will sell you Deku Sticks and Deku Seeds, should you need them.
Jump to the center platform. From your vantage point, find the boulder on the lower level to the left and, using the bomb plant, blow it up to reveal a button switch underneath. Jump over the lava and press the switch to activate the left platform, granting you quick access to the second floor. Back to the center, time your bomb flower to jump to the left and destroy the rock wall to claim your Dungeon Map! There is nothing else you can do in this room for now, so jump on the left platform to advance to the second floor.
The way forward is blocked by boulders, so instead take a right, across the bridge across the giant Dodongo head and hit the switch on the other side to open the barred door on the first floor. Ride the platform back down, or simply jump to the first floor, and head through the newly opened door. You’ll see a line of bomb flowers surrounding the giant staircase, and as you near you’ll be ambushed by a Beamos. Take advantage of the Bomb Flowers readily available to destroy it, and also the one on the other side. It will leave behind a Silver Rupee, meaning you must collect all five to open the door and proceed. The second is in a crate on the left of the staircase.
Using another Bomb Flower, destroy the wall on the south side of the room to reveal a torch. This door leads to a puzzle room hiding a Golden Skulltula, but you cannot complete it without the Song of Time. Using a Deku Stick, light the Bomb Flower on the nearby wall and quickly throw it to the gap in the line of Bomb Flowers around the giant staricase to lower the stairs. Climbing up, the very top step will magically levitate you to a Deku Business Scrub, who will sell you a Deku Shield in the event that yours burns up. From the top of the stairs, proceed either direction and you will encounter another crate hiding a silver rupee. The fifth and final can be found by climbing the vines at the very top.
Now that you finally have the door opened, enter the next room. Defeat the three dodongos using the traditional hit and run tactics in the enclosed space is difficult, so luckily you are able to climb the ladder up the small platform in the center of the room and throw bomb flowers onto the Dodongos below. Defeating all three will unlock the next door, as well as make a treasure chest appear. Open it to claim your compass.
Head through the newly opened door, across the narrow bridge, and through the door on the other side. Jump down to the floor level. Locate three movable blocks; push and pull them to be situated under the three torches embedded in the pillars near the entrance to this room. When each torch has a block underneath, climb up the ladder and light a Deku Stick on the torch here. Jump onto the blocks you strategically positioned with a lit Deku Stick to light all three torches, unbarring a door on the far right of this room. Head to the door. Inside, equip your slingshot and shoot some eggs off of the ceiling to claim a chest of five rupees, then break the crates in this room to find a Golden Skulltula.
Back through the door you came through, and on the right wall you’ll find another movable block embedded in the wall. Pull it out far enough to climb the ladder. At the top of the ladder, turn around to see a golden torch burning. Jump across and light a Deku Stick, then back to the side with the ladder. Burn the Deku web, and light the torch as a Skulltula descends from above. Quickly defeat it, and relight your Deku Stick and carry the fire to the next torch.
Jump down and quickly defeat the Baby Dodongos who come out of the ground. They shouldn’t be too much to deal with. When they’re all gone, drag the small block all the way around to the other side. Climb up the block to climb up the platform on the far side of this room. The path ahead is riddled with Skulltula and Keese, so use your slingshot from a distance if you can. Finally you’ll come to a bomb flower in the wall. Go back to the nearest torch and once again light a Deku Stick, carrying it to the bomb flower in the wall. Light it, then put your Deku Stick away to pick it up and throw it at the rock wall directly ahead. Go through the door to face a pair of Lizalfos.
They shouldn’t pose too much of a problem. Follow Navi’s advice: Use your shield well and fight with L Targeting techniques! When one runs in one direction, watch for the other to come from the other. When you’ve beaten them both the next door opens. The small peninsula jutting out over the lava below holds a Golden Skulltula, but it cannot be accessed until you have bombs, so continue on through the new door.
In here, the object is to turn off the fires so you can cross. Shoot the Keese on the wall next to you before proceeding. On the ground near the exit, there will be a crate on the right and a boulder on the left. Roll into the crate, then climb back up to the first platform. Use your slingshot to shoot the diamond switch to put out the fire on the second platform. Jump to it, and turn to the alcove to the right. Shoot the Keese in the alcove, then jump over to grab the bomb flower. Pick it up and quickly run to the left side of the exit platform to blow up the boulder to find the button switch. Stand on it to put out the fire on the third platform, hit the crystal switch to put out the fire on the second, and quickly climb back to the first to jump across before the fires come back. You’ve finally made it all the way around. The treasure chest you can now get contains a measly 5 rupees. Jump straight across and use the Bomb Flowers to to blow up the boulders to open up a shortcut from the main room on the first floor.
Grab the bomb flower again, and jump down off the ledge to the right and throw it at the rock wall just ahead of you. Through this way, there’s a rock wall at the right that protects a Business Deku Scrub, who will sell you a red potion if you defeat him. Unless you need it, don’t even bother. Climb onto the grey block at the left and grab the bomb flower up above. Jump down and blow up the boulder to the right. This reveals another bomb flower, which you can use to set off the chain reaction ahead, revealing an eye switch on the wall. Shoot the eye to unlock the door, and either avoid or shoot the Fire Keese and the Skulltula to safely proceed.
The small tunnel holds Baby Dodongos to get in your way. You can defeat them for the usual rupees and hearts, or simply run past them. Through the door you have another Lizalfos fight, but it should be pretty much the same as before. Defeating them unlocks the next door, so go through it. If you’ve explored the graveyard, you’ve probably already fought some poes. There are three in this room, but killing them gives you nothing and you can easily ignore them, as they are neither fast nor very aggressive. The first Bomb Flower chain in this room will open the door at the north, though this room only contains a Golden Skulltula you can only earn after getting your Boomerang. Break the crates at the south end for a new bomb flower and set off the chain reaction on the pillar in this room to open the door at the south corner.
Finally, you can get that chest that’s been taunting you since the main room. Open it, as slowly and dramatically as always, and you finally get a bomb bag and some bombs! At this point, you can go back through this temple for things you can blow up, as well as to the Deku Tree for the one Golden Skulltula this was holding you back from, but we’re so close to the end we might as well finish it now!
Back in the main room, ride the west pillar back to the second floor and bomb both eye sockets of the Giant Dodongo skull to open the final area. Take the plunge. Through the mouth and the door. You can ignore the Baby Dodongos in this room, jump up and take the left path. Deal with the Baby Dodongos here, and advance to fight a single Lizalfos. Pull the last tombstone forward, and throw a bomb over the fires to hit the switch. Ahead and to the right you’ll see a mass grouping of Armos.
Aim carefully, and throw a bomb onto the top left portion of the grouping. This will set off the chain reaction of Bomb Flowers on the wall, which, as well as activating the switch to allow you to progress, it will in-turn set off a chain reaction of Armos exploding and killing the next Armos. There should be little to none still alive, and if there are any left, simply throw another bomb into the largest mass of them until there aren’t any more in your way.
Climb up the ghostly floating steps, and climb onto the wall at the right. Carefully follow it all the way to the end to find another Golden Skulltula. Turn around and head through the west door. You can first head to the first door, though this room only contains a Poe who hides a chest with five rupees, so there is no big loss for skipping this room unless you are playing a complete run. Finally, in the upper alcove, drag the tombstone backwards to reveal the switch which opens the boss door. Jump back down to ground level, once again ignoring the Baby Lizalfos, and head to the east to face the boss.
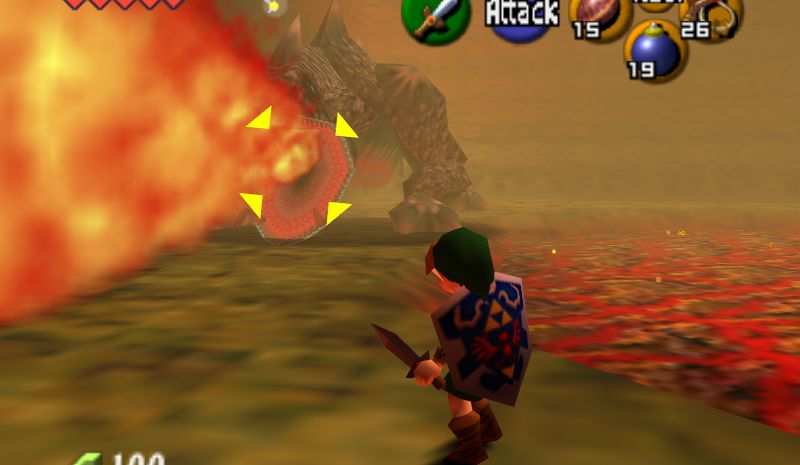
King Dodongo is another easy boss that just looks big. Its large size makes for awkward attacks that are easily avoided. It only has two forms of offense, the first of which is to breathe fire at you, which takes him a long time to charge up. His second attack is to roll around half the arena, which he does repeatedly throughout the battle, usually either immediately after the first attack, or when there’s an awkward situation where he can’t hit you that well.

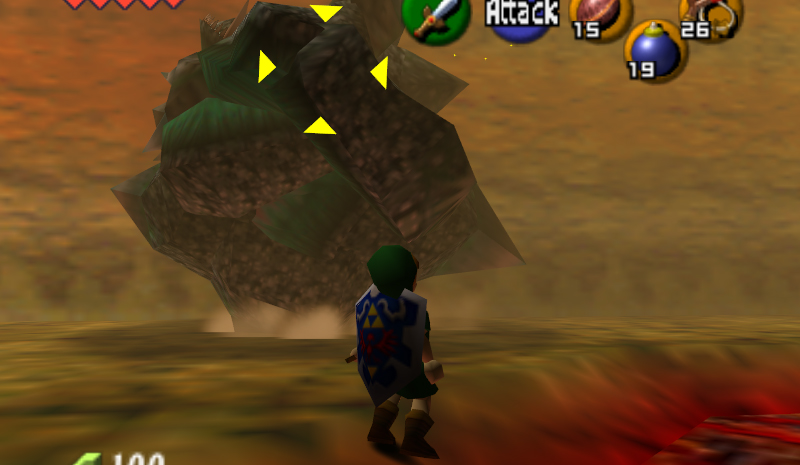
Both of his attacks are easily avoided by standing close to the lava, or in one of the insides of the corners. For the rolling attack, you can also just hold in your shield to avoid taking damage.
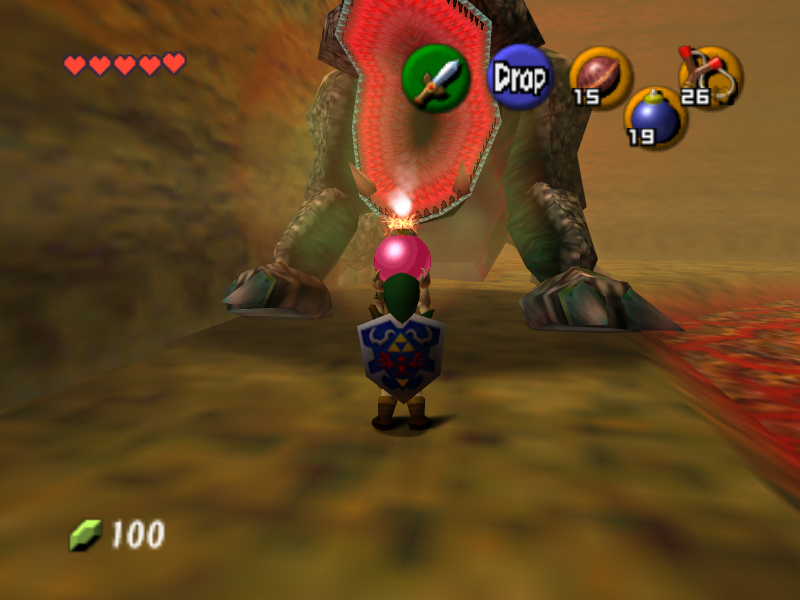
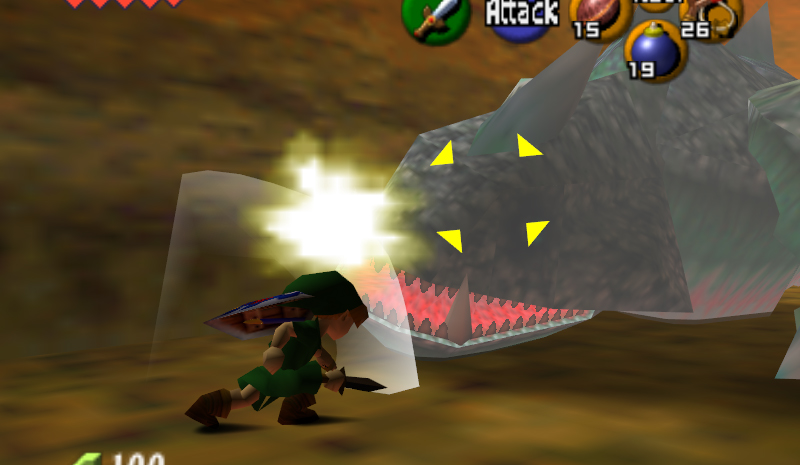
With that being said, you should follow Navi’s advice and try “giving him a shock.” Do so by throwing a Bomb or Bomb Flower into his mouth while he’s inhaling to breathe fire. It will explode in his stomach, stunning him for a moment. Use the opportunity to slash him with your sword. Just be prepared to jump to the side with the lava to avoid his roll immediately after, then circle around to the other side or wait in one of the corners to face him once again.
Four or five hits will kill this beast. And if you plan ahead, you can throw the Bomb, whip out your sword while he flings himself in the air, then use A to do a Jump Attack on him as soon as he hits the ground, dealing extra damage.
After the old king has been defeated, be sure to grab the Heart Container that’s left behind, then enter the blue portal to leave this dungeon.
- Chapter 2 – Dodongo’s Cavern
- Chapter 3 – Inside Jabu Jabu’s Belly
- Chapter 4 – Forest Temple
- Chapter 5 – Fire Temple
- Chapter 6 – Ice Cavern
- Chapter 7 – Water Temple
- Chapter 8 – Bottom of the Well
- Chapter 9 – Shadow Temple
- Chapter 10 – Spirit Temple
- Chapter 11 – Gerudo Training Grounds
- Chapter 12 – Ganon’s Castle
