- Chapter 1 – Skyloft
- Chapter 2 – Faron Woods
- Chapter 3 – Skyview Temple
- Chapter 4 – Eldin Volcano
- Chapter 5 – Earth Temple
- Chapter 6 – Lanayru Desert
- Chapter 7 – Lanayru Mining Facility
- Chapter 8 – Isle of Songs
- Chapter 9 – Lake Floria
- Chapter 10 – Ancient Cistern
- Chapter 11 – Lanayru Sand Sea
- Chapter 12 – Sandship
- Chapter 13 – Volcano Summit
- Chapter 14 – Fire Sanctuary
- Chapter 15 – Thunderhead
- Chapter 16 – Song of the Hero
- Chapter 17 – Sky Keep
- Chapter 18 – Final Showdown
10.1 Whip
Once you enter the dungeon jump across the lilypads that are straight ahead and read the stone tablet to the right. The secret order of this dungeon is Back, Rear, Back of the Right Hand, and Back of the Left Hand. These directions relate to the massive structure in the center of the room.
Head to the back of the statue (above the water) and you’ll see a symbol with the Top portion shaded in. Now swim just below it and in the water you’ll see the same symbol with the Bottom portion shaded in. You’ll also find some new Blue ChuChu. These are water varieties and you can defeat them by performing a water dash.


Swimming around to the front of the structure you’ll see the two hands, both of which have silver rupees hovering over the base of the hands. Perform a dash attack to grab the rupees before the hands can close. If you look behind the statue’s right hand, you’ll see that the Left part of the symbol is shaded. If you look behind the statue’s left hand, the Right part of the symbol is shaded.
In the final analysis we find that the secret order of the dungeon is Top, Bottom, Left, and Right. We will be using this information shortly. Run on over to the east end of the room and you’ll find a closed door. Pull down the lever and head inside.
Jump down and head to the north end of the room. Cut your way through the skulltulla webs and defeat the enemies. Around the corner of this hall, you will find a locked door and a stone tablet. The tablet says to strike the gemstones wisely, using the temple’s secret order.
Turn to the lock and you’ll see four gem stones. Strike it in the proper order that we learned from the previous room. Top, Bottom, Left, and then Right. Doing so will open the door, so head on through.


In this next room, use the beetle to cut down the strings of the two skulltulas that are in this room. If you look at the map, you’ll see that there is a passageway at the east end of the room. However, it is in the water and roots of the lilypad are blocking your way. What you need to do is defeat the walltulla that is on the vines at the southeast corner of the room and climb on top. Jump off this ledge and land on that lilypad, causing it to flip over. This will allow Link to swim through the narrow passage.
Swim through the hole and follow this narrow corridor. Use a water dash attack to break through the wooden planks. At the end of the tunnel you can climb up the vines and head through the door. Open the treasure chest to get a small key. Jump off the ledge here and use the nearby water geyser to reach the higher ledge. Defeat the deku baba and jump off the ledge. Go through the door to get back to the main room of the dungeon.
Back within the main room of the dungeon, you want to head to the south end of the room near the dungeon entrance. There is a locked door facing this direction from the center structure. Jump on the lilypads and head through the locked door. Jump down to the floor below to take on the dungeon mini-boss, Stalmaster.
The battle will start just like the fight with a regular Stalfos. It will block in two directions with his two arms. Slash in one of the directions that are not being covered. The Stalmaster is quick to change the direction that it is blocking and it will also slash multiple times in a row at you. Even when you try running away, the Stalmaster is quick to chase after you. Whenever Stalmaster is preparing for an attack, jump back to prevent yourself from getting hurt. Watch out as some of his attacks involve two strikes in a row.


After several hits, the Stalmaster will pull out its two other arms, giving it four arms, each with its own weapon! The stalmaster almost always blocks from three directions and sometimes all four of them. You have to be much more precise when angling your sword slashes. When Stalmaster blocks with all four swords, you can deliver a thrust to harm it. Stalmaster sometimes attacks four consecutive times with its arms, so be careful not to rush in too quickly once it starts attacking.
As Stalmaster weakens, the enemy will change the directions it’s guarding from even more quickly. It gets to the point where it changes so quickly that you don’t have time to react. Your best bet is to guess which opening he’ll have and if you guess incorrectly, just jump back. Deliver the final sword slashes and Stalmaster will be defeated.
Once the mini-boss has been defeated, go through the door that unlocks. Collect the dungeon item from the treasure chest, the Whip. Afterwards, head back to the previous room where you fought the mini-boss.
10.2 Dungeon Map
Back in the room where you fought the Stalmaster, pull out the whip and use it on the wind-up key. This will cause a water geyser to appear, so use it to reach the next floor. If you’d like to activate the rest of the wind-up keys in this tall room, go right ahead, but we cannot do anything at the top of the room just yet. Exit through the door to get back outside to the main room.


Jump back over to the outer platform and walk counterclockwise around the room. There are a few poles higher up that you can target and use your whip. Do so and you’ll be able to swing across the gaps and reach further platforms. Follow along this pathway and you’ll reach a treasure chest containing the Dungeon Map!
You’ll encounter a new enemy here known as a Furnix. It will fly around the area and will eventually target you. Once its tail hangs down, lock on to it and swing your whip. Pull it towards you and then slash away with your sword. There is a locked gate here, but we cannot do anything about it yet, so just jump back down to the water below.
Swim on over to the west end of the room where there is an ‘X’ on your map. Jump onto the lilypads found here and you’ll see one of them upside down. Latch onto the top of the lilypad with the whip and flip it over. Jump on over to this lilypad and then use the whip to grab onto the nearby lever. This will cause the water to stop in the nearby location.


Jump into the water and swim into the hole. There is a long water corridor that you can swim down before resurfacing. Once you are back on land, walk to the east end of the room and open the treasure chest to get a red rupee. Defeat the skulltula and then run on over to the closed gate. You can use the whip through the gate to latch onto the lever. Pull it down to open the gate.
In this next area you’ll run across some chuchu and some bokoblin. Defeat them and then climb on the ledge to the right. Use the whip to latch onto the bar that is hanging above. Swing yourself across and jump over to the vines in the distance. Climb the vines here and defeat the deku babas.
There is a rotating cylinder just to your left that has vines. Run and jump up to the vines and climb upwards. There is a platform that you can rest at to fill your stamina meter. Climb back onto the vines and let it take you to the next platform as well. Defeat the bokoblin found here and you’ll see another bar that you can swing your whip on. There is a locked gate across so we don’t want to jump on the vines yet. Instead, latch onto the bar and stop swinging, turn yourself slightly to the left and start swinging again. Jump off the whip to latch on to the lever here and this will cause the gate above to open.


Drop down and pull out your slingshot to defeat the walltulla that is on the vines. Turn around and climb the vines found here. Once again use the whip on the bar and swing across. This time jump and latch onto the vines. Climb up and defeat the deku babas found here. Afterwards use the whip on the wind-up key and it will cause a whirlpool in the ground below to stir.
Jump down into the whirlpool and it will suck you down to an area below. There is a bird statue in this room at the west end, so save if you’d like. Afterwards use the beetle to knock down the skulltulas that are in this room. In particular the middle skulltula will flip over the lilypad, allowing you to swim through the gap underneath.


There is a green bokoblin archer on the other side of the fence, but if you look closely, there is something shiny attached to him. Use the whip through the gate and it will pull a small key from him. Jump across to the door and use it there. In the next room run on over and defeat that same bokoblin. Follow the water and it will send you back to the first floor of the dungeon.
Swim around the water and use a water dash to get onto the platform at the east end of the room. Use the whip to latch onto the lilypad and flip it over. Use the slingshot to knock down the walltulla found here and then climb the vines.
Run up the ramp and defeat the quadro baba found here. You cannot jump across the gap here, but if you look below you’ll find a lilypad. Jump down and land on the lilypad, causing it to flip over. Jump down and you’ll be able to swim underneath the lilypad. Follow the pathway and resurface after avoiding several froaks.


Climb up the steps found here and use the whip on the wind-up key, causing a water geyser to appear in the center of the room. Jump back in the water and climb the vines once again at the east end of the room. Run up the ramp and use the whip to flip over the lilypad. Finally, you can safely jump across. At the end of this pathway, pull down the lever with the whip and the gate will open.
Climb down the vines to the left of the door and climb down to the platform just below the door you came out of. You’ll find a treasure chest containing some rupees. Use the Slingshot or Beetle to knock down the Walltula on the vines, making your climbing easier. Climb the vines once again and make your way on over to the platform near the west end of the room. Pull the wind-up key with the whip, causing a water geyser to appear, making this platform more accessible in the future.


Against the west wall there is a bar hanging from the wall. Latch onto it with your whip and pull it down, causing the entire middle structure to lower by one floor. Jump into the water and swim to the door on this middle structure.
10.3 Blessed Idol
Once inside drop down to the bottom floor once again. Go through the door found here and you’ll now be in a strange underground area. There is a new form of enemy here known as a Cursed Bokoblin. These zombie-like creatures move incredibly slow and they will try to latch onto you. Simple sword slashes will hurt them, but deliver a final blow to get rid of them quickly.
Run to the northeast and follow along the pathway, defeating cursed bokoblins along the way. Jump onto the lilypads to the left and use the whip to flip over the third one. If you face the northeast part of the room and look up, you’ll see a figure that has two eyes. Send out the beetle into one of the eyes and hit the diamond switch that is behind it, causing the liquid to stop flowing.


Jump back across the lilypads and make a left. Defeat the fire keese here and you’ll find a bomb flower. Use the beetle to grab onto the bomb flower and blow up the boulder that can be found in the distance to the right. Run back across the lilypads and now you can safely use your whip on the bar to land on the platform where the boulder once stood.
Jump onto the rotating cylinder here and climb the vines to the top. Jump on over to the next cylinder and ride it to the second landing (not the one with the fast spinning platform). Run around and jump onto more vines which will eventually lead to a large lever. Use the whip to latch onto the lever and pull it to the other side, causing the spinning platforms below to change direction.


Jump off this ledge down to the moving platform and it will spin you to the other side. Climb up this ramp here, defeating some cursed bokoblin along the way. Jump onto the vines and ride it to the platform on the other side. Climb another set of vines to get back to that same lever we pulled just a minute ago. Pull it back to the previous direction and the rotating platforms will shift once again.
Turn around and head back to the rotating cylinder and jump onto the vines. Ride it around to the other platform where we haven’t been yet and release. Defeat the fire keese and then jump down to the ground below.
Start to climb the rope in this room and cursed bokoblins will begin to follow you up. Just keep climbing and if one of the bokoblins latches on, just shake the Wiimote and nunchuck to get them down.


Once you’ve reached the top of the rope, turn to the left and pull down the lever here, causing a nearby ramp to extend. Walk along this ramp and use the whip on the large lever once again to alter the center structure. Turn back around and jump down the rope that we just climbed up.
Run on over and use the whip to pull the wind-up key. This causes a water geyser to form, making it easier to get back up here if you need to. Jump down and run over to the treasure chest that is found here. Open it up to get the Blessed Idol. As soon as you get it a bunch of cursed bokoblins will appear and the platform above will start to fall. Avoid the bokoblins and just run back up the ramp. The large platform will fall to the ground allowing Link to access the door.


Once inside, follow the water geysers up through this large room. If you haven’t activated them all, use the whip on the wind-up keys to activate them. Keep riding these water geysers up until you reach the locked gate. Examine it and place the Blessed Idol in. Once you insert it, the ceiling will open, allowing you to reach the top of this structure.
Climb the steps and use the whip to activate all four of the wind-up keys. Doing so will raise the structure upwards. Once you arrive, pick up any loose recovery hearts around the room and save your status using the bird statue. Once you are ready, climb up the steps to take on the dungeon boss, Koloktos.
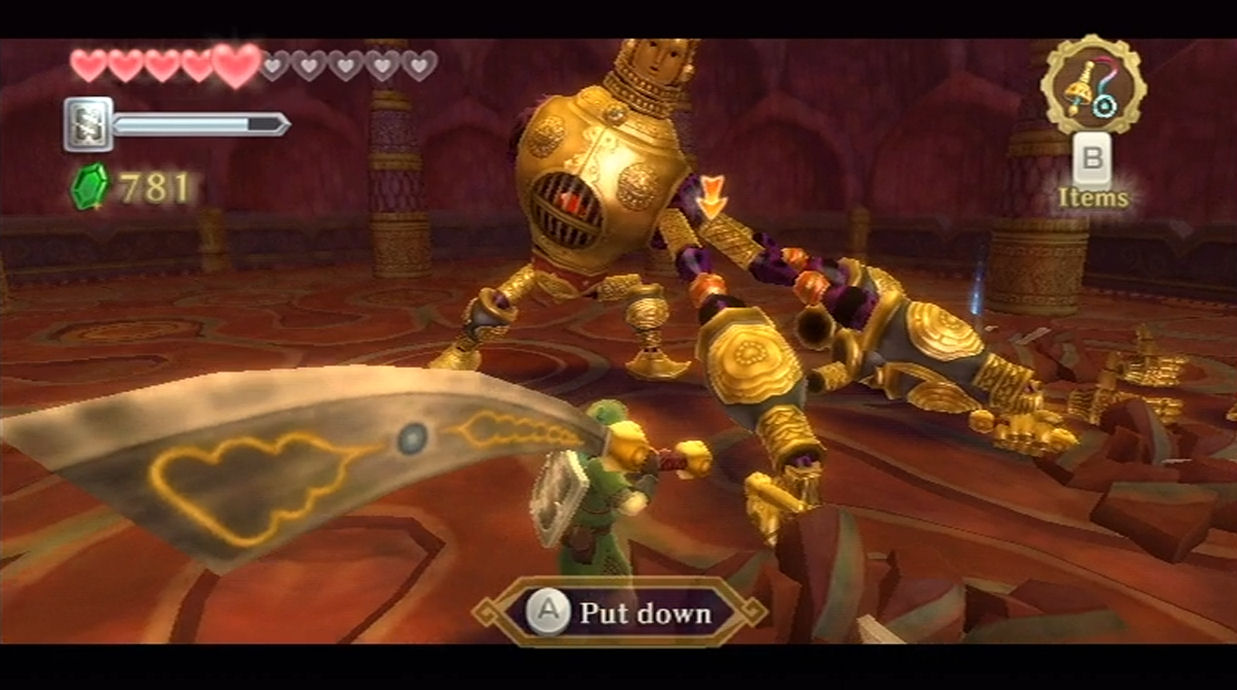
10.4 Ancient Automaton Koloktos
Once you arrive you’ll be met by Ghirahim once again. After an exchange of a few words, he will activate the massive statue and the battle with Koloktos will begin.
Koloktos has six giant arms at the beginning of the battle and two of them wield these giant double axe knives. He’ll toss these knives at you and they work sort of like boomerangs. These attacks can be hard to avoid, but just keep running and that should do the trick. Don’t however run against the outside wall as that’s where the knives seem to travel the most.


Koloktos will eventually try to hit you with one of its massive arms. Move out of the way and pull out your whip. Latch onto the arm and pull it, separating it from the rest of the body. Repeat this same process until you’ve latched off four of its arms. At this point you’ll see a red weak spot in the center of Koloktos’ body. When you have an opening, run on in and deliver consecutive sword slashes. After several sword slashes, Koloktos will reattach all of its arms and the phase starts over. Repeat the same process once again.
After hitting the weak spot several times, Koloktos will climb up from its stationary spot and will pull out six massive swords, one for each of its hands. Koloktos will now chase you around the room and will occasionally try to hit you with three of its arms at the same time. Dodge these arm attacks and then quickly use your whip to pull them away from Koloktos’ body. Doing so will cause those giant swords to fall to the ground, so run on over and pick one up!
Once you have one of these giant swords in your hand, you can use it to cut off the limbs of Koloktos (cut his legs out with a horizontal slash, or the other set of three arms with a vertical slash). More importantly, you can harm its protective cover of that red gem. Just bash at him with the giant knife and unload on its red weak spot. After several hits, Koloktos will gather all his limbs once again.

In the final phase, Koloktos will walk around the room constantly swinging all six of its swords. Koloktos will also summon cursed bokoblins, but they are easy to avoid and easy to defeat. Repeat the same process of pulling the arms away from Koloktos and getting a hold of one of those massive swords. Use that sword to damage the weak spot and put an end to Koloktos.
After he has been defeated collect the Heart Container that is left behind and then head through the door. Deliver a Skyward Strike to the emblem and a cut-scene will ensue. Link will hold out his sword and Fi will power it up with the Sacred Flame. The Goddess Sword will now become the Goddess Longsword. This sword is both stronger and longer, doing more damage and having further range.


Fi mentions that you should return to the Isle of Songs and that will be one of our next destinations. We’ll have that fun in the next chapter, so join me for Chapter 11.
- Chapter 1 – Skyloft
- Chapter 2 – Faron Woods
- Chapter 3 – Skyview Temple
- Chapter 4 – Eldin Volcano
- Chapter 5 – Earth Temple
- Chapter 6 – Lanayru Desert
- Chapter 7 – Lanayru Mining Facility
- Chapter 8 – Isle of Songs
- Chapter 9 – Lake Floria
- Chapter 10 – Ancient Cistern
- Chapter 11 – Lanayru Sand Sea
- Chapter 12 – Sandship
- Chapter 13 – Volcano Summit
- Chapter 14 – Fire Sanctuary
- Chapter 15 – Thunderhead
- Chapter 16 – Song of the Hero
- Chapter 17 – Sky Keep
- Chapter 18 – Final Showdown
