- Chapter 1 – Zelda’s Rescue
- Chapter 2 – Eastern Palace
- Chapter 3 – Desert Palace
- Chapter 4 – Tower of Hera
- Chapter 5 – Hyrule Castle Tower
- Chapter 6 – Dark Palace
- Chapter 7 – Swamp Palace
- Chapter 8 – Skull Woods
- Chapter 9 – Gargoyle’s Domain
- Chapter 10 – Ice Palace
- Chapter 11 – Misery Mire
- Chapter 12 – Turtle Rock
- Chapter 13 – Ganon’s Tower
5.1 The Master Sword
Now that Link has acquired all three Pendants, it is now time to find the Master Sword. From outside the entrance to the Tower of Hera, drop down to the lower edge just below. Walk all the way to the far west part of this area and then climb down the large staircase. Enter the cave here which leads out of Death Mountain.


This dark cave has just two rooms that are filled with Keese and holes in the ground that Link can fall down. Just carefully make your way through and then exit the cave.
Back outside, jump off the ledge and walk up a screen. Walk to the northwest corner of this area and then head west to enter the Lost Woods.


Walk to the southwest and step through the first log that you see. Immediately walk through the next log just to the left. You’ll see a third log just to the west, walk over to it and head through it. Continue through one more log and continue walking to the northwest corner of the Lost Woods and head through a final log to reach a special forest region.
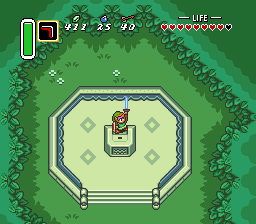
Walk northward to find the pedestal that holds the Master Sword. Walk to the top of the pedestal and try to grab the Master Sword. This will trigger a scene where Link releases the three pendants and acquires the Master Sword!

Immediately after acquiring the Master Sword, Link is contacted telepathically by Sahasrahla. After Link leaves the area, he is contacted telepathically once again, this time by Princess Zelda. She yells out that soldiers are coming to the Sanctuary and then screams.
Before continuing onward with the main quest, we can get a new magical item with the Master Sword that we just acquired. Exit the Lost Woods the same we came in. Make your way just east of the Lost Woods and once again enter the cave that leads up to Death Mountain.


This is the same cave where we previously met the Old Man. Make your way through, moving along on the exact same route. Walk to the right a screen and then exit the dark cave at the southeast corner. Once you are back outside on Death Mountain, scale the mountain the same way you did before until you reach the warp portal. Once again go through it and enter the Dark World.


Since you now have the Moon Pearl, you’ll remain in Link’s normal form. Once again walk just to the west and use the Magic Mirror in the same location as you did earlier to return to the Light World. Leap off the higher ledge to the north so that you are just outside of the Tower of Hera.
To the west of the Tower of Hera there is a large bridge. Walk across the bridge and you will see a green tablet. Walk up to it and use the Book of Mudora while standing in front of it. Link will raise his sword and will acquire the Ether Medallion. This magic ability can be used to freeze a number of enemies on the screen all at once. This is a required magical item that will be used later in the quest.


After acquiring the Ether Medallion, go ahead and leave Death Mountain just as we did earlier. Our next destination is over at the Sanctuary, so head on over. Once you arrive you will find the Loyal Sage wounded on the ground. He informs Link that Princess Zelda has been taken to Hyrule Castle.


Exit the Sanctuary and then head west a screen. Immediately walk to the south a screen to enter a forest area. Defeat or avoid the Soldiers and then head east to reach the outside of Hyrule Castle. Walk to the front of the Castle and head into the courtyard. Continue forward and enter Hyrule Castle once again.


Back inside of Hyrule Castle, walk to the left a screen and climb the steps. Exit Hyrule Castle from this second floor to get back outside. Walk to the right and you’ll see an electric barrier that is blocking the entrance. Strike this barrier with your sword and it will disappear, allowing you to enter the Hyrule Castle Tower.

5.2 Hyrule Castle Tower
Once you enter the Hyrule Castle Tower, head up a screen and you’ll find a pair of Gold Ball and Chain Troopers. These enemies have more health then their gray counterpart that we fought earlier in the game. Use your Boomerang to temporarily stun them and deliver a sword slash. Once both have been defeated, continue to the right a screen.


In the next room Link will find a pair of Sword Knights. These Soldiers are much more aggressive than any previous ones that Link has fought. They will run right at you and can be difficult to avoid. Slash at them on the side of their body opposite of their sword. After defeating both of them open the treasure chest to get a small key. Use it on the locked door and head up the stairs.


This next room has another Sword Knight and a Chasupa, but they are hard to see as it is dark. Defeat or avoid them and head left a screen. This next room is a maze that is filled with Blue Sword Soldiers and Chasupas. Walk up, left, and then down until you see a torch. Use the lamp to light it so you can see within the room. There is a treasure chest on the west side of the room that contains a small key, so be sure to grab that. Make your way to the southeast corner of the room and then head right.


This next room is also dark and contains two more sword knights. You can defeat or avoid them, then climb up the stairs to the next floor.
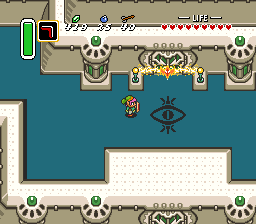
This next room is still dark and it will have a Blue Sword Soldier that will charge at you, as well as a Blue Archer that shoots arrows at you. Defeat or avoid them and head left a screen. Walk straight to the left and light the torch to light up the room. Defeat a number of Blue Soldiers and then head through the door at the top-right of the room.


Two Blue Archers and another Blue Sword Soldier can be found here. There are also two torches that can be lit to make it easier to see. Defeat all three enemies, as one of the Blue Archers holds the small key. Use it on the locked door and then head up the stairs.


Defeat the two Chasupas and two Spear Knights to open the door to the left. Before heading left you can read the telepathic tile on the wall to get some advice about fighting Aghanim. In the next room defeat the two red Spear Soldiers and head down a screen.


This room has a pair of Red Spear Soldiers and two Chasupas. The Spear Soldier at the center of the room holds a small key, so lift the pots and defeat him. Continue to the right a screen and you’ll find a trio of tough enemies. Defeat or ignore them and head up the stairs.


Push the statue to the left and defeat the enemies if you’d like before continuing to the next room. Make your way across the narrow ledge and climb the stairs to the next floor. Walk straight ahead and you’ll find Agahnim and Princess Zelda. After some chat, slash at the middle curtain along the top of the room and head up to face off with Agahnim.


Agahnim cannot be harmed with the Master Sword. Instead, Link will need to use the wizard’s own magic against him. Agahnim has three primary attacks. One has the boss shooting orbs towards Link. These orbs can be deflected right back at Agahnim with the Master Sword to damage him.


Agahnim will also occasionally send out a spinning jewel towards Link. If Link slashes at this attack, it will spread and go in six directions, likely hurting Link in the process. It is best to just avoid this attack if possible. Occasionally Agahnim will go to the top-center portion of the room. Once he does, stand either to the left or right of Agahnim. If Agahnim turns to look at Link, that means he’ll do one of his first two attacks. If he continues to face southward, this means he is about to use an extremely powerful lightning attack. Avoid standing near the center of the room during this attack.


Continue to deflect Agahnim’s attacks until he has been defeated. Afterwards, Link will be warped over to the Dark World.
- Chapter 1 – Zelda’s Rescue
- Chapter 2 – Eastern Palace
- Chapter 3 – Desert Palace
- Chapter 4 – Tower of Hera
- Chapter 5 – Hyrule Castle Tower
- Chapter 6 – Dark Palace
- Chapter 7 – Swamp Palace
- Chapter 8 – Skull Woods
- Chapter 9 – Gargoyle’s Domain
- Chapter 10 – Ice Palace
- Chapter 11 – Misery Mire
- Chapter 12 – Turtle Rock
- Chapter 13 – Ganon’s Tower
