- Chapter 1 – Zelda’s Rescue
- Chapter 2 – Eastern Palace
- Chapter 3 – Desert Palace
- Chapter 4 – Tower of Hera
- Chapter 5 – Hyrule Castle Tower
- Chapter 6 – Dark Palace
- Chapter 7 – Swamp Palace
- Chapter 8 – Skull Woods
- Chapter 9 – Gargoyle’s Domain
- Chapter 10 – Ice Palace
- Chapter 11 – Misery Mire
- Chapter 12 – Turtle Rock
- Chapter 13 – Ganon’s Tower
2.1 Lost Woods and Kakariko Village
At this point Link can journey straight to the Eastern Palace, located at the east end of the Overworld. However, there are tons of goodies to find beforehand. Upon exiting the Sanctuary, travel westward two screens to reach a building just north of the village. From here, head north and enter the Lost Woods.


Beware of the enemy Crow that is perched on one of the nearby trees. Further north you’ll find a hut along with nine small bushes above. Slash your way to the middle bush to find a secret hole that you can fall down. Inside collect the first Piece of Heart. Collecting four of these pieces will add a full Heart Container to your life. Jump off the ledge and exit the hut.


From the Thief’s Hut, travel northwest and you’ll find a Mushroom lying around in the woods. Collect the Mushroom, which you can later use to acquire some Magic Powder. That’s all there is to do in the Lost Woods for now, so go ahead and exit the way you entered. Beware of the enemy Thief that wanders around as he’ll try to bump into you and steal some of your goodies.
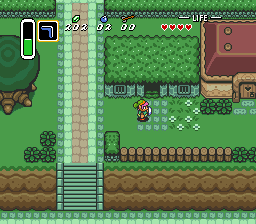
Back outside, head south and enter Kakariko Village. The first stop is at the northwest corner of town. There is an entrance to a cave and just to the west of it, there is a well. Standing on the higher ledge above, jump down and land inside of the well.


Inside of the cave, open the four treasure chests and lift the pots to collect some Bombs and 70 Rupees. If you look closely at the northern wall, there is a strange mark. This signifies that it can be blown up using a Bomb. Do so and head through. Collect some more Rupees and open the treasure chest to get Piece of Heart #2. Exit the cave to get back to town.

From the cave head directly to the east and you’ll find a small building with a green roof. Go ahead and enter the building and head down to the basement. There are four treasure chests here, each containing 20 Rupees. To acquire all 80 Rupees, push the blocks accordingly to the image above. If a mistake is made, simply walk up the stairs and come back down to find the blocks all back in their original positions. Look closely at the wall at the top part of the room to see a crack at the very center. Place a Bomb here to blow it open and head through to find Piece of Heart #3. Exit the hut to get back outside.


Just south and west of the green hut there is a merchant sitting on some carpet. The merchant will sell Link a Magic Bottle for 100 Rupees. Link should easily have this by now, so go ahead and purchase the Magic Bottle.


The next stop in town is at the southwest corner where Link will find a small shack. This Mysterious Hut does not appear to have an entrance, but Link can actually place a Bomb at its bottom wall to blow it open. Inside Link can replenish is Bombs and Arrows, as well as acquire some Rupees. Link can repeatedly re-enter this hut to stock up on goods.


Directly east of the Mysterious Hut, Link will find the Kakariko Village Shop. Just east of the Shop is the Kakariko Inn. There is a secret back entrance to the Bar that Link can access by simply walking into the back of the building. Do so and open the treasure chest found inside to collect a second Magic Bottle.


From the back entrance of the Bar, head into the building directly to the north. Speak to the Bug Catching Kid that is in bed. Since he is not feeling well, he will lend you his Bug Catching Net. In the building just to the west of the Bug Catching Kid’s house, Link can place a Bomb against the right wall. This leads to a chest containing some Arrows. However, Link can more easily replenish Arrows at the Mysterious Hut at the southwest part of town.


That’s all there is to do in the main part of town, so go ahead and exit to the south. Here you will find the House of Books and just south of there is the Quarreling Brothers home. Go ahead and enter it. Use a bomb to blow down the wall to the left to reach the next room and then exit the building.


Here you will find what is simply known as the 15 Second Game. Link has 15 seconds to journey through the maze and if he wins, he will get the Piece of Heart that is waiting for him. Slash the first five bushes as you make your way northward. Take the path to the left and slash three more bushes. Run over to the sign and you can jump over the wooden plank just south from there. Walk over to the end of the maze and claim Piece of Heart #4. This will increase your total life to five full Heart Containers.


The next stop is to trade in the Mushroom that Link acquired in the Lost Woods. Backtrack through the Village and return to the Sanctuary. Walk right two screens through the Hyrulian Cemetery. Continue down a screen, across the bridge, and back up a screen. Walk right a screen to find yourself at the Magic Shop. There is a witch named Syrup who resides just outside of the shop. Walk up to the Witch with the Mushroom equipped and give it to her. She tells you to come back to the shop later for something good.
After giving the Mushroom to the Witch, just walk left a screen and then return to the Magic Shop. This time head inside and next to the Hooded Shopkeeper you’ll find the Magic Powder! Grab it with A. This item can be sprinkled on top of enemies or other objects to cause some unique things to happen. While inside the shop, it might be worth picking up a Blue Potion, which will completely restore your health and magic.


After getting the Magic Powder. Link is now ready to tackle the next dungeon, the Eastern Palace. Link can get two optional Pieces of Heart, as well as the Ice Rod at this point in the game, but all of these things are somewhat out of the way at the moment. The Pieces of Heart won’t add to Link’s overall health and the Ice Rod has no practical uses in the first dungeon. Nevertheless, jump over to Chapter 3 of the walkthrough if you’d like to acquire these goodies right now.
2.2 Eastern Palace
The Loyal Sage within the Sanctuary marks your map, indicating you should travel to Kakariko Village. The mark on the map corresponds to the village elder’s house. Upon arriving, you’ll find Sahasrahla’s Wife, but the elder is nowhere to be found. Elsewhere in the village you’ll find Sahasrahla’s Grandson who will mark Sahasrahla’s location on your map at the east end of the Overworld. Speaking to Sahasrahla will cause him to mark the location of the Eastern Palace on your map. None of this is actually required and Link can instead journey straight to the Eastern Palace.
From the Sanctuary, travel east two screens, down a screen, across the bridge, and down another screen. The enemy Octoroks found here serve as a good source of extra Rupees so go ahead and defeat them if you’d like. Continue down a screen, right a screen, and up a screen to reach the Eastern Palace Compound.
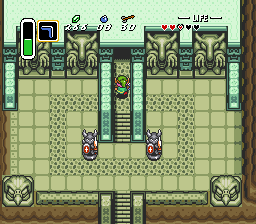
The Compound contains several enemy Octoroks as well as some enemy Armos. These Armos will appear as stationary statues, but once Link draws near, they will activate and hop towards Link. Navigate through the Compound to the northeast corner of this enclosed area. Enter the building to find yourself inside the Eastern Palace.

Lift the pot that is straight ahead and step on the switch to open the door. The enemy Popo found here can be defeated with a simple sword slash and they are a good source of Rupees. Step on the ground switch and continue on to the next room.


This room has a series of balls that are shot towards Link, including a giant ball that takes up the full width of the narrow passage. Travel through, carefully using the sides to protect yourself from the balls. Once you make it across, turn to the left and follow the passage up some stairs and across a bridge, eventually leading to a treasure chest. Open it up to get 100 Rupees! Backtrack to the north end of the room and continue up the stairs and up a screen.


The pathway to the right is completely optional and will lead to Link acquiring the Dungeon Map. Should you wish to acquire it, lift one of the pots and step on the floor switch to head right one screen. Avoid the enemies in this room and head through the entrance leading to the right at the north end of the room. Lift the center pot in this room, step on the floor switch and head down. Open the chest to obtain the Dungeon Map! Jump down and go up the stairs, then head left two screens to find yourself back in the central room. Take the pathway to the left. Lift the pots and step on the floor switch to open the door.


The Blue Stalfos found here will jump away when Link tries to use his sword. Corner them or use your Boomerang to defeat them. Continue on to the next room to find four more Blue Stalfos. The easiest way to get rid of these foes is to toss pots at them. Once they have been defeated, head up a screen and grab the Compass from the treasure chest. Continue down the stairs and right two screens to get back to the central chamber of the dungeon, this time on the lower floor.
There are a pair of enemy Eyegores here but they are best avoided for now. Just run right through the room and exit to the right. Climb the steps and head down a screen to reach a dark chamber. The Anti-Fairies found in this room can be defeated by sprinkling some Magic Powder on them. This will cause them to turn into Fairies that will replenish Link’s health.


In the dark chamber, step on the floor switch that is found on the right side of the room and then head through the nearby door. There are a few Stalfos in this room, so defeat them by throwing pots at them if you’d like. Underneath the pot at the top-right corner of the room, Link will find a Small Key. Grab it and return to the previous room. Walk over to the left side of the room and use the Small Key to head left. Back in the ball room, just run across the platform and continue left a screen.


In this room, defeat the two Popos, as well as the two Blue Stalfos. The Green Eyegore is the next challenge for you. Once you draw near, the Eyegore will open its eye and start charging towards you. It will take eight sword slashes to defeat this enemy. Alternatively, you can toss a pot at it when it is awakened and this will kill it instantly.


With all the enemies defeated, the four Anti-Fairies will start to move about the room. Lift up the pot that they were previously surrounding and step on the switch. Open the treasure chest that appears to get the Big Key. Use the Big Key on the locked door above. Push the block and then head right to get back to the main chamber of the dungeon.
Now that you have the Big Key, go over and open the large treasure chest to get the dungeon item, the Bow. This will allow Link to shoot Arrows at enemies. Beware, as once you acquire the Bow, Gray Stalfos will drop from the ceiling, lifting their skulls and tossing them at Link. Dodge these enemies and head up through the locked door. Note: before heading through the locked door, you can jump off the ledges into the large white vases. This will lead to Link finding some fairies. These fairies can be captured with the Bug-Catching Net and stored in a Magic Bottle.


This dark room is filled with Popo and two green Eyegores. Light the torches in the bottom corners of the room to see and then defeat the Popo. Luckily, the Eyegores are easily defeated with a single Arrow to their open eyes. Defeat the Eyegore to the right to acquire a Small Key. You can head through the door on the right which leads to a room filled with Blue Rupees. Afterward, use the Small Key on the locked door to the left and head down the stairs.


Lift the bottom-left pot to find a switch that will open the door. In the next room defeat the three green Eyegores here and step on the bottom floor switch to open the door. Maneuver past all the moving balls and step on the top-left floor switch to unlock the door.


In this room you’ll encounter a Red Eyegore. Different than its green counterparts, this enemy cannot be harmed by Link’s sword. Instead, Link must hit it twice with direct Arrow shots to defeat it.


In this final room before the dungeon boss there are tons of Popo. They can all be defeated with a Spin Attack if you are quick enough to get it off. The two Red Eyegores can give you trouble since they are both next to each other. Deliver some Arrows to their eyes to defeat them. Lift up the pots to replenish your resources and then head up to take on the dungeon boss.
The bosses of the Eastern Palace are the six Armos Knights. These large Armos statues will come to life and begin jumping around the room. Initially, they will form a circle and rotate clockwise. Then, after a few seconds, they will line up horizontally at the top of the screen and jump downward.
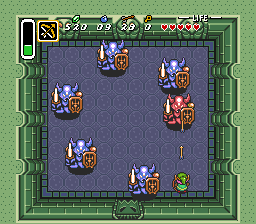

Link will need to hit them sixteen times each with his Fighter’s Sword to defeat them. A much easier way is to use the Bow and Arrow, as it will take just three Arrows to kill each one. When the Armos are jumping around the room in a clockwise fashion, stand near the bottom-right corner of the room facing northward. You can repeatedly shoot Arrows and you’ll hit a number of the Armos Knights several times.
When only one Armos Knight remains, it will turn red and will hop directly to where Link is. As Link moves around the room, the red Knight will continuously jump around, trying to land on top of him. Once again the sword works here, but the Arrows are best. Move quickly around the room, and position yourself so that when he drops down you will be able to land an Arrow, or potentially a few sword slashes.


After the final Knight has been defeated, collect the Heart Container to increase your health to six hearts. Grab the Pendant of Courage and you’ll be transported outside of the dungeon.
- Chapter 1 – Zelda’s Rescue
- Chapter 2 – Eastern Palace
- Chapter 3 – Desert Palace
- Chapter 4 – Tower of Hera
- Chapter 5 – Hyrule Castle Tower
- Chapter 6 – Dark Palace
- Chapter 7 – Swamp Palace
- Chapter 8 – Skull Woods
- Chapter 9 – Gargoyle’s Domain
- Chapter 10 – Ice Palace
- Chapter 11 – Misery Mire
- Chapter 12 – Turtle Rock
- Chapter 13 – Ganon’s Tower
