Dodongo (The Legend of Zelda)

Games | ||
Dungeons | ||
Rewards | ||
Threat | ||
Attacks |
| |
Effective | Sword - 1 hit | |
DODONGO DISLIKES SMOKE |
The Dodongo is the second boss in The Legend of Zelda. It is first encountered in Level 2: The Moon, where it is the final boss and guardian of the second Triforce fragment. Later on in the game, a set of three Dodongos appear in Level 5: The Lizard. Also, two sets of three Dodongos appear in Level 7: The Demon. The Dodongo looks very similar to a three-horned dinosaur, which could be its inspiration. There are a total of ten Dodongos found in The Legend of Zelda.
First Quest
Level 2: The Moon
The Dodongo first appears as the final boss of the second dungeon, Level 2: The Moon. This one appears by itself. Oddly enough, whenever Link is fighting a Dodongo, it seems to take on no drive to attack Link. It will simply walk around the room, basically minding its own business. It can be defeated if Link places a Bomb right in its path, at which time the Dodongo will swallow the bomb and be damaged. Two explosions will defeat the Dodongo, and allow Link to collect the second Triforce Shard. Another way Link can defeat the Dodongo is by putting a bomb right on their backs. If it hits just in the right spot, it will stun them. Once they are stunned, Link can just simply swipe them with his Sword and it will be gone. The Dodongo will also leave bombs when defeated in this manner.
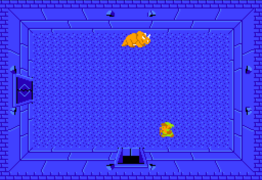
Dodongo from Level 2
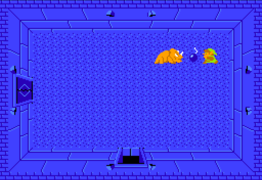
Using the bombs
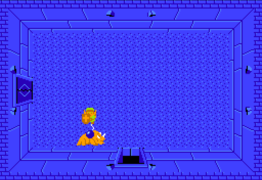
Placing the bomb on its back
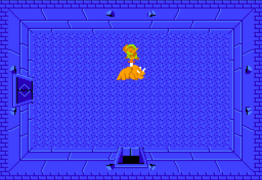
Attacking with the sword


Level 5: The Lizard
The second appearance of the Dodongo contains a total of three, and they all fight Link at the same time in Level 5: The Lizard. Defeating these Dodongos requires the same strategy as the first battle; line up the Dodongo, place a bomb, watch it be defeated. The Dodongos guard a door that leads to the Old Man who will offer Link a bomb capacity upgrade. These Dodongos can be a real pain, as it takes a total of six bombs to defeat them, yet Link at this point in the game can only carry a maximum of eight. This means that if Link misses with three bombs, he will have to leave, collect some more bombs, and try again. Alternatively, Link can use a bomb in the room south of these Dodongos to head toward this Old Man if he does not wish to fight them.
Level 7: The Demon
The third and final appearance of the Dodongo takes place in Level 7: The Demon. There are a total of six Dodongos in this dungeon, and they all attack and defend the exact same way previous ones did. Link will face them three at a time, like in the fifth dungeon. Similarly to the previous appearance, these Dodongos can be tricky because of Link's limited bomb capacity. However, he should be able to hold up to 12 by now, so the challenge is severely less than before.
Second Quest
Level 1
A lone Dodongo patrols a room in Level 1 of the Second Quest, guarding the Dungeon Map. Link never needs to face this Dodongo though, if he already knows how to find the secret room at the beginning of the dungeon that leads to the boss and its Triforce Shard.
Level 3
Three more Dodongos are found in Level 3, acting together as the boss of this dungeon. However, though they will drop a Heart Container if Link defeats them all, they are not guarding the Triforce Shard, and Link can choose to ignore them instead of fighting if he does not want the Heart Container.
Level 4
A total of four Dodongos appear in the next dungeon, though once again, Link does not have to defeat them all. The first one appears in a room with four Stone Statues in the corners that will shoot fireballs at Link, making the fight more difficult. If Link defeats this Dodongo, the northern door will open, granted Link access to the room with the Dungeon Map. The next three are fought together in a room north of the Triforce Shard, and Link must defeat them all to continue on to the next room hiding the Raft.
Level 8
Finally, a record-breaking twelve Dodongos appear in this dungeon, in groups of three patrolling four separate rooms. One trio of Dodongos guard the final Triforce Shard of the game, and must be defeated in order for Link to move on to Level 9 (Second Quest). However, Link does not even need to cross the rooms holding the other nine Dodongos if he does not wish to. One group of Dodongos are in a hidden room that can only be entered by bombing open its west wall, but only provide a Small Key if Link defeats them. Another group guard the room holding the Magical Rod, but since the door to that room is only locked, Link does not need to fight them in order to collect this item. The last group of Dodongos block a passageway leading toward the Magical Key, and Link will have to defeat these enemies if he wishes to collect this useful item.
Trivia
- Dodongos from The Legend of Zelda look very similar to the dinosaur called Triceratops.
- Dodongo is the only boss enemy from The Legend of Zelda to reappear in later dungeons as a normal enemy, as all other bosses who reappear in later dungeons will never respawn after being defeated.
Gallery

Sprite
