- Chapter 1 – Spirit’s Grave
- Chapter 2 – Wing Dungeon
- Chapter 3 – Moonlit Grotto
- Chapter 4 – Skull Dungeon
- Chapter 5 – Crown Dungeon
- Chapter 6 – Mermaid’s Cave
- Chapter 7 – Jabu-Jabu’s Belly
- Chapter 8 – Ancient Tomb
- Chapter 9 – The Black Tower
- Chapter 10 – Room of Rites
8.1 An Essence to the Past
Swim down one screen from Jabu-Jabu’s Shrine. One of the Zoras here will present Link with the Zora Scale for all his efforts at Zora Village. With this scale, Link will be recognized by all Zoras as their hero. Continue swimming down another screen, then right one and down two. Exit Zora Village by heading right one screen. Continue swimming right four screens.

Walk down the steps and re-enter the water, then dive down to discover a cave beneath the house. Enter the cave and use the Long Hook to latch onto the diamond stone on the right. From this location, swim up to the chest above and open it to obtain a Magical Ring! Switch back with the diamond stone and exit the cave, then resurface.Optional: Magical Ring - Red Holy Ring


Swim left two, down one, and right three screens. Dive underwater and speak with the Zora, who will let Link enter the Sea of Storms now that he has the Zora Scale. Swim into the area the Zora was blocking and resurface. Walk onto the strip of land to the right and head right one screen.

Optional: Magical Ring - Pegasus Ring


Swim around the Sea of Storms searching for a Pirate Ship. When found, swim into it and Link will climb aboard. Walk over to the right side of the ship, where its Captain can be found. Speak with him to hear his troubles, to which he requests Link’s Zora Scale to calm the seas so the Pirates may sail on their way. Give him the scale to obtain the Tokay Eyeball, a key item in discovering the ruins at Crescent Island.


The pirates will sail off to their next destination while Link will be let out in front of the Sea of Storms. Use a Gale Seed and warp to the South Shore, then head down one and right one screen. Enter the sea and swim down three screens and right one. Walk up to the head statue and place the Tokay Eyeball into the empty socket on the right. The statue’s mouth will open, allowing Link to enter a cave which will test his courage, wisdom, and power.


Defeat all five Gibdos in the first room to have a doorway open on the right. Head through right one screen to the next room of the cave, where Link must navigate a narrow path while trying to avoid three blade traps. Once on the other side, continue right one screen into a room with invisible floors.


There are invisible pathways along the floor in this room. Link will need to make his way to the staircase at the top portion of the room. Link can take multiple pathways, but the following pathway is the quickest and easiest way to get across. There are three visible safe squares on the left side of the screen. The black spaces just to the right are all safe for Link to stand on.
- Jump to the right so you are one space above the green block.
- Walk up so you are one space away from touching the northern wall
- Walk right three squares so you are directly below the stairs
- Head downstairs.


Swim to the right, navigating the underwater cave until a ladder will lead Link up and out. Resurface once outside of the cave and walk onto the land mass above containing three inactive Armos Statues. Push the one sticking out on the right to the “left”, lining it up vertically with the other two and opening a passage above. Head up one screen into what seems to be ancient ruins.


Some of the most dangerous enemies in the game will swarm the ruins, including red and blue variants of Darknut and Lynel. Head up and left one screen each, then follow this path down one screen and back up one via the leftmost passage. Continue up another screen, then continue following the path right two screens and down one. Head left one screen, then back right one along the lower path, then continue down one screen and up one along the rightmost path. Finally, head up and left one screen each to reach the entrance to the final dungeon of Link’s quest, the Ancient Tomb.


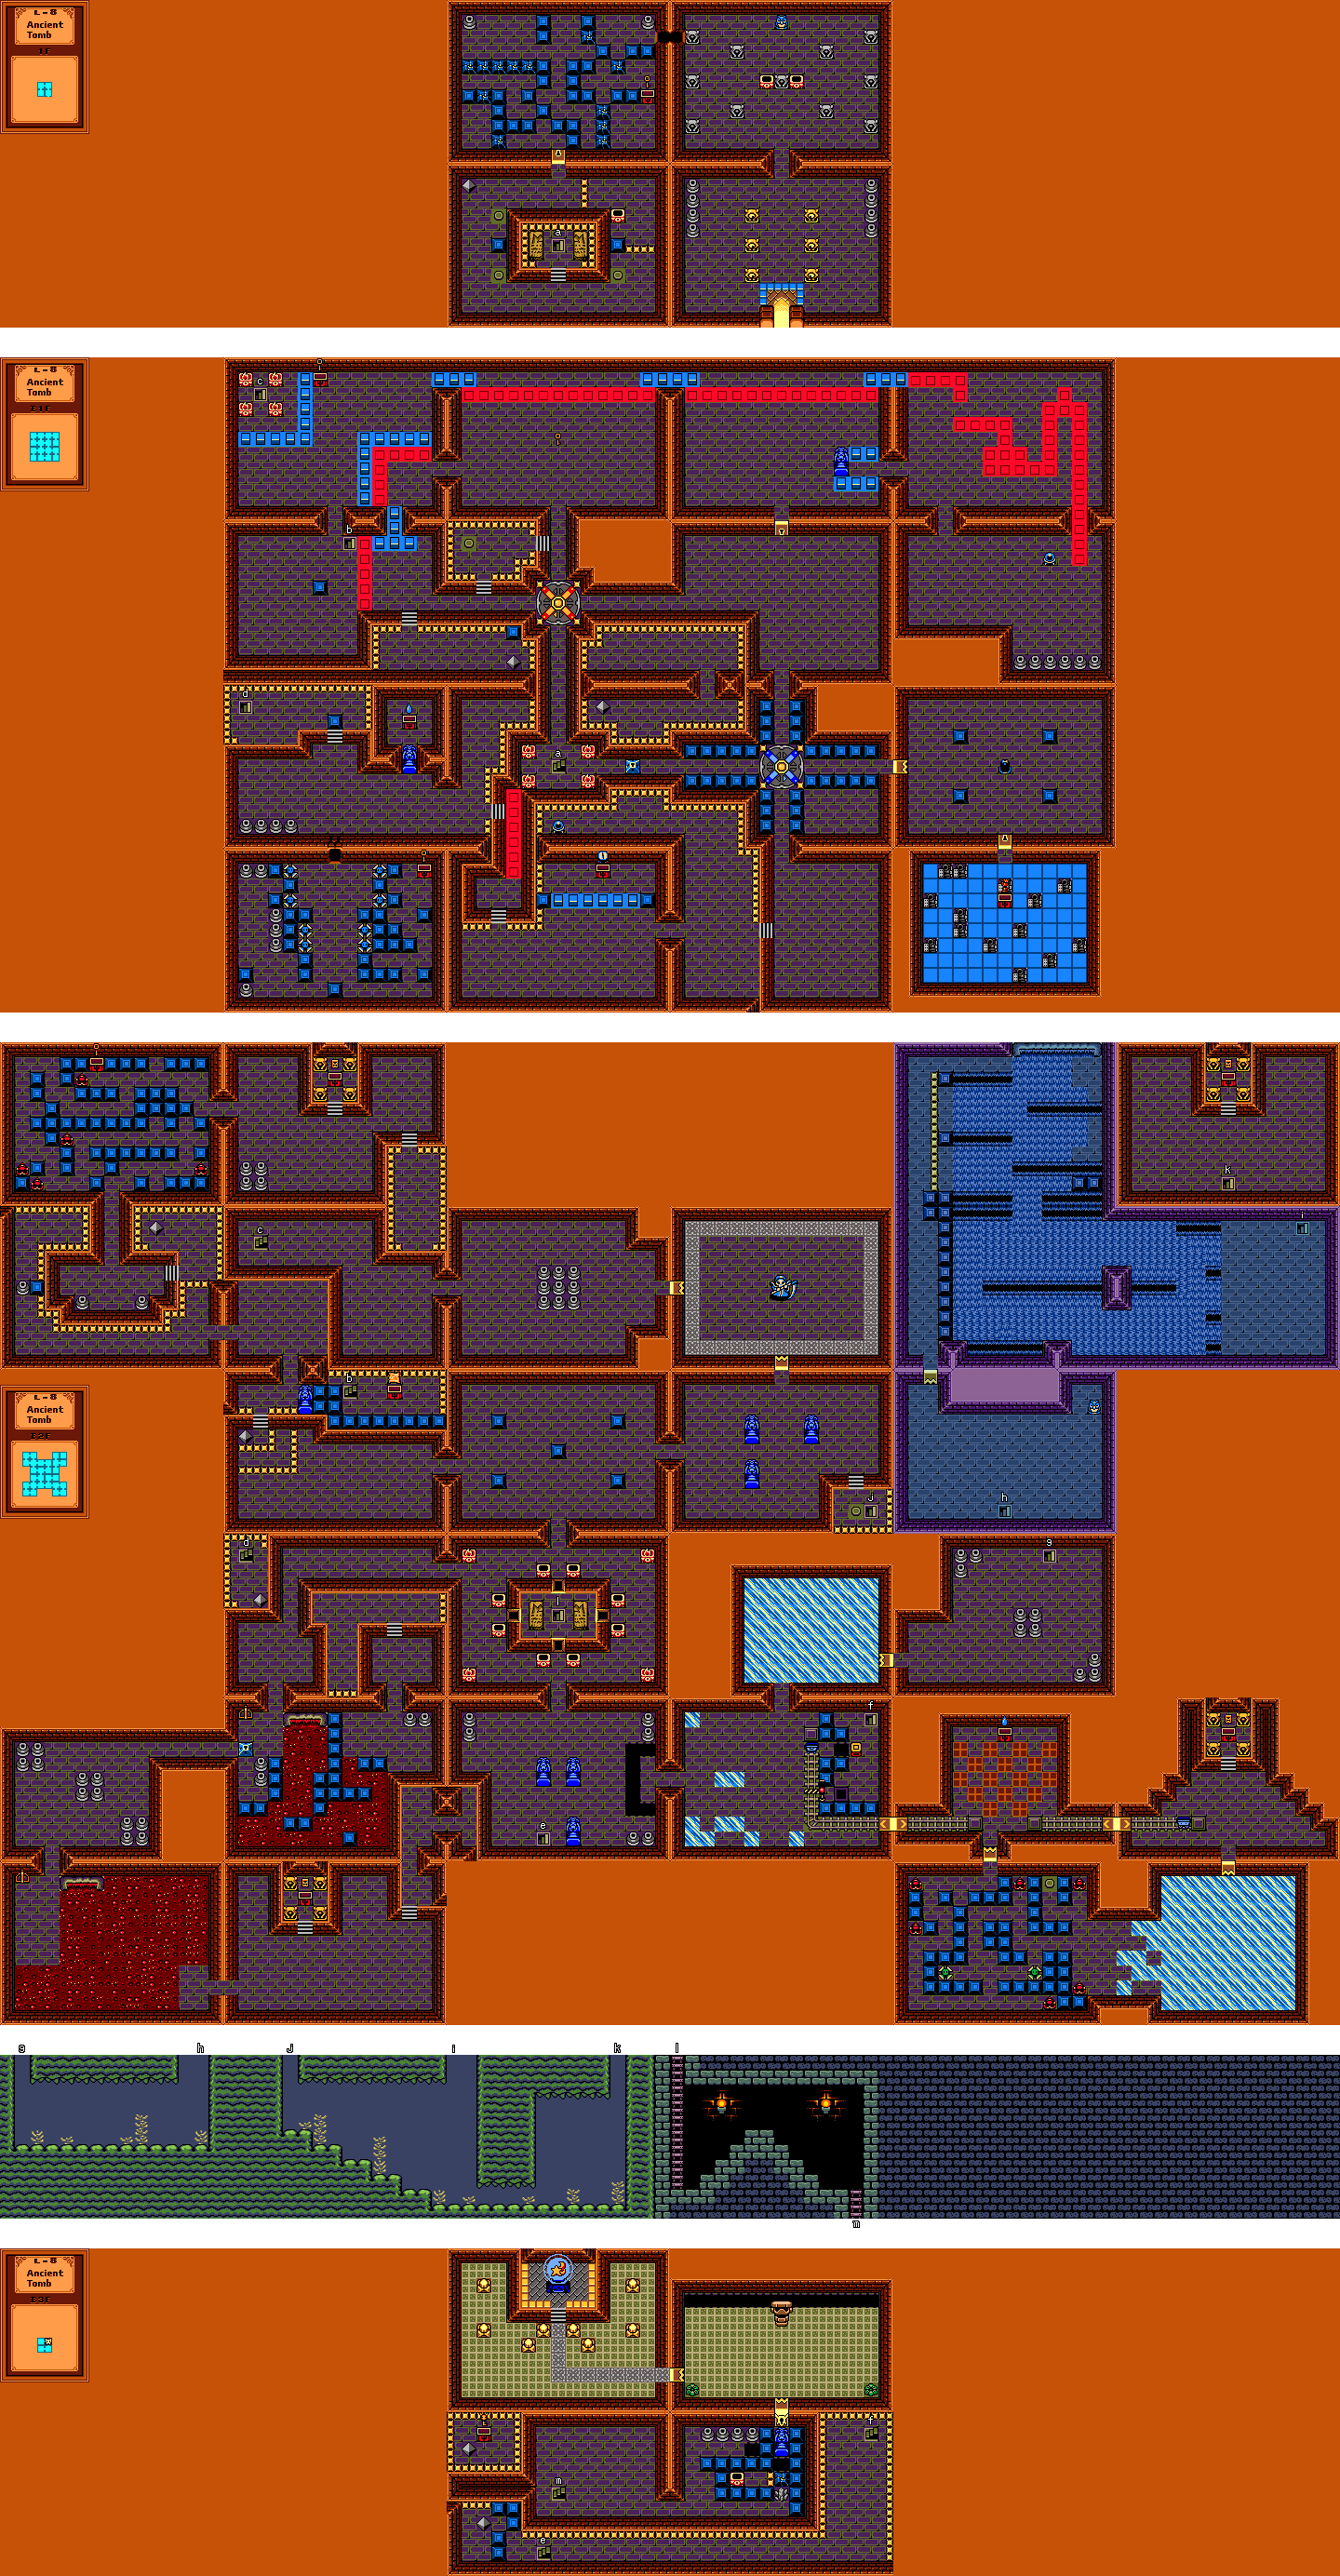
8.2 Level 8: Ancient Tomb
In the entrance room, there are supplies and fairies in the vases at the top left and right of this room, so stock up and begin by heading up one screen. Light the torches in this room and defeat the Ghinis, then head to the statue at the top-left corner of the room. Push the statue “up” or “down” and place a bomb where it was to blow a hole in the wall. Head through this passage, left one screen.


Three Floormasters will spawn while in this room, so its best to get rid of them before trying to navigate. After they are defeated, bomb the cracked block to the left and head down to a row of three more cracked blocks. Blast through these as well to access the chest on the right containing a Small Key. Grab the key and head to the upper-left corner of the room, then head back down blasting through the various cracked blocks until reaching a locked door. Use the key Link just obtained to open it and head down one screen.


Use the Long Hook to move the diamond stone to the left on top of the button near it. Then use the Cane of Somaria to place a block on the button in the lower-left corner of the altar. Step on the button at the bottom-right, and while standing on it, shoot an Ember Seed diagonally up and right. It will bounce off the wall and hit the torch, lighting it and causing the stone tablet on the altar to separate, revealing a staircase leading to the lower levels. A set of steps will also appear leading to the staircase, so head up them and take the stairs down to the basement level.


Head up one screen and step into the rotating platform, turning Link towards the west, and continue left one room. Defeat the three Ghinis in this room and push the lone blue block in any direction to have a staircase leading down appear at the top of the room. Avoid the staircase for now and head up one room where a chest at the top of the room provides another Small Key for Link to obtain. Grab the key and head back down one screen, then take the staircase down to the second floor of the basement.


Open the chest beside the staircase to obtain the Dungeon Map, then head back up the staircase to the first floor of the basement.
Head right one screen to B1F-B2, step into the rotating platform again, then continue down one screen. Unlock the blue block in the way of the eastern path and head right one screen. Step into the rotating platform here and head down one screen. Walk up the steps on the left and follow the ledge up and left one screen each. Strike the blue switch here to turn it red, lowering all blue pillars in the dungeon and raising the red ones, then backtrack right and down one screen each.


Head left one screen, then walk up passed the now-lowered blue pillars and open the chest to obtain the Compass. Get back to the switch by heading right, up, and left one screen each, then strike the switch to turn it back blue. Head right, down, and left one screen back to the room with the compass. Then walk down the steps on the left side of the room and follow the lowered red pillars up one screen.


Walk up the steps on the left and head left one screen. Bomb the weak section of the southern wall to open a passage and head through. Walk passed the first two Blue Blade Traps and jump over the last two, then head over to the upper-right corner. Open the chest here to obtain a Small Key, then exit this room up one screen.


Head right, down, and right one screen each, then head up one screen along the ledge on the left. Continue left one screen to find the crystal switch once again. Strike it to turn it red, raising the red pillars and lowering the blue ones. Walk back right and down one screen each. Walk down the steps on the right and head up one screen. Step into the rotating platform and continue left and up one screen. Step into the rotating platform here and head left one screen, where the lowered blue pillars now provide a new route.


Walk up one screen along the lowered blue pillars, then right one screen. Defeat the Stalfos holding a Small Key in this room to obtain it, then head down one screen. Climb up the steps on the left and step on the switch, creating a nearby staircase. Step into the rotating platform from the top and have it turn Link towards the left. Climb the steps and circle back around to the top and steop into the rotating platform again. This time it will turn Link towards the east. Continue to the right one screen.


Continue down one screen and step into the turning platform, then head left one screen. Circle back around to the platform again by heading up, right, and down one screen each, then use the platform again to access the eastern path. Head right one screen, where the door will close behind Link until all four Ropes in this room are defeated. Continue down one screen through the locked doorway.


Defeat the Mini-Moldorms in this room first, then leave and re-enter to avoid them knocking Link around while trying to complete the puzzle. This is the last, and possibly most difficult, tile-changing puzzle which Link must complete. In order to do so, walk along the path in the following number of spaces:
- Right 5, Down 2, Left 2, Up 1, Left 2, Down 2, Right 4, Down 1, and Left 3.
- Down 1, Right 2, Down 1, Right 1, Down 1, Left 3, and Up 1.
- Left 1, Up 1, Left 1, Up 3, Left 1, Up 2, Left 1, Down 3, Right 1, Down 1, and Left 1.
- Down 2, Right 2, Down 1, Left 5, Up 1, Right 2, Up 1, and Left 1.
- Up 1, Left 1, Up 1, Right 1, Up 1, Right 1, Up 1, Left 2, and Up 1.


Open the chest which appears once the puzzle is completed to obtain the Power Glove! Replacing the Power Bracelet, the Power Glove can pick up even bigger items such as the large blue statues spread throughout this dungeon.


Head up and left one screen, then step onto the rotating platform which will turn Link towards the northern path. Continue up one screen, then unlock the door at the top of the room and head through. Go right and down one screen each to discover a switch. Strike the red switch on the right side of this room, turning it blue, then stand on the lowered red pillars to the right of it and shoot the switch again. Head up one screen along the path of raised red pillars, being careful not to fall off while using Roc’s Feather to jump across the gap. Follow the path until it leads Link left one room through a passage at the upper-left corner. Follow this path left two more rooms, where the lowered blue pillars on the left side of the room give way to a staircase. Head down to the second floor of the basement level.


Head right two screens, where a showdown with the mini-boss, the Blue Stalfos, will ensue.


This Blue Stalfos is no ordinary blue-colored Stalfos like those which have been seen many times throughout Link’s quest, but more like the head Stalfos in charge, both in terms of appearance and power. Blue Stalfos will shoot one of two orb variations towards Link, one which remains solid when launched and can be swiped back at Blue Stalfos, and another which appears comprised of multiple small orbs when shot that will only break apart when making contact with another object. Because the latter orb variation breaks up into smaller pieces and flies in all directions when struck, Link cannot simply avoid the attack by hitting it with his sword. The best strategy to use here is to keep the Noble Sword and Roc’s Feather equipped, using the power of the feather to jump over the multi-layered orbs and striking the solid ones back at Blue Stalfos. Use the Noble Sword to knock an orb back at the Blue Stalfos. When a solid orb is knocked back into the mini-boss, he will transform into a smaller, flying version of himself, similar to a Keese, at which point he can be slashed repeatedly and damaged.


After defeating the mini-boss, grab the Fairy released and head down one screen. Defeat or avoid the Wizzrobes and continue left one screen, then do the same in this room and head left another room. Hook to the diamond stone on the left side of this room to access the steps and head up one screen, then head directly left one screen.


Follow the path around the ledge to the left side of the room, then use the Long Hook on the diamond stone directly across on the opposite ledge. Walk down the steps below and head up one screen through the narrow path. Equip the Roc’s Feather and head through the path surrounded by blue blocks, jumping over the Spinning Blade Traps as they come towards Link. At the top of the room, open the chest to obtain a Small Key, then head right one screen.


Walk up the steps in the center of the room to an altar with a chest. Open the chest to obtain a Slate, one of four needed to open a passage later in the dungeon. Head up the steps on the right side of the room onto a ledge and follow it down one screen. Jump off the ledge and continue right two screens, then head down, left, and down one screen each to reach the large altar room.


Continue down one screen and you’ll find four large blue statues here. Lift the lower-left statue and toss it aside to reveal a staircase leading down. Head down the staircase to the third floor of the basement.


Of the two vertical blocks on the left, push the lower one “left” and the one above it “up”, then walk hook to the diamond stone on the opposite ledge. Open the chest here to obtain the Boss Key, then hook to the diamond stone again and head right one screen along the ledge.


Continue along the ledge until reaching a staircase, then use it to reach the second floor of the basement.


Push the puzzle block “down” three times and “left” once, raising the gate over the track, then hop across the pit and into the mine cart. It will empty in a room where phantom tiles will begin rising from the floor and launching at Link. Stand in front of the locked doorway below and either strike at the tiles or hold Link’s shield out until they are all gone, then walk up and grab the Gasha Seed from the chest.


Head down one screen. Follow along the path surrounded by blue blocks and jumping over the Spinning Blade Traps to avoid contact. When Link comes to a break in the blocks, head up through the path, careful not to be hit by the two Green Blade Traps. Keep following the path until reaching a button, which when stepped on separates the walls to the east. Head right one screen through the new passage.


Be careful not to run into the Ball and Chain Trooper in this ice-covered room, though he must be defeated to unlock the doorway above. Head through once opened and grab the second Slate from the chest at the top of the room. Ride the mine cart on the left, then quickly hop into the opposite mine cart there to ride back another room.


Walk up a room to find a room with an iced-over floor and four Candleheads swarming about. Light-up and defeat all the enemies to unlock the doorway to the right, then head through it. Take the staircase at the top of this room to an underwater cavern below, then swim through it to the right, up and out. Link will emerge in a new room, a flooded section of the dungeon.


Use the Long Hook to defeat the three Mini-Bari in this room and head up one screen through the unlocked doorway. Continue swimming up another screen along the path, then head right into the flowing waters. Swim from side-to-side to avoid being sucked down one of the holes until reaching the bottom, which will take Link one screen back. Head right one screen through either path and eventually out of the area of flowing water. Take the staircase at the upper-right section of the room to another underwater cavern.


Swim straight down and head right one screen through the narrow passage at the bottom. In the next room, swim to the far right and up to exit the underwater cavern. Walk up and grab the third Slate from the chest, then head back down the staircase into the underwater cavern again. Swim left one screen through the cavern, then up and out from the left side of the room.


Step on the button to the left to have a set of steps appear, then walk down them and head left and down one screen each, back to the large altar room. Take the path out of this room to the left, then exit at the bottom-left side. Unlock the blue block in front of the lever and head through the passage left one room, where many vases will provide Link with health and other goodies.


Continue down one screen and pull the lever on the left as far down as it will go, stopping the flow of lava into the room momentarily. While the floor is solid, head to the lower-right corner of the room and take the passage right one room. A chest at the top of this room contains the fourth and final Slate, so grab it and head up the steps on the right side of the room to the ledge, following it up one screen.


Jump off the ledge above and head up one screen, then walk up the steps in front of Link and follow the ledge towards the left. Long Hook to the diamond stone on the ledge further left and head up the steps there.


Push the blue block aside and head down the steps. Over on the right side of the room, toss aside the large blue statue to access a chest containing a Gasha Seed. Climb back up the steps and head down to the floor below. Walk right a screen to get back to the room with the tablets.
If you accidentally left the room after getting the Gasha Seed, you’l have to backtrack through much of the dungeon. From the Gasha Seed, go right one screen. Walk to the top of the room and hook to the diamond stone on the ledge to the right. Continue right, up, and left one screen each and hook to the diamond stone on the left ledge. Go left one screen, then head right one screen through the narrow path. Walk up the steps on the ledge with the button and down the next set, then step into the rotating platform from the north. Circle around and step into the platform again from the north to have it turn Link towards the eastern path, then head right one screen.


Continue up, right, and down one screen each, then stand on the lowered red pillars and strike the switch to raise them. Head up one screen and follow along the pillars left one screen. Continue left three more screens, then take the staircase on the left side of the room down to the second basement floor.


Head right two screens and down one, then continue left and down one screen. Place all four Slates into the walls of the altar to uncover a staircase beneath the stone tablet. Walk up the steps that appear and descend the staircase to a dungeon area below.


Jump through the dungeon area and head down the ladder on the right side. Link will resurface in the third floor of the basement.
Head right one screen. Slash the gray crystal in front of the cracked block, then bomb the block and shoot an Ember Seed at the torch to the left of it. Walk across the bridge that appears and toss aside the blue statue to access the boss room door. Head through the door when ready to reach the lair of Ramrock.


During his first form, Ramrock will move from side to side at the top of the room and often launch his fists towards Link. To damage the boss, strike his own hands back at him, timing it so they hit him in the head. After three successful hits, Ramrock will exchange his hands for claws and chase Link throughout the room, attempting to crush between his claws. During this second form, Link must throw bombs towards Ramrocks face, timing it just right so he crushes the bomb before it explodes as this is the only way he can be damaged. Again, after three successful hits, Ramrock will change into a third form.


Using two shields on each side of his head, Ramrock will begin moving from side to side as he did in his first form, only now he will shoot large orbs at Link and sometimes fire lasers from his eyes while moving across the room. The orbs cannot be struck back at Ramrock, so try to avoid their crossing their path. As for the lasers, Ramrock will start at one side of the room and make his way to the next, but the attack’s path will not cover this entire area. Run in front of the lasers to avoid contact by the time Link reaches the opposite side of the room. To damage the third form, shoot Scent Seeds off the wall behind Ramrock so they bounce down and hit him in the back of the head. Once defeated, the boss will change into his fourth and final form.


Ramrock will equip two chain arms with large metal balls for hands. Still moving about the top of the room, Ramrock will often stop to launch one of his hands at Link. When he does this, use the Power Glove to pull the opposite hand down three times before releasing and launching it towards the boss, damaging him in the process. Ramrock will stay in place and shoot the other hand towards Link as long as one hand is being pulled down. Good timing can be used in pulling down one hand, waiting for Ramrock to launch the other, then releasing, running up and grabbing it again after it has hit him, and pulling it back down for another attack while the boss stays in place the entire time. After three hits, Ramrock will be defeated.


Grab the Heart Container from the middle of the room and head left into the altar room of the final Essence of Time. Walk up the steps to claim the Falling Star, restoring the Maku Tree to full power!


After exiting the dungeon, the Maku Tree will encourage Link to visit her in the present, where she can now give him an important item in bringing an end to Veran’s quest for sorrow…
