- Chapter 1 – Mercay Island
- Chapter 2 – Temple of Fire
- Chapter 3 – Ocean King Part II
- Chapter 4 – Temple of Wind
- Chapter 5 – Ocean King Part III
- Chapter 6 – Temple of Courage
- Chapter 7 – Ghost Ship
- Chapter 8 – Ocean King Part IV
- Chapter 9 – Goron Temple
- Chapter 10 – Temple of Ice
- Chapter 11 – Ocean King Part V
- Chapter 12 – Mutoh’s Temple
- Chapter 13 – Ocean King Part VI
8.1 Zauz's Island
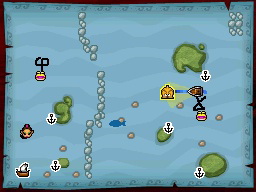
After completing the Ghost Ship, we must make a stop at Zauz’s Island. This is an uncharted island that we checked out back in Chapter 4. If you have yet to visit the island, it is located north of the Isle of Gust, and west of Bannan Island. Sail in this area and you’ll find Zauz’s Island near the north-central portion of the northwest quadrant.
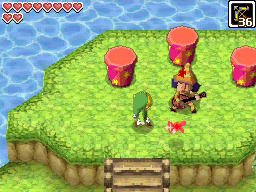
Enter the lone building and speak with Zauz. After some back and forth chit-chat, examine the picture on the wall and be sure to make note of the symbol. This is the classic Zelda symbol of the Triforce, and we will need to draw it shortly. Leave the hut and return to Linebeck to set sail.


Use the Cyclone Slate to warp over to the southwest quadrant and then sail back over to Mercay Island. Once you arrive you will get a letter in the mail from Linebeck. Read it and you’ll see that he also included a gift; a random ship part. Now make your way northward and enter the Temple of the Ocean King once again.
8.2 Temple of the Ocean King IV
Not too much has changed in the first several floors of the Temple of the Ocean King. However, we now have the Bow and Arrow, and it does open up a few new goodies. Much of this section will cover the floors with quick summaries, highlighting mostly just the new material, since you’ve already completed these puzzles. If you are really stuck on some of the older puzzles, you can refer back to the previous chapters, which go a bit more in-depth with these particular sections.
There is nothing new on Floor 1F, so run over to the staircase and head down to Floor B1.
The first notable difference of the Temple is that on this floor, and on many floors to follow, some of the blue phantoms have been replaced by red phantoms, known as Swift Phantoms. These red variants move quite a bit faster than their blue counterparts, so you’ll have to be careful. You can temporarily stun these phantoms by shooting their backside with an arrow. Just like the previous visit, run to the northeast corner of the room and use bombs to blow up the cracked blocks. Use the nearby floor switch to grab the small key at the northwest corner of the room and then use it on the locked door to reach the next floor.
Nothing has changed in this room, other than the Swift Phantom that now appears near the bottom screen. Just like before, hit the two crystal orbs near the northeast part of the room, causing a small key to appear. You can use a bomb to blow up the cracked wall on the right, providing you with a shortcut to the small key. Step on the switch and snag the key. If the Phantom sees the key before you, it’ll snatch it up. Just slash it in the back, stunning it momentarily, and allowing you to get the key. Use the key and head down to the next floor.
Much of this floor is the same. Collect the first force gem from the treasure chest at the top left of the room. The second force gem is found in a chest at the bottom-right portion of the room. The third force gem is located in a treasure chest within the safe zone near the bottom left part of the room. You’ll need to acquire a small key by dropping the phantom into the abyss, using the floor switches. Alternatively, you can just shoot his backside with an arrow to stun him, causing him to drop the small key.
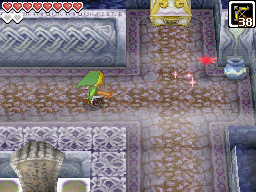
On Floor B3, there is an eye switch, just southeast of where you need to place the Force Gems. You can only hit this target when on the higher ledge. Hit it with an arrow and it will temporarily cause a treasure chest to appear near where you place the force gems. Quickly run over and open the treasure chest to get Power Gem #11. Walk up a screen and snag some extra time from the yellow pot in this safe room and then continue down to the next floor.Optional: Power Gem #11


Once you enter the room, run to the northeast corner and use your bow to shoot the eye switch with an arrow. This will cause all the wind geysers in the room to turn off, making it significantly easier to maneuver around the room. The rest of the floor remains the same. It is still a good idea to get rid of the Phantom Eyes, as it will make this floor a bit easier. Blast the cracked wall near the west part of the room to hit the crystal switch, causing the spikes to lower. Grab the small key and then use it on the door to reach the next floor.


Just to the right of the staircase, use the bow to shoot the eye with an arrow, allowing you to quickly reach this storage area where you can refill your hearts, bombs, arrows, and grab some extra time.
The remainder of this room is identical to the first trip, with the exception being, the type of enemies that appear. Instead of Yellow ChuChus and Miniblins, they have been replaced with the more dangerous Fire Bubbles and Moldorms. It makes the combat slightly more difficult, but nothing too bad. Note, now that you have the arrows, you can shoot the Bubbles, instead of using your boomerang and sword. Moldorms can also be defeated with a single arrow shot. Hit the orb at the northeast corner of the room and then continue down to the next floor.


Just west of where you enter Floor B6, use the bow to shoot the eye switch with an arrow. This will cause a treasure chest to appear at the northeast corner. Unfortunately you don’t have much time, and the Phantom Eyes, as well as the Phantoms can get in the way. It is recommended to defeat the Phantom Eyes first. Open the treasure chest to get Treasure Chart #11.Optional: Treasure Map #11


You can ignore everything else in this room and just run over to the red door. Before, we drew the hourglass on the symbol, but this time, as Zauz suggested, draw the Triforce symbol with a single stroke and the door will open up.


In this new room a warp portal will appear, acting as a midway point of the Temple. At any time, you may now step into this portal to quickly appear back at temple’s entrance, and vice-versa. Furthermore, depending on how long it took you to reach the midway point, that is how much time will be removed from your hourglass. Thus, if you are having trouble with time in the later portions of the Temple of the Ocean King, it does benefit you to go through them again, clearing the floors in a faster time. Tap on the Door of Courage and continue down to the next floor.


There is a cool trick you could use if you need more time in your hourglass. Return to Floor B6 and this time draw the symbol of the Hourglass on the Red Door, instead of the Triforce. In this room there is a yellow jar that will give you some extra time. Then return and draw the Triforce symbol to progress.Extra Sand of Hours
Finally, a brand new floor and there sure is a lot to it. Step onto the moving platform and then cross over to a number of moving platforms as you make your way northward. Make sure you are facing westward so that your shield will block the arrows. Step onto the safe zone and if you’d like some extra time, you can use your boomerang to break the yellow pot to the right to grab 30 additional seconds.


Cross over to the west side of the map and you’ll notice the floor acts a bit differently. If you run across this floor, a chime will ring and any nearby phantoms will be alerted to your location. If you walk slowly, the phantoms won’t be able to hear you. Carefully make your way southward, and once you are close enough, you can just make a run for the staircase at the southwest portion of the room. We will be returning to this floor shortly, but for now, climb up the staircase to the next floor.
Once you arrive at this floor, just wait in the safe zone for a few moments. Be sure to follow the path of the red phantom that is near you and you’ll see that it walks across the gap to the east side of the room. There is a hidden pathway. Make note of where the phantom is walking and trace it on your map. Walk across that same pathway to reach the east end of the room. Climb up the staircase here to get back to Floor B7.


The east side of this floor is heavily guarded by two phantoms and there isn’t much in the way of safe zones. Wait until the blue phantom is facing northward, and the red phantom is walking eastward. Bolt to the left and around the corner. Follow after the red phantom, but be careful as you draw near, as the ground will make noise, alerting the phantom. At the east end of the room there is a red pot. You want to lift that pot up, and when the blue phantom is not facing northward, walk in his direction, tossing the red pot somewhere in his direction, creating a small safe zone. If the phantoms see you, stay in the safe zone until they go about their business.


From this safe zone that you created, you should be able to use your boomerang and hit the crystal orb that is located at the southeast corner of the room. This will cause the flames in the center of the room to go out for a short period of time. Wait until it’s safe, notably when the red phantom just starts walking northward, and then hit the crystal switch. Carefully make your way over to the flames and once the moving platform arrives, step onto it.
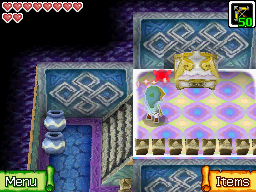
Ride the platform northward and then step off to the platform on the left. If you didn’t earlier, be sure to smack the yellow pot to get some extra time and then open the treasure chest here to get the Round Crystal. This will also cause the flames at the east end of the room to go out. Carry this crystal across the gap to reach the safe zone nearby.


No matter how fast you move, you won’t make noise while carrying a crystal. Wait until the red phantom starts heading northward. Once it reaches the northeast corner of the room, run south to get by it. Maneuver back around to reach the safe zone near the staircase. With the crystal in hand, climb down to get back to Floor B8.


Wait until the path is clear and run across the invisible platform to reach the west side of the map. Avoid the blue phantom and carry the Round Crystal to the safe zone in the center of the map. Drop it in the hole and the nearby spikes will lower. When the pathway is clear walk north past the spikes and step on the floor switch. This causes a nearby geyser to appear, which isn’t of much use right now. There is a yellow pot on this higher ledge, but you can easily get it without using the geyser. Just climb up the nearby staircase and then use your boomerang to hit the yellow pot, collecting 30 seconds more of time. Then climb down the staircase at the northwest corner of the room.


Finally we’ve reached the next floor, but our time here is short lived as flames block our pathway. For now just open the treasure chest to get the Triangle Crystal and then carry it back down to the floor below.


Back on this floor we want to avoid the phantoms as we carry the Triangle Crystal across the invisible gap to the east side of the room. We then want to head to the northeast portion of the room, but be careful of the red phantom that patrols this area. Also, the apparent safe zone at the east part of the room is a trapped door, so don’t walk on it. Instead run to the northeast corner of the map and step into the safe zone. Drop the Triangle Crystal in this safe zone for the time being.


Pick up the nearby red pot and run westward where you will find a square of blocks, with one of them cracked. Toss the red pot in this area to create a safe zone. Toss a bomb so that it blows up the cracked block. This will likely trigger the nearby phantom to run in your direction, so quickly run back to the small safe zone you just created. When the path is clear, run back and grab the Triangle Crystal and place it into the pedestal we just revealed.
The nearby spikes will lower, and a treasure chest will appear. When the pathway is clear, run past the lowered spikes and hit the crystal switch, causing the nearby door to open.


On Floor B8, after you place the Triangle Crystal into the pedestal, a treasure chest will appear, almost as if it is floating in mid-air. Wait until the nearby phantom is walking to the east and then make a run for it. There is a secret path directly above the treasure chest, allowing you to reach it. Open it up to get a Courage Gem.Optional: Courage Gem #7


When the path is clear, run back to the safe zone and grab the Triangle Crystal once again. This time carry the triangle crystal down the steps at the northeast corner of the room.
Leave the Triangle Crystal in the safe zone for now and then step out of the safe zone to talk to the fallen adventurer. If you glance at your map after the discussion, you will see four skulls, one in each corner of the map. This corresponds to the location of enemy Wizzrobes that are located in this room. These enemies will follow Link when his back is turned. If they get close enough to Link, they will appear briefly and will try to strike Link with their scythe. If they successfully do, not only will it deal damage, but it will eat up 15 seconds of time within the hourglass. After a few moments the Wizzrobe will re-appear in its original location.
The trick here is to allow the Wizzrobe to get close and when it is right behind you, immediately turn around swipe at the enemy to defeat it. Successfully defeating it will also gain Link 30 seconds of sand. With four Wizzrobes to find in this room, that’s an extra two minutes of time. It’s a good idea to get rid of all four Wizzrobes before doing much else in this room.


After defeating all four Wizzrobes on Floor B9, a treasure chest will appear near the center of the room, which contains a Wisdom Gem.Optional: Wisdom Gem #9


At the south end of the room there is an arrow orb and an eye switch. If you look at the eye switch, it will close, making it impossible to hit with an arrow. Instead, hit the arrow orb so it is facing northward. Then face directly westward or southwestward so that the eye switch remains open. Shoot the arrow orb and it will hit the eye switch, causing spikes at the southwest corner of the room to lower.


Avoid the phantom and make your way to this newly accessible safe zone. Stepping on the floor switch causes a trap door to appear just to the right. Wait until the phantom is directly above the trap door, and then step onto the floor switch, sending the phantom down to the abyss. The Square Crystal that the phantom was holding will drop, and a treasure chest in the southwest corner of the room will appear. Run over and open the treasure chest to get a Ship Part.


Grab the Square Crystal and take it to the northwest corner of the room. Place it into the pedestal, causing the nearby flames to go out. Use the staircase here to get back to Floor B8.
Make sure you have stepped on the nearby floor switch, which causes a nearby geyser to appear. Then run southward and grab the Round Crystal, causing the spikes to block your way back. When the path is clear, make your way to the geyser just to the south. Use the geyser to send yourself up to the higher ledge. Walk around on the higher platform and jump off to the area north of the spikes. Carry the round crystal back up to Floor B9.


Finally, we have all three crystals on the floor. One by one, take each of the three crystals to the north end of the room and place them in their proper pedestals. With all three in place, head through the door that opens up.
Inside this new room, open the treasure chest to get the Southeastern Sea Chart. A blue portal will appear and if you step into it, it will send you back to the Temple’s entrance.

At this point you can actually dive even further into the Temple of the Ocean King and retrieve the 4th Sea Chart, unveiling the northeast quadrant of the Great Sea. However, the next few floors are challenging and if you don’t have much time remaining in your Hourglass, it could get quite difficult. In order to reach the next floor, exit the room you just entered. You have to place the three crystals in their pedestals in a specific order. First place the Square Crystal, then the Round Crystal, and finally the Triangle Crystal. When you then head up north, the room will shake, sending you down to the next floor. When you exit this room again, you’ll now appear on Floor B10. This chapter won’t cover the remainder of the Temple of the Ocean King at this time. However, if you’d like to do so, jump on over to Chapter 11 of the walkthrough.Optional: Sea Chart #4
8.3 Southwest Quadrant Extras
Now that we have unlocked the third Sea Chart, there are a pair of new Treasure Maps that you can now pick up, with their corresponding Sunken Treasure appearance in the southeast quadrant.
After acquiring the third Sea Chart, speak with Freedle at the northeast corner of Mercay Island and he will give you the Treasure Map.Optional: Treasure Map #12
Return to Molida Island and speak with the young girl in red near the dock to get the Treasure Map.Optional: Treasure Map #13

There is a Wisdom Gem that you may have already acquired, and I briefly mentioned it earlier. After completing the Temple of Wind and playing Salvatore’s game, Salvatore will eventually send you a letter in the mail. In order to acquire this letter, at least 24-hours must have gone by. You can acquire this more easily by tricking your Nintendo DS, by changing its internal clock and then restarting the game. Once you do get the letter from Salvatore, it will include the Wisdom Gem.Optional: Wisdom Gem #10

Now that you have collected 10 Wisdom Gems, you can travel to Spirit Island and present them to the Spirit Shrine. This will upgrade Neri, the Spirit of Wisdom. There are numerous benefits for this upgrade. In particular, Link will now only take half the amount of damage from attacks. Furthermore, Link’s shield is now upgraded, capable of stunning weaker enemies by just walking into them. Lastly, if Link is struck by a Phantom in the Temple of the Ocean King, he will only lose 15 seconds of time instead of 30.Optional: Spirit Island Upgrade

You may have already acquired this, but after delivering Jolene’s Letter to Joanne, Joanne will later deliver a letter to Link to show her appreciation. The letter will come with an attached Ship Part.Optional: Joanne's Letter

As mentioned earlier in the guide, the Treasure Teller on Mercay Island is now open. Here you can sell some of your treasure, as well as any Ship Parts. The price of each Ship Part and Treasure piece is variable from game to game. He may pay 0, 50, 150, 800, or 1500 rupees for any particular treasure or ship part. Whatever he offers to pay for a particular item, it will remain that price for the duration of the game. However, if you start a new game, treasures might be assigned different values. At this point you should trade in as many of your treasures and any duplicate ship parts to get some rupees so we can purchase some valuable goodies.Optional: Treasure Teller


Make your way over to Beedle’s Shop Ship and he has for sale a Bomb Bag Upgrade, at the cost of 1,000 rupees.Optional: Bomb Bag Upgrade #2


We need to make our way to Beedle’s Masked Helmet Shop. This special shop only appears at certain times of day. You can either just ignore this for now, or change the game’s internal clock. Then when you reload the game with these time settings, Beedle’s Masked Helmet Shop will appear instead of his regular shop. On Monday-Friday, the Masked Ship Shop appears from 10pm to Midnight. On Saturday and Sunday, the Masked Ship Shop appears from 10am to Noon. The Masked Ship sells a Heart Container for 1,500 Rupees.Optional: Heart Container #8

- Chapter 1 – Mercay Island
- Chapter 2 – Temple of Fire
- Chapter 3 – Ocean King Part II
- Chapter 4 – Temple of Wind
- Chapter 5 – Ocean King Part III
- Chapter 6 – Temple of Courage
- Chapter 7 – Ghost Ship
- Chapter 8 – Ocean King Part IV
- Chapter 9 – Goron Temple
- Chapter 10 – Temple of Ice
- Chapter 11 – Ocean King Part V
- Chapter 12 – Mutoh’s Temple
- Chapter 13 – Ocean King Part VI
