Eastern Hyrule (The Adventure of Link): Difference between revisions
Jump to navigation
Jump to search
Want an adless experience? Log in or Create an account.
mNo edit summary |
m (Text replacement - "Wizzrobe-Sprite-AOL.png" to "Wizard-Sprite-AOL.png") |
||
| (7 intermediate revisions by 3 users not shown) | |||
| Line 17: | Line 17: | ||
==Enemies== | ==Enemies== | ||
=== Overworld Enemies === | |||
{{Gallery|size=80|pad=5}} | {{Gallery|size=80|pad=5}} | ||
{{Gallery/Box|file=AchePurple-Sprite-AOL.png|link=Ache|caption=[[Ache|Ache (Purple)]]}} | {{Gallery/Box|file=AchePurple-Sprite-AOL.png|link=Ache|caption=[[Ache|Ache (Purple)]]}} | ||
| Line 29: | Line 23: | ||
{{Gallery/Box|file=Basilisk-Sprite-AOL.png|link=Basilisk|caption=[[Basilisk]]}} | {{Gallery/Box|file=Basilisk-Sprite-AOL.png|link=Basilisk|caption=[[Basilisk]]}} | ||
{{Gallery/Box|file=WhiteBagoBago-Sprite-AOL.png|link=Bago-Bago|caption=[[Bago-Bago|Bago-Bago (White)]]}} | {{Gallery/Box|file=WhiteBagoBago-Sprite-AOL.png|link=Bago-Bago|caption=[[Bago-Bago|Bago-Bago (White)]]}} | ||
{{Gallery/Box|file=Pesto-Sprite-AOL.png|link=Boon|caption=[[Boon]]}} | {{Gallery/Box|file=Pesto-Sprite-AOL.png|link=Boon|caption=[[Boon]]}} | ||
{{Gallery/Box|file=DeelerRed-Sprite-AOL.png|link=Deeler|caption=[[Deeler|Deeler (Red)]]}} | {{Gallery/Box|file=DeelerRed-Sprite-AOL.png|link=Deeler|caption=[[Deeler|Deeler (Red)]]}} | ||
{{Gallery/Box|file=DeelerBlue-Sprite-AOL.png|link=Deeler|caption=[[Deeler|Deeler (Blue)]]}} | {{Gallery/Box|file=DeelerBlue-Sprite-AOL.png|link=Deeler|caption=[[Deeler|Deeler (Blue)]]}} | ||
{{Gallery/Box|file= | {{Gallery/Box|file=Girubokku-Sprite-AOL.png|link=Girubokku|caption=[[Girubokku]]}} | ||
{{Gallery/Box|file=Leever-Sprite-AOL.png|link=Leever|caption=[[Leever]]}} | {{Gallery/Box|file=Leever-Sprite-AOL.png|link=Leever|caption=[[Leever]]}} | ||
{{Gallery/Box|file=LizalfosOrange-Sprite-AOL.png|link=Lizalfos|caption=[[Lizalfos|Lizalfos (Orange)]]}} | {{Gallery/Box|file=LizalfosOrange-Sprite-AOL.png|link=Lizalfos|caption=[[Lizalfos|Lizalfos (Orange)]]}} | ||
| Line 45: | Line 38: | ||
{{Gallery/Box|file=Usriverdevilsprite.png|link=River Devil|caption=[[River Devil]]}} | {{Gallery/Box|file=Usriverdevilsprite.png|link=River Devil|caption=[[River Devil]]}} | ||
{{Gallery/Box|file=Tektite-Sprite-AOL.png|link=Tektite|caption=[[Tektite]]}} | {{Gallery/Box|file=Tektite-Sprite-AOL.png|link=Tektite|caption=[[Tektite]]}} | ||
{{Gallery/Bottom | {{Gallery/Bottom}} | ||
=== Palace Enemies === | |||
{{Gallery|size=80|pad=5}} | {{Gallery|size=80|pad=5}} | ||
{{Gallery/Box|file=Red_Armored_Stalfos.png|link=Armored Stalfos|caption=[[Armored Stalfos|Armored Stalfos (Red)]]}} | {{Gallery/Box|file=Red_Armored_Stalfos.png|link=Armored Stalfos|caption=[[Armored Stalfos|Armored Stalfos (Red)]]}} | ||
| Line 57: | Line 51: | ||
{{Gallery/Box|file=FokkaBlue-Sprite-AOL.png|link=Fokka|caption=[[Fokka|Fokka (Blue)]]}} | {{Gallery/Box|file=FokkaBlue-Sprite-AOL.png|link=Fokka|caption=[[Fokka|Fokka (Blue)]]}} | ||
{{Gallery/Box|file=Fokkeru-Sprite-AOL.png|link=Fokkeru|caption=[[Fokkeru]]}} | {{Gallery/Box|file=Fokkeru-Sprite-AOL.png|link=Fokkeru|caption=[[Fokkeru]]}} | ||
{{Gallery/Box|file=GiantBot-Sprite-AOL.png|link= | {{Gallery/Box|file=GiantBot-Sprite-AOL.png|link=Boss Bot|caption=[[Boss Bot]]}} | ||
{{Gallery/Box|file=Guma-Sprite-AOL.png|link=Guma|caption=[[Guma]]}} | {{Gallery/Box|file=Guma-Sprite-AOL.png|link=Guma|caption=[[Guma]]}} | ||
{{Gallery/Box|file=IronknuckleOrange-Sprite-AOL.png|link=Iron Knuckle|caption=[[Iron Knuckle|Iron Knuckle (Orange)]]}} | {{Gallery/Box|file=IronknuckleOrange-Sprite-AOL.png|link=Iron Knuckle|caption=[[Iron Knuckle|Iron Knuckle (Orange)]]}} | ||
| Line 73: | Line 67: | ||
{{Gallery/Box|file=StalfosBlue-Sprite-AOL.png|link=Stalfos|caption=[[Stalfos|Stalfos (Blue)]]}} | {{Gallery/Box|file=StalfosBlue-Sprite-AOL.png|link=Stalfos|caption=[[Stalfos|Stalfos (Blue)]]}} | ||
{{Gallery/Box|file=|link=Stone Statue|caption=[[Stone Statue]]}} | {{Gallery/Box|file=|link=Stone Statue|caption=[[Stone Statue]]}} | ||
{{Gallery/Box|file= | {{Gallery/Box|file=Wizard-Sprite-AOL.png|link=Wizard|caption=[[Wizard]]}} | ||
{{Gallery/Box|file=Tinsuit-Sprite-AOL.png|link=Wosu|caption=[[Wosu]]}} | {{Gallery/Box|file=Tinsuit-Sprite-AOL.png|link=Wosu|caption=[[Wosu]]}} | ||
{{Gallery/Bottom}} | {{Gallery/Bottom}} | ||
==Items== | ==Items== | ||
| Line 113: | Line 105: | ||
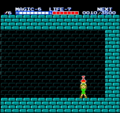
===Towns=== | ===Towns=== | ||
<gallery> | <gallery> | ||
File:Welcome_to_Nabooru.png|[[ | File:Welcome_to_Nabooru.png|[[Town of Nabooru]] | ||
File:Welcome_to_Darunia.png|[[Mountain Town of Darunia]] | File:Welcome_to_Darunia.png|[[Mountain Town of Darunia]] | ||
File:Welcome_to_Hidden_Kasuto.png|[[Hidden Town of Kasuto]] | File:Welcome_to_Hidden_Kasuto.png|[[Hidden Town of Kasuto]] | ||
| Line 123: | Line 115: | ||
File:Maze_Island_Palace_Entrance.png|[[Maze Island Palace]] | File:Maze_Island_Palace_Entrance.png|[[Maze Island Palace]] | ||
File:Ocean_Palace_Entrance.png|[[Palace on the Sea]] | File:Ocean_Palace_Entrance.png|[[Palace on the Sea]] | ||
File:Hidden_Palace_Entrance.png|[[ | File:Hidden_Palace_Entrance.png|[[Three-Eye Rock Palace]] | ||
File:Binding_Force.png|[[Great Palace]] | File:Binding_Force.png|[[Great Palace]] | ||
</gallery> | </gallery> | ||
| Line 135: | Line 127: | ||
</gallery> | </gallery> | ||
{{ | {{Listbox|The Adventure of Link|Items}} | ||
{{ | {{Listbox|The Adventure of Link|Enemies}} | ||
{{ | {{Listbox|The Adventure of Link|Locations}} | ||
{{Cat|The Adventure of Link Locations}} | {{Cat|The Adventure of Link Locations}} | ||
Latest revision as of 14:02, January 4, 2021
Eastern Hyrule

Games | ||
Related | ||
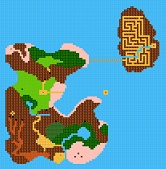
Eastern Hyrule is second of the two major regions of Hyrule in The Adventure of Link, encompassing the second half of the game.
Enemies
Overworld Enemies
Palace Enemies

Items
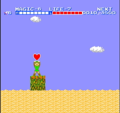
Containers
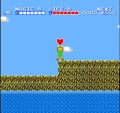
Heart Container north of the Palace on the Sea
Heart Container on the Seashore
Magic Container in the Hidden Town of Kasuto


Inventory


Miscellaneous
Four Link Dolls

Various Point Bags


