Death Armos: Difference between revisions
Jump to navigation
Jump to search
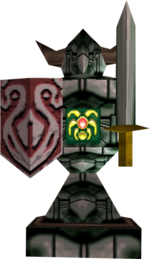
Death Armos as seen in Majora's Mask
Want an adless experience? Log in or Create an account.
(Created Page) |
No edit summary |
||
| (17 intermediate revisions by 8 users not shown) | |||
| Line 1: | Line 1: | ||
{{Infobox|enemy | |||
{{ | |image = [[File:Death-Armos.png|150px]] | ||
| | |caption = Death Armos as seen in ''Majora's Mask'' | ||
|image = [[File: | |game = ''[[The Legend of Zelda: Majora's Mask|Majora's Mask]]'' | ||
|game = ''[[The Legend of Zelda: Majora's Mask|Majora's Mask]]'' | | location = [[Stone Tower Temple]] | ||
| | |weapon = [[Bow]]<br/>[[Light Arrow]] | ||
|weapon = [[Bow]]<br>[[Light Arrow]] | |||
}} | }} | ||
A '''Death Armos''' is a more intense version of the [[Armos]], found exclusively within the [[Stone Tower Temple]] in ''[[The Legend of Zelda: Majora's Mask|Majora's Mask]]''.{{Ref|''[[The Legend of Zelda: Encyclopedia]]'', pg. 174}} | |||
==Overview== | |||
The Death Armos moves primarily by hovering above the ground in a patrol routine and react to [[Link (Ocarina of Time)#Majora's Mask|Link]]'s presence by attempting to squash him by slamming into the ground. The best way to deal with them is to fire a [[Light Arrow]] into the red emblem on their chest or backside, then avoiding their explosion; alternatively, Link can just wear the [[Stone Mask]] and ignore these statues altogether. | |||
==Tatl== | |||
{{Tatl}} | |||
==See | ==See also== | ||
*[[Armos]] | *[[Armos]] | ||
*[[Armos Knight]] | *[[Armos Knight]] | ||
==Gallery== | |||
<gallery> | |||
File:Death-Armos.jpg | |||
</gallery> | |||
{{references}} | |||
{{Listbox|Majora's Mask|Enemies}} | |||
{{Cat|Majora's Mask Enemies}} | |||
Latest revision as of 22:03, March 23, 2023
Death Armos

Death Armos as seen in Majora's Mask
Games | ||
Location | ||
Effective | ||
A Death Armos is a more intense version of the Armos, found exclusively within the Stone Tower Temple in Majora's Mask.[1]
Overview
The Death Armos moves primarily by hovering above the ground in a patrol routine and react to Link's presence by attempting to squash him by slamming into the ground. The best way to deal with them is to fire a Light Arrow into the red emblem on their chest or backside, then avoiding their explosion; alternatively, Link can just wear the Stone Mask and ignore these statues altogether.
Tatl
Death Armos, a temple guard... |
See also
Gallery

References
- ↑ The Legend of Zelda: Encyclopedia, pg. 174