Lost Isle
| This article describes a subject that is or may be outside the core Zelda canon. |

Title Screen
| Release | ||
|---|---|---|
Platform | Date | |
PC (Zelda Classic) | 2007 | |
| Credits | ||
Developer | DarkFlameWolf | |
Lost Isle is a Zelda Classic custom quest developed by DarkFlameWolf and Peteo. This game had been under production for almost 2 years, and it was finally released in 2007. Lost Isle is quite similar to Link's Awakening that took place on Koholint Island. However, this time Link ends up on a deserted and hostile island, and he has to find a way out of the island.[1] It also references the original The Legend of Zelda in many ways.
Lost Isle offers:
- Almost 20 hours of game-play.
- Pretty 2D graphics, fitting music and solid game-play.
- One gigantic world to explore, with an entire island-wide cave system.
- Various terrains such as ghost towns, graveyards, swamps, forests, volcanoes, wastelands and canyons.
- 5 huge dungeons.
- 36 pieces of heart, 6 optional Triforce pieces, 10 potions, and 6 magic shields are available on the island.
- 13 warp portals across the island.
- Many hidden secrets and mics.
Beginning in January of 2013 Mases, Webmaster of Zelda Dungeon, began a Let's Play of Lost Isle.
Story
Link has crash-landed on a seemingly deserted island out in the middle of the ocean. With no real reference point to indicate where exactly he is in the world, he has no choice but to explore the island and find some way of getting off of it and back to the mainland.
Though it appears that there was once a civilization here that was thriving, all that has turned to dust and dead bodies. Undead and foul creatures fill the villages and take shelter in the woods and creep through the dark corners of the island. What could have caused this great catastrophe and is this great evil still alive and well as Link explore the very land that it destroyed?[2][1]
Download
In order to play Lost Isle, Zelda Classic must first be downloaded and installed. Lost Isle will run in v2.5.0, which can be downloaded at the official Zelda Classic Website
After Zelda Classic has been installed. The Lost Isle Fan-Game can be downloaded from PureZC.
How to Play
- In the Zelda Classic folder, open the file titled zlaunch-w.
- In the Zelda Classic tab, configure your settings that you'd like to use and then click Launch ZC.
- Click Register Your Name and type out your name.
- Select your name but DO NOT click Play Game, as that will just start a game of The Legend of Zelda. Instead, press whatever button is chosen as the A button Default. (On Windows installs of Zelda Classic, this is the ALT button).
- Select the A button once again to click Custom Quest. Find the folder where Lost Isle was installed and open it. Now that record will permanently be linked to your Lost Isle file and you can start the game.
Warp Portals
|First 4 on Left: Top Left Akavir swamp,Top Right Zakerand Fields,Bottom Right Dasa Woods,Bottom Left
Heart Pieces
| # | Location | Requirements | Description | Screenshot |
|---|---|---|---|---|
| Before Entering Level 1 | ||||
| 01 | Chovian Fields | None | From the Weathercock in the center of Oderra Village, walk two screens right and one screen down. Next to the red building, slash at some bushes to the left. Follow this pathway and you'll eventually run into the heart piece in Chovian Fields. | 
|
| 02 | Oderra Village | Bombs | At the north part of Oderra Village, northwest of the Windmill. From the Windmill, on the higher platform, walk up a screen, and left a screen through the narrow passageway. Use a bomb to blow up the bombable wall and enter the cave. Walk along the pathway to the left and it will eventually lead to a treasure chest containing a piece of heart. | 
|
| 03 | Vasshinghon Flows | Bombs Power Gauntlet (optional) |
This heart piece can technically be reached before acquiring the Power Gauntlet, but you'll have to take a longer pathway through the Oderra Graveyard.
From the blue flower that opened up after completing the Ancient Temple, go up a screen right across the bridge to enter Vasshinghon Flows. From the bridge, go up a screen and move the rock with your Power Gauntlet. Walk up a screen and move another rock out of the way. Walk right a screen and cross the bridge. From here a screen and you'll find a Longhorn-looking skull. Bomb the wall to the left and enter the cave. Walk through the cave, and you'll come across a chest with a Heart Piece in it. |

|
| 04 | Vasshinghon Flows | None | Looking at the map of the Vasshinghon Flows, the Piece of Heart is located on the top row of screens, three screens from the right. This heart piece can technically be reached right from the start of the game without the need of any item by traversing through the Oderra Graveyard. However, acquiring the Power Gauntlet and more heart containers will make the pathway much easier. | 
|
| 05 | Chovian Fields | Bow and Arrow | Found two screens to the right of the initial starting screen. However, it is on the higher ledge. It can be reached from the screen to the right. Link will need to shoot the statue with an arrow, causing the large rock to disappear, clearing the pathway to the heart piece. |
|
| 06 | Akavir Swamp | Bombs | One screen north of the Warp Portal in Akavir Swamp there is a bombable wall. From the warp portal, head down a screen and cut through some bushes to find a narrow path to the right. Navigate the narrow pathway through the trees and you'll eventually reach the bombable wall. Go through the cave to find the piece of heart! | 
|
| Before Entering Level 2 | ||||
| 07 | Akavir Swamp | Raft | Located three screens up and one screen to the right of the first dungeon. Link will need to use the Raft in order to reach it. | 
|
| 08 | Vasshinghon Flows | Bow and Arrow Power Gauntlet |
Located at the top-right most screen of the map while in Vasshinghon Flows. One screen to the left, Link will need to use the Power Gauntlet to push the rock out of the way. From there, Link can shoot the statue with his Bow, causing the large rock to crumble, giving him access to the heart piece. | 
|
| 09 | Tahou Woods | Bow and Arrow | This heart piece is a reward for the arrow shooting mini-game. The game can be found at the far east portion of the Tahou Woods. | 
|
| 10 | Glathriel Canyon | Power Gauntlet | At the far northwest corner of the Yeven Basin, Link can use the Power Gauntlet to push a rock out of the way. Walk up a screen to find the Heart Piece on the higher ledge within the Glathriel Canyon. | 
|
| 11 | Zackerand Fields | Bombs | In the maze where you got the Big Quiver, head to the south-east part of the maze. Inside the room, you will find a piece of heart! If you're having trouble getting there, just head south of where you got the Big Quiver. | 
|
| 12 | Akavir Swamp | Ocarina | From Dasa Wood's warp portal cave; head down three screens, left a screen, and down a screen. Use the Ocarina on the Sheikah Stone there to make it disappear. Then head down, and pick up Piece of Heart there. | 
|
| 13 | Ebenar Temple | Ocarina | Go back to Ebenar Temple. On floor B2 is a room with bats and floating logs. In that room is a Sheikah Stone. Use the Ocarina and it will go away. Go up through the door. Get the Heart Piece, and take the warp back to the beginning. | 
|
| Before Entering Level 3 | ||||
| 14 | Dasa Woods | Bombs and Power Rod | Warp to the Dasa Woods entrance. Go down a screen, and right a screen. Use the Power Rod on the gem to make the flowers disappear. North of there are 3 Dodongos. After killing them, a Heart Piece appears! Collect it, and go north for another prize, the Candle. | 
|
| 15 | Oderra Village | Power Rod | In the graveyard, there are three tombstones that can be pushed. Push them into the flowers and it will cause the gem to change colors so that the Power Rod can be used on it. Then travel west and push a lonely tombstone and a staircase will appear. (this cave needs to be explored in a previous section to open up the pathway to the Heart Piece.) | 
|
| 16 | Mt. Horgrus (South) | Ocarina | Go left from the part you first entered at the beginning. There is the bridge that is out. You can't go by, but remember where it is. Go back. Go up to the sign that says Horgus Summit. Go into the cave. Go to the left to the room with spikes and a torch. From there, go around until you can exit the cave. Make your way around until you pop back out. Go to where the bridge is out. Near that bridge is the cracked wall. Bomb that wall, enter the cave, and collect a Heart Piece inside. | 
|
| 17 | Mt. Horgrus (South-West) | Ocarina | From the cave with Heart Piece #16; go left until you reach another map screen in the south-west. Follow the only path to a sitting Heart Piece! | 
|
| 18 | Mt. Horgrus (West) | Power Rod | From Mt. Horgrus' Warp Cave; head down, left, up, right, up, left, up, and down two screens (through the lower path). Shoot the switch there with the Power Rod to clear the path, and collect the Piece of Heart. | 
|
| 19 | Glathriel Canyon | Candle | South of the first Glathriel Canyon Heart Piece is a tree. Burn it down and go north. Go north until you're in a screen with a lake in the top-right corner and a rock blocking it. Take the raft over, and the Heart Piece is back on land. | 
|
| 20 | Sky Garden | Boomerang | At the bottom right corner of the Sky Garden, there is a Heart Piece. You can get it now. Throw your boomerang at the switch and a block will lower. Go get the Heart Piece. | 
|
| 21 | Mt. Horgrus | Boomerang | Go through the cave a screen above the start of Mt. Horgrus. Go all the way left, all the way up, and to the right. Exit the cave. Use the boomerang on the orb near the statue blocking you. Go up a screen, and right a screen. Enter the cave. Go all the way through it. When you exit, go up to the stairs. Throw the boomerang left from one spot under the statue. This will give you a Heart Piece! | |
| During Level 3 | ||||
| 22 | Bhalstok Castle | Royal Melody | Start at the very beginning. Go up to the second fork. Go left. Go down to the basement. Go right until you find a door and a spot with a music note. Step on it. Go inside and kill a Gleeok. Open the chest for a Heart Piece! | |
| After Level 3 | ||||
| 23 | Vasshinghon Flows | Ladder | Take the bridge after the pond into the Flows. Go down to the staircase, but stay on the top level and go right, and south past the bones. Go down all the way, and use the Ladder to cross. Go all the way to the right. Then up to get to a staircase. Go down the stairs. Enter the cave. At the end, you'll pop out near a Heart Piece! | |
| 24 | Oderra Village | Ladder | In Oderra, there was a game at the west that you had to go through. You were too slow, but go to the left, and use the Ladder to go faster! At the end, get your Heart Piece. | |
| 25 | Tahou Woods | Ladder | There's a lake in Tahou Woods. Use your Ladder to step over the waterfall and get a Piece of Heart! | |
| 26 | Mt. Horgrus | Ladder | From the start of Mt. Horgrus, go left two screens and up one. Use your Ladder to get the Heart! | |
| 27 | Glathriel Canyon | Candle | Enter Glathriel Canyon from the Bhalstok Castle entrance. Go up and down the stairs. Go down more and cross the gaps with your ladder. Go down another set of stairs. Go left and up. Go up until you see a blue tree. Burn it down with your Candle. Follow the path left and up to get a Heart Piece! | |
| 28 | Xaagan Wastelands | Ocarina | From the Xaagan warp, go around the set of trees up north all the way. (clockwise) When the area to the right is blocked off, go up. You'll see a lake. Use your Ocarina, and the lake will fill! Climb the newly grown vines. Go up and left far enough, and you'll find a Heart Piece! | |
| 29 | Chovian Fields | Giant's Gauntlet | From the first Vasshinghon warp portal, go down, right, and up. You'll see a gray tree. Burn it down with your Candle. Follow the path to get the next Heart Piece! | |
| During Level 4 | ||||
| 30 | Xaagan Wastelands | First Gate Open | Open the first gate. Go through it. Go up the ladder. Go through the door to the west. Pass the room with the red blocks. Head over to the room with the yellow tower. Go south to exit the facility. Follow the outside path to a Heart Piece! | |
| 31 | Plague Fortress | Rod Chip Upgrade | From the entrance of Plague Fortress, Go north once then continue to head east as far as you can go until you reach the room with the heart piece. Use your rod on the enemies at the top of the screen so that the fire from the rod (With the Rod Chip Upgrade) hits the 2 switches. Doing so will turn off the electricity in the room allowing you to access the Heart Piece! | |
| After Level 4 | ||||
| 32 | Akavir Swamp | Rod Chip Upgrade | In Akavir Swamp, north of the second warp portal. There are 3 rib skeletons. At the bottom of the second one is a tree. Stand at its left. Face right. Fire your wand to make it disappear. Go right a screen and get the Heart Piece! | |
| 33 | Glathriel Canyon | Rod Chip Upgrade, Bombs, Boomerang | From the warp portal in Glathriel Canyon, go south then east. A tree blocks your way. Use the Power Rod on the dead tree to make the tree blocking your way disappear. Go north twice and use the bombs on a cracked wall to reveal a cave. Inside, use your Boomerang on the lever to make the spikes drop, and make your way to a chest containing a Heart Piece! | |
| 34 | Horgrus Summit | Ladder, Rod Chip Upgrade | Head to the side of Horgrus summit that you can only access from a cave. Go north and then go east through some trees (This is hard to notice). Use your Power Rod on the dead tree to open up a way to a cave that leads to a Heart piece! NOTE: The candle doesn't work on the dead tree even though it's in reach. | |
| 35 | Xaagan Wastelands | Upgrade Chip | There is a ridge between Xaagan and Zackerand. Follow the cave to get to it. Follow the ridge down. You'll get to a screen with a dead tree in a corner. Shoot and light it with your power rod to remove a tree below you. When it disappears, go down and get the Heart Piece! | |
| 36 | Horgrus Mountain | Holy Arrow | Go to Horgrus, and past the bridge that's out to the east. Go up and enter the first cave. Find a torch in a strange place, and a bridge to the right. Shoot the torch and go over the bridge. Exit the cave, and go all the way up. Shoot the statue with your Holy Arrow, and you can get the game's final Heart Piece! | |
Magic Potions
Magic Potion can be used to fully restore Link's hearts and magic. There are 10 Magic Potions that can be found across the island. Here is the location of these potions.
| # | Location | Requirements | Description | Screenshot |
|---|---|---|---|---|
| 01 | Oderra Village | None (You can get it before entering Level 1) |
From the red-roofed house with a narrow pathway that lead to a Piece of Heart #1; walk two screens right, and open the chest for Magic Potion #1. | 
|
| 02 | Dasa Woods | None (You can get it before entering Level 1) |
From Dasa Wood's entrance; head up a screen, and right a screen. Open the chest there for Magic Potion #2. | 
|
| 03 | Tahou Woods | Bow & Arrow (You can get this before entering Level 1) |
Upon entering Tahou Woods from the southwest side of the map, go up as far as you can and then go right. Go up through the log (a cave will be below you) to a screen where you use the Bow & Arrow to open a path north to a chest with Magic Potion #4. | 
|
| 04 | Vasshinghon Flows | Raft (You can get it before entering Level 2) |
From Chovian Field's warp portal cave; head down three screens, and use raft to reach the screen in the right. Go up a screen, and you'll arrive at the screen where the blue flower disappeared after clearing level 1. From here; head up a screen, right a screen, down two screens (through the lower path), and open the chest for Magic Potion #3. | 
|
| 05 | Vasshinghon Flows | Candle (You can get it before entering Level 3) |
Using the screen with the warp point as a reference, you want to be on the left side of that screen. Go left and then down a small passage. Go right and burn a tree stump with the Candle. Head down to find Magic Potion #6 | 
|
| 06 | Chovian Fields | Candle (You can get it before entering Level 3) |
Go a couple screens left from where you started the game. You'll find a tree stump that you can burn with the candle. Follow the long path to the end to find Magic Potion #5. | |
| 07 | Horgrus Summit | None | Two screens directly south from the entrance to Svalbard Temple is the chest with a Magic Potion! | |
| 08 | Akavir Swamp | Giant's Gauntlet (You can get it before Level 4) |
At the eastern portion of Akavir is a gray block. Move it out of your way. Go south all the way, and right all the way. You'll find a chest. Open it for Magic Potion! | |
| 09 | Xaagan Wastelands | Candle | Go two screens to the left of the Xaagan warp. There is a small gap between some trees to the left. Burn the tree above the gap with your Candle. Follow the path to a Potion! | |
| 10 | Horgrus Temple | None (You can get it after Level 4) |
At the beginning of Level 5, Once you enter Horgrus Temple, there will be a chest waiting for you containing a Magic Potion! |
Magic Shields
These are a stronger version of your shield. All of these do the same thing. However, there is an enemy called a Grasp, a disembodied hand, that can steal your shield. Due to this, there are plenty of shields you can get, so losing one isn't completely devastating.
| # | Location | Requirements | Description | Screenshot |
|---|---|---|---|---|
| 01 | Chovian Fields | Bombs | You'll need some bombs. After you get the sword, go left for a bit, then up, and then some more to the left. You'll pass by a bombable cave below, just work around a few screens to that spot. Bomb open the cave and make your way to the end to get the Magic Shield, which will help for Aquamentus. | |
| 02 | Mt. Horgrus | Ocarina | From the weathercock in Oderra Village; head up, right, up, and use the ocarina on the Sheikah stone there to make it disappear. Head up a screen to reach Mt. Horgrus. Be prepared since enemies here take away lots of hearts. Once you climb the ladder; head right a screen, down a screen, and bomb the cracked wall there. Enter the cave; then head up three screens, and open the chest for Magic Shield #2. | |
| 03 | Oderra Graveyard | Boomerang | From Oderra Graveyard's warp cave; head up a screen, right two screens, and down a screen. Push the middle tombstone to uncover a staircase. Inside the cave, bomb the eastern wall, and head right a screen. Shoot the lever in the north-east with the boomerang, and open the chest for Magic Shield #3. | |
| 04 | Glathriel Canyon | None | In Tahou Woods, two flowers die after Level 2. From there, go up until you reach the Castle entrance. Go left through the bushes, then left and up. In the cave, kill all the enemies, and the chest will appear. Open the chest for Magic Shield #4. | |
| 05 | Vasshinghon Flows | Ladder | After opening the Warp Point in Vasshinghon Flows, enter through it. Go right, cross the lava, and go up. Enter the cave. Within this cave is another Magic Shield! | |
| 06 | Xaagan Wastelands | Ocarina | Go past the heart piece you got by filling the Oasis lake. There is a wall here that you need to bomb. Enter the cave. At the end of the cave is a Magic Shield! |
Magic Upgrades
All Magic Upgrades can be found in caverns that have a crest outside of their cave entrances. All of the caves also need to be bombed to enter.
| # | Location | Requirements | Description | Screenshot |
|---|---|---|---|---|
| 01 | Chovian Fields | Bombs | Keep looking one screen south of Oderra village (More towards the west side) for a strange looking emblem. Next to the emblem should be a cave. Make your way around the screens to get to the cave. Inside, you will find a very helpful Magic Meter Upgrade! | |
| 02 | Zackerand Fields | None | From the cave with the Big Quiver, go left and then up a few screens to find a cave with that emblem to find another Magic Meter Upgrade. | |
| 03 | Akavir Swamp | None | From Zakerand Fields' Warp Cave; head down three screens, right two screens, and burn the purple tree there with candle to uncover the secret path. Head right a screen, and enter the cave there. Inside; head up, left, and shoot the lever there to inactivate the traps. Open the chest for Magic Meter Upgrade. | |
| 04 | Tahou Woods | Boomerang | In Tahou Woods, there is a lake. On the west is a raft port. From the port, go up. Enter the cave. Make your way through northeast and exit into Kali Beach. Go down and right. Use your Boomerang on the orb. Go up from that screen. Enter the cave. In there is a Magic Meter Upgrade. | |
| 05 | Horgrus Mountain | Ladder | In eastern Horgrus, there is a bridge out. Pass it, and go north. Go up and you'll find a magic cave. Go inside to get your Upgrade! | |
| 06 | Vasshinghon Flows | Ladder | From Vasshinghon Warp 2, go right, up the stairs, and left all the way. From there, go up and use your Ladder to move up past the river. Do this again, going right. Go all the way right, down the stairs, and left. Enter the cave for a Magic Upgrade! |
Bomb Bag Upgrades
Acquiring all of these will let you hold a total of 20 Bombs.
| # | Location | Requirements | Description | Screenshot |
|---|---|---|---|---|
| 01 | Oderra Graveyard | Bombs | Once you enter Oderra Graveyard; head up a screen, right two screens, down a screen, right two screens, and up a screen. Bomb the cracked large stone in the south-east to uncover the cave. Inside, go left a screen, and bomb the stones in the north. Go up a screen, and you can buy the Bomb Bag Upgrade for 165 Arrows. | |
| 02 | Mt. Horgrus | Bombs | From Mt. Horgrus entrance; walk to the east as much as you can until you find a cracked rock which should have lava flowing out of it. Use a bomb to reveal a staircase. Inside is a person selling a Bomb Bag Upgrade #2 for the same amount of arrows as earlier (165). | |
| 03 | Zackerand Fields | Bombs | From the entrance to Zackerand, go all the way north. Past a heavy block, up, left, and continue going up. Enter the cave. Go through it, and avoid anywhere you've been, since this is a new entrance. Exit the cave. From there, go as far right as possible. Go down the stairs. Go to the left. Bomb the rock. Go down the stairs. In the cave, go up. Pay 250 arrows to get more bombs! |
Walkthrough
The Lost Isle Walkthrough below only consists of the main quest. For the optional items, heart pieces, and upgrades, see the other appendices within the Wiki page. Editors, please don't include optional items.
Basic Overworld Secrets
Hidden Caves Most bombable caves are easy to spot with their bouldery surfaces. However, some are more difficult to find, as they only have a small crack on them. These caves are hidden Easter Eggs, with one such cave per main map area. The caves they lead to contain a large stone with info about the area you are located in. Slashing a certain plant in each cave will get you 20-50 arrows.
Fairy Flowers Throughout Lost Isle, you are bound to notice larger patches of flowers, each two tiles high and three tiles long. Playing the Ocarina while standing on them will instantly refill your hearts. If you're close to one of these and are low on hearts, these flowers can be a godsend.
Magic Caves Some caves in the game have shield-like emblems close to the entrance. By navigating these specific caves, you will find a Magic Upgrade, which increases your magic bar by a small amount.
Finding Level 1
Items to Get
Below are the items that you can get before entering Level 1. You can also find six Heart Pieces, and three Magic Potions (refer the appendices within the Wiki page).
| Item | Description | Screenshot |
|---|---|---|
| Link's Sword | Once you gain control of Link, walk two screens to the right and enter the cave. Make your way to the northeast room and you will find Link's Sword. | |
| Bombs | To get to Oderra Village, head left a screen, up two, left one, then up two. Once you enter the village, head left four screens, and up a screen. Slash the bushes in the north to find some Bombs. Alternatively, you can buy bombs from a shop just one screen down from the hidden bombs or fight enemies until they drop some. | |
| Magic Shield #1 | You'll need some bombs. From the hidden bombs, head down a screen, right one, down three, left one, down one, left one, up one, left one, down one, then right one. You'll reach a cracked wall. Bomb open the cave and make your way to the end to get the Magic Shield, which will help for Aquamentus. (Right one screen, slash lever, left one, up one, right one, then down one) | |
| Oderra Bow | The Oderra Bow is found inside of a secret Cave within Oderra Village. Bomb the purple-roofed house that is one screen west of the Weathercock. Make your way through the Cave and defeat Aquamentus to get the Oderra Bow. | |
| Wooden Arrow | The Wooden Arrows are also found in the same Cave within Oderra Village, but you need to find a different entrance. Bomb the green-roofed building that is one screen south and east of the Weathercock. Make your way through and defeat Aquamentus to find the Arrow. | |
| Bomb Bag Upgrade #1 | Once you enter Oderra Graveyard; head up a screen, right two screens, down a screen, right two screens, and up a screen. Bomb the cracked large stone in the south-east to uncover the cave. Inside, go left a screen, and bomb the stones in the north. Go up a screen, and you can buy the Bomb Bag Upgrade for 165 Arrows. It will allow you to carry 12 bombs. |
Level 1: Ancient Temple
Also known as the Ebenar Temple, the Ancient Temple is the first level of the fan-game Lost Isle. Similar to the Water Temple in Ocarina of Time, Link must raise and lower the water in order to progress to the next area. Consisting of only two keys and simple enemies, it is a fairly easy level apart from its size. The miniboss, four Red Darknuts, guard a switch that will allow Link to obtain the raft on the first floor. The boss of the Ebenar temple are two Landmolas and one Mother Landmola. Defeating them earns you a Heart Container and access to the Vasshinghon Flows.
| Item/ Destination | Description | Screenshot |
|---|---|---|
| Compass | After the cutscene, push the block to the left to open the door. Head left two screens, and you can open the chest for recovery heart. Head left again two screens, up three screens, right a screen, and kill all Goriyas there. Open the chest that appear for the Compass. | |
| Small Key #1 | From the room with compass; head left, down, right three screens, and step on the switch there. Head up a screen, and right two screens. Push the brown colored block into large switch in the south to open the door. Head up, and kill all enemies including wallmaster to open the north door (wallmaster will sent you back to the entrance if they catch you).
Head up again, and this time you must walk right to the next room while avoiding small spikes in the water. In the next room; head right a screen, down two screens, and left a screen. Bomb the left pillar in the northern wall to uncover a secret door. Head up, and hit the switch there to lower the water level. From here; Head down, right, up, and open the chest there for Arrows 20. Head down two screen, and step on the switch there. Head left a screen, and go down the stairs to the basement 1st floor. In the 1st basement floor; push the blocks in right order to open the door. Once you're done; head left, up, right, up, and kill the Armos there. Head up, kill the Armos behind the waterfall, and walk down a screen. Shoot the crystal to open the door, and head left. In the next room, you must be careful because floor spikes will pop up if you step on the nearly invisible traps. So watch your steps, and walk down to the next room. In the next room; step on the switch, and head left two screens. Push the blocks that blocking your way, and head left again two screens. Enter the mouth of left most statue; then head left a screen, and down a screen. Shoot the crystal to make bridge appear in this room. From here; head up, right, down, left, down, and then right two screens. Push the blocks in right order to open the door. Once you're done; head a screen, and shoot the statue there to open the southern door. Head down, left, and step on the switch there. Head left a screen, and go up the stairs. In the first floor; go down a screen, and climb down the vines there. In the basement 1st floor; slash the vines in northern wall to uncover the door. Head up, and open the chest for Small Key. |
|
| Small Key #2 | From the room with small key #1; make your way back to the first floor; walk up a screen, and go down the stairs.
In the basement 1st floor; head right five screens, and step on the switch there. Head left once (through the bridge), up two screens, and open the chest there for another Small Key. |
|
| Dungeon Map | From the room with small key #2; head down two screen, right once, left three screens, up two screens, left a screen, and down a screen. Hit the switch there to lower the water level. Walk up a screen, right a screen, down two screens, and go down the stairs.
In the basement 2nd floor; head up, kill all enemies, and open the chest that appear for Bombs. Head left a screen, and kill all wallmasters to make brown block appear. Push it into the large switch to make the door open. Head left, and bomb the left statue to make the door open. Head up two screens, and shoot the Sheikah Stone there several times to make the door open (The trick is to not let the statue to close its eye. If it closes the eye, the damage resets and you have to start all over with dealing damage). Head right two screens, and open the chest for fairy to replenish your hearts. Head left, down, and hit the switch there to lower the water level. From here; head down, step on the switch, head right, down two screens, right three screens, up three screens, left two screens, down three screens, left a screen, and open the chest for Dungeon Map. |
|
| Raft | From the room with map; head right a screen, up three screens, right a screen, up a screen, left three screens, up a screen, and kill all Darknuts there with bombs. Head up, hit the crystal, and step on the warp tile.
You'll be warped back at first floor. Head left two screens, and open the chest there for some Arrows. Head right a screen, down a screen, left two screens, up a screen, and left a screen. Open the chest there for the Raft. Make your way back to crystal switch room in this floor, and hit the switch there to lower the water level. Go down to basement 1st floor through eastern stairs. |
|
| Boss Key | In the 1st basement floor; head left, down, and use the raft in the jetty there. follow the water flow while control you raft direction until you reach another jetty. Open the chest there for Arrows 20. Head back to crystal switch room in this floor, and hit the switch there to lower the water level. Go down to basement 2nd floor through western stairs.
In the 2nd basement floor; head up two screens, left a screen, up a screen, and right a screen. Shoot the crystal to make bridge appear. Head left a screen, and use the raft on the jetty until you reach another jetty in the south-east of this floor. Head up a screen, and bomb the northern wall. Head up, and open the chest there for Boss Key. Step on the warp tile to return to the first floor. |
|
| Getting to the Boss Room | From the warp room; head left a screen, down a screen, and left a screen. Use the raft on the port there until you reach the left port in the north of this floor. Head right, and step on the switch there to open the door in the right port. Make your way to the right port, and head up a screen. Use the boss key on the boss door, and head up again. After a cutscene, get ready for the boss fight.
The bosses of this dungeon are the Darknuts and Landmolas. In this battle, just pay attention to Darknuts. Attack them with bombs or arrows, and the Landmolas will also die after you destroyed the Darknut. |
|
| Heart Container | When all bosses are destroyed; head right a screen, pick up the Heart Container, and step on the warp tile there. In the cutscene, you will see the blue flower that blocked the path in Chovian Fields disappear. Now, leave this dungeon. |
Finding Level 2
Items to Get
Below are the items that you can get before entering Level 2. You can also find seven Heart Pieces, and one Magic Potion (refer the appendices within the Wiki page).
| Item | Description | Screenshot |
|---|---|---|
| Magic Upgrade #1 | Keep looking one screen south of Oderra village (More towards the west side) for a strange looking emblem. Next to the emblem should be a cave. Make your way around the screens to get to the cave. Inside, you will find a very helpful Magic Meter Upgrade! | 
|
| Power Gauntlet | Make your way to the screen where the blue flower disappeared after clearing level 1. Continue across the bridge into Vasshinghon Flows. Go a bit south and then right until you see a path splitting to go up. Take the up path and you should reach a cave below a big eye statue. You'll trap yourself in the cave, in which you'll get Power Gauntlets at the end of the cave path to help you get out of the cave. | |
| Ocarina | Start where the blue flower died after you complete Ebenar Temple. From there, travel up, right, and cross the bridge. From there, go up. Move the block with your Gauntlets. Go up again, and move this block too. Go right, and over the bridge. From there, and go right until you can move up a screen. Move up. From the longhorn skull, move right to where the sign is. From there, travel up until you reach a staircase being blocked by a tree. Go right, and up. Move past the stairs, and go up some more. This will bring you to the Yeven Basin. Go right all the way. Travel up through the log. You should be in Tahou Woods. Bomb the warp portal so you can get here easier. Go up a screen. Right a screen, up a screen. Go up the stairs and move the rock. Go up two screens. Behind a tree is a hidden chest. Open it and get an Ocarina!
The Ocarina can be used to make the Sheikah Stones to vanish. Stand next to one of those statues and use the Ocarina. It is also very useful to help you warp to those purple trees you may have seen. This of course is only after you clear the corresponding Triforce Dungeon near the tree. |

|
| Big Quiver | From the Akavir Swamp's warp cave; head down, up, left, down, left, and shoot the statue there to open the path. Head down a screen, left a screen, and up a screens (through upper path) to reenter Dasa Woods. From here; head right a screen, up a screen, left a screen, and up a screen to reach Zakerand Fields. Around there are two caves. The one you need you can enter from the screen with the bombable wall in the top right corner. In that cave is a pirate. In the maze, the Big Quiver is up some stairs in the top right raft port. The piece of heart is in the bottom right corner. | 
|
| Magic Upgrade #2 | From the cave with the Big Quiver, go left and then up a few screens to find a cave with that emblem to find another Magic Meter Upgrade. | 
|
| Magic Scroll | In a house in Oderra. The house has an open door. Costs 260 Arrows. Gives Link a spin attack! Hold the sword to charge. It is also useful to detect bombable walls and blocks by stabbing at the object of interest while charging for spin attack. | |
| Magic Shield #2 | From the weathercock in Oderra Village; head up, right, up, and use the ocarina on the Sheikah stone there to make it disappear. Head up a screen to reach Mt. Horgrus. Be prepared since enemies here take away lots of hearts. Once you climb the ladder; head right a screen, down a screen, and bomb the cracked wall there. Enter the cave; then head up three screens, and open the chest for Magic Shield #2. | 
|
| Bomb Bag Upgrade #2 | From Mt. Horgrus entrance; walk to the east as much as you can until you find a cracked rock which should have lava flowing out of it. Use a bomb to reveal a staircase. Inside is a person selling a Bomb Bag Upgrade #2 for the same amount of arrows as earlier (165). This will bring you to a total of 16 Bombs. |
Triforce Dungeon 1
The first Triforce Dungeon can be found back in the swamp when the Ocarina is found. There is a Sheikah Stone in the swamp to the far left and far north. Go there and play the Ocarina to go north, and there will be a cave. Bomb the cave and enter. Inside the cave there will be a boulder that will need to be bombed. Keep going and there will be a Triforce Dungeon. There are a few chambers in here that will be a puzzle room that contains four paths.
- In the first puzzle room there will be letters on the ground (R means right L means left and U means up). The pattern is: right, up, left, and up.
- In the second puzzle room there will be blocks pointing in the direction of the pattern. The pattern is: right, down, right, and up.
- In the third puzzle room there will be blocks that go increasing order. there will be one block to the right and two blocks and three blocks in the north part of the room. The last part will be 4 blocks to the left. The pattern is: right, up, up, and left.
- This last maze is a bit tricky. As you went through this place, you should have noticed letters on the floor in the rooms between the other mazes. From beginning to end, you saw an E, then an N, then an E and finally an N on the floor of the non-maze rooms. So in the last maze; you go East, North, East, and North to reach the end.
It also takes some foot work to dodge the traps well. The trick to step forward just enough to trip the traps so that you can then move past them. In the last room, you can pick up your first Piece of Triforce.
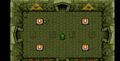
Triforce Room #1
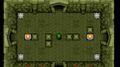
Triforce Room #2
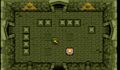
Triforce Room #3

Triforce Room #4


Level 2: Sky Garden
The Sky Garden is level two of the fan-game Lost Isle. It is highly recommended that Link brings a level 2 shield, as flying projectiles are not a rare sight. Consisting of two main ideas, the Tower of Hera's block-raising and lowering switches(Link to the Past) and the ability to fall to the other side of the level and enemies such as Peahats, Flying Jars, and Lynels, the Sky Garden is massive compared to level 1. Two keys will get you through it. The midbosses are multiple red wizzrobes who guard the Power Rod(Wand), and the bosses are four Digdoggers in two stages. Defeating the Digdoggers will get you a Heart Container and access to level 3.
| Item/ Destination | Description | Screenshot |
|---|---|---|
| Compass | After some cutscene with the previous monster from level 1; head down, left, down, right, down, right, and up (through the middle path). Step on the blue switch there, head right, and open the chest for the Compass. | |
| Dungeon Map | Form the screen with compass; head left, down, right, up three screens, down, left, down, left, and step on the blue switch there. Step on the warp tile there, and you'll be warped to other screen.
From there; head down a screen, left a screen, up two screens, left a screen, and shoot the crystal in the western wall with an arrow. Head right a screen, down two screens, left a screen, and up a screen to return at the beginning. Head up again a screen, and jump down the hole there to be warped to the Dark Side. From here; head right, down, left, down twice, and hit the hidden switch below the bridge there. Head right a screen, and kill the Darknut with bomb to open the path. Head up, left twice, up, and shoot the crystal there. Head left, down, open the chest for Dungeon Map, and step on the warp tile there to return to the beginning at the Light Side. |
|
| Small Key #1 | From the beginning; head right two screens, and jump into the eastern hole to go back at the Dark Side. Head right (open the chest for recovery heart), up twice, right, left, down, left, up, and hit the switch there.
From here; head down, right, down, left twice, and jump into the western hole to return to the Light Side. Head up a screen, and bomb the north-western wall to uncover a door. Head up two screens, and hit the switch there. Head down, left, and slash the bushes there to uncover hidden switch. Step on it to activate the blue portal there (you can step on the green portal there to fight some Zols that always drop magic decanter). Step on the blue portal, and you'll be warped to the unreachable part of Light Side in the north. Head left, down, and kill the Manhandla there with bomb (drop the bomb from it right side). Make your way back to the previous portal, and step on it to return to previous room. Head right, up, and hit the switch to lower the red block. Return to the screen with Manhandla, and head up a screen. Open the chest for Small Key, return down, and slash the bush there to uncover a portal. Step on it to return at the beginning. |
|
| Power Rod | From the beginning; head up, and jump into the hole to go to the Dark Side. Head up two screens, and hit the switch there to lower the blue blocks. Make your way back to the beginning in the Light Side.
From here; head left, and jump down into the western hole to return to the Dark Side. Head right, up (through hidden path below the bridge), down, up, and left. Hit the switch few times until you can walk west past the blocks. Then head up, right, up, left, down, and open the chest there for some Arrows. From here; head up, right, and jump into the eastern hole to go to the Light Side. There; head right, and step on the portal there to warp to the room in the west. Step on the blue switch there, and head up for Mini-Bosses battle with the group of Wizzrobes. To defeat them; just stay on the middle of this room while attacking. Make sure to always avoid their attacks. When you're done; head up, and open the chest for the Power Rod. Take the warp to return at the beginning. |

|
| Small Key #2 | From the beginning; head up, and jump into the hole to the Dark World. There; head up, right (shoot the flower), down, and open the chest for 5 Arrows. Head up, left, up, and hit the switch to lower the red block. Head down twice, up once (through upper-right path), and open the chest for Magic Decanter.
Return to the screen with crystal, and hit it to lower the blue blocks. Head down twice, right, down twice, left, and shoot the flower there with the Power Rod. Head left, up, and shoot the small hole in northern wall to make the chest appear. Open it for magic decanter. Head down two screens, and shoot the mirror in the south-west with the Power Rod until the magic is reflected into the switch there. Head down through the new opened path, and shoot the small hole in the eastern wall with arrow to make the chest appear. Open the chest for Magic Decanter, and head left a screen. In the next screen; use the Power Rod to remove the flowers, walk through invisible path, and bomb the pillar with the chest there. Open it for Small Key, and step on the portal to return to the beginning. |
|
| Boss Key | From the beginning; head down, left, down, right, down, left, shoot the mirror there with the Power Rod to reflect the magic into the switch. Head up, and hit the switch to lower the blue blocks. Head down a screen, right two screens, and jump into the southern hole to go to the Dark Side.
From there; head right, up, right twice, left, up (through hidden path below the bridge), and jump into the northern hole to return to the Light Side. Head down, left, and shoot the mirror there with the Power Rod to reflect the magic into the switch. Head up two screens, kill all Stalfos here, and continue walk up a screen through hidden path below the bridge. In the next screen; shoot the mirror there with the Power Rod to reflect the magic into the Stalfos there. After they all die; head right, and step on the blue switch there to create a shortcut. Head left, up, right, and hit the switch there to lower the red blocks. Head left, up, right, up, and kill all enemies here. Slash the lone bush in the north-west to uncover the switch. Step on it, then head right, and shoot the mirror there with the Power Rod to reflect the magic into the switch. Jump into northern hole to go to the Dark Side. From here; Head right, and push the stone block into the eastern hole. Head right, down, and then up through right most path. Here; you must hit and shoot the crystal there in the right order. When you're done; shoot the mirror there with the Power Rod to reflect the magic into the Stalfos there. Push the blocks there, and jump into northern hole to go to Light Side. Head down a screen, and slash the bushes there to uncover the green portal. You can step on that portal to fight some Zols that will always drop magic decanter. When you're done; head up, right two screens, down a screen, left a screen, and jump into southern hole to go to Dark Side. Shoot the small hole in the north-eastern wall with arrow to open the door. Head up, shoot the mirror there with the Power Rod to reflect the magic into the switch, and open the chest for the Boss Key. |
|
| Getting to the Boss Room | From the room with Boss Key; head down, right, and step on the portal there. Head up three screens, and hit the switch there to lower the blue blocks. Return down two screens, and return to the Light World. In the Light World; head down, left, and jump into western hole to go to Dark Side.
Head right, and shoot the flower below the bridge to clear the path. Head up through right most path, and hit the switch to lower the blue blocks. Head down twice to arrive at another room with mirrors. When the mirrors position is right; shoot the bottom mirror with the Power Rod two times to reflected the magic into the switch there. When you're done; head down, right, and use the Power Rod to remove the flowers. Head up, walk through the invisible path while avoiding the fireballs, and open the boss door. Head up for a boss fight with the Digdoggers. Use your ocarina to split the Giant Digdoggers into four smaller one, and kill them with your sword or arrows. You'll fight the Digdoggers in two stages. |

|
| Heart Container | When you have killed all Digdoggers, head up and pick up the Heart Container there. Step on any portal to return to the beginning. In the cutscene, you will see that the blue flower that blocked the path in Tahou Woods disappears. Now, leave this dungeon. | 
|
Finding Level 3
Items to Get
Below are the items that you can get before entering Level 3. You can also find eight Heart Pieces, and two Magic Potions (refer the appendices within the Wiki page).
| Item | Description | Screenshot |
|---|---|---|
| Candle | Take the Warp to Dasa Woods. Go one down and one right. Two flowers are blocking your path. Use your Power Rod on the gemstone and the flowers will move out of your way. Go up through the log. There are 3 Dodongo here. Place a bomb in their mouths twice to beat them. After they die, collect the Piece of Heart! Afterwards, go up another screen. Open the chest for a Candle! | 
|
| Magic Upgrade #3 | From Zakerand Fields' Warp Cave; head down three screens, right two screens, and burn the purple tree there with candle to uncover the secret path. Head right a screen, and enter the cave there. Inside; head up, left, and shoot the lever there to inactivate the traps. Open the chest for Magic Meter Upgrade. | 
|
| Horgrus Boomerang | From the entrance of Mt. Horgrus; head up, and enter the cave there. Inside; head up, right, and leave this cave. Outside; walk up two screens, and bomb the cracked wall there.
Enter that cave; then head left a screen. Light up the torch there with candle, then head up a screen. Kill the Gleeok there, head up a screen, and go up the stairs to reach Horgrus Submit. Open the chest there for Horgrus Boomerang. |

|
| Magic Shield #3 | From Oderra Graveyard's warp cave; head up a screen, right two screens, and down a screen. Push the middle tombstone to uncover a staircase. Inside the cave, bomb the eastern wall, and head right a screen. Shoot the lever in the north-east with the boomerang, and open the chest for Magic Shield #3. | 
|
| Weird Fish #1 | From the entrance to Glathriel Canyon; go north until you find a screen with a lake in the top-right corner, a pier, and a rock. From there, go left, then up. There's an open cave door here. Inside; head up, left twice, up (through western path), and open the chest for Weird Fish #1. | 
|
| Glathriel Sword | Start at the raft screen again in Glathriel Canyon. From there, go up two sets of stairs. Continue to go North past another staircase. Go right when possible. Cut through the bushes and get through the secret path. Go down the stairs. Find your way through the cave. At the end (downstairs), open the chest and get the Glathriel Sword! This is more powerful than your first sword. Also, it has slightly longer range than the Link's Sword. | 
|
| Long Bow | In Oderra Village, there is a windmill with a hungry Moblin inside. Dropping a fish for him will grant you access to the room behind him. By entering the bed, you will be warped to an area called "Link's Dream". The mini-dungeon is a maze that tests Link's ability to see through cunning tricks and defeat difficult enemies. Elements such as warping you back to the mini-dungeon's entrance and walking into dead ends to progress can be frustrating, so trial and error will most likely play a role in beating it. After completing the level, Link will be warped back to the bed in the windmill, but a path to the right will be there. In that room, a monster will sell you the Long Bow for 500 arrows. | |
| Magic Shield #4 | In Tahou Woods, two flowers die after Level 2. From there, go up until you reach the Castle entrance. Go left through the bushes, then left and up. In the cave, kill all the enemies, and the chest will appear. Open the chest for Magic Shield #4. | |
| Magic Upgrade #4 | In Tahou Woods, there is a lake. On the west is a raft port. From the port, go up. Enter the cave. Make your way through northeast and exit into Kali Beach. Go down and right. Use your Boomerang on the orb. Go up from that screen. Enter the cave. In there is a Magic Meter Upgrade. | |
| Mythril Mail | The Mythril Mail is found in the Svalbard Temple, a temple found on the icy summit of Mt. Horgrus. | 
|
Svalbard Temple
This is a temple found on the icy summit of Mt. Horgrus. Scaling this high brings you to a temple in the ice. Within this temple is something that will come in extremely handy for Link, but is not required.. NOTES: This temple can be entered before Level 3. This is also a side dungeon and is not required to progress.
Inside this dungeon are some new enemies - one of which is a stronger version of a previous area. These enemies are octoroks that spit out fire. Note that the fire does not melt ice! The suggested way to defeating them is with a ranged weapon such as the Bow and Arrow or the Boomerang. Be careful since these enemies drop fire around them once killed.
There is only one key in this dungeon, but lots of obstacles and the key is needed in order to open up a chest containing the boss key all the way to the north-east. There are also flashing buttons that you have to hit with your sword to open up a nearby door. Arrows and the Boomerang do not work, as well as the Power Rod.
| Item/ Destination | Description | Screenshot |
|---|---|---|
| Compass | From the first room that has multiple exits, go right. Use your candle on the blue thing blocking your way. Go right again. Open the chest for a Compass! | |
| Map | Go up the stairs at the beginning. Go to the east. Fight the wind to go east again. Go up, up, and through the other staircase in this room. Go south. Fall down the hole to the bottom right. Go east, and light the torch. In the chest that appears is the Map! | |
| Small Key | From the first main room. Go up all the way until you get to a room with a blue and red button. Lower the red blocks, and go through the door. Past the fire wheel, go up again. Kill all the enemies in this room to gain access to the east. Go north again. Go to the middle, switch the blocks, and go to the northwest. Fight the wind and get to the east. In this room, go to the eastern door. Go down, right, and up. Go up some more, and left past the torch. Go south past the ice blocks, and hit the switch with your sword to open a door. Fall through the hole, and go up. Kill everything here, and get the small key from the chest! | |
| Boss Key | From the beginning, go left and up. Go left, and squeeze past the fire wheels. Go up again. Ignore or fight the Octoroks and go up. Pass these fire wheels too, and go up. Go up some more, and continue until you reach the Boss Key! It's in the chest, of course. | |
| Boss | Go through the northwest door, and up the stairs. Go up these next stairs. In this room is the boss door. Get a Fairy if you need, and go up. The boss of this level is a dragon. At one point in the battle, he will make ice blocks appear on the floor. He will then charge at you. Get out of the way. When the boss has a ? over his head, use your Candle on a tile under his sprite. He should flash yellow. Do this a total of 4 times, avoiding all of his attacks, until he is defeated! Take a portal and go to a room with the Mythril Mail! |
Link's Dream
Before entering, have a full 500 Arrows. Do not use any, or you won't have enough. This place is.. hilarious. Don't freak out. Stuff will happen to throw you off, but I guarantee nothing bad will really happen.
| Item/ Destination | Description | Screenshot |
|---|---|---|
| Entrance | In Oderra Village, there is a windmill. Go inside. It just has a door to the right. In there is a Moblin. Talk to him. Use your Bait (Weird Fish) and he will let you behind him. Walk into the bed, and you'll be transported to some weird place! | |
| First Part | From the beginning, go up and talk to the Happy Face. Go back, and to the left. Shoot the Tongue Face with magic. Take the left path up a screen, and kill all the enemies. You'll pop somewhere else. Go up, past... you... and go up again. Talk to the Panda, and stay with him for a few seconds. You'll teleport again. Kill the guy and go left. In the C://LI screen, avoid the Deathbos and wait until you're teleported somewhere else. | |
| Second Part | Talk to the crying child, and go up. Kill the Keese, and go up towards your first couple life Hearts. You'll teleport. Shoot the Happy Face, go up, and talk to the Cucco? Dodge his friends, and go left. Quickly go left again after shooting the bottom-left Happy Face with magic. Run, I mean climb, left. Avoid... yourself... and talk to the Wallmaster. | |
| Glitch | Walk down, and right, following the You Got Bomb! box. Talk to the Blue Lynel, then go down, right, and up. Go into the portal to find your way back. | |
| Third Part | Go up, up, and talk to the Deathbo. Walk to the southeast, and go into the dead end to teleport. Walk into the other dead-end and go up. Go right and up at the fork, and enter the next screen. Kill the enemies, and go up to the wall. | |
| Boss | You'll come across a Mirrorobe. It'll fly around the room, and sometimes materialize into solid form. It will shoot three blasts of magic forward. The only way to damage him is to trick him into shooting magic into a mirror. If he does it right, he will damage himself. Keep doing this until he poofs! (If you come here after Level 4, with the Shield of Ages, your shield can reflect the attacks back at him. Otherwise, do it this way.) | |
| Long Bow | You'll beat the boss. Go through the portal to wake up. After waking from the dream, go to the left. Pay 500 arrows to get the Long Bow! This makes arrows fly faster, but does NOT make them do any more damage or anything. Leave when you're done. |
Triforce Dungeon 2
A couple of screens east from the entrance to the second dungeon, there is an odd stone which you can hit with your boomerang to make a block disappear, creating a way up a ladder. Make your way around to that screen and go one screen north to find a cracked wall. Use a bomb and enter the cave.
In the cave, you will find 3 more of the odd stones. Use your Boomerang to hit all 3 of them, creating a way up and into the dungeon. This dungeon is pretty clear on what you have to do. There are many warp tiles, creating a maze. Also, there are some blocks that shoot in all 4 directions, dealing 2 damage with each hit. You must step on warp tile in the right order to proceed in this dungeon.
- In the first room, step on the only warp tile there to warped in the second room in the east. Step on the bottom-left warp tile to warp to western part of the first room.
- Go left a screen to the third room, and step on the middle warp tile near the south wall of the this room to warped to the fourth room.
- Step on the upper-left warp tile on this room to warped to the fifth room.
- Step on the northern warped tile on this room to warp back at the second room.
- Step on the northern warp tile to warped back at the first room.
- Step on the southern warp tile to warped back at the third room.
- Step on the south-western warp tile to warped to the sixth room.
- Step on the northern warp tile to warped back to the fifth room.
- Step on the upper-right warp tile on this room to warped to the seventh room. Head up two screens, and pick up Triforce Piece #2 there.
Triforce Dungeon 3
Go to the Southwestern entrance to Oderra Village. Go down to the first screen in Chovian Fields. To your right is a tree. Burn it down and continue right until you see a wall. Bomb it, and enter. Through the cave is Triforce Dungeon 3.
This place is rather confusing to try to explain. Basically the gimmick to this dungeon is that you're going to be falling down holes to reach the bottom where the Triforce piece is. Many holes to fall into, but only one correct path. If you fall into the wrong hole, it will take you to a dead end room with teleporters that will take you back to the start. More annoying than anything else. However, caution with the black bats, as they do quite a bit of damage, so doesn't hurt to be a bit conservative in your exploration.
Completion of this dungeon allows you to use the ocarina to warp to the tree right below Oderra Village. A very useful warp point, as it's very close to the central cave system.
This will be easier to explain with the pictures below:
1. For the first room, go all the way to the right to the furthest hole on the right. Fall down this hole to land on a ledge that will let you then go right. Other holes lead to nothing.

2. A little trickier, this time go right until you reach a cross point. Go down away from the torch and fall down the first hole you come by as shown in the picture. Again this will land you on a ledge allowing you to go right.

3. This piece is a bit trickier. On entering this section, you'll see lots of holes. Skip these and head on up to find a screen with more holes. If you go from left to right, you'll want to fall in the second hole from the left (or just look at the one right next to the upper left wall). Again the picture shows the correct hole. This will take you to a corner that has a switch. Step on that to remove a blockade. Fall down more holes until you reach the warps that take you back to the beginning.

4. Follow steps 1 and 2 again. This time when you go right, don't go up. Now you want to fall in the lower right hole. This will take you to a passage leading to a door. Remember that you had to step on that switch in step 3 first to reach the door.

Many holes here. Go in the hole just northwest of the right pillar (or second from the top however you want to look at it) to land you on a ledge. Go up to find the Triforce piece.

Triforce Dungeon 4
This dungeon may be hard to find since you need to hit a switch on Mt. Horgrus with the Power Rod to create a cave, which requires a lot of backtracking. In order to hit the switch (around the middle squares of Mt. Horgrus) you have to go through a cave system to get to a higher ledge.
This dungeon is a test of evasiveness and accuracy, since there are many traps and targets.
In the first room, you will find a switch. Hit the switch and start running along the pathway! Hitting the switch will cause spikes to come out of the ground. Once you exit through the door, you can rest.
This second room is quite straight forward. You have a couple of traps that shoot fire, and some eye targets that open and close. Using the Bow and Arrow, shoot the two eyes to open the door.
This third room can be quite hard to not take damage. There are some spike traps that come towards you when you get in their "line of sight." Using the gaps in the walls, try to dodge the traps as they come towards you.
in the fourth room, you have a button just like the first room, but instead you have 2 spikes that come up and down. Quickly step on the button and run!
Room number 5 has two eye switches just like the second room, but you have enemies blocking the switches. using the same Zelda lgic, hit the two eyes with Arrows and advance the next room.
This room is the same as the previous two spike runs, but there are two switches this time. Hit the first and run until you pass the block that went down. Now hit the second and run for the exit! This time, spikes that are going up and down are blocking the exit.
In the final room, there are more traps that shoot fire. dodge their fire, and go through the door to get to the triforce room. Pick up triforce number 4 and leave the dungeon, also creating another warp for your Ocarina.
Level 3: Bhalstok Castle
Directly north of the flowers that died in Tahou Woods after the Sky Garden boss was defeated.
Bhalstok Castle is possibly the most difficult and rage-inducing level in the entire game. It is EXTREMELY recommended that you come here with the Glathriel Sword and the Mythril Mail. The level consists of 11 small keys keys, difficult enemies, puzzle aspects, and painful footwork. The most difficult parts of the dungeon are traversing disappearing floor tiles and crossing narrow ledges while avoiding flying projectiles and other enemies. One misstep on either of these could cause you to start from floor 1 unless you opened up a shortcut. Most of the level is inside the castle, but occasionally you must loop around the castle walls to enter a different section of the castle's interior. One key requires that you exit the level entirely and to a cave leading to another key. There is also a hidden extra key, but finding it is almost a pure stroke of luck. Navigate level 3 with caution, or you'll regret it.
| Item/ Destination | Description | Screenshot |
|---|---|---|
| Compass | At the first fork, go right. Go right again. Enter the bottom left screen. Go left again. Kill the enemies. Behind the bottom right pillar is a block. Move it to the square above the top left pillar. This will make a chest appear. Open it for the Compass! | |
| Key 1 | Go north until you get to a fork. From there, go left, and down. Solve the block puzzle, and go through the door. Follow the path to a Small Key! | |
| Super Secret Key | This key is optional, but helpful. From the start, go to the first fork, and right. Go right again, down, and left. Go south past the compass, and bomb the broken wall at the bottom right. Go up, and step on the switch. Go back down and back to where the Compass was. Go right, up, and down the other side, crossing the blocks you lowered. In this next room, go down. Hit all of the switches in time to open the door to the right. Go through, step on the switch, and right again. You'll enter a maze room. Hit the switch in here. Hit a second switch. There is a crystal switch to hit with your boomerang. Go through the door to the southwest. Hug the left wall and walk down, walking over the gap like there's something there, which there is not. You'll get a well-hidden key! | |
| Key 2 | From the Secret Key, go back into the maze room, and through the northern door. Go left, and hit the crystal with magic, and go north. Through this door is a chest with a Small Key! | |
| Key 3 | Go south after spelling Edgar IV. Follow the path west and south, and blow up the wall. Go down the path, hit the switch, and go east past the block puzzles. There's a key in the chest. | |
| Royal Melody | From the bomb room, where you used the candle to blow them up, keep heading north. You will find a way to go right. Approach the door, and it will slam shut. A miniboss will appear. For his first phase, kill all of the gels. Then hit the main boss. He will appear somewhere else in the room. Keep slashing him a couple of times and he will start his second phase. You have to kill the gels again, then slash him. This time, you have to hit the boss in a specific order, eventually leaving the top-right one left. Keep using your sword against him, and he will eventually die. Head east and walk up to the tablet to gain the Royal Melody! This will allow you to access rooms in the dungeon by walking onto the floor tiles with a music note on them! | |
| Dungeon Map | Follow south after getting the melody and against the east wall all the way south. Back west, and curve around the wall. Step on the switch to get the Map. | |
| Key 4 | After lowering the switch, follow back and south to go outside. The chest has the key. | |
| Key 5 | You saw a door going east not too long ago. The right middle Armos in this room will leave a hole if you bomb it. In the chest is the key. | |
| Helpful Shortcuts | You solidified some blocks by stepping on a switch. Go back up the stairs. Go north, through the door, past the ocarina block, and lower this switch. Go to the previous room, and west this time. Go either north for puzzles or west for enemies, and in the final room, go through the northeast door. Follow the path and step on a switch for more of a shortcut. Go back to the stairs, north, and follow until there's another switch you use to make some floor appear. | |
| Key 6 | There's a room with a blue block and a statue. Follow the left wall down a room and get the key at the end of the next room. | |
| Shortcuts | South of the last key in the puzzle room is a locked door. Go through. Follow the path, and go either way until you're in a room with a switch. Hit it and go south and step on the switch. | |
| Key 7 | Take the northeast path of the main castle's fork. In here, where the stair shortcuts are, is a door that stays on this level. Go in, play the Melody, and open the chest for a key. | |
| Step Ladder | on the upper floor of the dungeon, you can find a room with two switches and two statues. Step on the switch to start the dreadful Boomerang minigame! First, constantly hit the left statue with your Boomerang until it breaks. Do the same thing after, but hit the right statue. Ignore the bats that block your path, and don't forget the time limit! If you manage to do it in time, you can go north to a chest containing the step ladder! | |
| Key 8 | Go through the shortcut to get up one floor. Get to the r-shaped room with the grasps. Take the east door and open the chest for a key. | |
| Key 9 | Take the shortcut all the way to the top floor, and find the Melody room just before you got the Ladder. This time, go right, and across the little lake is a key. | |
| Key 10 | There was a room where you spelled Edgar IV, and pushed a block onto stairs. Go all the way to the east of this area. Go outside. There is a linear path that takes you to the key. | |
| Key 11 | Unknown. You won't need any more if you got the secret one, however. Please fill this spot in if you see a key that is missing. Could go anywhere in the walkthrough for this level.. | |
| Boss Key | Take the northwest fork and go into the basement. Walk over the spot of water. Through the puzzles is the boss key. | |
| Boss | Boss door is a cracked wall one screen to the right of the right-south fork in the main hall. The battle will start with you versus a Gohma. The Gohma will shoot fireballs at you. Not only can the fire go through your shield, there are spikes coming up from the ground! There's an area at the bottom-right that has no spikes. Hit the Gohma three times with an arrow to defeat it. Be careful; you can only damage it while its eye is open. After it is defeated, 2 more Gohma will appear! Defeat these two the same way you did the first one! But wait, it's still not over! A Patrat will appear. Destroy it like all others: by first destroying the little ones flying around it, and then hitting the main body until it's defeated. Once that's done, you can go north to get your Heart Container! Step on the warp. In the cutscene, you will see that the blue flower that blocked the path in Zackerand Fields disappears. Now, leave this dungeon. |


After Level 3
| Item | Description | Screenshot |
|---|---|---|
| Magic Shield | After opening the Warp Point in Vasshinghon Flows enter through it. Go right, cross the lava, and go up. Enter the cave. Within this cave is another Magic Shield! | |
| Magic Boomerang | Farther within the cave is a Magic Boomerang! To get it, you had to have hit the skull on the stalagmite to remove the blocks. | 
|
| Weird Fish 2 | There's a flower in Zackerand that closes after Level 3 is completed. In the cave is 4 Aquamentus. Beat them, and take the northern path to get another Bait! | |
| Magic Shield | Take the Warp portal into Xaagan Wastelands. There is a group of trees in the top left corner. Stay with the trees and go to the top left corner, and over a screen. Go north all the way until you get into a cave. In the cave is a Shield! | |
| Giant's Gauntlet | From the Warp, go one screen up. You'll be somewhere with 4 paths and a lot of skeletons. Go right, down, right, then left. You'll hear the puzzle-finished jingle. Go in the cave. In the cave is the Giant's Gauntlet! | 
|
| Bomb Upgrade | From the entrance to Zackerand, go all the way north. Past a heavy block, up, left, and continue going up. Enter the cave. Go through it, and avoid anywhere you've been, since this is a new entrance. Exit the cave. From there, go as far right as possible. Go down the stairs. Go to the left. Bomb the rock. Go down the stairs. In the cave, go up. Pay 250 arrows to get more bombs! | |
| Magic Amulet | In Xaagan Wastelands, you'll see some odd hands that come out of the ground. If you touch them, you will be dragged to an underground cavern. Down here is a chest (along with tons of stuff) that is blocked by two sets of spikes. To lower them, you'll have to be dragged down in certain places to hit each switch. You need to fall down in the screen that has the special shop. The other screen you need to fall in is the screen one north of the purple tree. Fall down in both of these screens, and you'll be able to lower all of the spikes! Go get the Magic Amulet out of the chest. This will allow you to see the invisible enemies that reside in the Master Dome. |
Triforce Dungeon 5
Few screens to the north of Glathriel Canyon warp there is a small river with a crack on the wall, inside there is the Triforce Dungeon 5. This one is rather easy. Go into all of the rooms, and defeat all of the enemies. Once that is done, a colored block will appear. Memorize the exact location of that block. Do the same for all the other rooms. After that, go north from the entrance. You'll reach a room with all of the blocks. Move them into their positions. Once that's done, go up and get your Triforce shard!
Triforce Dungeon 6
North of the purple tree in Xaagan is a statue. From there, go left. Enter the cave. Go enter the dungeon. This dungeon is nothing more than an enemy challenge. Kill everything to go forward a room. After the last room is the Triforce!
Oderra Catacombs
This section of the walkthrough can only be accessed after getting all 6 Triforce Pieces. Bring lots of Bombs. The bare minimum is 7, but I guarantee you'll need more just in case. Bring 16-20, just in case. Also, this level is very gory. No, really, it is. So be prepared to be grossed out. Well, it's actually not bad. But it's there. Ah, the joys of 2D gaming.
| Destination | Description | Screenshot |
|---|---|---|
| First Maze | You'll come across a room, and you'll notice, that after a couple attempts, it's a maze! Don't worry, there are certain doors you need to go through. Go in this order: top right, top left, top right, bottom left, right, down, bottom right, down, left. You're through! Hit the switch to open barriers so you don't have to do this again. | |
| Second Maze | Eventually, you'll come into a room with a statue, and some bodies hanging from the roof. Yuck! This is another maze. Go left, down, and right. You'll be in a room with three Deathbos and 2 flaming faces on the middle of the room. Go right, then up, then up again. Go up one last time, and hit the switch so you don't have to do this anymore! | |
| Third Maze | From the room with the one head torch, go through the eastern passage. You'll be in a room with 2 of the torches. Go east again. Go up through the door on the eastern side that takes you up a room. From there, go to the left, and then up. In there, go left a room, and the only option from there is south, so take it. And the last direction is left! Hit the switch to get another shortcut. | |
| Doom Cave | This place is rather simple. There's only one path, but it does not warp you to the beginning if you take the wrong one. You'll know you're at the end when you're in a room with a Manhandla and a strange statue at the north part of the room. The only entrance is from the south. Kill the Manhandla. Bomb the northern statue three times. It will change appearance slightly every time you blow it up. Once it's blown up, you can head north. If you die after this, the whole last room will still be completed. | |
| Boss | This boss is somewhat easy if you're careful. When the head stops in the middle of the room, bomb it. Once it's bombed, a red spot guarded by hands will appear. Slash away at it with your sword! You need to do this a total of 4 times. After the boss is defeated, go north. In the chest is a Death Sword! This does twice as much damage as the Glathriel Sword, and four times as much as the Wooden Sword. After you have the sword, take the portal and you can leave the Catacombs. |
Level 4: Plague Fortress
In Xaagan Wastelands, a couple screens right from the entrance, is a big metal block. Move it out of the way with the Giant's Gauntlet. Continue up and move to the metallic screens. There's a spot with an Armos guarding a ladder. Go up the ladder, and up a screen. You'll see a red circle high on the wall. Walk into it, and a door will open. Go through the door to enter Level 4!
This dungeon may seem hard at first, and you may think it's an effort to heal up after you die or start with 3 hearts, but it's not that bad. Go one screen north and go down the ladder. This part is mainly an area for shortcuts later on. Head east, then north to find a new type of flooring. The computer gives you a detailed explanation if you walk up to it. Step on the tiles that have hearts on them to refill your life completely. There is nothing else to do here, so head back up the ladder.
The only real problem with this dungeon is the electricity and closed gates, which get confusing after a while. Head east from the ladder, to find yourself in a room with a faulty lighting. Head past the armos and go south. You can't go south anymore because the electric floor panels will hurt you, so head east for now. You will come across some electric wires. Just like the spikes in previous areas, these turn off and on with a timer. time it carefully and head past the wires and head south. There will be an armos waiting for you, so quickly head south! These armos try to block you, so you have to outrun them. Head to the ladder and touch the number 1 above the adder to open gate number one.
Going down the ladder will take you to some bricks you can move for a shortcut back. Head up the first ladder you went down to heal. You could head west and go through gate 1, but that's if you want a Heart Piece and the compass, and we will be passing those later on so we'll get them then. For now, though, head east. you will be in the faulty electric room again. This time, head east. You will be sent to a room with blue wizzrobes. You could choose to beat them now but they only open a door to a Heart Piece we can't get yet. Instead, head north dodging the electricity. This room will have red wizzrobes. Take them all out. To the north-west of the screen is a button. Press it without pressing up a lot since that will give you less time to reach the door that opens. Pressing it gently, use the conveyor belt to speed towards the door. In this next room are some stalfos - but these ones are just like the octoroks in Svalbard Temple, and spit out fire. Ignore them and head north past the armos. This next room can be challenging. You have to defeat all of the enemies to pass through the door at the north. In this room, there is a machine that turns the power on and off when you touch it (More described in the previous room on a monitor). Use it and turn the power off.
With the power off, the enemies will pause and be replaced with rats and bats. Go west. Push the ladder down to gain easy access to the power room and not have to worry about defeating the enemies again. Go up the ladder to the second floor for the first time.
| Item/ Destination | Description | Screenshot |
|---|---|---|
| Compass | Go up from the first screen. Follow the conveyor belt all the way over. At the end, go down. Step on the yellow tile. Go around the barriers and over right a screen. Step on the other yellow tile. Go over and open the chest to the right. Open it for a Compass! | |
| Map | From the start, go up and right. Hit the red flashing button with your Power Rod. Go through the door. Kill all of the Darknuts. Move the switch and go through the door. In the room, press the yellow button, and run onto each of the flashing green squares. Open the chest that appears and open the chest for a Map! | |
| Gate 1 | From the beginning, go up, and through the door to the right. In that room, kill the Armos and go south. Go right past the sparks. Go down. There's an Armos that follows you. You have to be quick to pass it before it gets in front of you. Then go above the ladder, and touch the spot with a 1 on the wall. This will open a gate! | |
| Gate 2 | Go to the room where you got the Map. Go right. Deafeat all the enemies in the room. You can kill the Blue Darknut, but you have to wait for it to get close enough. Go through the door. Go up the next door. You'll be in a room with electricity on the ground. There's a big 2 lever at the top right corner of the room. Touch it to lower the second gate! | |
| Gate 3 | From the room with gate 2, go right. Go up a room (hall, not ladder) and to the right. In this room is the 3rd Gate lever! To do what I just said, you need to move all the switches from I to O. After you do this for both switches, you can move through. | |
| Entering Plague Lab | From the beginning, go right until you reach the room with the door and ladder. Go up the ladder. Go right and down. Get on the blue panel. Follow it, and go up. Go down the ladder and to the right. Play this minigame, and go down the ladder. Go out the door to the south. Go down the stairs, and up the next ones. Go right until you get to the entrance to Plague Lab! | |
| Rod Upgrade Chip | In the lab, go up a couple screens until you can go right. Go right. In the top-right corner, is a screen that's blank. Bomb this. While there is more to do before going in there, it's good to remove that now. South of this room is a heart panel you can heal yourself with if you need. Before going through the hole you bombed, wander the rest of the lab and read the computers to get backstory. Through the hole, at the end of the path, is a lab key. Take the lab key to a locked door and go through. Follow the path, and you'll get to a boss! After you defeat it, go outside. You'll be on top of the facility. Open the chest for the Upgrade Chip! | |
| Gate 4 | From the area you got the first Heart Piece. Go to the room with the exit. Go up a room. Use your Power Rod on the pedestal on the right side. Go up past the laser that is now gone, and lower the fourth gate! | |
| Boss Key | Open Gates 2 and 3. Go through gate 3, and all the way to the left. Defeat all the room's enemies and go up. There's a boss key in a nearby room. Turn the power on and off until you get it. Do not go back through gate 3. Once you get to the room with the key, have the power off and acquire it! | |
| Boss | He will summon a Patrat. Defeat it. There will then be a yellow spot next to him. Shoot it with your arrow. After this, he will summon another patrat. Kill this one, too. He will do the same thing again. Shoot him until it breaks. And, of course, this is going to get harder. Shoot the heart panels to his right, and then to his left. This isn't as easy as it looks, of course. Once you break both of them, he will be defeated! After that, head up and pick up the Heart Container there. Step on any portal to return to the beginning. In the cutscene, you will see the spike traps that blocked the path in Level 5, Inner Volcano, disappear. Now, leave this dungeon. |
After Level 4
Cultist Cave
| Destination | Description | Screenshot |
|---|---|---|
| Entering Cultist Cave | There is a lake in Tahou Woods. You should be west of it at the raft port. From there, go up until you enter a cave. In the cave, take the right path. You'll come across a room with spikes up north. Use your Rod at the torch when a Keese is near it, so the torch will light. After the spikes are down, go up until you enter The Cultist Cave. | |
| Secret Shop | When you enter Cultist Cave, go right as far as possible. Go right out of every screen, through a whole in the wall, and keep going. Eventually, you'll be blocked. Go down all the way. Bomb the wall to find a shop. It will sell you a Bait, Magic Shield, and Potion. | |
| Shield of Ages | At the end of the cave is a Pentagram. Step into it. You'll be taken to a room with a scary looking Manhandla! Kill it, and two more will appear. Kill them. After that, go up. Get the Shield of Ages out of the chest! Never again will you fear a Grasp. Also, not only can you block stuff, you can reflect it! |
Entering Level 5
Level 5 is found on Horgrus summit. From the far east side of the Horgrus Summit, head north up the ladder, then back south, then east, cutting through the trees. Go up the ladder and use your Power Rod on the enemy and destroy the dead bush. This will allow you to gain access to Level 5!
Note: If you somehow made here when you haven't completed level 4, however, there are spike traps that will block your way after going east, and north. You'll have to complete level 4 to explore deeper in this dungeon.
Inner Volcano
The Inner Volcano can almost be thought of as a level on its own. The real final dungeon, Horgus Temple, can be found after navigating the volcano. The volcano is a fairly straightforward area consisting of tougher enemies and traps. Pay close attention to the floor. If you see a slight glowing X on the ground, do not step on it. It will ignite, and do damage. So don't step on them! Also, this place is very hard. Be careful..
| Destination | Description | Screenshot |
|---|---|---|
| Holy Arrows | Follow the path all the way right. Go up, then all the way right, past the floating rocks. Go down, and right. Go down through the hole at the end of this room. Go down again, and light the torch with your candle for later. After that, go left and up. Go left twice, then down. Bomb the lower left boulder, and go down. Enter through the warp portal. Follow the path, killing everything, until you get the Holy Arrows! | |
| Small Key | This is in the room in which you lit a torch. You could see the chest from this room. Go right across the lava from the room with the portal you just took. Go down from this room, and remove the spikes for later. Go back up and right. Follow this path until you get to a room with a Small Key! | |
| Shortcut Warp | Go back, and down the vines. Cross, and step on the switch. Now you have easy access back here! Use your Small Key on the door to the left to enter the REAL Level 5. However, there is a LOT more you need to do before actually going in there. Go in the warp and exit the cave. |
Note: If you're finding the place too hard, leave after you get the Holy Arrows. You'll find something with them to make this easier. Then you can come back and get the key and warp. If you think you can handle it, fight on until you get the key and warp!
Oderran Hideout
| Destination | Description | Screenshot |
|---|---|---|
| Entrance | Near Oderra, in Chovian, you may remember a pirate talking about a pig head. There was an arrow statue that you couldn't hit. Now that you have the Holy Arrows, you can! Shoot it, and enter the cave. Follow it north. Bomb the crack in the ground, and go down the stairs. Go up again, and enter the hideout! | |
| Oderran Melody | Be careful that they are a lot of Deathbos here that will take away a lot of hearts. From the beginning, go west. Kill the two Deathbos here (you can go north through the hole to get a 200 arrows stash), then go west, move the cupboard there to open a path to the north. Read the sign for the Oderran Melody! | |
| Dragonscale Mail | Go back to the entrance. Go east, north, and west. From the room with the dinner table, go north. Stand on the music note panel to play the Oderran Melody. Go through the door, and north all the way. In the chest is Dragonscale Mail! Your defense is now doubled! Take the warp back outside, and leave the cave. |
Master Dome
Go along the western wall of the Canyon. Follow the wall all the way up. Pick up 50 Arrows if you so choose. Now, look at the wall at the northern part of this trench. It's just another wall, right? Wrong. Shoot it with your Power Rod. This will create a cave. Go inside. Take the way north to enter the Master Dome! This area is completely optional. However, there is an amazing upgrade for something up here. You may even say the upgrade is... awesome.
When navigating the Master Dome, you will stumble upon switches. Activating these switches will cause the innermost part of the temple to rotate 90 degrees. The combination of every type of Wizzrobe, Kamikaze Drones (the bomb enemies), traps, and bosses makes this the most difficult dungeon in the game. Bring both strong weapons and a ton of patience if you wish to conquer the Master Dome.
Note : Make sure you have the Magic Amulet found in Xaagan Wastelands. Otherwise you'd have a very hard time completing the Master Dome.
| Destination | Description | Screenshot |
|---|---|---|
| Compass | From the beginning, go up a screen. Then, go right a screen. Open the chest for a Compass! | |
| Small Key | I did not get a chance to write this down. My apologies. You NEED to get this to get the boss key, however. After you move the building once, take the right path instead of the left. Do this at the room with a line of skulls at the bottom of the top part of this room. The Key should be somewhere down this path. | |
| Map | Go north and move everything. Take the left path after this. Move everything again. At the next two forks, take the northern path, and then the eastern path. Go through a warp. In this room is a chest with the Map! | |
| Boss Key | Boss Key: Go south past the chest with the Map. Follow this path, and go up at the next fork. Use your Small Key on the door here. Inside, you will fight a Gleeok. But this is not the problem: There are two Windrobes here! If they hit you with their wind, you will be sent to the start of the dungeon. If you find this process absolutely unbearable, eventually you'll get lucky and the Windrobes will stop respawning after about a dozen attempts.. Otherwise, dodge/kill the Windrobes and hack away at the Gleeok. Once you beat it, step on the warp and follow the path over to get a Boss Key! | |
| Boss | Found on your way to the Key. So you will have to either backtrack to get there, or start from the beginning. There's a door you may have noticed. Go through it to fight the boss! The boss is basically a Black Darknut that can shoot fire. At the northwest of the room, are spark switches. This will light up some panels. The boss can not cross these panels. There are also a candle and switch. Hit them in that order to further trap him into one spot. Hack away until he is defeated! | |
| Awesome Arrows | Go north from the boss room. Pick up the Awesome Arrows! |
Level 5: Horgrus Temple
Take the Shortcut Warp from earlier, and go left. Go in the door that's locked. The concept of the final level of Lost Isle is similar to that of the last dungeon in The Wind Waker. Four warps can be found in the corners of the level, each leading to a minidungeon. Each minidungeon represents one of the four main dungeons and the puzzles that each dungeon was known for. The Ancient Temple warp is full of block puzzles. The Sky Garden warp consists of raising and lowering blocks. The Bhalstok Castle warp consists of traversing disappearing platforms. The Plague Fortress warp consists of battling enemies. After beating the enemies at the end of the minidungeons, you will be awarded a key.
| Destination | Description | Screenshot |
|---|---|---|
| Magic Potion | This is easy: it's right at the beginning. Thank you, developers! | |
| Boss Key | Move the blocks around the room onto the switches until you can hit Gleeok. Kill him, and he will drop the Boss Key. Pick it up! | |
| Room 1 - Ancient Temple Warp | In Gleeok's room, go through the southwestern door and enter that room. Enter the portal. The path is very straightforward. Follow everything, past the block puzzles, and get to a room with 3 Moldorm. Kill them all, get the Key, and go into a portal. | |
| Room 2 - Plague Fortress Warp | Take the portal north of the first. This one is a straight path. At the fork, take either path until you get to a room. Shoot all of the top panels with your Power Rod. This will make a portal to a Dual Patra. Kill it, grab the key, refill your Hearts, and go into the warp. Note: The Heart Panel only works when you don't have full hearts and they will stop working after the boss is defeated. | |
| Room 3 - Sky Garden Warp | Southeast corner. This one is just a switch challenge. You'll want to step on the switch just north of where you start at one point. Then take the path with the lowered spikes over. Eventually you'll come across a room with hidden panels. Take the path north, and hit the switch with your rod. Go north a room. Here are 3 Digdogger! Kill them, get the key, and go into the warp. | |
| Room 4 - Bhalstok Castle Warp | Northeast corner. Just go along the tiles until you get to a block puzzle. Beat it, and go north a room. At the end is a Fire Gohma. Kill it, grab the Key, and enter the portal. | |
| Boss Door | Redo the block puzzle. Go straight north past the Gleeok room. Avoid the Deathbos and go all the way up. There is a health room right south out of the temple. Refill Hearts if you wish. | |
| Final Boss | When you get to the room, walk up and listen to his story. The battle will then begin. Kill everything he summons. Don't worry about damage; you can't do any. Eventually, he will change form. When his eyes glow, shoot him with an arrow. Three shots, and he will be destroyed! You beat the game! NOT. | |
| Escape | RUN. There is basically only one path to take, thankfully. There is one split near the beginning of Oderra Village. South is faster, but harder. West is easier but slower. Keep following the path off the Isle. At the beach, go left. Go down to the start of the game and take the raft path. You beat Lost Isle! |
Overworld Map

Let's Play Lost Isle
Beginning in January of 2013 Mases, Webmaster of Zelda Dungeon, began a Let's Play of Lost Isle:
Let's Play the Legend of Zelda: Lost Isle playlist