Ghirahim

Title | Demon Lord | |
Race | ||
Gender | Male | |
Games | ||
Location | ||
Threat | ||
Attacks | Skyview Temple | |
Related | ||
Ghirahim is the main antagonist of Skyward Sword. His primary goal throughout the game is to revive his ruler, who he refers to as the The Demon King, by using Zelda's spirit. He appears multiple times throughout the game as the boss of the Skyview Temple and Fire Sanctuary, and to call upon other bosses such as Scaldera and Koloktos.
Appearance
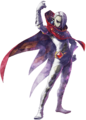
Ghirahim is a tall and slender fellow with pale gray skin and white hair. Diamonds are a common motif in his design as his attire and most of his attacks are decorated with diamonds.
Personality
Ghirahim is a flashy, sharp and confident antagonist whose sole focus is to capture Zelda in order to revive 'his master'. Ghirahim seems to be very self-absorbed as he states to Link "my preferred title is Lord Ghirahim." His behaviors are usually very exaggerated and dramatic as he often moves his hands in a very theatrical manner. Upon first encountering Link, he is very polite and formal, claiming to be uncivil as he had not properly introduced himself.
Ghirahim is very quick to anger, however, and is a fierce opponent. Ghirahim loses composure and quickly becomes psychotic as things do not go in his favor. He reveals himself to be a very cruel and ruthless demon with a thirst for blood and battle as he threatens Link with death several times throughout the quest.
Story
Ghirahim is a member of a Demon Tribe that attempted to take over the Surface, but they were stopped by the Goddess, Hylia. What happened to him between then and the events of Skyward Sword are unknown.
Throughout the game, Ghirahim makes many attempts to revive the Demon King by sacrificing Zelda. His first attempt occurs when Link and Zelda are riding on their Loftwings. Ghirahim summons a tornado and knocks Zelda off her bird into the Sealed Grounds below, but he fails to capture her.
Ghirahim appears again for a brief moment when Link enters the Skyview Temple. He nearly reaches Zelda at the end of the temple, but he is stopped by Link. The boss fight with Demon Lord Ghirahim proceeds and he states to have not used his full power, but instead, was merely toying with the young hero.
In the proceeding dungeon, the Earth Temple, Ghirahim appears once again in the boss arena, but he will not be fought this time. Instead, he summons the boss of that temple, Scaldera.
Later in Lanayru Desert, Ghirahim appears once more. On this occasion, he is seen after Link has navigated his way through the treacherous Lanayru Mining Facility, where he finds himself in the Temple of Time. The Demon Lord destroys the boulders blocking the way and attempts to yet again kidnap Zelda. Impa, the servant of the Goddess, blocks Ghirahim's attack with a large blue force field, giving Zelda time to go through the Gate of Time. Link then distracts Ghirahim long enough to allow Impa through the Gate of Time before she destroys it. Ghirahim, in frustration of losing Zelda again, promises in a fit of rage to kill Link, and Ghirahim teleports away.
Ghirahim makes a brief appearance at the end of the Ancient Cistern, where he summons another boss. He awakens a Shiva-like statue as the boss of the Ancient Cistern, Koloktos.
Later on in the game, the Demon Lord makes an appearance in the penultimate dungeon, the Fire Sanctuary, for a fight similar to that of the Skyview Temple. He is much more powerful in this fight because his projectiles are much harder to dodge, and he is now protected by a metallic like armor. Ghirahim seems to be losing his calm persona in this appearance as he freaks out about losing Zelda yet again. It is now known that Ghirahim is searching for a Gate of Time since the one in the Temple of Time was destroyed.
| Spoiler Alert! This section describes a subject that is sensitive to plot development. |
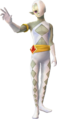
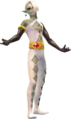
Ghirahim makes his final stand by arriving at the Sealed Grounds where Demise was just destroyed. He ambushes Link and captures the newly awakened Zelda. He escapes to the past to try to revive Demise since he was destroyed in the present. Ghirahim summons a horde of enemies to keep Link from approaching Zelda and himself. Link eventually fights through the horde, but Ghirahim has already begun Zelda's sacrifice, and Ghirahim reveals his true form. His entire body is almost entirely hard metal except for a gemstone in his chest. Link manages to defeat Ghirahim, but Demise had already awakened at this point. Ghirahim reveals himself to actually be Demise's equivalent to Link's Fi. Ghirahim is, in fact, Demise's sword. Demise transforms Ghirahim into his true sword form while Ghirahim laughs hysterically. It can be assumed that Ghirahim has completely lost his normally calm attitude and gone completely insane by then.
Boss
Skyview Temple Boss Strategy
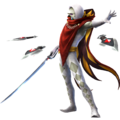
Demon Lord Ghirahim is the first boss of Skyward Sword. Link encounters him in the Skyview Temple as both search for Zelda. In battle, he prefers to toy with his enemy, initially opting to go weaponless and cunningly blocking attacks.
Phase 1

Ghirahim slowly advances towards Link as the fight begins. If the sword is not drawn, Ghirahim will slap Link for one heart of damage. This can be blocked with a Shield Bash, but it is better to have the sword drawn before Ghirahim gets close enough.
Ghirahim will holds his fingers up with a purple aura, and will try to catch the sword between his fingers as it is swung. If Link does not quickly pull the sword free, Ghirahim takes it away and will use it against Link. To get the sword back, block one of his strikes with a shield bash and it will fly out of Ghirahim's hands so that Link can retrieve it. Ghirahim may also throw the sword at Link after a few strikes. Dodge it, and then run over to it and pick it up before he does.
The key to harming him is to quickly turn where the sword is and slash at him. Hold the sword on the right and Ghirahim will block in that direction. Then quickly deliver a sword slash from left to right using your Wiimote and Link will hit him almost every time. If Ghirahim does catch the sword, quickly waggle your Wiimote to break free. Continue hitting in this fashion until he changes up his attacks.
Phase 2
Once Ghirahim sustains enough damage, a cutscene shows him licking his lips and materializing his sword. From this point on, Ghirahim fights more seriously. Instead of heedlessly advancing toward Link he tries to keep his distance, often backing away, even jumping back to avoid Link's attacks.
Ghirahim launches most of his attacks from a distance. He conjures throwing knives arranged in a line and launches them at Link. A well-timed sword slash at the correct angle as well as a shield bash reflects the knives back at Ghirahim. Unfortunately, Ghirahim blocks these and sustains no damage. Simply raising the shield or dodging can protect Link from harm.

He also attacks by dashing at Link and sweeping with his sword, signaled by crouching for a moment with his sword at his side. Note which side he is holding his sword, as this tells which side he will attack from. If he is holding it to his right, he will attack Link from Link's left, and vice-versa. This is especially important in parrying and countering this attack. A dodge only succeeds if Link side-hops away from the direction of attack; a backflip will work as well. Sword slashes must be directed toward him in order to be effective (i.e. if he dashes to Link's right, swing to the right). A Spin Attack, however, should work from either side if timed well. After his attack misses or is halted, you get a chance for a counter-attack.
Blocking is another great option for dealing with Ghirahim's charge attack. Simply blocking with a shield protects Link from damage, though Ghirahim will be ready to dodge any attempted counter-attack. A shield bash knocks him off balance, leaving enough time for several sword hits.
Another tactic Ghirahim employs is to teleport directly in front of or behind Link with his sword raised, ready for an attack. If Link stands there too long Ghirahim will attack him. If Link hastily strike without regard to his sword, he may block the attack and immediately counter it. When he disappears, be prepared to look for the position of his sword, and make sure Link attacks his unguarded side.
At close range, he either dodges Link's attacks or raises his sword the same as when he teleports. Mind his sword or risk a block and counter-attack.
Fire Sanctuary Boss Strategy
Ghirahim appears again in the Fire Sanctuary, but this time, he is in a much more powerful state.
Phase 1

Ghirahim is a lot more fierce in this battle. He continues to summon projectiles, but he holds these close to himself in various arrangements. They can be shot at you, but they are generally defensive as they block your slashes. He continues to block your sword with his hand, but as opposed to last time, the projectiles hits you if you do not get your sword away quickly enough.
Phase 2

Once Ghirahim takes enough damage, he summons two swords that he uses. The battle continues similarly for the rest of the way. He uses his swords to make blocks that you must get around. He no longer grabs your sword as he no longer has a free hand. He does, however, have many vicious counters for if you accidentally hit his swords. These can be avoided by dodging out of the way or lifting your shield quickly. Either of these dodges leaves Ghirahim open to attack.
Ghirahim continues to use his teleportation, but in much more creative ways. He still teleports behind you, but he can also teleport above you. If he jumps upwards and disappears, begin to sprint in any direction. He comes down to your previous location, and his swords get stuck in the ground, leaving him open for attack.
Sealed Grounds Boss Strategy
Ghirahim appears as a boss yet again in the Sealed Grounds. He summons a horde of monsters to keep Link from approaching him, but this of course fails. Link approaches Ghirahim, and Ghirahim reveals his true form.
Phase 1


Ghirahim lifts himself and Link up on a platform that he created himself. Ghirahim carries no sword in this phase, so he uses physical attacks like punches and kicks. Since Ghirahim's metallic skin is invulnerable, he needs to be driven off the platform to another one by various attacks. As soon as Ghirahim falls down to another level, you need to deliver a fatal blow on to the weak point on his chest. Once Ghirahim gets up, he has a purple aura around his hands. If you touch the purple aura, Ghirahim catches your blade and flips you over him, close to the edge. You need to drive him off the platform twice more to finish this phase. Note that each time he is driven off the platforms, the stage becomes slightly bigger.
Phase 2

After exposing his weak point (the red gem in his chest), Ghirahim summons his black saber again. However, this fight is very different from the previous battles. Ghirahim holds out his sword, allowing him to block attacks with ease and he can hit you from further away. He begins to attack if you get too close (making it harder to attack his weak point). Instead of conjuring and shooting knives, he attacks with Sword Beams if you are at a distance. These can be deflected with the shield, or returned with a sword slash in the same direction. He sends these horizontally or vertically, and you can stun him by returning these. Be careful, as he can still reflect the sword beams you return to him. Once he is stunned, run up to him and stab his chest.

Another way to defeat him is to go sword-to-sword with him: shield bash his attacks and stab at his chest to deal damage. He takes around five stabs to defeat, but it takes much longer than it seems since he puts his guard back up every time he takes a hit. You can defeat him very quickly if you charge up a Skyward Strike, and stab at his chest after shield-bashing his attack. Provided you do this at a distance, the Skyward Strike stuns him long enough to deal two or three hits. Repeat until he is down.
Phase 3


For the final phase, Ghirahim summons a giant sword. You will have to completely change your strategy; he stops using sword beams, and shield-bashes only block his attack (they do not stun him). He occasionally slashes at you with the sword, knocking off a heart if he hits. Do not be fooled by the size of the sword: he attacks surprisingly quickly, and it has a very long reach.
To defeat Ghirahim for good, you have to break his sword and stab at his chest again. Slashing at Ghirahim forces him to block your attacks with his sword, but the Master Sword damages Ghirahim's blade. You have a limited time to hack away at his sword and break it completely, before Ghirahim retreats. Throughout the battle, Ghirahim constantly repairs his sword and switches his defensive stance when you have hit the blade three times, which may cause you to stagger. Be careful when you get knocked back, as Ghirahim immediately attempts to attack. The easiest way to defeat this form is to take about a second pause between each swing at his blade, he holds it up for a while.
Non-Canon Appearances
Super Smash Bros. for Nintendo 3DS and Wii U
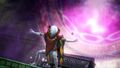
Ghirahim makes an appearance in Super Smash Bros. for Nintendo 3DS and Wii U as an Assist Trophy. When summoned by a player, he will attack other players with his sword. He can also use teleportation.
Hyrule Warriors

"A polite manner belies the brutality of this magical swordsman—brutality that you'll appreciate when it helps you win a battle!"
Ghirahim appears in Hyrule Warriors as an antagonist and as a playable character.
Gallery
Ghirahim
Ghirahim's initial form
Ghirahim's second form

Ghirahim's final form

Key art for Hyrule Warriors
With the Demon Blade in Hyrule Warriors
Ghirahim in Hyrule Warriors
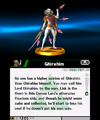
Trophy from Super Smash Bros. for Nintendo 3DS
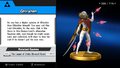
Trophy from Super Smash Bros. for Wii U


