- Chapter 1 – The Beginning
- Chapter 2 – The Forest Realm
- Chapter 3 – Tower of Spirits 2
- Chapter 4 – The Snow Realm
- Chapter 5 – Tower of Spirits 3
- Chapter 6 – The Ocean Realm
- Chapter 7 – Tower of Spirits 4
- Chapter 8 – The Fire Realm
- Chapter 9 – Tower of Spirits 5
- Chapter 10 – The Sand Realm
- Chapter 11 – Tower of Spirits 6
- Chapter 12 – The Dark Realm
12.1 The Dark Realm
Leave the Tower of Spirits towards the Forest Realm. Trace a path all the way in the direction of Aboda Village. Travel to the west and into the new area that is made available by the Spirit Tracks. Travel west and enter the Dark Realm!


There are a ton of armored trains covering the tracks here. These trains move faster than the normal enemy trains and will even go in reverse. Additionally, there are Tears of Light scattered around. Once Link acquires a Tear of Light his train will have a gold glow to it. While it is glowing, pull on the train whistle and you can move at a much faster speed! The Spirit Train will be so fast and powerful that you can ram right through the armored trains!


The Tears of Light will reappear even after Link gets them. The goal is not to collect all the Tears of Light but, rather, to destroy all six of the armored trains. The corner sides of the map with those weird looking symbols act as warp portal, and they will take you to another warp portal that is on the same line as this portal.
The hardest part of the map is easily the top-right corner, where there are two armored trains and just one tear of light. Utilize the warp portals and defeat all six of the armored trains.
12.2 The Demon Train
Afterwards, you’ll be riding around and four tracks will appear next to one another. After a short scene, the scary looking Demon Train will appear!
The battle takes place on four rails and the Demon Train will move back and forth amongst the rails. At times the Demon Train will move right in your way, at which you’ll need to slam on the breaks and hit reverse so that the Demon Train doesn’t hit you. You can even switch tracks when there are forks in the road. Never stay directly behind the train as you’ll get trapped in and likely take some damage.


The first phase deals with the back cart of the Demon Train. Ride along the tracks and occasionally parts of the back cart will open up with explosive barrels. Use the cannon to explode this barrel while it is still inside the compartment. There are five sections that have these barrels. Explode all four of them and the back cart of the Demon Train will fall off from the rest of the train. You’ll then be sent through a portal, starting the path all over again.
Now the Demon Train only has one cart. This part of the battle is similar to the previous one, but instead of explosive barrels, the Demon Train is equipped with laser cannons! These cannons take two hits to defeat but there are only four of them. Avoid the Demon Train when it changes tracks and avoid the laser cannons. Once all four of the laser cannons are done away with, you’ll be sent through a second portal.


The third and final phase of the Demon Train leaves the train with only the front part of it. In this phase the Demon Train fires rotating lasers from the side of the train. It shoots out multiple layers at once, so it can be quite intimidating. Continue riding alongside the Demon Train and blast away at the crystals that are shooting the lasers. Since the crystals are rotating, you can hit them all from one of the sides of the train. Once you’ve hit all the crystals the Train will be stunned for a moment and will slow down drastically. Speed up your train to get in front of the Demon Train. Then unload your cannon into the face of the Demon Train. Repeat this same process until the Demon Train has been defeated!


12.3 Cole and Possessed Zelda
We are now back inside of the Spirits’ Train and Anjean is giving a pep-talk to Link and Zelda. Anjean volunteers to help, but then Byrne offers to help instead. Princess Zelda says that it is “Just Cole and Malladus” and that her and Link should be able to take care of it themselves. Anjean will create a phantom for Princess Zelda.


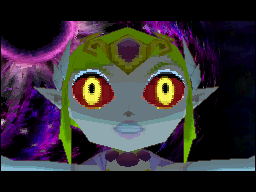
Phantom Zelda and Link will crawl up onto the Demon Train and confront Cole. After some small talk, the Demon Train starts to move once more, and Malladus is finally resurrected within the body of Princess Zelda!


The goal is to march the phantom all the way to Puppet Zelda at the north end of the train. As you walk towards Puppet Zelda though, Cole will set off various traps to stop you. For one of these traps Cole will summon magical rats that surround the phantom. You must slash all the rats before they can reach the phantom. If they do, Cole will then be able to control the phantom with some magical strings. Pull out the boomerang and trace a path so that you can cut these strings. Just keep pressing on with the phantom and keep Link behind the phantom to protect from the lasers that Puppet Zelda shoots out. Keep slashing away at the magical rats that Cole sends out towards you.


Once you have finally reached Puppet Zelda trace a path so that the Phantom picks up Puppet Zelda. Walk to the very edge of the train and pull out the bow and arrow. Shoot a Light Arrow into Puppet Zelda to finish off the boss and defeat Malladus!


12.4 Malladus, Demon King
This will trigger a short scene where Puppet Zelda is struggling within a ball of light. The Demon Train comes crashing to a halt and next we see we are back on a land area. The Light Arrow will have separated Malladus from the body of Princess Zelda and the princess will immediately float and try to reclaim her body. Malladus will make a last ditch effort to reclaim the body of Princess Zelda but is stopped, thanks to a beam of energy sent out by Byrne.


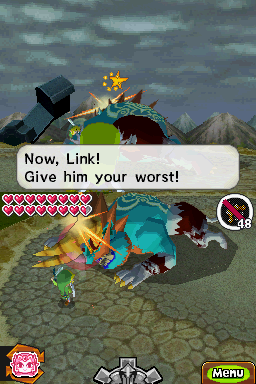
After summoning the power of the Spirits, the Princess makes a triumphant return to her body…and gives Link a hug. In the meantime, Malladus uses its power and seemingly destroys Byrne, banishing him into thin air. Malladus then gobbles up Cole and turns into a massive warthog!


The first phase of the battle involves protecting Princess Zelda from the fireballs. Malladus will shoot out numerous large fireballs at Zelda. The first few will be direct shots that are easy to deflect, but then he’ll start shooting fireballs that trail off to the side and come around from the right or left to hit Zelda. Be ready to move around and hit the fireballs before they hit Zelda. It’s a good idea to swing a bit earlier to get the timing down perfectly.


As the fireballs become a bit more elaborately planned they are much harder to avoid. Malladus will jump to the left and the right, shooting multiple fireballs out at once. Using the spin attack works well when there are more than one fireball coming at you. At one point Malladus will shoot four fireballs at once! If you have the great spin attack, this is precisely the time to use it. If not, stand as close to Zelda as possible, and if you perfectly time a spin attack you can deflect all four fireballs. This can be quite frustrating and will likely take a lot of trial and error to get the timing down perfectly.


Once Princess Zelda has fully charged up her power, she says she needs to combine her sacred power with the power of the Spirit Flute. Princess Zelda will then teach Link a very challenging song on the Spirit Flute that goes, Orange, Purple, Yellow, Turquoise, and Orange. There are two jumps between notes in this one, so it can be really challenging to learn. Upon successfully playing it, Link and Zelda will be joined by all five of the music playing Lokomos that we have met earlier in the game. Playing the song reveals a shining weak spot on the back of Malladus!


Link now needs to distract Malladus so that its back is facing Princess Zelda. Princess Zelda will take control of the Bow of Light. Run around the room with Link and slash at the legs of Malladus. The top screen will show the over the shoulder view of Princess Zelda. Keep using Link to run around Malladus until you have a clear shot of the weak spot of Malladus. When the cursor on Malladus turns yellow, tap the arrow at the bottom of the screen to deliver a light arrow shot. Repeat this process until you’ve hit Malladus three times, sending it falling to the floor. Run over and slash at the gem that is on its forehead. Attack it enough times and part of its horn will fall off.


Malladus is a bit more aggressive once it awakens and will even shoot fireballs out towards Link again. However, much of this time around is exactly like last time. Distract Malladus and then deliver a light arrow when the cursor turns yellow for Zelda. After Malladus is stunned a second time, sword slashes will cut off his second horn. Repeat this for a third and final time.
Once Malladus falls to the ground again, run over and jam your sword into the gem on its forehead. Quickly rub the stylus back and forth and Princess Zelda will run on over. They will deliver the final blow together to Malladus.


Congratulations on completing the Legend of Zelda Spirit Tracks. Sit back, grab some popcorn, and enjoy the last scene and the glorious credits artwork.


- Chapter 1 – The Beginning
- Chapter 2 – The Forest Realm
- Chapter 3 – Tower of Spirits 2
- Chapter 4 – The Snow Realm
- Chapter 5 – Tower of Spirits 3
- Chapter 6 – The Ocean Realm
- Chapter 7 – Tower of Spirits 4
- Chapter 8 – The Fire Realm
- Chapter 9 – Tower of Spirits 5
- Chapter 10 – The Sand Realm
- Chapter 11 – Tower of Spirits 6
- Chapter 12 – The Dark Realm
