Majora's Mask Stray Fairies: Difference between revisions
| (3 intermediate revisions by 2 users not shown) | |||
| Line 3: | Line 3: | ||
==Nintendo 3DS Version== | ==Nintendo 3DS Version== | ||
===Woodfall Temple=== | ===Woodfall Temple=== | ||
<gallery widths="300" heights="180"> | |||
<gallery widths=" | |||
File:Woodfall-Temple-Stray-Fairy-01.png|Stray Fairy #1 - In the first room of the Temple, located straight ahead. | File:Woodfall-Temple-Stray-Fairy-01.png|Stray Fairy #1 - In the first room of the Temple, located straight ahead. | ||
File:Woodfall-Temple-Stray-Fairy-02.png|Stray Fairy #2 - In the first room of the Temple, in a treasure chest just to the right. | File:Woodfall-Temple-Stray-Fairy-02.png|Stray Fairy #2 - In the first room of the Temple, in a treasure chest just to the right. | ||
| Line 23: | Line 22: | ||
===Snowhead Temple=== | ===Snowhead Temple=== | ||
<gallery widths=" | <gallery widths="300" heights="180"> | ||
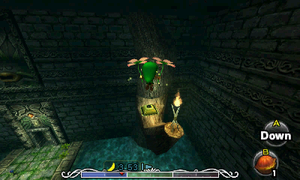
File:Snowhead-Temple-Stray-Fairy-01.png|Stray Fairy #1 - In the Freezard room where you need to roll across the gap as Goron Link. It is located just below inside the pillar. | File:Snowhead-Temple-Stray-Fairy-01.png|Stray Fairy #1 - In the Freezard room where you need to roll across the gap as Goron Link. It is located just below inside the pillar. | ||
File:Snowhead-Temple-Stray-Fairy-02.png|Stray Fairy #2 - In the Freezard room along the eastern wall. You can shoot it with an arrow or reach it by walking by the ledge. | File:Snowhead-Temple-Stray-Fairy-02.png|Stray Fairy #2 - In the Freezard room along the eastern wall. You can shoot it with an arrow or reach it by walking by the ledge. | ||
| Line 41: | Line 40: | ||
===Great Bay Temple=== | ===Great Bay Temple=== | ||
<gallery widths=" | <gallery widths="300" heights="180"> | ||
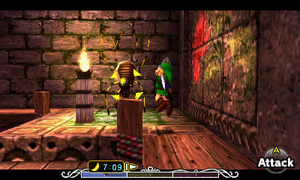
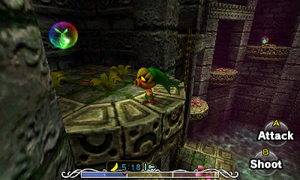
File:Great-Bay-Temple-Stray-Fairy-01.png|Stray Fairy #1 - In the first room of the dungeon. Light the three four torches. | File:Great-Bay-Temple-Stray-Fairy-01.png|Stray Fairy #1 - In the first room of the dungeon. Light the three four torches. | ||
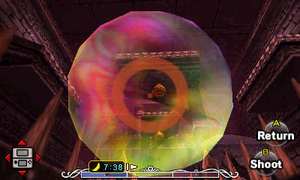
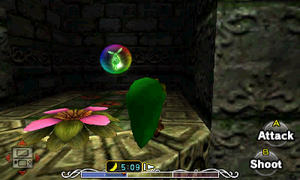
File:Great-Bay-Temple-Stray-Fairy-02.png|Stray Fairy #2 - In the second room of the dungeon. Underneath the platform right when you enter the room. | File:Great-Bay-Temple-Stray-Fairy-02.png|Stray Fairy #2 - In the second room of the dungeon. Underneath the platform right when you enter the room. | ||
| Line 61: | Line 60: | ||
===Stone Tower Temple=== | ===Stone Tower Temple=== | ||
<gallery widths=" | <gallery widths="300" heights="180"> | ||
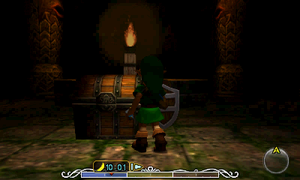
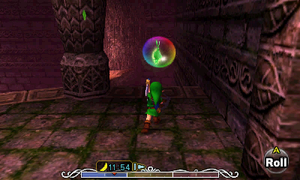
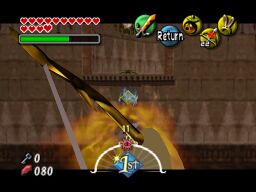
File:Stone-Tower-Stray-Fairy-01.png|Stray Fairy #1 - Shoot the eye switch in the entrance room. | File:Stone-Tower-Stray-Fairy-01.png|Stray Fairy #1 - Shoot the eye switch in the entrance room. | ||
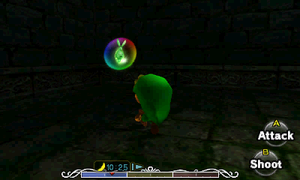
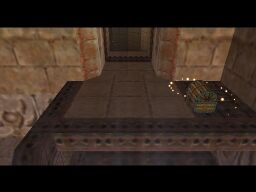
File:Stone-Tower-Stray-Fairy-02.png|Stray Fairy #2 - In the room with the 6-Armos and the Dungeon Map. Look at the ceiling and hookshot up to the target. | File:Stone-Tower-Stray-Fairy-02.png|Stray Fairy #2 - In the room with the 6-Armos and the Dungeon Map. Look at the ceiling and hookshot up to the target. | ||
| Line 74: | Line 73: | ||
File:Stone-Tower-Stray-Fairy-09a.png|Stray Fairy #9a - In the large, multiple-floor room, shoot the eye with a fire arrow to trigger the switch. | File:Stone-Tower-Stray-Fairy-09a.png|Stray Fairy #9a - In the large, multiple-floor room, shoot the eye with a fire arrow to trigger the switch. | ||
File:Stone-Tower-Stray-Fairy-09b.png|Stray Fairy #9b - Ride the air geyser towards the treasure chest. You can also hookshot to the treasure chest. | File:Stone-Tower-Stray-Fairy-09b.png|Stray Fairy #9b - Ride the air geyser towards the treasure chest. You can also hookshot to the treasure chest. | ||
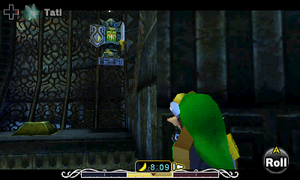
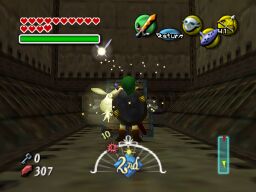
File:Stone-Tower-Stray-Fairy-10.png|Stray Fairy #10 - In the large, multiple-floor room, play the [[Elegy of Emptiness]] on a floor switch to | File:Stone-Tower-Stray-Fairy-10.png|Stray Fairy #10 - In the large, multiple-floor room; before inverting the temple, first step on the floor switch behind three mines to make the treasure chest appear. Then play the [[Elegy of Emptiness]] on a different floor switch in the inverted temple to remove the fire barrier. | ||
File:Stone-Tower-Stray-Fairy-11.png|Stray Fairy #11 - Defeat [[Wizzrobe]]. | File:Stone-Tower-Stray-Fairy-11.png|Stray Fairy #11 - Defeat [[Wizzrobe]]. | ||
File:Stone-Tower-Stray-Fairy-12.png|Stray Fairy #12 - Back in the entrance room, step on the floor switch next to the [[Death Armos]]. The fairy is then acquired when the temple is returned to normal. | File:Stone-Tower-Stray-Fairy-12.png|Stray Fairy #12 - Back in the entrance room, step on the floor switch next to the [[Death Armos]]. The fairy is then acquired when the temple is returned to normal. | ||
| Line 88: | Line 87: | ||
[[File:N64-Woodfall-Temple-F2.png|600px]]{{Clear}} | [[File:N64-Woodfall-Temple-F2.png|600px]]{{Clear}} | ||
<gallery widths=" | <gallery widths="256" heights="192"> | ||
File:WF+01.jpg|1. As soon as you enter, use the Great Fairy Mask if you have it. | File:WF+01.jpg|1. As soon as you enter, use the Great Fairy Mask if you have it. | ||
File:WF+02.jpg|2. Open the chest on the second platform. | File:WF+02.jpg|2. Open the chest on the second platform. | ||
| Line 110: | Line 109: | ||
===Snowhead Temple=== | ===Snowhead Temple=== | ||
[[File:SnowheadTempleFairyFinder.png|400px]] | [[File:SnowheadTempleFairyFinder.png|400px]] | ||
<gallery widths=" | <gallery widths="256" heights="192"> | ||
File:SH_01.jpg|1. This one is trapped in a bubble within the pillar holding up the second half of the bridge. It's easier to see from down below. | File:SH_01.jpg|1. This one is trapped in a bubble within the pillar holding up the second half of the bridge. It's easier to see from down below. | ||
File:SH_02.jpg|2. The second Stray Fairy is in a bubble under the ledge leading to the stairs on the far side of the room. Shoot it and use the Great Fairy Mask. | File:SH_02.jpg|2. The second Stray Fairy is in a bubble under the ledge leading to the stairs on the far side of the room. Shoot it and use the Great Fairy Mask. | ||
| Line 129: | Line 128: | ||
===Great Bay Temple=== | ===Great Bay Temple=== | ||
<gallery widths=" | <gallery widths="256" heights="192"> | ||
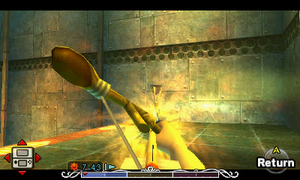
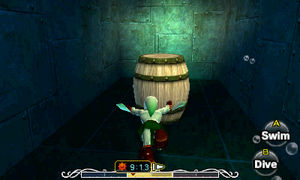
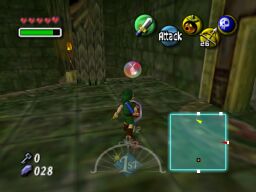
File:GB_01.jpg|1. There are four unlit torches near the first door. Either shoot them all with Fire Arrows or run along them with a Deku Stick (there's some in the barrels nearby). If you light all of them in time, a chest appears. | File:GB_01.jpg|1. There are four unlit torches near the first door. Either shoot them all with Fire Arrows or run along them with a Deku Stick (there's some in the barrels nearby). If you light all of them in time, a chest appears. | ||
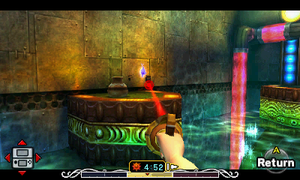
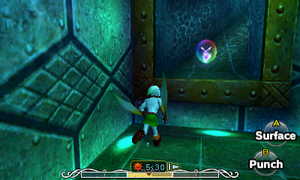
File:GB_02.jpg|2. The next one is trapped in a bubble underneath the platform you enter this room from. Sink down with the Zora Mask and grab it. | File:GB_02.jpg|2. The next one is trapped in a bubble underneath the platform you enter this room from. Sink down with the Zora Mask and grab it. | ||
| Line 148: | Line 147: | ||
===Stone Tower Temple=== | ===Stone Tower Temple=== | ||
<gallery widths=" | <gallery widths="256" heights="192"> | ||
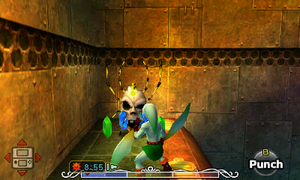
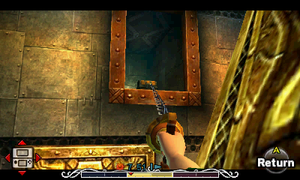
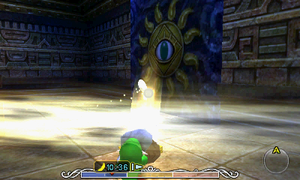
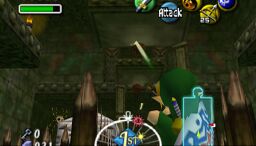
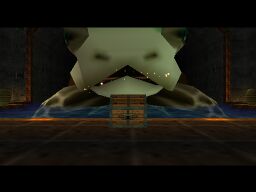
File:ST_01.jpg|1. To get the first Stray Fairy, shoot the golden eye switch in one of the eyes in the giant figure straight ahead. Jump to the chest that appears using the Bunny Hood or Zora Mask. Open the chest. If you don't have that mask, you can get it later when you come through that door. | File:ST_01.jpg|1. To get the first Stray Fairy, shoot the golden eye switch in one of the eyes in the giant figure straight ahead. Jump to the chest that appears using the Bunny Hood or Zora Mask. Open the chest. If you don't have that mask, you can get it later when you come through that door. | ||
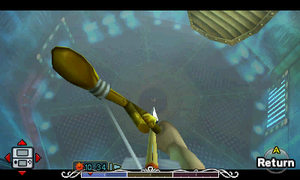
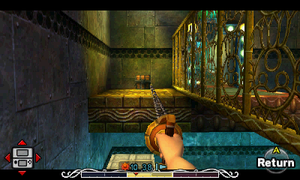
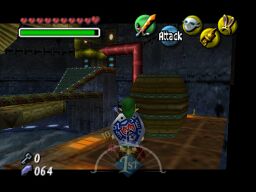
File:ST_02.jpg|2. There's a target on the ceiling that allows you to get onto a small, hard to see ledge. Find it and get up there. Open the chest. | File:ST_02.jpg|2. There's a target on the ceiling that allows you to get onto a small, hard to see ledge. Find it and get up there. Open the chest. | ||
| Line 169: | Line 168: | ||
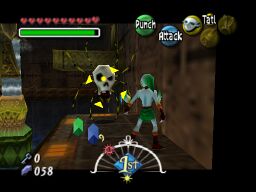
File:ST_15b.jpg|15. Go to the room with all the mirrors and Black Boes we had to tackle earlier. Follow this whole chain of rooms until you get to the room with the skinny bridge and the Hiploop. Fall to the bottom and open the chest we created earlier. | File:ST_15b.jpg|15. Go to the room with all the mirrors and Black Boes we had to tackle earlier. Follow this whole chain of rooms until you get to the room with the skinny bridge and the Hiploop. Fall to the bottom and open the chest we created earlier. | ||
</gallery> | </gallery> | ||
<noinclude>{{cat|Majora's Mask}}</noinclude> | <noinclude>{{cat|Majora's Mask}} | ||
{{cat|Guides}}</noinclude> | |||
Latest revision as of 13:38, June 15, 2023
We have all the Stray Fairies for the Nintendo 3DS and the Nintendo 64 versions below. There are some slight differences but each version has screenshots and descriptions for all of the stray fairies found in the game.
Nintendo 3DS Version
Woodfall Temple
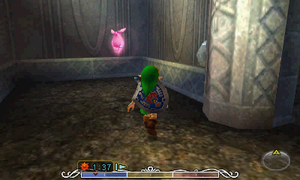
Stray Fairy #1 - In the first room of the Temple, located straight ahead.
Stray Fairy #2 - In the first room of the Temple, in a treasure chest just to the right.
Stray Fairy #3 - In the large central room, defeat the Deku Baba to get the fairy.
Stray Fairy #4 - At the southeast corner of the large central room. The stray fairy is inside one of the pots.
Stray Fairy #5 - In the room where you must push the central block, defeat the skulltula at the northwest part of the room.
Stray Fairy #6 - In the room where you must push the central block, shoot the beehive with a Bubble Blast attack.
Stray Fairy #7 - In the dark room with a bunch of Black Boes and a few unlit torches. Defeat all the Boes to get the fairy.
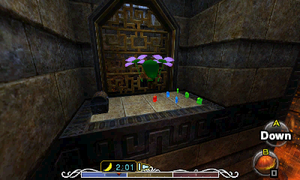
Stray Fairy #8 - In the 2nd Floor room where you have to fly to platforms using Deku Link. It is on the lower level at the northeast corner.
Stray Fairy #10 - On the 2nd Floor of the central chamber, the fairy is just on the north side of the room.
Stray Fairy #11 - On the 2nd Floor of the central chamber, float over to the switch at the northwest corner of the room, causing a chest to appear containing the fairy.
Stray Fairy #12 - In the last room before the boss, it is in an alcove at the southeast part of the room.
Stray Fairy #13 - In the last room before the boss, it is in an alcove at the southeast part of the room, just above the previous fairy.
Stray Fairy #14 - In the last room before the boss, it is in an alcove at the southwest part of the room.
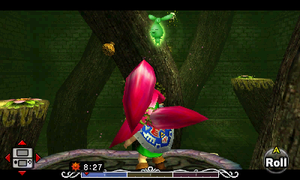
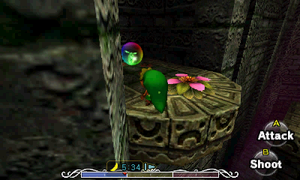
Stray Fairy #15 - In the last room before the boss, it is right in the center of the room, above a flame. Shoot it with an arrow.


Snowhead Temple
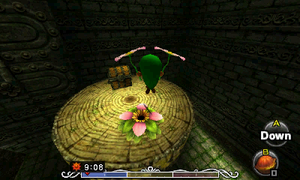
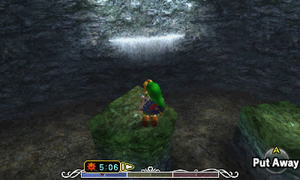
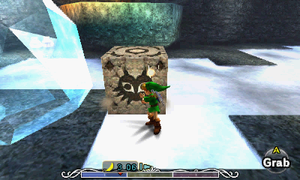
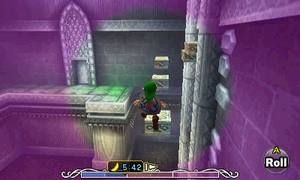
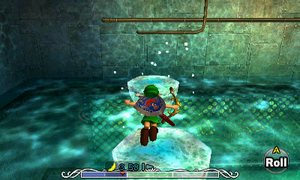
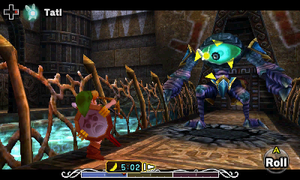
Stray Fairy #1 - In the Freezard room where you need to roll across the gap as Goron Link. It is located just below inside the pillar.
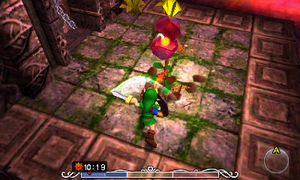
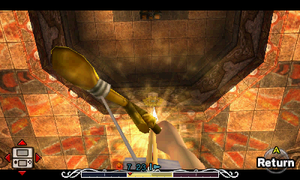
Stray Fairy #2 - In the Freezard room along the eastern wall. You can shoot it with an arrow or reach it by walking by the ledge.
Stray Fairy #3 - In the Elevator room with the eye switch that is covered in ice. It is floating near the northwest corner of the room.
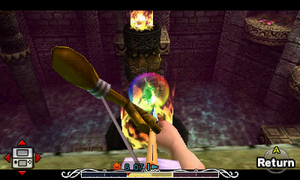
Stray Fairy #4 - In the room with icicles along that must be shot down with arrows. Use the Lens of Truth to find a fake wall.
Stray Fairy #5 - Use the Lens of Truth to look at the ceiling while in the room with the floor switches that must be Goron Pounded on with Goron Link.
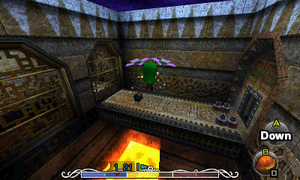
Stray Fairy #6 - Step on the large switch on the basement floor, using Goron Link. A treasure chest will appear containing the fairy.
Stray Fairy #7 - In the room that can be accessed via either of the two green doors from the main chamber. Defeat all three freezards.
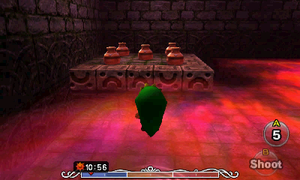
Stray Fairy #8 - In the room with Wolfos and several large Frozen Ice Blocks. There is a crate that can be blown up with a bomb that holds the fairy.
Stray Fairy #9 - In the Frozen Ice Block room, push the block to reach a treasure chest on the higher ledge containing the fairy.
Stray Fairy #10 - From the Ice Block room, go through the door on the higher ledge. You will have needed to push the double layered blocks in place in this room to reach the other side.
Stray Fairy #11 - In the Elevator room with the frozen eye switch, use the Lens of Truth to find invisible stairs that lead to a treasure chest.
Stray Fairy #12 - In the room with the multiple Eenos, use the Lens of Truth to find the fairy.
Stray Fairy #13 and #14 - Defeat the two Dinolfos.
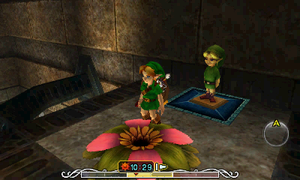
Stray Fairy #15 - In a hidden alcove at the northwest part of the room in the main chamber. Use the bunny hood and jump off the ledge to land on the deku flower.


Great Bay Temple
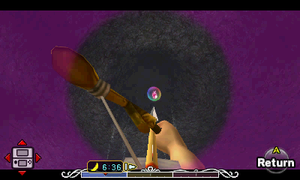
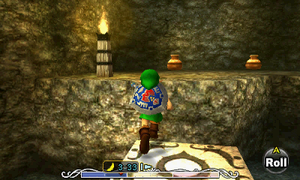
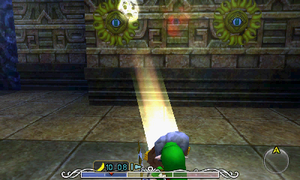
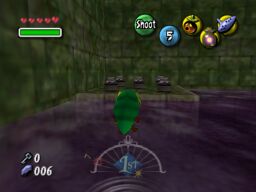
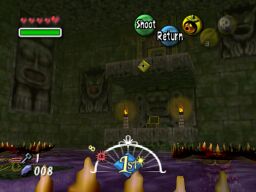
Stray Fairy #1 - In the first room of the dungeon. Light the three four torches.

Stray Fairy #2 - In the second room of the dungeon. Underneath the platform right when you enter the room.
Stray Fairy #3 - In the second room there is a skulltula at the southwest corner of the room on the higher ledge. Defeat him to get the fairy.

Stray Fairy #4 - In the large central chamber with the spinning platforms. Break the barrel on the western wall to get the fairy.
Stray Fairy #5 - At the very bottom of the large central chamber there is a single pot. Hit it with an arrow to reveal the fairy.
Stray Fairy #6 - In the room where you get the Dungeon Map. Right across the gap there are two pots, one of which contains a stray fairy.
Stray Fairy #7 - In the narrow hallway room after getting the Dungeon Map, there are a number of Bio Deku Babas. Defeat them all to get the fairy.
Stray Fairy #9 - In the room just north of the central chamber. Create ice blocks leading to the northwest corner of the room.
Stray Fairy #9 - Then use the Hookshot on the target above to reach the higher level of this room where the stray fairy can be found.
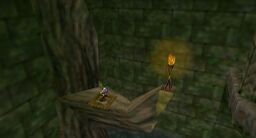
Stray Fairy #10 - In the waterwheel room at the northeast corner of the temple. Hookshot to the torch that is at the southeast corner of the room to find the fairy.
Stray Fairy #11 - In the same room as the previous fairy. After freezing the water in the waterwheel room, face the northern wall and you'll find a chest in the alcove.
Stray Fairy #12 - In the room with the multiple see-saws. Once you enter the room, swim underwater near the nearest see-saw. Swim into the barrel to find the stray fairy.
Stray Fairy #13 - In the see-saw room, after turning the green lever, allowing water to flow through the pipe, walk across the green pipe at the southeast part of the room. Drop down and hookshot to the treasure chest.
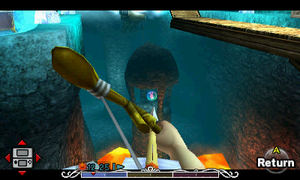
Stray Fairy #14 - In the room just before the boss room. Swim underwater to the northeast corner. Break the bubble using the Zora Fins and swim into the fairy to get it.

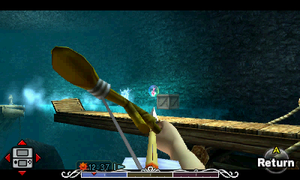
Stray Fairy #15 - In the room just before the boss room, the stray fairy is hidden underneath the central platform. Stand on the green pipe and face the platform to get the fairy.


Stone Tower Temple
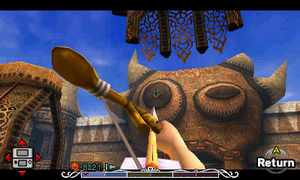
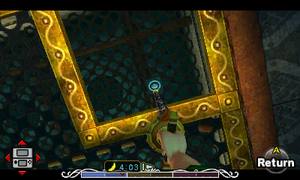
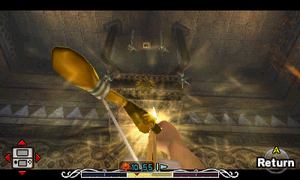
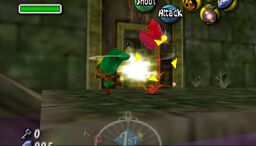
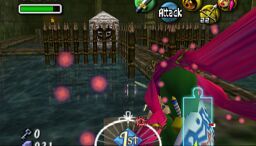
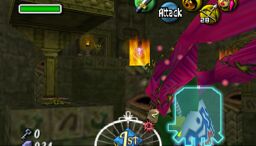
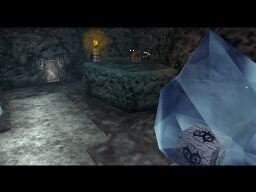
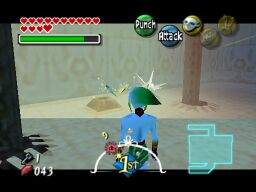
Stray Fairy #1 - Shoot the eye switch in the entrance room.
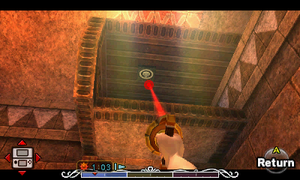
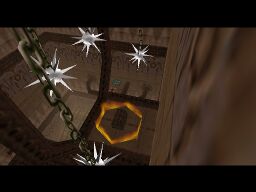
Stray Fairy #2 - In the room with the 6-Armos and the Dungeon Map. Look at the ceiling and hookshot up to the target.
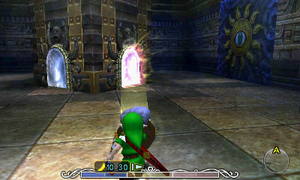
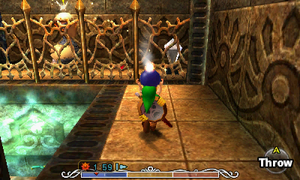
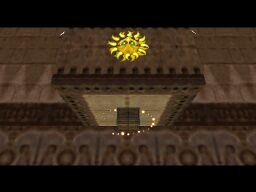
Stray Fairy #3 - Use the mirror shield to shine sunlight onto one of the suns, creating a treasure chest.
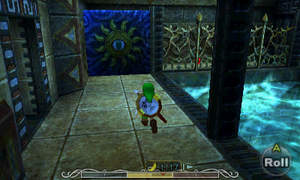
Stray Fairy #4a - In the same room as the above fairy, shine light onto one of the nearby mirrors.
Stray Fairy #4b - Then reflect light onto the sun block, opening a pathway to the treasure chest.
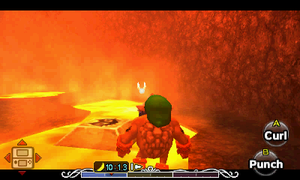
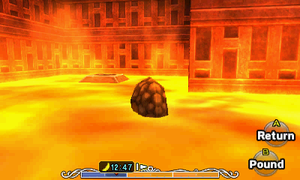
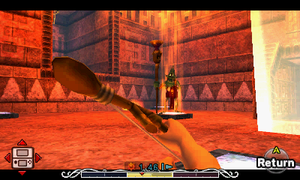
Stray Fairy #5 - In the room that is filled with lava, a treasure chest sits in the center near a bunch of rupees.
Stray Fairy #6a - Goron Pound the floor and then quickly roll through the room to step on the switch on the other side.
Stray Fairy #6b - Float over to the other side of the room using Deku Link to reach the treasure chest.
Stray Fairy #7 - Defeat the first Eyegore you come across.
Stray Fairy #8 - In the entrance room of the Inverted Stone Tower. Shoot the sun with a light arrow, creating a chest.

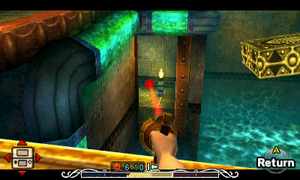
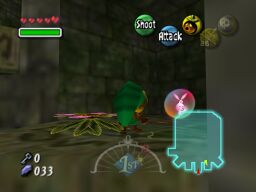
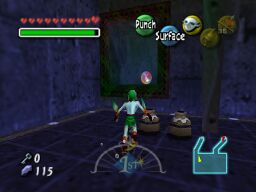
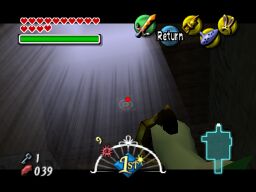
Stray Fairy #9a - In the large, multiple-floor room, shoot the eye with a fire arrow to trigger the switch.
Stray Fairy #9b - Ride the air geyser towards the treasure chest. You can also hookshot to the treasure chest.
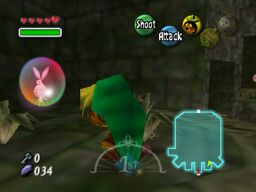
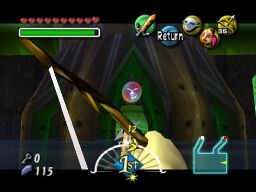
Stray Fairy #10 - In the large, multiple-floor room; before inverting the temple, first step on the floor switch behind three mines to make the treasure chest appear. Then play the Elegy of Emptiness on a different floor switch in the inverted temple to remove the fire barrier.
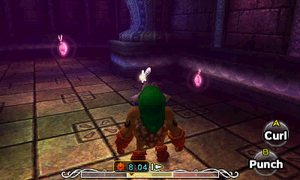
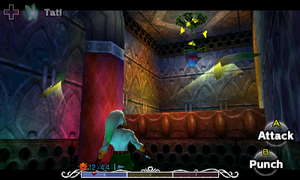
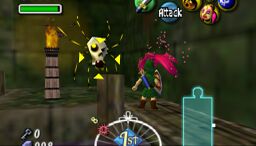
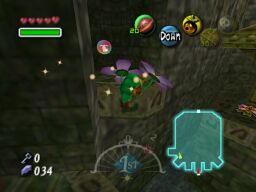
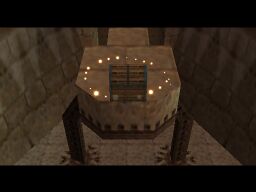
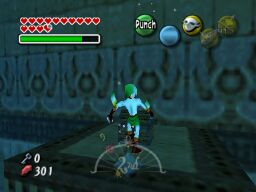
Stray Fairy #11 - Defeat Wizzrobe.
Stray Fairy #12 - Back in the entrance room, step on the floor switch next to the Death Armos. The fairy is then acquired when the temple is returned to normal.
Stray Fairy #13a - The first time through the dungeon in a room just north of the entrance. Hit the crystal switch with a bomb or a spin attack.
Stray Fairy #13b - After inverting, and then reverting the Temple, return to this room, now with Light Arrows. Shoot the sun block to reach the chest.
Stray Fairy #14 - When the Temple is Inverted, use a Light Arrow to shoot the sun in the multi-floor room. Revert the temple back to normal to find the treasure chest.
Stray Fairy #15 - In the room just before the Temple boss while the dungeon is inverted, hit the crystal switch. Revert the dungeon and return to Hiploop room to get the fairy.


Nintendo 64 Version
Woodfall Temple


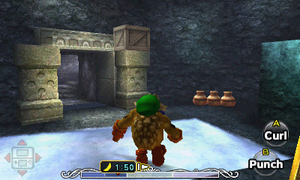
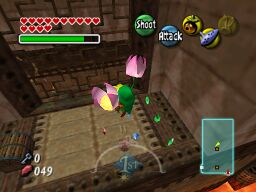
1. As soon as you enter, use the Great Fairy Mask if you have it.
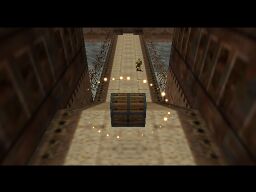
2. Open the chest on the second platform.
3. Kill the Deku Baba at the end of the wooden ramp.
4. There's a little island in the corner with several pots filled with goodies. In one of them is a Stray Fairy.
5. On the platform where the small key is, turn to your left to beehive against the wall. Hit it with a Bubble Blast or two to knock it down, then snag the Stray Fairy by spinning into it with the Deku Mask or use the Great Fairy Mask.
6. Kill the Skulltula.
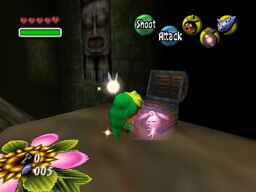
7. Kill all the Black Boes to make a chest appear.
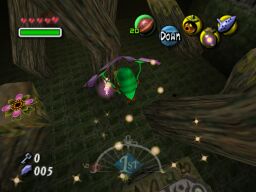
8. On the top level of the Main Room, there's a Stray Fairy just floating there, trapped in a bubble.
9. Next, put on the Deku Mask and use the flower here to get to the little platform in the northwest corner of the room with the unlit torch. Take off the Deku Mask and step on the switch. This will cause a chest to appear near the beginning, make your way over there and open it.
10. Shoot the beehive underneath a higher platform.
11. Trapped in a bubble underneath the walkway.
12. Trapped in a bubble in one of the cubbies on the right side.
13. Trapped in a bubble in one of the cubbies on the right side.
14. Trapped in a bubble in one of the cubbies on the left side.
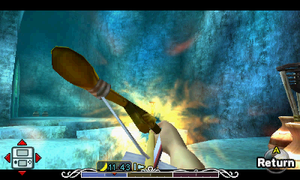
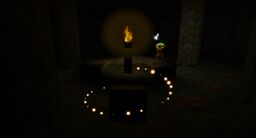
15. This one is floating on the left side of the room, in one of the pillars ahead of you. Shoot the bubble to release the last Stray Fairy, and use the Great Fairy Mask to reel it in.


Snowhead Temple

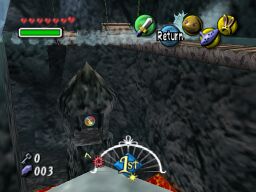
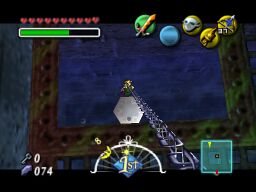
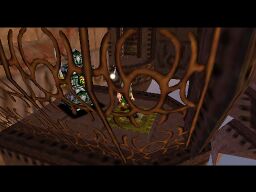
1. This one is trapped in a bubble within the pillar holding up the second half of the bridge. It's easier to see from down below.
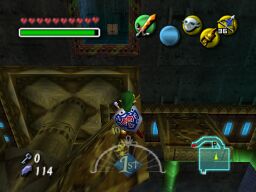
2. The second Stray Fairy is in a bubble under the ledge leading to the stairs on the far side of the room. Shoot it and use the Great Fairy Mask.
3. Climb onto the first three little pillars. Straight ahead, in the wall, you'll notice an icy patch that looks funny. Use the Lens of Truth if you like to see that it's a hidden cubby in the wall. Jump in and open the chest to snag your prize.
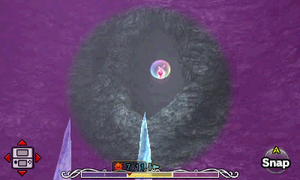
4. Kill the White Boes here and stand near the center of the snowy area below. Look up while wearing the Great Fairy Mask and using the Lens of Truth. Shoot the center of the dark area to pop a bubble.
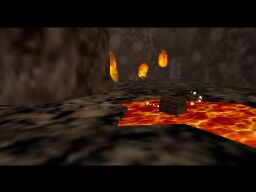
5. You'll find a large switch in the lava. Wear the Goron Mask and step on it to cause a chest to appear in another lava puddle. Snag it, then head back up the stairs.
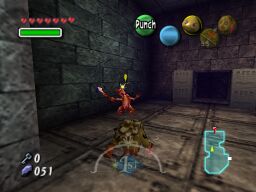
6. Kill the three Freezards in this room to make a chest appear.
7. In this room, right near the cracked wall we blew up earlier to reveal the stairs is a crate atop one of the pillars. Throw a Bomb at it to blow it up, then use the Great Fairy Mask to reel it in.
8. Right next to you is a frozen switch. Melt it, kill the White Wolfos, then step on the switch to make a chest appear on a ledge. Melt the nearby frozen block. Now, if you look at it from your MAP PERSPECTIVE, push the block UP, RIGHT, then DOWN. Jump onto the ledge and open the chest.
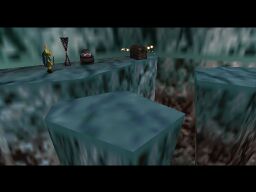
9. If you moved the "double blocks" in an earlier room into a little slot, there is another Stray Fairy you can get now. Push the block LEFT, UP, LEFT. Jump onto the second platform and enter the door. In this familiar room, if you placed the double blocks in the right place (where it fell into a slot), you can use them to jump to the other side. Open the chest when you get there to claim your prize.
10. As you come up the stairs, this one is directly on your right, just floating there.
11. In the upper level of this room, use your Lens of Truth to see tiny hidden platforms. Use them to reach a cubby above the stairs with a hidden chest containing another Stray Fairy.
12. In the south portion of this room are three blue stalactites in front of a little invisible cubby that's pretty obvious due to the snow hanging from its ledge. Use the Lens of Truth, Great Fairy Mask and Hero's Bow to pop the bubble hidden in the center.
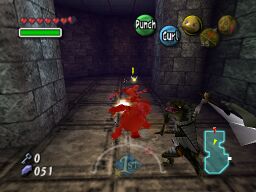
13. Kill the first Dinolfos.
14. Kill the second.
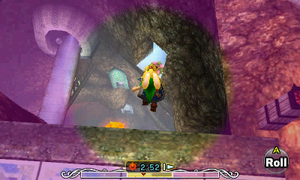
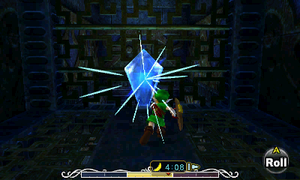
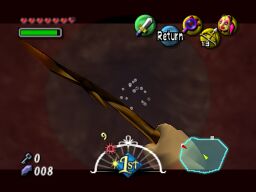
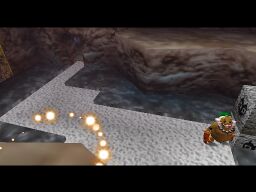
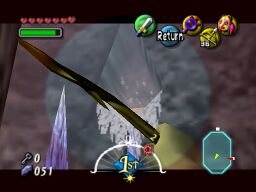
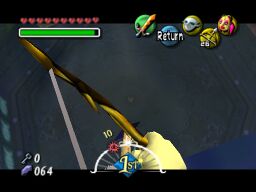
15. In the main room, there is a small hidden cubby that holds a chest containing the last Stray Fairy. You can see where it is by the patch of ice hanging off the ledge (or use your Lens of Truth). To get to it, you'll have to jump from a higher level. After knocking out the top two ice discs as Goron Link, take the mask off and run towards the edge of the pillar (as pictured) and roll to extend your jump down into the hidden room.


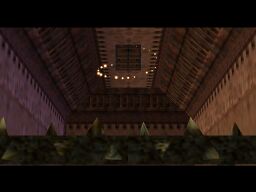
Great Bay Temple
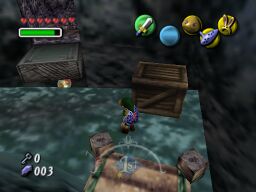
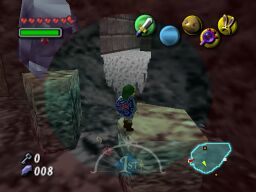
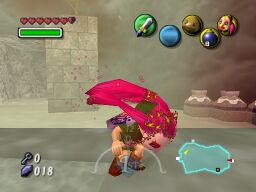
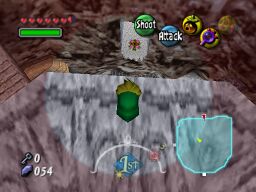
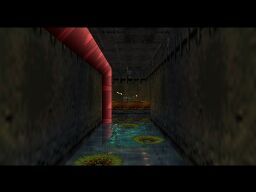
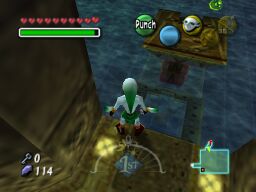
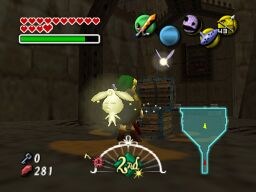
1. There are four unlit torches near the first door. Either shoot them all with Fire Arrows or run along them with a Deku Stick (there's some in the barrels nearby). If you light all of them in time, a chest appears.
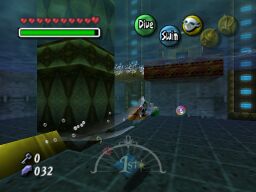
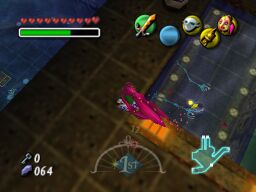
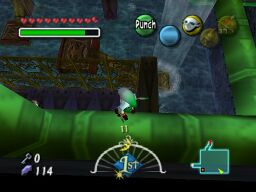
2. The next one is trapped in a bubble underneath the platform you enter this room from. Sink down with the Zora Mask and grab it.
3. There are two platforms rising up out of the water repeatedly. Take the right one (when facing the door) to come to a platform with Rupees and a Skulltula. Kill it to find the Stray Fairy.
4. On one side of the room, there's a barrel atop one of the small platforms with the ladders. Break it and snag the Stray Fairy.
5. There's a lone jar in the center of this room in the 'eye of the storm' of spinning water at the bottom. Stand on the side and shoot an arrow at it, then wear the Great Fairy Mask. Or, just sink down and hit it with your Zora Fins, then try to swim into it.
6. Kill all the Bio Deku Babas to make a chest appear on the small ledge. Use the lily pads to get there.
7. On the left side of the flowing water (when you're facing the door), there are two Dexihands attached to the wall. Between them is a jar. Break it and use the Great Fairy Mask or swim into it.
8. There's a small platform with two pots on it. Break the pots to find a Stray Fairy in one of them.
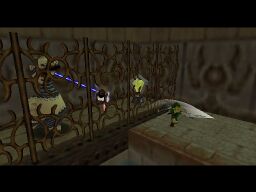
9. Get to the YELLOW platform and face the wall opposite the door. If you look up, you'll notice some metal grating separating you from a small area up there. In front (above) of you is a hole in the grating with a target nearby on the ceiling. Use your Ice Arrows to create platforms and get near the far wall, then turn around and Hookshot the target. It may take a couple of tries, but once you get up there, in the center you'll find a chest.

10. After you've used the elevator thing to go up, jumped onto the spinning waterwheel and are standing on the next moving platform, turn right and you'll notice a torch burning in a hole in the wall. Use your Hookshot on it to find a small space with a chest.
11. When you've frozen the waterwheel in this room, walk part way across the paddles, then turn right. When you get to the six blades (only two are accessible, pointing in either diagonal direction) climb onto the one on your right. Climb to the end of it. You'll notice that straight ahead is a small hole in the wall with a chest. Hookshot the chest and open it.
12. The first see-saw you come to when you enter the room, jump into the water on either side, sink down and break the barrel.
13. When standing on the GREEN platform with the switch, kill the Real Bombchu, then walk along the GREEN pipes. Put on the Zora Mask and climb your way right. Follow it and jump down into the small area when you can't go any further. Use your Hookshot on the chest and open it.
14. At the exit to this room, there is a Stray Fairy in a bubble in the opening. Use your charged up fins to break the bubble, then swim into it.
15. Directly underneath the GREEN platform is a Stray Fairy in a bubble. It's too high to get when you're in the water, so stand on the GREEN pipe right on the edge of the water and shoot it with an Arrow, then use the Great Fairy Mask.


Stone Tower Temple
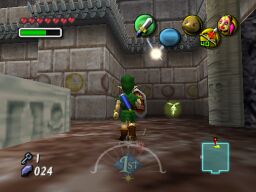
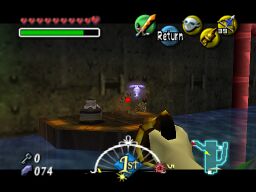
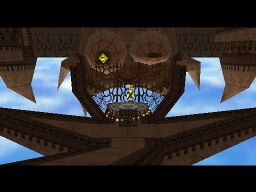
1. To get the first Stray Fairy, shoot the golden eye switch in one of the eyes in the giant figure straight ahead. Jump to the chest that appears using the Bunny Hood or Zora Mask. Open the chest. If you don't have that mask, you can get it later when you come through that door.
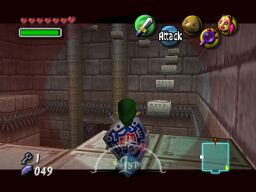
2. There's a target on the ceiling that allows you to get onto a small, hard to see ledge. Find it and get up there. Open the chest.
3.1. This is a two parter. Sink down to the bottom here and charge up your Zora Fins to make the mines blow up. Step on the switch to make a chest appear for later. Don't forget!
3.2. There's a small platform at the top of the room with a flame on it. If you stepped on a switch in this room (that was filled with water before) earlier, there's a chest here now. Go to the small platform on the right side of the room with a switch on it. Play the Elegy of Emptiness to keep it down, then fly up and claim your prize.
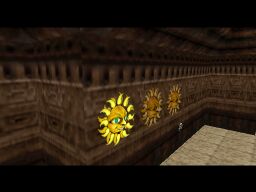
4. There are six Sun Faces on the wall near the light source. Use the far left one on the right side to make a chest appear.
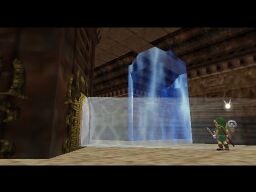
5. When standing in the light facing the pillar in the center of the room, charge up the mirror on the right. Now run over and use it to make the Sun Block on your right disappear. This will reveal a small area with a Nejiron and a chest.
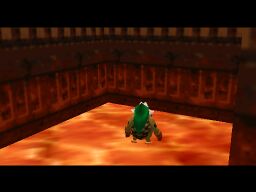
6. There is a chest on the other side that is surrounded by fire. Down below, there is a switch you can stop on as a Goron to put the fire out, but it's on fire as well. Use a Goron Stomp (A + B) on the Goron Switch on the first side, then run and roll to the other side and step on the switch before the fire returns. This will put out both flames. When you get to the other side later, open the chest.
7. As you just start flying around the "U" shape, right before you turn the corner, there's a platform on your left with lots of Rupees. Go there and open the chest.
8. Kill the Eyegore to make a chest appear.
9. Stand near the Majora's Mask emblem in the center of the room and turn around. Shoot a Light Arrow practically straight up into the Sun Face above you. Open the chest that appears next to you.
10. Right underneath the platform with the flower you start at, there's a Frozen Eye Switch. Jump down and shoot it with a Fire Arrow. This will make a chest appear on a nearby ledge. Use the middle air pump thing to get there.
11.1 At the edge of the platform mentioned above, there's a Sun Face that can be shot from below that will make a chest appear. It's right-side up though, so you'll need to come back for it later.
11.2 Go to the room with all the water. On top of the platform at the bottom, there's a chest for the Sun Face nearby that you shot earlier.
12. Open the chest after defeating Wizzrobe.
13.1. Step on the switch with the Death Armos to make a chest appear on the ceiling.
13.2. Head back to the entrance room and jump down into the pit deal and open the chest we created (that you need to Hookshot to, to get to the Boss room when the temple's upside-down).
14. Go back to the room with the water, the bridge and the hand enemy. Use it to throw you up onto the ledge. Use a Bomb or a Spin Attack to hit the crystal switch to make a chest appear in the other area. Go to the other side by either going back through the various rooms, using a dolphin jump with the Zora Mask to get back on the ledge, or play the Song of Soaring to get back to the start of the temple and go through the two doors on your left. The last way gets my vote for the best. Use a Light Arrow to remove the Sun Block. Kill the Beamos using a Bomb and open the chest.
15. Hit the crystal switch while the temple is upside-down.
15. Go to the room with all the mirrors and Black Boes we had to tackle earlier. Follow this whole chain of rooms until you get to the room with the skinny bridge and the Hiploop. Fall to the bottom and open the chest we created earlier.


