Dancing Dragon Dungeon: Difference between revisions
Jump to navigation
Jump to search
Want an adless experience? Log in or Create an account.
FierceDeku (talk | contribs) No edit summary |
No edit summary |
||
| Line 30: | Line 30: | ||
*[[Zol]] | *[[Zol]] | ||
==Gallery== | |||
<gallery> | |||
File:Dancing-Dragon-Dungeon-Map.png|Map of the Dancing Dragon Dungeon | |||
</gallery> | |||
{{Cat|Oracle of Seasons Dungeons}} | {{Cat|Oracle of Seasons Dungeons}} | ||
{{Cat|Oracle of Seasons Locations}} | {{Cat|Oracle of Seasons Locations}} | ||
Revision as of 01:00, December 28, 2013
| This article is a stub. You can help the Zelda Dungeon Wiki by expanding it. |
Dancing Dragon Dungeon

Games | ||
Location | ||
Boss | ||
Mini-bosses | ||
Items | ||
Rewards | ||
| Guides | ||
|---|---|---|
Walkthrough | ||
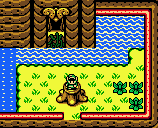
The Dancing Dragon Dungeon is the fourth dungeon featured in Oracle of Seasons. It is only accessible after Link has used the Dragon Key to make the waterfall disappear. Link can enter the dungeon once he has used the Rod of Seasons to change the season to summer, allowing him to climb the vines in front of the dungeon's entrance. The dungeon is found on Mt. Cucco, a mountain in the northeast section of Holodrum.
Enemies
- Anti-Fairy
- Beamos
- Blade Trap
- Gel
- Keese
- Like Like
- Shrouded Stalfos
- Spark
- Spiked Beetle
- Stalfos
- Water Tektite
- Wizzrobe
- Zol
Gallery
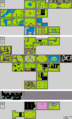
Map of the Dancing Dragon Dungeon
