- Chapter 1 – Inside The Great Deku Tree
- Chapter 2 – Princess of Destiny
- Chapter 3 – The Mighty Collection
- Chapter 4 – Dodongo’s Cavern
- Chapter 5 – Inside Jabu-Jabu’s Belly
- Chapter 6 – Timely Appearance
- Chapter 7 – Forest Temple
- Chapter 8 – Fire Temple
- Chapter 9 – Ice Cavern
- Chapter 10 – Water Temple
- Chapter 11 – Bottom of the Well
- Chapter 12 – Shadow Temple
- Chapter 13 – Spirit Temple
- Chapter 14 – Ganon’s Castle
13.1 Rescuing the Carpenters
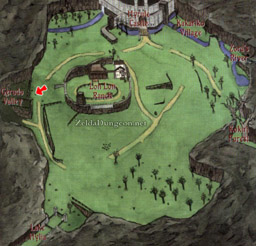
Hyrule Field – Our next destination is the desert, due west. The area is pretty easy to find in Hyrule Field, although its kinda far. Use Epona if you have her to make the trip faster.
Gerudo Valley – The Gerudo across the way have since broken the bridge to keep people out. To get across, you can either run at it with Epona, or Longshot either the pieces of the bridge hanging down the ledge, or the target directly above each side.


Talk to the man here and he’ll inform you the Gerudo women broke the bridge and his construction workers ran off to their fortress for who knows what reason. He’ll fix the bridge for you if you can get his workers back. We don’t really need the bridge, but this quest is required so that we can reach our next major destination.
Before we head onward, there are two Skulltulas we can get in this are. Play the Sun’s Song to make it night. The first is just directly behind the tent. The other is near the top of an arch sticking out of the rock face, on the south side. Just follow your ears and you’ll find it. When you’re ready, continue on to the fortress up ahead.
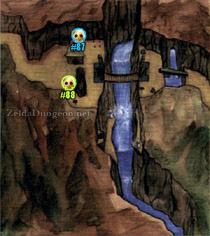
In Gerudo Valley, just behind the Carpenters tent, there is a Skulltula on the back wall. Use your Longshot to defeat it and snag the token.Optional: Gold Skulltula #87


In Gerudo Valley, once you cross the bridge, there is an archway just to the left. Look up on one of the sides at nighttime to find the Skulltula.Optional: Gold Skulltula #88


Getting Captured… – You’ll witness a short scene surveying the area, after which you’ll be free to roam around. As soon as one of the female guards sees you, you’ll be captured and thrown into a cell with no escape. Crud.


Fortunately, they didn’t take any of your items. Use the Longshot to hook onto the wooden overhang in the window. If you get captured multiple times, you’ll have to repeat this process.
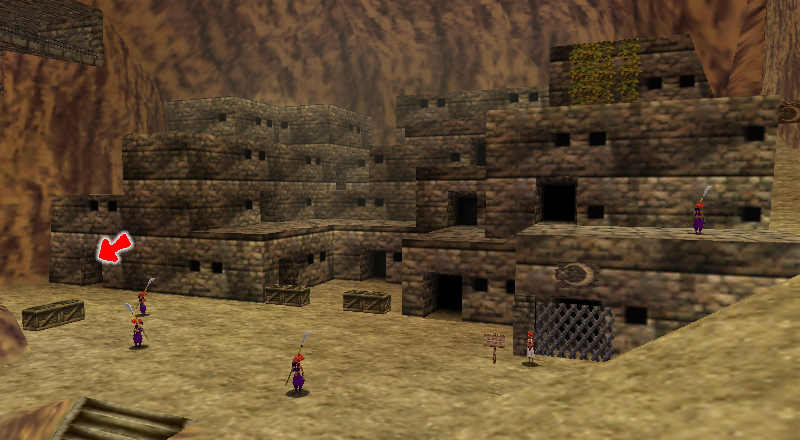
Once you escape, you can use either your Longshot or Fairy Bow to stun the guard closest. Or just wait until she’s further away, jump down, and enter the door directly next to your left.


Round the corner and speak with the guy in the cell. He explains that he and his fellow carpenters have all been captured and that they’ll repay the favor if you can help them out.
You’ll be interrupted by the first Gerudo Thief, a new enemy that doesn’t throw you in prison as soon as they see you. This one has to fight you first. Use your shield to block her attacks and try to get far away if it looks like she’s “charging up” because her jump attack goes straight through your defenses and knocks you out.


I recommend targeting her and performing a jump attack, as that hit’s almost all the time. After several hits, she’ll disappear and leave a Small Key behind. Use it on the cell and Ichiro will give you his thanks. Three more carpenters to go.
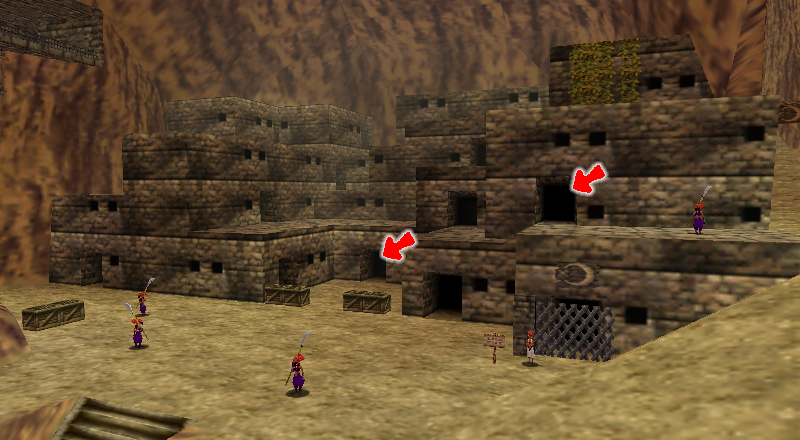
Proceed through the next opening to find yourself back outside. Enter the next door that just right nearby.
This room is actually a hub to many of the other doors outside. To get to most of them though, you’ll have to tackle several guards. If you wish to be risky, you can go forward and knock out the guards with arrows, but the much more safer route is to just turn right as soon as you can and come out the next opening.


Back outside, target around the corner and once the guard is turned away, inch out and shoot her with an arrow. Jump up the small ledge and enter the doorway.


In this room, approach the cell and once again, you’ll have to battle a Gerudo Thief. After you defeat her, open the cell and free the second carpenter, Jiro. After the carpenter runs off, continue on through to the next opening. Two left to go!
You’ll appear back outside next to another opening. Rather than going in that one, notice that there are vines leading down nearby. Climb down them and enter the only door on this level. Inside, talk to the worker in the cell, slay the Gerudo Thief and release the dude. Just one left! Rather than going out the other exit, go back the way you came…


Back outside, climb up the vines and go through the door on the left. Inside, you’ll find yourself in a room where there are guards below. They can’t see you atop this ledge. I recommend using the bow to knock out the two guards in this room. Alternatively, you can use the Hoover Boots to get across the platform to the other side. Follow the path and go through the opening.


Back outside, there’s a little ledge right next to you that you can climb up. Ignore that for now and turn the opposite way. Jump down into the little area with the door that has no other means of accessing it. Who in their right mind would put a room up here?!
Inside, stand behind the crate and shoot the guard once she shows herself. Run around the corner and speak with the last carpenter, then you will have to fight the final Gerudo Thief. Shiro tells you a secret he overheard before he runs off:


Gerudo Membership Card – After rescuing all four carpenters, the leader of the fortress will appear and explain that all men are worthless… except for “The Great Ganondorf” and now… yourself! You’re obviously skilled to have rescued all the carpenters and gotten past her guards.
She explains that Nabooru, second in command after Ganondorf himself, placed her in charge of the fortress. Thus, because you’re so talented, you can become part of their all female thieves guild. This item is known as the Gerudo Membership Card in the Nintendo 64 version of the game and the Gerudo Token in the Nintendo 3DS version of the game.
13.2 Gerudo Goodies
NOTE: This sections is completely optional, so jump ahead to section 13.3 to move onward with the main quest.

Now that we can go everywhere, it’s time to get some goodies. Play the Sun’s Song to make it night, then work your way to the top of the area. Once again, you can do so through that room with all the guards.


After coming out this exit, climb onto the little ledge, follow it till the end then jump onto the roof to your right. Go around the bend and climb up the vines. Follow the highest roof till the end. If it’s night, you should see a Gold Skulltula directly below you on the wall. Snag it with your Longshot.
Located near the top of Gerudo Fortress, against back wall. The skulltula is only there at nighttime. Use your Longshot to snag the token.Optional: Gold Skulltula #89


Next, you’ll see a chest in the distance. If you have the Longshot, you can just use that. Otherwise, you can play the Scarecrow’s Song to make Pierre appear on the otherside. Open the large chest to find a Heart Piece.
At the top of Gerudo Fortress, there is a treasure chest in the distance. If you go right up to the edge, you can reach it with your Longshot. Alternatively, you can play the Scarecrow’s Song, hookshot over, and open the chest to get the heart piece.Heart Piece #34


Next, jump down and make sure it’s day time. Play Epona’s Song to summon your horse and ride her to the back area of the fortress with the huge shooting range. Talk to the woman in white straight ahead to play a little mini-game.


Horseback Archery – You have to be riding Epona while talking to her in order to play. Once you start, Epona will move on her own, leaving you free to fire your bow and look around. I suggest taking care of the jars first. Just hold still and worry about timing. Each Jay will give you 100 points. After hitting the jars, turn to the left and shoot the big target once or twice.
On your way back, shoot any jars you might have missed and then shoot the three big targets against the wall. Try to aim as close to the center as possible. One trick you can do is align yourself vertically with one as best as possible, then just keep shooting and slowly easing the analog stick left to repeatedly hit the target. Perfect shots will give you 100 points, and close shots will give you 60 points. At the very end, be sure to use up all your remaining arrows. Getting one or two good ones isn’t going to be as good as seven mediocre ones.
The game isn’t that hard once you get used to it. The jars are the easiest part once you get the timing down, which gives you a good 700 right off the bat. The second half can be pretty hard, but after a few tries, you should be able to get it. Anyway, for 1000+ you get a Piece of a Heart and 1500+ after that gets you the Biggest Quiver. The heart piece will always be your first reward, even if you put 1500+.
At back of Gerudo Fortress, jump on your horse to play the archery game. If you successfully score more than 1000 points, you will be rewarded with a piece of heart.Heart Piece #35


Once you’ve acquired the heart piece and Big Quiver, play the Sun’s Song to make it night time and return to the shooting gallery. Run over to the far big target that all by its lonesome where a Gold Skulltula awaits you.
At nighttime in the Gerudo Fortress, head to the back area where the archery game is located. Located on the target at the far end of the area is a Gold Skulltula. Use the Longshot to defeat it and collect the token.Optional: Gold Skulltula #90


13.3 Crossing the Desert
Gerudo Fortress – We’re now ready to tackle the desert. Before you go, there’s an optional side quest known as the Gerudo Training Grounds. It’s a little mini-dungeon that’s totally optional, but has a fun prize.
The tricky thing about it is that you need all the items from all of the dungeons in order to get all the keys. There are nine total keys, but you only need seven to complete the dungeon, if you know what to do… So technically, you can get the main reward right now, without completing the Spirit Temple. If you’d like to tackle it early, check out our Gerudo Training Grounds guide. I’ll be covering it in full within the next chapter when we have all the items to get everything.
On that note, head for the northwest part of the Fortress to find a giant gate. Climb up the ladder and speak with the woman wearing white to be forewarned of the two trials in the desert ahead. She’ll clap to open the gate and bid you goodbye. Hop on down and go through.


Haunted Wasteland – As soon as you enter the area, you’ll see… well… that it’s hard to see at all… It is easier to see during the daytime, so play the Sun’s Song. Run forward and jump atop the box. You’re immediately confronted by a giant pit of quick sand that you don’t want to fall in. Use your Longshot on the boxes on the other side to get across.


Next, follow the flags like the Gerudo back at the fortress told you to. You’ll come to a sign shortly that points off towards a dock. If you follow it, you’ll find a dude riding a magic carpet selling Bombchus, which honestly you don’t need. Should you decide to undertake the endeavor, I suggest using the Hover Boots to get to and from. Buy some if you’d like and head back to the path.


Just keep following the flags, one after the other. Don’t stray, or you’ll start the area over again. Yikes.


Once you get to the end, you’ll find a nice stone building. Jump down inside. Ahh, away from the sand. Kill the Skulltula that’s just waiting for you and snag its token. You can light the torches with either Din’s Fire or Fire Arrows, but the reward is a measly 50 Rupees. Smash the jars and go back up.
When traveling through the Haunted Wasteland, you’ll come to a lone structure right in the middle of the Desert. Drop down into the below chamber and you’ll find the Skulltula ahead, right between the two torches.Optional: Gold Skulltula #91


Get on top of the stone building by way of the ramp along the side. Check out the stone.
Use the Lens of Truth at the top of the stone building to find a Big Poe that will offer to guide you the rest of the way through the Wasteland. Follow the Poe along its windy pathway through the poles at the end of the desert. With a full magic bar, you should be able to easily make it through while keeping the Lens of Truth on the entire time.


Desert Colossus – Ahh, that feels good to be able to see again, doesn’t it? There are actually a few things we can get in this area, but before we do, go ahead and enter the temple straight ahead, avoiding the annoying Leevers as you go. Don’t worry, you can’t miss it. =D


Spirit Temple – Once inside, quickly be prepared to shield against the killer jars right in front of you. Upon further exploration, you’ll quickly find that you can’t do anything… In this entry room you’ll find two Armos statues, a hole we can’t crawl through on the left and a giant block we can’t push on the right.
There’s a hole in the ceiling, but you can’t do anything with that at the moment either… Check out the two snake-like statues on either side of the bottom level.
Hmmm… So we need to crawl through the hole as a child… Go back outside.
Desert Colossus – Sheik will jump off the ledge above and tell you more poetry about using the Ocarina of Time to return here as a child. Sheik will then offer you our next song, allowing you to teleport directly here, because you can’t go through the Gerudo area as a child.
Again, Sheik avoids letting Link get too close. What is Sheik hiding anyway…? Hmm… In any case, use the Prelude of Light to get to the Temple of Time, put the Master Sword back to become a child again. Then warp back to the Desert Colossus.


NOTE: Everything else in this section is optional. To continue onward with the main walkthrough, go ahead and enter the Spirit Temple as a child and jump over to section 13.4.
Soft Soil – Our next objective is to venture into the temple in our youth. However, before doing that, there’s a ton of stuff we can get, including a Piece of Heart that requires us to go back in forth in time a bit. You can get it while in the midst of the temple, but to ensure that the most amount of people see this, I am placing it here. First off, we’ll need a Magic Bean from the Salesman near the entrance to Zora’s river.
Teleport to the Desert Colossus as a child and run towards the temple. The Leevers are as big as you are now! There’s a soft patch of soil near the entrance to the Spirit Temple. We want to drop some bugs into the soft soil to get a Skulltula to appear. If you need some bugs, there are some right in the Desert Colossus, found beneath a small rock that is right in the dead center of the desert, right where there are two boulders sticking out of the ground.
As a child, drop some bugs into the Soft Soil location just outside of the Spirit Temple to get a Gold Skulltula to appear.Optional: Gold Skulltula #92


Plant a Magic Bean here as we will need to ride the Magic Bean Plant as an adult in order to gather all of the goodies here. While it is really inconvenient, return here as an adult and the Magic Bean will have been fully grown.
As an adult, you can ride the magic bean and it will take you on top of the large rock sticking out of the ground at the north-central portion of the Desert. At nighttime a Skulltula can be found here. You can also ride the bean plant to get a heart piece.
In the Desert Colossus, ride the Magic Bean plant to a large rock, near the north-central potion of the map. Play the Sun’s Song to make it nighttime and you’ll find a Skulltula right here.Optional: Gold Skulltula #93


Ride the Magic Bean plant and let it take you throughout the entirety of the Desert. It will circle back to near the entrance of the Spirit Temple, where it will travel right beneath a stone arc. Immediately when it heads back up, jump off to land on top of that stone arc. Grab the piece of heart that is found here.Heart Piece #36


There is one more Skulltula to collect here and it is located near the Oasis at the south end of the map. Run on over and you’ll find a trio of palm trees. At nighttime, use the Longshot to defeat the Skulltula that is up near the top of the tree.
Near the Oasis at the south end of the Desert Colossus, you’ll find the Skulltula at the top of one of the Palm Trees at nighttime. Use the Longshot to defeat it and grab the token.Optional: Gold Skulltula #94


There are two other goodies to collect in the Desert and they can be done while Link is a Child, or an Adult.
Nayru’s Love – Next, head on over to the north part of the area, kinda near the entrance to the Colossus, where there are two trees by their lonesome against the wall that has a crack in it. Lay a Bomb to blow it open.
Head inside to find another Fairy Fountain. Play Zelda’s Lullaby as usual on the Triforce ahead to summon the third and final Great Fairy of Magic. After the usual chit-chat, she will give you Nayru’s Love. This will act a shield against attacks and will protect Link for a little less than a minute. It does consume magic however, so be wise when using it.


Fairy Oasis – Lastly, head to the south part of the area where you’ll find a dried up oasis. Jump on top of the rock so the Leevers will leave you alone, then play the Song of Storms. This will slowly fill up the Oasis and, once full, will continually make red fairies appear.


Stock up on the fairies and once you are ready, make your way over and enter the Spirit Temple as a child.
13.4 Spirit Temple Child
Entry Room – As you enter, shield against the floating jars directly ahead. Go up the stairs and ignore the Armos. Head left to the hole and… oh… Speak with the Gerudo woman in the way and she’ll talk to you.
Before introducing herself, she’ll ask a few questions. First tell her that you’re “not doing anything” in order to progress. For the second question, it does not matter what you choose. She’ll eventually task you with retrieving the Silver Gauntlets, which you should obviously agree to. After she’s done talking, she’ll move out of the way. Crawl on through, leaving Nabooru behind.

Main Corridor – Throughout this temple, you’ll fight many fire enemies, such as Fire Keese and a new enemy called Anubis. While this is the last portion of the game that you are required to tackle as a child, it can be very easy to lose your Deku Shield, so it might be a good idea to just keep the Hylian Shield equipped.
This room has two Spike Traps, two Fire Keese, two regular Keese and an Armos. Kill the flying enemies first to make things easier, then lay a bomb on the final guy. Remember, you can use your Boomerang to stun him too. Both doors will open, and even though it points you towards the one on the right… enter the left door.


Stalfos Room – Ahh! A Stalfos! Just when you were getting used to these guys too… They’re quite a bit harder as a child, seeing as they’re harder to avoid and you do much less damage. Just slash away and be prepared to dodge if he does a jump attack. If you can manage it, make him walk over the edge and fall down into the abyss!


Next, we have to kill this giant Green Bubble. I suggest using the Boomerang to stun it and then finish it off with your Fairy Slingshot.
To make the bridge drop across the gap, we have to hit the crystal switch on the other side of it with the boomerang. You have to aim to the left so that the Boomerang wraps around and hits the target. On the other side, you can open the treasure chest to get a new Deku Shield. Then head through the door.


First Anubis Room – In this room, we face off with a new enemy: an Anubis. These things copy your every move, but will shoot a fire ball at you should you use a weapon. Also, they’re only vulnerable to fire.
The crystal switch on your right will start a flame next to the other door. Simply maneuver to the other side of the room, position yourself so the Anubis is floating right next to the door, then shoot the crystal switch with the Slingshot. Alternatively, you can just get up close to it and use Din’s Fire. Bam! Get back to the other side of the room and go through the door.


Keese Room – As you enter the room, Navi will announce the presence of a Wallmaster. Run forward and quickly slay the lone Fire Keese on this side of the grating, then kill the Wallmaster.
Once both are defeated, we have to collect the five Silver Rupees. I suggest getting the ones on the fence first; just avoid touching the Gold Skulltula, as it can still hurt you through the fence. Grab the final Rupee near the torch in the corner to make gate drop down. A few Keese will likely come at you now, so kill them one at a time, then head out and kill the remaining ones with your Slingshot.
As a child in the Spirit Temple, the Gold Skulltula is located in the room found early on with the five silver rupees and wallmaster. Grab the rupees to drop the bridge and then use your Boomerang to snag the token from the Skulltula.Optional: Gold Skulltula #95


Finally, go grab some fire from the torch using a Deku Stick and return to the other side of the bridge, lighting to the two unlit torches. Alternatively you can use Din’s Fire. A small chest appears back in the other area containing a Small Key. Grab and head through the door.


Main Corridor – You should be back in the room with the lone Spike Trap. With Small Key in hand, crawl through the small hole in the north wall, which leads to a small area with a locked door. Go through.
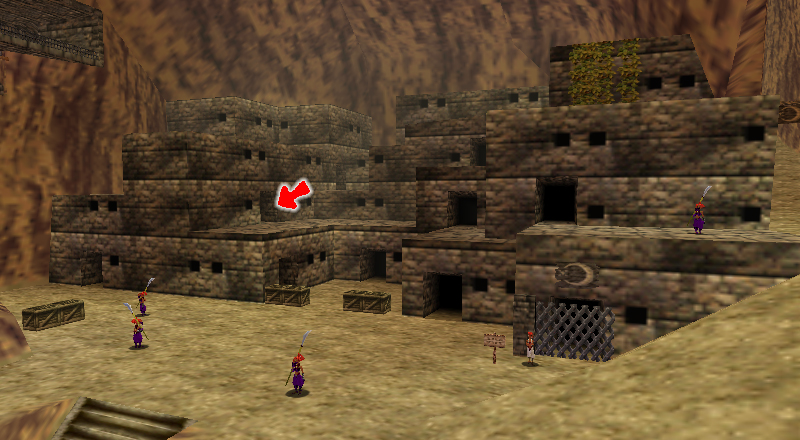
Bombchu Puzzle – Here, turn right and kill the two Skullwalltulas on the climbable wall. After they’re gone, climb up. Before we venture further in the room, turn around and snag the Gold Skulltula that’s waiting patiently directly behind where you climbed.
As a child in the Spirit Temple, the Skulltula is located in the room with the Bombchu puzzle. Once you enter the room, climb the wall where there are two regular skulltulas. Turn around and look down to find the gold skulltula. Use the Boomerang to defeat it and snag the token.Optional: Gold Skulltula #96


There are two Lizalfos in this room that appear when you walk in certain spots in the room. Wander around until they appear and kill them both.
Now that we have no enemies to worry about, we need Bombchus to complete this puzzle. If you don’t have any or are low, simply shoot the crystal switch atop the tiered ledge on the south side of the room to make a a pair of small chests appear. Open them both, one of which contains some Bombchus.
Now, there’s a sun face in the middle of the floor. We have to get sunlight on it to open the next door. The cracked wall has sunlight peeking through it and is just begging to be blown up. Line yourself up and target it, then let loose a Bombchu. Boom! Head through the door.


Colossus Room – In this room, the most notable thing is of course the giant snake-woman statue against one wall, very similar to the one that makes up the exterior of the temple itself. Unfortunately, there’s nothing we can do in the room at the moment.


Right when you enter, there is a nearby Armos statue and directly below you is a switch that opens the door above. It needs to be held down though, so push the Armos statue off onto it. Climb up the stairs and go through the door. Round the red stairs here and enter the next door as well.
Sun Face Room – The first step is to kill the three Beamos with Bombs. Just be careful about the Spike Traps as you maneuver around the room.
Once they’re out of the way, it’s time to collect the five Silver Rupees. Each of the platform walls have little niches where the Beamos sat that you can climb up. There’s one Silver Rupee along the south wall, two in the center, one of which you have to jump to, and then two more along the north wall.


Getting them all causes the golden torch to light. Obviously we have to light all the torches, which is pretty easy. Going clockwise is easiest in my opinion. Climb up to the small chest that appears to get a Small Key.
At long last, pull the blocks in the center of the room out of the way and bring the one with the Sun Face underneath the sunlight to open the door on the far side of the room.


Corridor 2 – Here, there’s only a set of stairs… but wait… Turn around and snag the Gold Skulltula. Head through the next door.
As a child in the Spirit Temple, the Skulltula is located in the room just before the Iron Knuckle battle. In this narrow hallway, turn around and look at the door you came through and the Skulltula is located just above.Optional: Gold Skulltula #97


First Iron Knuckle Room – In this room there’s only one thing to do. Smack the statue sitting on the throne with any weapon to wake it up. This enemy can be particularly hard the first time because the range of your sword is so short.

If you lure him close to one of the pillars or the throne, he’ll smash it open, revealing three recovery hearts that you can easily get by simply rolling past him. Keep this in mind throughout the battle. The trick to hurting him is to make him attack, jump back, then stab him quickly while he’s stunned. After you hit him, back away so that you don’t get hit. Just repeat this process, until he’s defeated. If at anytime he is giving you trouble, Nayru’s Love can be used for protection and you can also hit the Iron Knuckle from a distance with Bombchus.
Once he’s defeated, go through the open door and into the sunlight.


Desert Colossus – Right Hand – As soon as you walk outside… oh no… Kaepora Gaebora is out here and he has some advice for you concerning the upcoming boss…


After he leaves, open the chest to get, ta-da, the Silver Gauntlets! You’ll immediately witness a short scene in which Nabooru is abducted by the Twinrova sisters. Lame.
There’s nothing left to here as a child. Now that we have the Silver Gauntlets we can progress deeper in the Temple, but this time as an Adult. Go ahead and play the Prelude of Light to return to the Temple of Time and become an adult again. Renter the dungeon, this time as an adult.
13.5 Spirit Temple Adult

Entry – Once again, rush forward and be prepared to shield against the killer jars. Head up the steps and at long last, head over to the giant silver block on the right. Push it all the way until it falls into the hole. In this new section you’ve revealed, there’s a Beamos and a Spike Trap, but they can both be ignored.
Use your Longshot or Bow to hit the crystal switch hanging from the ceiling in the center of the room to unlock both doors. Enter the left one first.


Compass Room – In this small room, head forward and kill the Wolfos that appears. After its dead, stand on the Triforce symbol on the floor and play Zelda’s Lullaby to make a large chest appear. Longshot to it and open it to find the Compass. Jump down into the sandy area, climb up and back out the door. Now, enter the opposite door on the right side.


Rolling Boulder Room – This room has three boulders rolling on a bowled, rectangle shaped room. We need to snag the five Silver Rupees. There are four in the cubbies, with two on each side of the room, and then the fifth rupee is in the middle of the room.
The ones in the cubby holes can easily be gotten, just avoid the boulders. To get that last one, simply climb up, then use the Hover Boots to grab it.
This will open the door across the way. Real quick however, go up to the Time Block and play the Song of Time to move it over an alcove. Snag the Gold Skulltula inside.


As an adult in the Spirit Temple, the Skulltula is located in the room with rolling boulders and five silver rupees. Play the Song of Time in front of time block to find the skulltula hidden right behind.Optional: Gold Skulltula #98


Small Key Room – The room simply contains a small chest. Wait! In a second a Like Like falls from the ceiling, so kill it, then open the chest to get a Small Key. Backtrack two rooms to the room with the Beamos and Spike Blade. This time use the small key and head through the locked door.
Trap Room – As title would suggest, this room is filled with traps. The first two of which is another Like Like that falls from the ceiling, as well as two attacking jars on the right. After you’ve bested them, climb up the grooved wall at the end.
You should be able to tell by the sounds, but there’s a Floormaster in this room. This particular one is invisible, so whip out your Lens of Truth and kill it. After that, you can quickly turn off the Lens and charge up a Spin Attack to take out the little ones all at once.


Once they’re all defeated, grab hold of the mirror and start moving it around the room, lighting up the Sun Faces. The first two faces will drop treasure chests, where as the third one will unlock the door. If you push it all the way to the fourth sun face, another Wallmaster will appear. The second treasure chest is a trap and it will freeze you if you open it. I always have a dilemma with this one as leaving an unopened treasure chest on my map just doesn’t seem right… Go on through the door that opens.

Colossus Room – Welcome back to the giant room again. Avoid the Armos here, as this one will come alive. First off, I want to mention that directly above you is a target for you to Longshot to, should you fall down below.
Go to the top of this set of stairs and take a look at the Colossus’s left hand, which is the closer one. You’ll see it has a Triforce symbol on it. Use the Hover Boots to jump over to it and play Zelda’s Lullaby. This makes two chests appear.


One of the chests that appeared is on the other hand of the giant structure. From here, use your Longshot to get over. Open the small chest for a Small Key.
That’s all that is required in this room and we can use the small key on the locked door at the southeast end of the room, but there are several other goodies here. You can use the Longshot to get back up to the top of the west side of the room. From here, look at the northwest corner this time, where you’ll see a Gold Skulltula we can’t reach. Navi turns green though, so play the Scarecrow’s Song to make Pierre appear, then Longshot over and claim the token. Just one more to go!!!
In the large Colossus room where the giant statue, climb up to the top on the west of the room. Navi will float over to a platform in the distance, so play the Scarecrow’s Song. Longshot over and defeat the Skulltula here.Optional: Gold Skulltula #99


Next, jump down and head to the middle of the room. Use either Din’s Fire or Fire Arrows to light both torches, then open the large chest that appears to get the Dungeon Map. Turn around and you’ll find that this door is closed.


Make your way back up to the Southeast corner of the room and if you look across the gap, there is a treasure chest there now. While it didn’t show it, this appeared when you played Zelda’s Lullaby. Longshot to the small chest that has appeared and then use the Megaton Hammer on the rusty switch. This opens the barred door in the middle of the room. Drop down and head through.
Shortcut Room – Work your way through this small room pushing the giant silver blocks into the holes, then smash the rusty switch at the end to make an elevator go up and down. This actually takes back to the entrance room of the dungeon. Nifty shortcut. Head back to the previous room.


Colossus Room – Back in the Colossus Room, head to the southeast corner of the room and work your way to the top. Use the small key and head through the locked door.
Beamos Corridor – This set of stairs is guarded by a lone Beamos. You can blow it up if you like, or just run past.

Second Anubis Room – This puzzle is a little more complicated than the last Anubis trick you had to perform. By far the easiest way to completing this room is to simply use Din’s Fire or Fire Arrows, as that will defeat them right away. However, if you are low on magic, you can still complete this room. First off, throw a Bomb at the Beamos nearby to get it out of the way.
Next, head over to the pit on the right side of the room and you’ll see Navi will fly over to it and turn green. Play the Song of Time to make a Time Block appear.


There are three Anubis in this room and the switch makes a fire appear near the center of the room. You need to maneuver Link so that the Anubis move right into the fire. If you move Link on top of time block, near the locked door, and near the door you entered from, all three will be defeated. To make it easy: Start the fire and follow the wall clockwise around the room to kill all three at once! Go through the newly opened door.
Armos Switch Puzzle Room – The switch in the middle of the room opens the barred door to the right, but it has to be held down… The four Armos that surround it could be useful. Stand near the barred door, then use the Fairy Bow or Longshot to smack one of the Armos on the opposite side. Lure them to jump on the switch. Head through the door quickly, while it’s open.


Second Iron Knuckle Room – In the hallway, use the Lens of Truth to find two treasure chests, and then head up the stairs and into the room. It’s another armed soldier! Don’t worry, now that you’re an adult again, you do more damage and have more range. You can easily defeat him in just a few strikes, especially if you have the Biggoron’s Sword.


After you make mince pie out of him, the door behind the throne will open. Step through and into the light.

Desert Colossus – Left Hand – As soon as you walk forward, a large chest thumps down. Open it to get the Mirror Shield.
Remember, you’ll have to switch back to the Hylian Shield if you want to reflect regular physical attacks like an Octorok’s projectiles… With that in hand, return to the room with the four Armos.


Armos Switch Puzzle Room – This time, head over to the door on the opposite side of the room. Equip the Mirror Shield and use it to reflect the sunlight onto the Sun Face. Enter the door. Inside, snag the Small Key. You’re so expecting a trap, right? Too bad, there isn’t one! Go back to the previous room and back to the Anubis room. Enter the locked door.

Moving Trap Wall – I’d just like to point out…: Who in their right mind would build a temple to their goddess and have some kind of terrible trap like this one in it?! Anyway… Kill the two Beamos first, then shoot the Skullwalltula.


You really can avoid this entire puzzle by just using your Longshot all the way to the top wall. Alternatively, you can carefully try to climb up. The best way is to get up so your lower hand is just barely over the edge while the top one is actually gripping the wall that’s moving directly above you. Wait until the wall is heading your direction, then make a run for it. Just hold up on the analog stick all the way and you should make it to the next chunk just fine.
At the top, you can turn around and Longshot atop the platform for some recovery hearts if you need them. Kill the two Beamos if you wish, then head through the door.

Triforce Corridor – In this small room, play Zelda’s Lullaby on the Triforce symbol on the floor to open the barred door straight ahead.
Boss Key Room – First off, kill all the Fire Slugs. After that’s done, lay a Bomb next to the fake door directly to the left of the flaming chest.


This will reveal a gold eye switch. Shoot it with your arrow to make another icy platform appear above. Then Longshot atop the first platform, jump to the second and stand on the switch to stop the flames for a short time. Jump down and open the fancy chest for the Boss Key!


Return to the previous room and enter the plain door on the right.

Mirror Puzzle – This section of the room is filled with killer jars that fly at you, which you’ll notice as soon as you enter. Try to avoid getting harmed by the ceramics. In the 3DS version, there is a crystal switch on the ground that you have to hit. In the Nintendo 64 version, that switch is on the other side of the bars, but you can still hit it. Hit the switch and go through the door that opens.


You’ll immediately be confronted by a Lizalfos. Dice him up, then use the sunlight shining in here to light up the Sun Face above the next arch. Open the small chest that appears for some Bombs.
In the next area, kill all the White Bubbles. What are they doing anyway? I guess they’re dancing or something… The Bow might be a good way to dispose of them so they don’t suddenly run into you due to their abrupt movements.
Notice, according to your map, there should be another room to the west. Blow up that odd looking wall with a Bomb to reveal the other room.


Now, to mess with the mirrors: Grab the first one and point it through the secret opening into the darkly lit room. Now turn the second one so it shines the light through the bars and onto the final, round mirror. Go back through the door.


Jump down into the lower area and defend against the killer jars. Now the light should be reflecting off the mirror above you, so use your Mirror Shield to shine it onto the nearby Sun Face. This will lower your platform down…
Colossus Room – We are back in the room with the giant statue! They don’t specifically tell you what to do here, but it’s pretty obvious. Reflect the light onto the statue’s head to make it crumble into a bazillion pieces.


Well that was a cool little scene. Use your Longshot on the bars across the way, which will then move to allow you access. Once you’re ready, enter the Boss Door.
Almost Boss Room… – As soon as you enter, you’ll witness a short scene with Koume and Kotake, huddled around a familiar foe. They disappear after sending the Iron Knuckle after you. This one looks slightly different than the last two though, and even Navi thinks something is a little weird…
Smack it to pieces like you did the last one and the armor will fall off dramatically revealing… A girl! Nabooru will plop out and, apparently, not know what happened. The Twinrova Sisters will once again make an appearance to snatch her away, then disappear. Let’s go rescue her, again, shall we? Enter the final door.


Boss Room – At long last, we’re in the giant, open room. Climb up any of the corners and stand in the middle of the big platform to start the battle.
For the first phase of the battle, the sisters will circle around the room, pausing every once in a while and taking turns shooting their magical beams of opposite types at you.


Their attacks are slow beams that can easily be avoided by continually moving, but they still have a very wide area of effect. Each beam does about two hearts of damage, but afterwards, they leave a wide area where the beam hit that will damage you if you touch it. The Ice one freezes you for awhile, but doesn’t do too much damage, while the fire one hurts you A LOT if you stay there. Roll away if you are on fire to make it stop. Together, they’re a formidable foe that can easily kill you in just a few hits!


Logically, you’ve probably already figured out and Navi confirms it. You need to use your Mirror Shield to reflect their attacks at the opposing sister. I suggest waiting on the opposite side of the room from wherever they’re currently at. At this point, you can either target one of them, or just hold the R button without targeting. Regardless, face the one who’s about to shoot. As the beam is coming towards you, quickly point your shield, or switch targets to the opposing sister. If you’re close enough this will cause damage.
After a several good hits to either sister, it will show a little scene in which they combine to form Twinrova. In this new, singular form, the attacks differ slightly. Each beam will power up your shield instead and gathering an opposing element will make your shield burst energy on you. As a result, you only want to collect the same elements. If she shoots Fire at you, block it with your Mirror Shield. If she then shoots Ice, run away to avoid it.
Once you’ve collected three of either element, your shield will start releasing the energy. Run towards her and point it towards her, either by turning left or using R. If you’re close enough, and in time, she’ll fall down onto one of the four platforms. Jump over and start slashing her to bits. You can also use B in mid air to do a jump attack when you’re first going over, but it’s tricky. Repeat this process several times to defeat Twinrova.


After they’ve been defeated, you’ll witness an amusing scene in which the two sisters bicker with one another about pointless matters before disappearing. The last message you see as they go away is “I’ll come back to haunt you!” Foreshadowing of one of the other Legend of Zelda titles…


Anyway, go snag the Heart Container awaiting you on one side of the room, then at long last, step onto the portal.
13.6 Sage of Spirit
Wouldn’t ya know it? Nabooru turns out to be the Sage of Spirit! I didn’t see that coming at all! 😉 She rambles for a bit, explaining that you’ve impressed her with your skill and how you totally beat up the bad guys. Go you! At long last, she gives you the final medallion.


Afterwards, the screen turns gray and you see yet another final word from the sage. Jeez, all the ladies have the hots for Link! At this point in the game, it’s kind of expected, but also getting a little frustrating. =P
- Chapter 1 – Inside The Great Deku Tree
- Chapter 2 – Princess of Destiny
- Chapter 3 – The Mighty Collection
- Chapter 4 – Dodongo’s Cavern
- Chapter 5 – Inside Jabu-Jabu’s Belly
- Chapter 6 – Timely Appearance
- Chapter 7 – Forest Temple
- Chapter 8 – Fire Temple
- Chapter 9 – Ice Cavern
- Chapter 10 – Water Temple
- Chapter 11 – Bottom of the Well
- Chapter 12 – Shadow Temple
- Chapter 13 – Spirit Temple
- Chapter 14 – Ganon’s Castle
