Divine Beast Vah Medoh: Difference between revisions
DrakonisGTR (talk | contribs) No edit summary |
|||
| (16 intermediate revisions by 7 users not shown) | |||
| Line 1: | Line 1: | ||
{{ | {{Specify|the dungeon inside the Divine Beast|the Divine Beast in other uses|[[Vah Medoh]]}} | ||
{{Infobox| | {{Infobox|dungeon | ||
| image | | image = [[File:Medoh-map.jpg]] | ||
| game | | caption = Isometric view of the Dungeon Map | ||
| | | game = ''[[The Legend of Zelda: Breath of the Wild|Breath of the Wild]]'' | ||
| | | location = [[Rito Village]] | ||
| | | item = [[Sapphire]]<br>[[Ancient Core]]<br>[[Bomb Arrow]] x5<br>[[Ancient Shaft]]<br>[[Ice Arrow]] x10<br>[[Hylia Series]] Bow<br>[[Hylia Series]] Two-Handed Weapon<br>[[Giant Ancient Core]] | ||
[[Revali's Gale]] | | boss = [[Windblight Ganon]] | ||
| reward = [[Heart Container]]<br/>[[Revali's Gale]] | |||
| related = | | related = [[Vah Medoh]] (history)<br/>[[Divine Beast Vah Medoh (Main Quest)]]<br/>[[Divine Beast Vah Ruta]]<br/>[[Divine Beast Vah Rudania]]<br/>[[Divine Beast Vah Naboris]] | ||
| walkthrough | | walkthrough = [https://www.zeldadungeon.net/breath-of-the-wild-walkthrough/vah-medoh-dungeon/ Text Walkthrough] | ||
}} | }} | ||
''''<br> | {{ZD|[https://www.zeldadungeon.net/breath-of-the-wild-walkthrough/vah-medoh-dungeon/ ''Breath of the Wild'' Walkthrough<br/>Chapter 11: Vah Medoh Dungeon]}} | ||
''' | '''Vah Medoh''' is one of the four [[Divine Beast]]s in ''[[The Legend of Zelda: Breath of the Wild|Breath of the Wild]]''. Vah Medoh serves as one of the four main dungeons in the game. [[Link (Breath of the Wild)|Link]] must defeat [[Windblight Ganon]] in order to free the Divine Beast from the control of [[Calamity Ganon]]. As is with the other Divine Beasts, Link must venture inside and activate the five [[Sheikah Terminal]]s in order to fight [[Windblight Ganon]], freeing Medoh and the spirit of the [[Rito]] champion [[Revali]]. Once the dungeon is completed, Link will not be able to re-enter it, for it moves to a different location to prepare an attack on [[Hyrule Castle (Breath of the Wild)|Hyrule Castle]]. | ||
==Gaining Entrance== | |||
As Link comes in close proximity to [[Rito Village]], a cut-scene plays showing Vah Medoh gliding around the area, making it dangerous for [[Rito]] to fly. Link must gain the trust of [[Teba]] by training at the [[Flight Range]]. After doing so, Teba will carry Link close by to Vah Medoh, allowing Link to shoot the four cannons, giving entrance to the dungeon. | |||
== | <gallery widths=400 heights=220> | ||
File:Vah-medoh-attack.jpg|Link shooting a cannon | |||
File:Vah-medoh.jpg|Overhead view of Vah Medoh | |||
</gallery> | |||
==Dungeon Overview== | |||
===Map=== | |||
On entering the dungeon, run ahead and note the Malice Eyeball on the wall to the right. Shoot an arrow out to remove the [[malice]]. You want to make it across to the other side of the room. Use [[magnesis]] on the blocks in the middle of the room to help make a path across; or use the wind geyser and paraglider over to the other side. | |||
Defeat the [[Guardian Scout II]], then activate the terminal in the room ahead to obtain the map. | |||
Link | ===Manipulation=== | ||
Once Link has obtained a map of Vah Medoh, he has the ability to manipulate it in order to progress and solve various puzzles. In this dungeon, Link can either tilt the abdomen up or down around 30° either way. | |||
===Terminals=== | |||
{{stub|section}} | |||
''' | ===Treasure Chests=== | ||
'''Treasure Chest #1''' | |||
On the tail of [[Vah Medoh]], directly behind Link when you first start the dungeon, is a chest that's surrounded by [[Malice]]. The eye that removes the malice is on the right side of the last hump in the tail, and can be easily targeted from the right. Open the chest for a [[Sapphire]]. | |||
'''Treasure Chest #2''' | |||
Inside [[Vah Medoh]], center area, directly in front and above the entrance to the left wing, is an elevated platform with a climbable wall attached to the bottom of it. Use the upwards fan that is back by the tail entrance to float up to just before the ceiling, and then paraglide to the wall. Climb the wall to find the chest, which contains an [[Ancient Core]]. | |||
'''Treasure Chest #3''' | |||
Inside [[Vah Medoh]], center area, there's a ledge that sits below the path to the Map [[Guidance Stone]], but above the bottom floor of the center area. On the left side, in the corner, is a chest with Malice blocking it from the sides. Float or jump down from the platform with Treasure Chest #2 to get to the chest, which contains [[Bomb Arrow]] x5 | |||
'''Treasure Chest #4''' | |||
Inside [[Vah Medoh]], on the very bottom floor of the center area, is a chest that's walled in by [[Malice]]. The eye to remove it is inside the walls, on top of the chest itself. Shoot an arrow through the openings in the wall to take out the eye. The chest contains an [[Ancient Shaft]]. | |||
'''Treasure Chest #5''' | |||
Inside [[Vah Medoh]], right wing area, at the far end of the wing is a chest that is trapped by [[Malice]] up on the ceiling, with an eye and a maw next to it. Shoot the eye to free the chest, which contains [[Ice Arrow]] x10. | |||
'''Treasure Chest #6''' | |||
Inside [[Vah Medoh]], right wing area, just to the right of the wing entrance is a high ledge with a chest on it. Head to the far end of the wing, and then use the Divine Beast Controls to elevate the right wing. Jump and paraglide back towards the center area, and you should have enough height to land on the ledge. If you need more height, climb the slanted wall with windows in it and try your jump. The chest contains a [[Hylia Series]] bow, i.e. [[Royal Bow]]. | |||
''' | '''Treasure Chest #7''' | ||
Inside [[Vah Medoh]], left wing area, right above the door to the far section of the wing is a platform with a chest. Using the Divine Beast Controls, elevate the right wing, which will cause the left wing to dip down. If you are at the wing entrance platform, you can paraglide right to the platform. If you are already in the room, climb the ramp to the left and jump/paraglide to the platform. The chest contains a [[Hylia Series]] Two-Handed Weapon, i.e. [[Royal Claymore]]. | |||
'''Treasure Chest #8''' | |||
On the tip of [[Vah Medoh]]'s nose is a small platform with a chest. You can use one of the front fans to the left/right of Vah Medoh's head to paraglide to the side of his head, and then carefully climb and jump your way to the platform. Conversely, you can use the Divine Beast Controls to tilt one of the wings up, and then use the fans on that elevated wing to paraglide right to the platform. The chest contains a [[Giant Ancient Core]]. | |||
===Windblight Ganon=== | |||
{{Main|Windblight Ganon}} | |||
[[File:Windblight-ganon-2.jpg|200px|left]] | |||
Windblight Ganon initially fires laser beams or summons a tornado, which must be dodged. After shooting the laser beams, or if stunned with arrows, it is vulnerable to attacks at ground level from a melee weapon. | |||
In the second phase, he summons drones and bounces the lasers off these, as well as summoning a pair of tornadoes at a time. Again, these should be dodged. While the drones can be destroyed with arrows, they respawn after a time. Link can shoot Windblight in the eye with arrows, using the updrafts to enter "bullet time" to make it easier. Whenever it is on the ground, Link can also use melee attacks once more. | |||
Finally, once at 10% health, Windblight Ganon might resort to using a fully-charged Guardian laser. If it does do this, Link can dodge it by jumping to the side, running away, or he can attempt a Perfect Guard to deflect the beam, which will create an opening for attack. | |||
Once Windblight Ganon is defeated, Link receives a [[Heart Container]]. Activate the Main Control Unit to free Revali's spirit and receive [[Revali's Gale]]. | |||
{{clear|left}} | |||
' | ==Completion== | ||
Upon freeing Vah Medoh of [[Calamity Ganon]]'s influence, it will fly up to the top of a natural pillar in the center of Rito Village, and it spreads its wings in order to prepare an attack on Hyrule Castle. Having completed this dungeon means in the fight against Calamity Ganon, he will lose one-eighth of his health. | |||
==Illusory Realm== | |||
{{see also|Illusory Realm}} | |||
After activating the main control unit, Link cannot reenter Vah Nedoh. However, as part of the [[EX Champion Revali's Song]] [[Breath of the Wild Expansion Pass|DLC]] quest, he can present three [[Medoh's Emblem]]s and be drawn into an "Illusory Realm" of memories, where he can re-experience the fight with Windblight Ganon with limited equipment. | |||
<!-- | |||
==Enemies== | |||
{{Gallery|size=78|pad=5|title=Enemies in Divine Beast Vah Medoh}} | |||
{{Gallery/Box|file=Cursed-bokoblin.jpg|link=Cursed Bokoblin|caption=[[Cursed Bokoblin]]}} | |||
{{Gallery/Box|file=Cursed-moblin.jpg|link=Cursed Moblin|caption=[[Cursed Moblin]]}} | |||
{{Gallery/Box|file=Guardian-scout-i.jpg|link=Guardian Scout I|caption=[[Guardian Scout I]]}} | |||
{{Gallery/Box|file=Guardian-scout-ii.jpeg|link=Guardian Scout II|caption=[[Guardian Scout II]]}} | |||
{{Gallery/Box|file=Malice Eyeball - BOTW.jpg|link=Malice Eyeball|caption=[[Malice Eyeball]]}} | |||
{{Gallery/Bottom}} | |||
--> | |||
<!-- | |||
==Treasure Chests== | |||
--> | |||
{{Listbox|Breath of the Wild Dungeons}} | |||
{{Cat|Breath of the Wild Dungeons}} | |||
{{Cat|Breath of the Wild Locations}} | |||
Latest revision as of 22:41, June 7, 2024
- This article is about the dungeon inside the Divine Beast. For the Divine Beast in other uses, see Vah Medoh.

Isometric view of the Dungeon Map
Games | ||
Location | ||
Boss | ||
Items | Sapphire | |
Rewards | ||
Related | ||
| Guides | ||
|---|---|---|
Walkthrough | ||
In-depth guide:
Breath of the Wild Walkthrough Chapter 11: Vah Medoh Dungeon |
Vah Medoh is one of the four Divine Beasts in Breath of the Wild. Vah Medoh serves as one of the four main dungeons in the game. Link must defeat Windblight Ganon in order to free the Divine Beast from the control of Calamity Ganon. As is with the other Divine Beasts, Link must venture inside and activate the five Sheikah Terminals in order to fight Windblight Ganon, freeing Medoh and the spirit of the Rito champion Revali. Once the dungeon is completed, Link will not be able to re-enter it, for it moves to a different location to prepare an attack on Hyrule Castle.
Gaining Entrance
As Link comes in close proximity to Rito Village, a cut-scene plays showing Vah Medoh gliding around the area, making it dangerous for Rito to fly. Link must gain the trust of Teba by training at the Flight Range. After doing so, Teba will carry Link close by to Vah Medoh, allowing Link to shoot the four cannons, giving entrance to the dungeon.
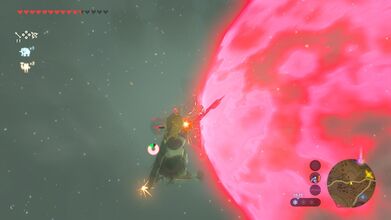
Link shooting a cannon
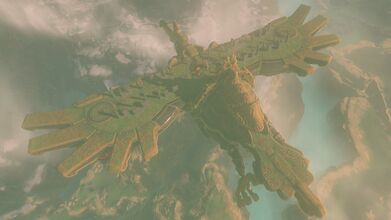
Overhead view of Vah Medoh


Dungeon Overview
Map
On entering the dungeon, run ahead and note the Malice Eyeball on the wall to the right. Shoot an arrow out to remove the malice. You want to make it across to the other side of the room. Use magnesis on the blocks in the middle of the room to help make a path across; or use the wind geyser and paraglider over to the other side.
Defeat the Guardian Scout II, then activate the terminal in the room ahead to obtain the map.
Manipulation
Once Link has obtained a map of Vah Medoh, he has the ability to manipulate it in order to progress and solve various puzzles. In this dungeon, Link can either tilt the abdomen up or down around 30° either way.
Terminals
| This section is a stub. You can help the Zelda Dungeon Wiki by expanding it. |
Treasure Chests
Treasure Chest #1 On the tail of Vah Medoh, directly behind Link when you first start the dungeon, is a chest that's surrounded by Malice. The eye that removes the malice is on the right side of the last hump in the tail, and can be easily targeted from the right. Open the chest for a Sapphire.
Treasure Chest #2 Inside Vah Medoh, center area, directly in front and above the entrance to the left wing, is an elevated platform with a climbable wall attached to the bottom of it. Use the upwards fan that is back by the tail entrance to float up to just before the ceiling, and then paraglide to the wall. Climb the wall to find the chest, which contains an Ancient Core.
Treasure Chest #3 Inside Vah Medoh, center area, there's a ledge that sits below the path to the Map Guidance Stone, but above the bottom floor of the center area. On the left side, in the corner, is a chest with Malice blocking it from the sides. Float or jump down from the platform with Treasure Chest #2 to get to the chest, which contains Bomb Arrow x5
Treasure Chest #4 Inside Vah Medoh, on the very bottom floor of the center area, is a chest that's walled in by Malice. The eye to remove it is inside the walls, on top of the chest itself. Shoot an arrow through the openings in the wall to take out the eye. The chest contains an Ancient Shaft.
Treasure Chest #5 Inside Vah Medoh, right wing area, at the far end of the wing is a chest that is trapped by Malice up on the ceiling, with an eye and a maw next to it. Shoot the eye to free the chest, which contains Ice Arrow x10.
Treasure Chest #6 Inside Vah Medoh, right wing area, just to the right of the wing entrance is a high ledge with a chest on it. Head to the far end of the wing, and then use the Divine Beast Controls to elevate the right wing. Jump and paraglide back towards the center area, and you should have enough height to land on the ledge. If you need more height, climb the slanted wall with windows in it and try your jump. The chest contains a Hylia Series bow, i.e. Royal Bow.
Treasure Chest #7 Inside Vah Medoh, left wing area, right above the door to the far section of the wing is a platform with a chest. Using the Divine Beast Controls, elevate the right wing, which will cause the left wing to dip down. If you are at the wing entrance platform, you can paraglide right to the platform. If you are already in the room, climb the ramp to the left and jump/paraglide to the platform. The chest contains a Hylia Series Two-Handed Weapon, i.e. Royal Claymore.
Treasure Chest #8 On the tip of Vah Medoh's nose is a small platform with a chest. You can use one of the front fans to the left/right of Vah Medoh's head to paraglide to the side of his head, and then carefully climb and jump your way to the platform. Conversely, you can use the Divine Beast Controls to tilt one of the wings up, and then use the fans on that elevated wing to paraglide right to the platform. The chest contains a Giant Ancient Core.
Windblight Ganon
- Main article: Windblight Ganon

Windblight Ganon initially fires laser beams or summons a tornado, which must be dodged. After shooting the laser beams, or if stunned with arrows, it is vulnerable to attacks at ground level from a melee weapon.
In the second phase, he summons drones and bounces the lasers off these, as well as summoning a pair of tornadoes at a time. Again, these should be dodged. While the drones can be destroyed with arrows, they respawn after a time. Link can shoot Windblight in the eye with arrows, using the updrafts to enter "bullet time" to make it easier. Whenever it is on the ground, Link can also use melee attacks once more.
Finally, once at 10% health, Windblight Ganon might resort to using a fully-charged Guardian laser. If it does do this, Link can dodge it by jumping to the side, running away, or he can attempt a Perfect Guard to deflect the beam, which will create an opening for attack.
Once Windblight Ganon is defeated, Link receives a Heart Container. Activate the Main Control Unit to free Revali's spirit and receive Revali's Gale.
Completion
Upon freeing Vah Medoh of Calamity Ganon's influence, it will fly up to the top of a natural pillar in the center of Rito Village, and it spreads its wings in order to prepare an attack on Hyrule Castle. Having completed this dungeon means in the fight against Calamity Ganon, he will lose one-eighth of his health.
Illusory Realm
- See also: Illusory Realm
After activating the main control unit, Link cannot reenter Vah Nedoh. However, as part of the EX Champion Revali's Song DLC quest, he can present three Medoh's Emblems and be drawn into an "Illusory Realm" of memories, where he can re-experience the fight with Windblight Ganon with limited equipment.