- Chapter 1 – Gnarled Root Dungeon
- Chapter 2 – Snake’s Remains
- Chapter 3 – Poison Moth’s Lair
- Chapter 4 – Dancing Dragon Dungeon
- Chapter 5 – Unicorn’s Cave
- Chapter 6 – Ancient Ruins
- Chapter 7 – Explorer’s Crypt
- Chapter 8 – Sword & Shield Maze
- Chapter 9 – Onox’s Castle
- Chapter 10 – Room of Rites
5.1 Summertime in North Horon
While the Pyramid Jewel was obtained back in Chapter 4 of the walkthrough, those who may just now be joining us should check to see if this key item is in their inventory. If not, before continuing further, dive down into the water just outside of Level 4 and swim through the cavern to grab the jewel. For those playing a Linked Game, 30 Rupees will be found here instead.
NOTE: Have You Obtained the Pyramid Jewel?


From outside of the Dancing Dragon Dungeon, simply jump off the ledge to the south, falling down one screen onto a small ledge where the sixth Piece of Heart will be found.
Optional: Piece of Heart #6


Use a Gale Seed and warp to North Horon and head down three screens. Toss aside the stone and walk right one screen to the location of a season-changing tree stump. Link can now complete several optional side-quests with the Power of Summer at his disposal. In a Linked Game, the next jewel is also obtained at this point.
Head down one screen along the path on the right. Walk down the steps leading into the dried-up lake and head left one screen, then bomb the cracked wall in the corner, revealing a cave entrance. Inside, open the chest to obtain 100 Rupees!
Optional: 100 Rupees in Eyeglass Lake


Head back to the tree stump and go left two screens to the isle where the Gnarled Root Dungeon is located. Walk down the steps in the lower-left corner of the isle one screen to find that some of the surrounding water has dried up, revealing a path to the right with a staircase leading underground. Inside, speak with the golden Old Man who will encourage Link to slay the four Golden Beasts throughout Holodrum in order to attain “true power”. Previously, in Chapter 4, the first of these four beasts, the Golden Octorok, could be found in the far southwestern corner of Spool Swamp during the Spring season. The Old Man will let Link know how many Golden Beasts he has slain thus far, but will not reveal which of the four have been defeated.
Optional: Wise Old Man's Golden Beast Quest


Leave the Old Man’s underground area and swim left one screen, where the season will change to Spring throughout the Holodrum Plain region. Continue swimming up three screens to reach a small isle with some bushes growing atop it. Chop down the second bush from the left on the lower row of four to reveal a hidden soil patch.
Optional: Soft Soil Location #9 - Holodrum Plain (Tier 1-3)


Optional: Octo Ring
Optional: Piece of Heart #7


5.2 The Final Season


Head back to the tree stump in North Horon and change the season to either Winter or Spring. Go down one screen and enter the waters of Eyeglass Lake, then head down and right one screen each. Climb the steps to the small isle and enter the portal to Subrosia.
Enter the house one screen down from the portal and speak with the Sign-Loving Subrosian, who will keep track of how many signs Link has broken. If Link has broken 100 or more signs, the Sign-Loving Subrosian will “teach Link a lesson” by seemingly resetting the game. The player will be shown the intro screen with the Nintendo and Capcom logos before appearing again inside the Subrosian’s house. After this, the Sign-Loving Subrosian will give Link a Magical Ring that appraises as the Sign Ring, meant to be a reminder for Link not to break any more signs.
Optional: Sign Ring


Head south until reaching Lava Lake, where a huge volcano will begin erupting fire across the screen. Continue through the lake, jumping onto the narrow strips of land amongst the lava and avoiding attacks from the Fire Pokeys that will emerge, until reaching the area where a Bomb Flower can be seen sprouting from the ground. Use the Power Bracelet to lift the Bomb Flower out of the soil, then head all the way back out of Lava Lake.


With the Bomb Flower, Link can finally get the last Season Power, so head towards the Temple of Seasons. From the volcano at Lava Lake, head up one, left two, and up one more screen. Toss aside the boulder and use a Pegasus Seed to help Link jump across the two pits and continue left, up, and right one screen each.


Now at the Temple of Seasons, head to the yellow tower in the upper-right hand corner and speak with the Subrosian Smelter, who will use the Bomb Flower to clear the rubble blocking the entrance to the Autumn Tower.


Enter the tower and climb to the top, where the Spirit of Autumn will bless the Rod of Seasons with the Power of Autumn! There are now a few optional quests that can be completed before leaving Subrosia.
From the entrance to the Temple of Seasons, head left two screens, jump across the lava, and then go down one screen down the steps. Continue left two screens to reach the Subrosian Market. Inside, Link can now purchase the Member's Card for the super-low price of 5 Ore Chunks!
Optional: Horon Village Shop Member's Card


Although Rosa is not needed to obtain the Lava Soup, go ahead and pick her up along the way as she will be needed for a subsequent quest. After leaving the Subrosian Market, head right one and down two screens to the Subrosian Seaside area. Continue right and down one screen each and speak with Rosa to have her accompany Link. Now, leave the seaside by going up and left one screen each, then climb the stairs and continue up two more screens. Head through the cave and exit via the entrance on the left, then cross the bridge next to the volcano and continue up one screen. Jump across the stream of lava on the left and head down, left, and up one screen each to reach the Subrosian Chef‘s Kitchen. Inside, speak with the chef, who will take Link’s Iron Pot and use it to make some Lava Soup, which he will then give to Link.
Optional: A Second Date with Rosa and Trading for Lava Soup


Outside of the Subrosian Chef’s Kitchen, head up one screen and enter the locked door in the mountainside with the help of Rosa’s key. Inside, open the chest to obtain the first Gasha Seed. Exit the cave and climb the steps up one screen, then continue up the next set of steps and across the bridge left one screen. Descend the next set of steps and head down one screen, then enter the cave on the left. Inside, open the chest to obtain a second Gasha Seed.
Optional: Gasha Seeds at the Subrosian Volcanoes


There’s nothing left to do in Subrosia for now, so leave via any accessible portal. The closest one to Link’s current location is actually the first portal that brought him to Subrosia. To get there from the second Gasha Seed cave mentioned above, head back up the steps and up one screen, then cross the bridge and go right two screens. Continue along the path down one screen, then descend the first set of steps, cross the small bridge, and head right one screen. Jump over the hole and continue right and up one screen each, then enter the portal. [/section]
5.3 Autumn in Holodrum


Use a Gale Seed and warp to Horon Village, then head to the Western Coast. Jump off the ledge and head down to the center screen on the beach, where a small bridge can be seen leading into the water near a lone, unlit torch. Use the Slingshot equipped with Ember Seeds to light the torch, extending the bridge out into the water, and follow across it down one screen to a small isle.


Use a Mystery Seed on the area of dirt resembling a “?”, causing a Mini-Moldorm to appear from beneath. Defeat the Mini-Moldorm and grab the X-Shaped Jewel from the chest that appears.
Back in Horon Village, head up to the Maku Tree’s area and enter it. Climb to the top, where the Maku Tree will have grown another level with the most recent Essence gathered. Inside the top of the tree is a room where two Fairies will spawn each time Link enters, refilling his health.
Optional: Fairies at the Maku Tree


Use the tree stump in the mid-south section of the village to change the season to Autumn, then head all the way to the southwestern corner. Here, there will be a couple of mushrooms which have now bloomed due to the current season and can be tossed aside using the Power Bracelet. Open the chest to obtain 20 Rupees.
Optional: 20 Rupee Chest in Horon Village


Link can now put his recently acquired Member’s Card to use over at the Horon Village Shop. Enter the shop and start to walk behind the counter, to which Stockwell will attempt to stop Link from continuing before noticing his Member’s Card. Continue on through the small room into the basement area of the shop, which will be selling a few exclusive items: Purchasing the Upgraded Seed Satchel is highly recommended here as it will bump the capacity of each to 50, as well as refill the satchel completely, making it less likely that Link will run out any time soon. As for the Treasure Map, it is not entirely necessary to have as this guide will reveal the locations of the remaining jewels anyway, but feel free if you choose to “go it alone”.
Optional: Member's Only Area of Horon Village Shop


– Upgraded Seed Satchel (300 Rupees): Upgrades the capacity of each seed type to 50.
– Gasha Seed (300 Rupees): A regular Gasha Seed. Once purchased, additional Gasha Seeds can be purchased for 500 Rupees each.
– Treasure Map (200 Rupees): Reveals the location of the four jewels needed to access the Tarm Ruins when viewing the overworld map.


Back in Horon Village, head on down to Bipin and Blossom’s House and speak with Blossom, who will be trying to rock her baby to sleep. She will ask Link whether she should “Sing him a song” or “Play with him”. As usual, this choice will have an impact on the child’s personality when he grows older.
Optional: Bipin and Blossom's Baby Never Sleeps


The second of four Golden Beasts can be found in the Woods of Winter. Use a Gale Seed to warp there, then head up one screen and use the tree stump to change the season to Autumn. Jump down from the ledge and head left one screen to the entrance of Snake’s Remains to find the Golden Moblin roaming around. Try to knock the Moblin into a corner and repeatedly slash away at it until it is defeated. To take a look back at finding the Golden Octorok, see Chapter 3.
Optional: Golden Beast #2 - Moblin


Now, Link can start actually heading toward the next dungeon, located near Eyeglass Lake. Use a Gale Seed to warp to North Horon, then head down three screens and right one to where the tree stump is located.
Use the tree stump to change the season to Autumn, then head left one and down two screens. Continue right one screen across the bridge to an isle and walk along the fallen leaves to a chest containing a Gasha Seed.
Optional: Gasha Seed in Eyeglass Lake


From the tree stump in North Horon, head down one screen into the lake and go right one screen. Climb the steps out of the water and continue up one screen to the location of another tree stump.
One screen up from the tree stump, use the Shovel to dig the bare spot in the center of the square of bushes growing to reveal a hidden patch of Soft Soil. In the Winter season, the bushes will not all be visible, but the spot hiding a soil patch can still be accessed.
Optional: Soft Soil Location #10 - Eyeglass Lake (Tier 2-4)


Use the tree stump above Eyeglass Lake to change the season to Summer, drying up most of the lake’s water, then head right one and down two screens. Descend the steps leading into the dried-up lake and continue up one screen. Lift the boulder and toss it aside to reveal a hidden stairwell leading underground and enter it. Pass through the cavern, defeating or avoiding the weak enemies along the way, until reaching a final room with a chest. Try to stay along the lower wall when walking over to the chest as there are statues that will shoot arrows towards Link while he passes by (the Roc’s Feather is also a good tool to use to jump out of harm’s way here). Open the chest to obtain the eighth Piece of Heart!
Optional: Piece of Heart #8


Back at the Eyeglass Lake tree stump, change the season is Autumn and head up and right one screen each, where the fifth dungeon will be found resting on a hill. Toss aside the mushrooms using the Power Bracelet and climb the stairs to enter the Unicorn’s Cave.
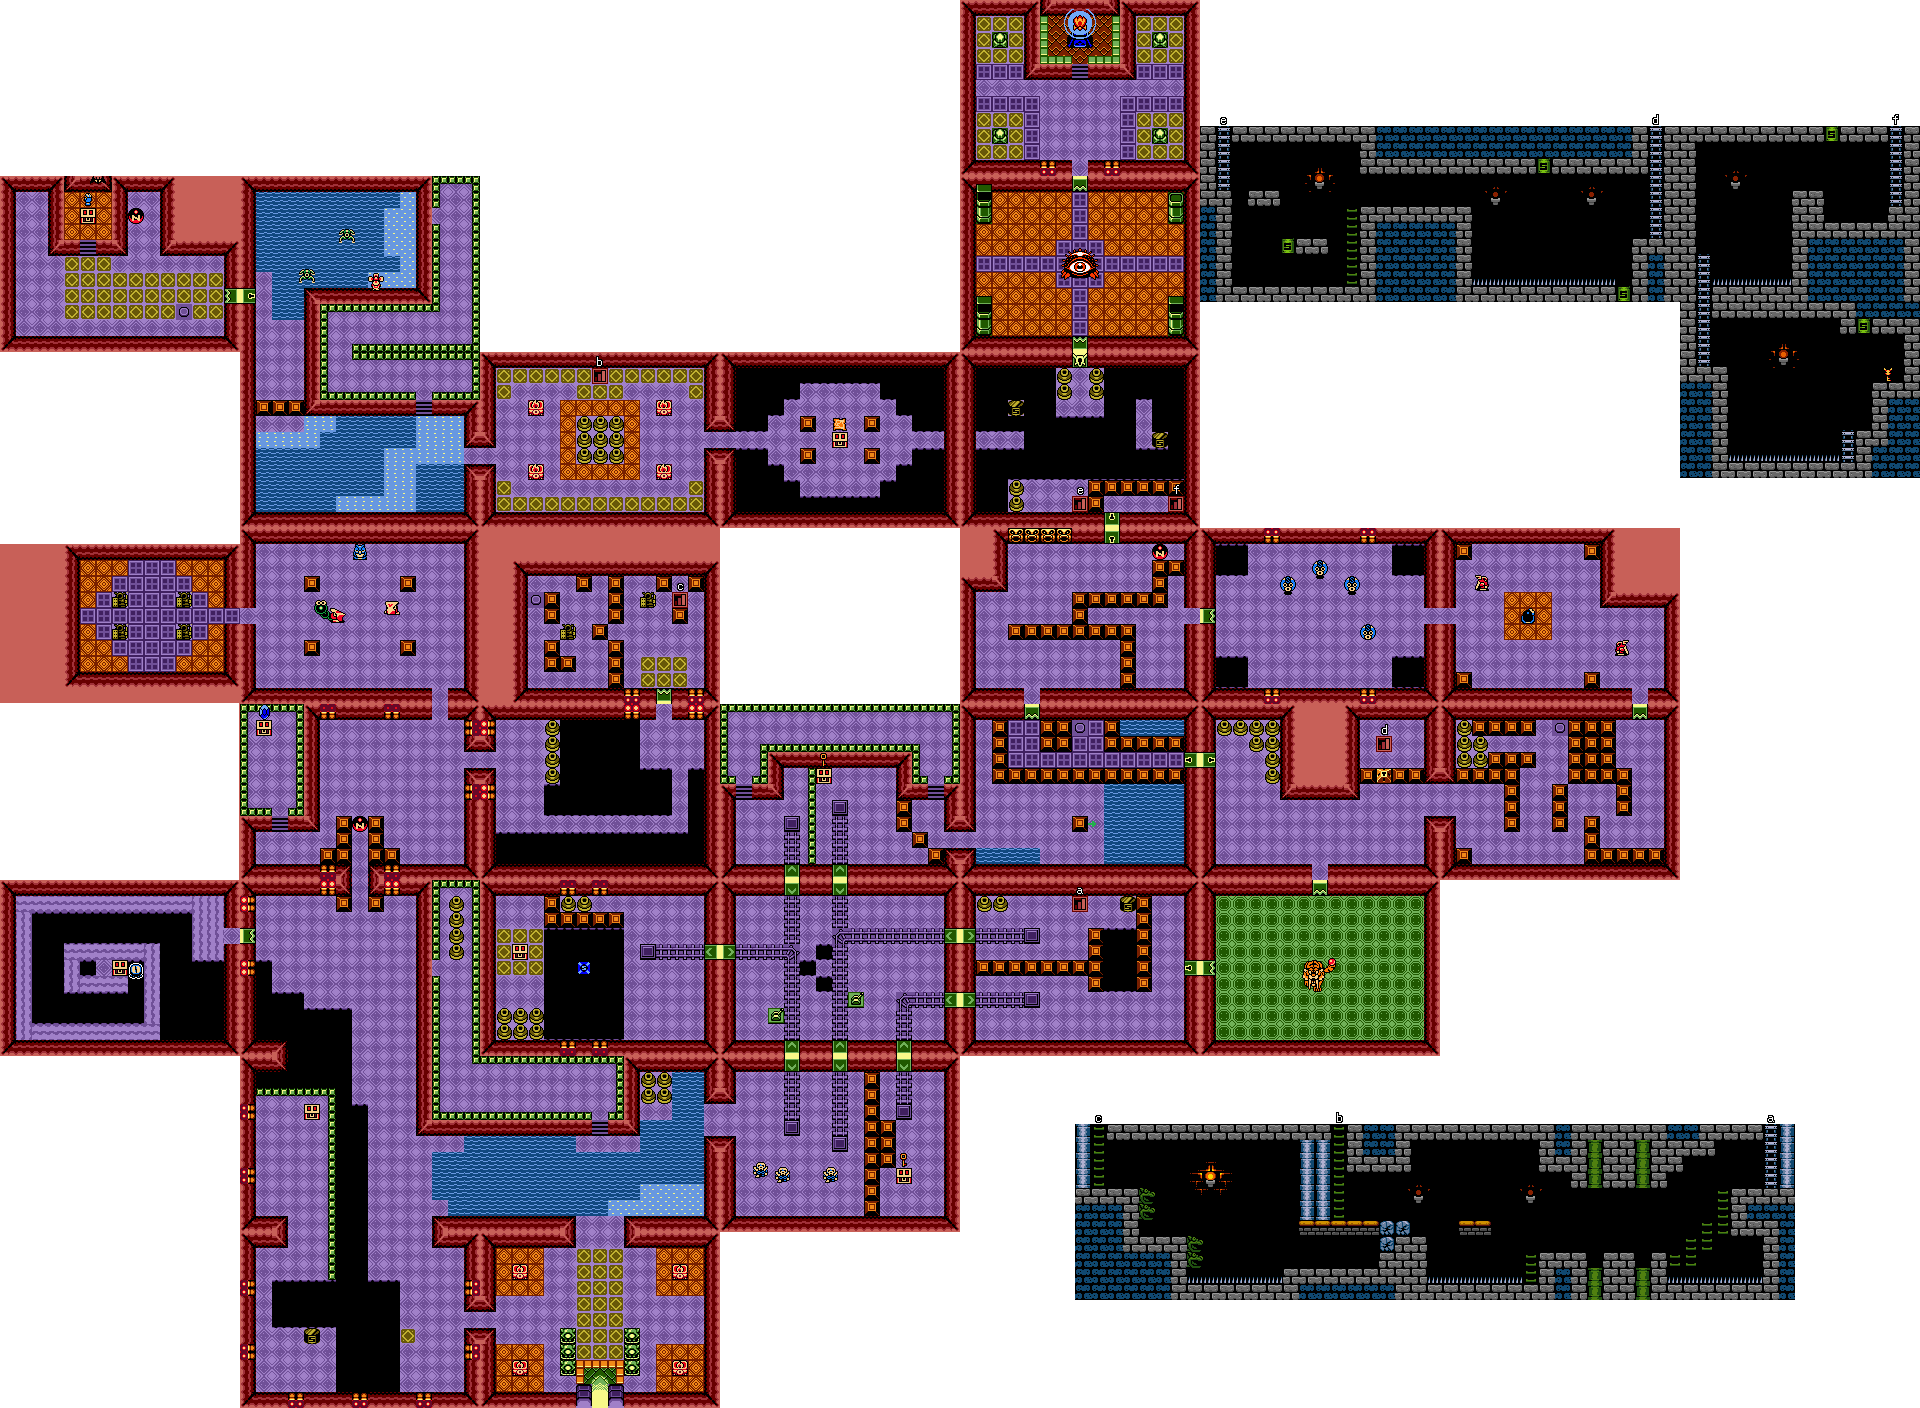
5.4 Unicorn's Cave


Start out by heading right one and up two screens. Defeat the Mini-Moldorm and three Iron Masks to have a doorway open on the left.


Head through the opened doorway left one screen and walk along the narrow path, pushing against the flow of the water running across the floor to prevent Link from being pulled into the bottomless pit, until reaching the chest to obtain the Compass. An alternative, easier technique to reach the chest is to use a Pegasus Seed when entering the room, then jump straight across to the area where the chest is, avoiding the difficult of walking along the winding path.


After leaving the Compass room, head down one screen and swim across the water right two screens to a room with two minecarts. Ride the minecart on the right and be ready to swipe the lever as Link passes by in the next room, taking him up another screen. Open the chest here to obtain a Small Key.


Hop back into the minecart and ride down one screen, swiping the lever again and changing the track above, before being taken down another screen to the cart’s original location. Hop into the same cart again and ride along the track up and right one screen each, then go down the staircase to the right into an underground area.


On the left are two pipes with fireballs falling out of them. Getting hit by one will not only damage Link, but may also knock him down one of the bottom pipes, damaging him again and sending him back to where he entered the underground. Try to time the pattern of the fireballs while jumping across and head left one screen. Lure down the Spiked Thwomp by walking near it, then jump on its head, riding it back up, then jump across the next one onto the ledge. Head up the ladder back into the first floor of the dungeon.


Avoid contact with the “sparky” orb enemies, known as Bubbles, roaming this room as they will render Link unable to use his weapons for a few moments, and head right one screen. Defeat the two Gibdos and Red Zols to have a chest appear in the center containing the Dungeon Map.


After grabbing the map, head left two screens to a mostly water-filled room. Head up the steps and walk along the ledge up one screen, then around until reaching a point where Link can jump off into the water on the left. Continue to the left side of the room and head through the locked doorway left one screen.


Open the chest atop the altar to obtain the Magnetic Gloves! Now, equip the gloves and use them to pull the magnetic ball towards Link, then walk it over and set it on the button on the right side of the room, reopening the doorway.


Head right one screen through the opened doorway and then down one screen. Push the block on the left DOWN, the one on the right DOWN, and the middle block either LEFT or RIGHT to pass by again and continue right one screen, then head down the staircase back into the underground area from earlier.


Go back across the Spiked Thwomps, right one screen, and up the ladder on the far right out of the underground. Stand below the S-pole on the right and using the N-polarity of the Magnetic Gloves, push Link across the gap to the lower section of the room.


Hop into the minecart on the left, taking Link left and down one screen each, and open the chest here to obtain a Small Key. Ride the minecart back up and right one screen, then go through the locked door on the right into the lair of the dungeon’s mini-boss, Syger.


The fight begins with Syger falling from the ceiling upon walking into the room. Syger will roll into a ball start spinning with its long fangs exposed, moving in one of three different patterns around the room. These patterns will always be the same and, although they are not specifically targeting Link’s location, will cover most areas in the room. After attacking, Syger will return to standing on its legs, slowly walking for a moment before attacking again. It is during this time while Syger is walking that the weak point, a red ball on the end of its tail, is exposed.


A couple of effective items to use during the fight are either the Pegasus Seeds or Roc’s Feather, as these will allow Link some leverage to avoid Syger’s attacks. Keeping a Spin Attack charged is also recommended as the window of time in which Syger’s weak point is vulnerable is very short, so making the most of the opportunity is important. It takes four hits from the Wooden Sword, or four Spin Attacks, to Syger’s weak point to finally defeat the mini-boss.


Leave the mini-boss room back left one screen and use the Magnetic Gloves to pull Link up to the S-pole, then head down the staircase into the underground area once again. Head past the fire pipes left one screen, then across the Spiked Thwomps over to the cracked blocks. Use Bombs to blow up the blocks and follow the uncovered passage left one screen.


The fireballs shot by the dragon head statues on the left can only be deflected by holding out the Shield, so equip it and keep holding down the assigned button while jumping onto the moving platforms. Head across the platforms and past the next set of dragon head statues until reaching the ladder leading out of the underground area.


Link will emerge in a room with two Armos Statues separated by blocks in the center. Whichever way the statue on the right side is pushed, the one on the left will move in the opposite direction. They key is to get the statue on the left over and onto a button to unlock the doorway below. To do this, push the statue on the right DOWN three times, RIGHT twice, and UP once. Once the doorway is open, head through down one screen.


Walk along the narrow passage where a Gibdo and several Keese will be roaming about and head left one screen. Right after entering the room, go directly up one screen through the passage. Defeat the Mini-Moldorms and Iron Masks in this room to open the doorway on the left. Remember that Link now has the Magnetic Gloves which can pull the Iron Masks’ mask off, making them easier to defeat.


Go through the opened passage left one screen, where four Armos are present that will come to life if Link gets close enough. The trick to this room is remembering which order the four statues are defeated in, so its best to near and defeat one at a time. Once the statues are defeated, chests will appear in their place. Open the chests in the order the statues were defeated to obtain 1 Rupee, 10 Bombs, 4 Ember Seeds, and a Small Key.


Exit the Armos room left one screen, then head down one screen through the passage on the right. Go to the far right section of this large room and walk up the steps to the ledge, where a chest containing 100 Rupees can be found. Next, use the S-polarity of the Magnetic Gloves to move the N-ball out of the way and head through the passage down one screen.


Continue down three screens where a noticeable golden-colored tile lies next to a bottomless pit. Standing on the tile, use the Magnetic Gloves to pull like across the gap towards the S-pole on the left side. Walk up one screen from here and open the chest to obtain a Small Key.


Head back down a screen to the S-pole and stand to the right of it, then use the Magnetic Gloves to push Link back to the right side of the gap. Continue on right one screen to the dungeon’s entrance, then head up and right one room each to the minecart room from earlier in the dungeon.


Hop into the minecart on the left and ride up and left one screen each. Use the Magnetic Gloves to pull link over to the blue metallic turnstile in the center of the bottomless pit, keeping the assigned button held down so Link does not fall. When Link is turned towards the left side of the room, quickly let go of the assigned button and repress it, changing the gloves’ polarity and pushing Link away from the turnstile across the gap. Open the chest here to obtain a Small Key, then get back across the gap the same way.


Ride the minecart right one screen and swipe the lever so the track becomes straight. Once the cart stops, hop in it again and ride up two screens. Walk up the steps on the left and follow the ledge to the right side of the room, then head right one screen.


First, defeat the Red Darknut in this room, then head over to the lone block on the right. Push the block in any direction and an N-ball will fall from the ceiling within the blocked-off area above.


Head left one screen out of the room, then go back across the ledge and ride the minecart back to its original position. Continue left and down one screen each, then step into the portal to teleport to the mini-boss room.


With three Small Keys in-hand, Link can now complete the last section of the dungeon. Head up and right one screen each and follow the narrow passage to a button at the top of the room. Step onto the button and the doorway on the right will open. Remember to use the Boomerang to take care of those annoying Sparks roaming about, as well as getting a Fairy out of the deal to refill Link’s health, then head up one screen through the opened passage.


Keep either the Roc’s Feather or Pegasus Seeds equipped here to best avoid the attacks of the Beamos in this room while also being mindful of the two Red Darknuts present and head left one screen. The four strange-looking enemies in this room are known as Magunesu, and all must be defeated before leaving the room. The Magnetic Gloves are useful in pulling the Magunesu towards Link for an attack as they will constantly move away from him. Once all four are defeated, head left one screen through the opened doorway.


Stand directly below the N-ball and use the Magnetic Gloves to pull it down towards Link, walking to the left as far as possible. Now, move behind the row of blocks, standing directly to the left of the N-ball, and use the gloves to push it off-screen to the left.


Backtrack to the room above the mini-boss’ room by heading right, down, and left one screen each. Go to the far left side of this room and head through the locked doorway left one screen. Pull the N-ball to Link and move it atop the button, opening the doorway at the end of the path, then head through it up one screen.


Use the Magnetic Gloves to pull the N-ball close to Link and continue holding the ball while walking in the path of the fire-spitting statues on the wall above. Move towards the top-right corner of the room and head through the locked door up one screen, then go down the staircase on the right into an underground area.


It is necessary to have both the Magnetic Gloves and Roc’s Feather equipped while navigating this underground area. Use the gloves to pull Link up to the S-pole in the ceiling, then release and hold LEFT, falling onto the ledge. Jump over to the moving conveyor platform, then jump off to the left and climb down the ladder.


Go across the next two conveyor platforms and use the Magnetic Gloves to pull Link up to the S-pole on the far right, then release and fall holding RIGHT to grab the Boss Key! Now, exit the underground area back to the dungeon.


Head down one screen and use the N-ball to protect Link again while crossing the path of fire, then continue down and right one screen each. Go through the locked block in the center of the room using Link’s last Small Key and head down the staircase to another underground area.


Similarly to the last underground passage, using the Magnetic Gloves and Roc’s Feather will be essential here. Jump over to the closest green platform, then use the Magnetic Gloves to pull Link up to the S-pole when the platform moves under it. Release the gloves’ button and fall onto the next green platform, then jump off onto the ledge on the left and move left one screen. Fall onto the bricks and stand atop the S-pole, then use the Magnetic Gloves to push Link up away from it. Release the button and fall onto the higher brick platform, then jump off and climb the ladder out of the underground area.


Walk to the left and stand directly below the S-pole, then use the Magnetic Gloves to pull Link across the gap to the section of floor ahead. Facing to the right, use the Magnetic Gloves again to pull Link over the gap to an S-pole on the right side of the room, then walk up as far as possible on this section of floor. Face to the left and use the gloves to pull Link to the platform where the door to the Boss’ lair is located, then head through it to face the boss of Unicorn’s Cave, Digdogger.


Digdogger will bounce around the room towards Link a number of times before jumping high in the air and coming down on his location. Using the Magnetic Gloves, the key is to push and pull the huge spiked metal ball in the room so that it crashes into Digdogger while he is on the ground. Link must hit the boss four times before Digdogger will break up into smaller versions of itself that begin scurrying around the room.


Though the fight can take some time, there are a few tricks that can help defeat the boss. Once Link is able to hit Digdogger with the spiked ball, the boss will bounce in place for a moment as if stunned. At this point, move the ball away and then back toward Digdogger to score a second, third, and even fourth hit without having the boss move position. As the small Digdoggers run around, try to move the ball around the room as much as possible, crushing them on contact. If Link cannot defeat all of the small Digdoggers in time, those remaining will collect and turn back into the normal-sized boss and resume bouncing around the room. The more small Digdoggers that are defeated will result in the boss moving much faster and jumping farther when it reforms. Once all of the small Digdoggers are destroyed, the boss will be defeated.


Pick up the Heart Container left in the center of the room and head up one screen. Climb the steps to the altar to claim the fifth Essence of Nature, the Nurturing Warmth!
