- Chapter 1 – Inside The Great Deku Tree
- Chapter 2 – Princess of Destiny
- Chapter 3 – The Mighty Collection
- Chapter 4 – Dodongo’s Cavern
- Chapter 5 – Inside Jabu-Jabu’s Belly
- Chapter 6 – Timely Appearance
- Chapter 7 – Forest Temple
- Chapter 8 – Fire Temple
- Chapter 9 – Ice Cavern
- Chapter 10 – Water Temple
- Chapter 11 – Bottom of the Well
- Chapter 12 – Shadow Temple
- Chapter 13 – Spirit Temple
- Chapter 14 – Ganon’s Castle
14.1 Light Arrows
As soon as you have saved all six sages, you’ll see a vision from Rauru, telling you to go to the Temple of Time to meet a certain someone… Mysterious! Use the Prelude of Light to get there.
Temple of Time – As soon as you enter, a cutscene will begin in which Sheik makes a final appearance. Sheik reiterates the fact that all six sages are gathered and that all that’s left is to confront Ganondorf. With that, Sheik launches into another tale of the Triforce…
Shiek goes on to explain that when Ganondorf entered the Sacred Realm and attained the Triforce, the legend came true, breaking the Triforce into three parts. Only the Triforce of Power remained with Ganondorf, while the other two found hosts who believed most in their like forces.
Our very own hero, Link, became the holder of the Triforce of Courage. The Triforce of Wisdom went to Sheik! Otherwise known as…


GASP! Sheik was Princess Zelda all along! After apologizing for the disguise, Zelda tells you that, back when she and Impa were escaping Hyrule Castle, it seemed the best thing to do was give the Ocarina of Time to you. Unfortunately, by allowing you to open the door of time, you did exactly what Ganondorf wanted. The Master Sword sealed you away for seven years, and since that time, Ganondorf became the King of Evil.
She’s just downright excited now because you guys can finally beat up the bad guy, explaining that with the help of the Sages, they can seal him away once and for all. To help you in this daring feat, she gives you the mystical Light Arrow. Nice!


Earthquake!!! Abruptly, Zelda is encased in a crystal shield of sorts. Ganondorf’s ominous… text… suddenly begins rambling about how awesome he is, especially since he’s found and caught the princess. As a last jest, he taunts you to come see him at his castle. Before we go charging in, there’s a few final things for us to accomplish…
14.2 The Last Skulltula
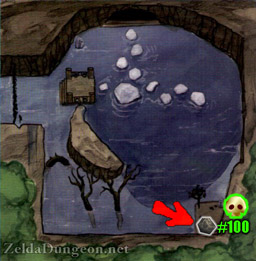
Zora’s Fountain – Head to Zora’s Fountain, and in the far corner, where the Fairy Fountain is, there’s a lone silver boulder all by itself, just begging to be lifted. Do so to reveal a hidden hole!
Fall in, and use your Lens of Truth to see the invisible Skulltulas that line the ceiling. At the end of this path, climb up the ladder of sorts.
At the top, kill the Skulltula and you’ll find the last Gold Skulltula (night only) waiting peacefully for you on the left wall. Snag the token and head for Kakariko Village!
At nighttime, make your way to Zora’s Fountain and then head on over to the southeast corner, where the Great Fairy was located. There is a lone silver boulder here and now that you have the Silver Gauntlets, you can lift it up. Do so and then bomb the regular boulder that is underneath. Drop down and then use the Lens of Truth to navigate through this passageway. Climb up the at the end and the Gold Skulltula will be found on the wall at nighttime.Optional: Gold Skulltula #100


Kakariko Village – Check your status screen and if it has all 100 Skulltula tokens on it, enter the spooky Skulltula House. Speak with the guy in the middle and he’ll thank you as well as offer reassurance that they’ll try not to get cursed again. Good man.
And the mystical prize for all of this!!!!!….. Is a measly 200 Rupees. One of the dumbest prizes in video game history! Completely worthless… I hope you feel satisfied to know you did it though… Anyway, you can enter this house over and over again to get the prize multiple times for infinite cash.


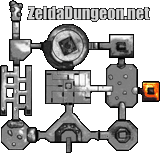
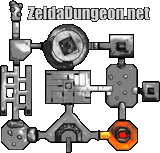
14.3 Gerudo Training Grounds
From the Temple of Time, ride Epona all the way to the Gerudo Fortress. Now that you have the Gerudo Membership Card, you can speak with the Gerudo women around here. One of the white clad women is standing in front of a barred entrance. For 10 Rupees, you can enter the Gerudo Training Ground, which is a series of rooms filled with puzzles in order to get keys. The items you need to get all the keys are listed below:
- Fairy Bow – Forest Temple
- Megaton Hammer – Fire Temple
- Longshot – Water Temple
- Lens of Truth – Within The Well
- Hover Boots – Shadow Temple
- Silver Gauntlets – Spirit Temple
You need all the items to get all 9 keys within the dungeon. Now, it’s possible to get the final prize with just get 7 keys, meaning, you can get away with having all but one of the items, but you just have to know what you’re doing. I suggest only tackling this after you have all the items though…

Entrance – As soon as you enter, you can turn around and shoot the golden eye switch directly above the entrance. This makes two small chests appear. One has a Blue Rupee and the other has a bundle of arrows.
There are three doors in this room. The one right across from the entry will take us to the locked doors, and the main prize, so we’ll do that one last. This entire dungeon just loops around, so you can start by going either left or right. Personally, I think left is easier.


In this room, you have one minute to kill both the Stalfos. They’re easily defeated, especially if you have the Biggoron Sword. As long as you keep moving, the sand shouldn’t cause you any problems.
Once they’re both dead, snag the Small Key [1] from the chest and go through the door.


This room contains a Wallmaster in the middle, rolling boulders on both sides side, and several invisible flaming walls. You only have a minute and a half to get all five Silver Rupees. I suggest ignoring the Wallmaster.
First of all, run forward and take a left. Peak around the corner and wait for the boulder to pass by, while watching out for the Wallmaster. Once it passes, quickly turn left to get the first Rupee (1). Head right and duck into the side crevices to avoid the boulder, and at the top, snag the Rupee (2).
Go to the middle corridor, which doesn’t have flames and is higher up, and turn right. Jump off the ledge to get the next Rupee (3).
Now, head through this middle corridor on the right side and wait for the boulder again. Head clockwise around the corner to grab another Rupee (4).
At long last, use your Longshot on the target straight ahead on the ceiling to fall into the final Rupee (5).


The timer stops and the next door opens. Go all the way up and towards the door, but watch out for the flames that block the way. Longshot to the target on the ceiling, then go through the door.


This area is a little tricky. First of all, run forward and kill the two Wolfos and two White Wolfos. Next, use the Lens of Truth to see a hidden area above the Fake Door. Longshot to the target up there and step on the switch. This opens up both of the sealed doors below.
Jump back down and use the Gauntlets to push the giant Silver Block all the way into the hole. Enter the now unsealed door.


In this small room, kill the three Like Likes to make two additional chests appear. The original on the platform is a trap that will freeze you. The two up front contain a Blue and Gold Rupee, but there’s an invisible one as well. Use the Lens of Truth in the last sandy hole to find a chest that contains a a Small Key [2].


Return to the previous room, Longshot back up to the hidden area and enter the door.


There’s a barred door on this top level we can’t use yet, but wait! Before you jump down, stand next to the barred door and you’ll see that Navi turns green. Play the Scarecrow’s Song while facing her to make Pierre appear. Now we have easy access back up. Jump down.
On the outer platform, which begins spinning. Face the statue in the middle and aim carefully. Shoot each eye once with an arrow to make a small chest appear next to them. Longshot to the small chest to get a Small Key [3]. Longshot to the target near the entrance of this area to get out.


Now, the barred door up top is now open. To get back up there, you can either fall in the lava, or face the barred door, making Navi fly up there and turn green, and play the Scarecrow’s Song to make Pierre appear.
Longshot to him and go through the door. Inside, you find a small chest containing another hidden Small Key [4]. Go back, jump down, and enter the other door.


Kill the two Fire Keese and Fire Slugs to make the door open and a small chest appear, containing some rather worthless stuff. Next, use the Megaton Hammer to smash the statues to reveal various goodies. In the northeast (top right) corner of the room, there’s a statue thing that’s hiding a switch in a hole.
Step on the switch and quickly grab the Small Key [5] from the chest in the middle before the fire comes back. Enter the next door. Note, if you’re trying to go back the other way, you have to find the gold eye switch, which will open up the door to the statue room.


There are five Silver Rupees in this room, which open the east door. First, go forward a little bit, turn around and Longshot the target directly above you to get the first Rupee (1).
Jump down to the platform in front of you (2).
At this point, I suggest equipping the Hover Boots. Use them to go to the next (middle) platform. Navi turns green straight ahead. Play the Song of Time to make two Time Blocks appear. Float over to them and climb all the way up to find a Small Key [6]. Don’t go through this entrance, though.


Jump/Fall off to the side of the platform where a single switch is dying to be stepped on. This causes the fire on the platform across the room to go out.
Using the Hover Boots, float along the obvious platform path, gathering another Silver Rupee (3). I recommend leaving one of these here uncollected. Run to the other side of the room and snag the Rupee (4). If you get this one last, it shows the animation of the door opening, and the lava might re-appear while that happens, knocking Link into the lava and making you start the room over.
Quickly run back to the middle of the room, grab the final Silver Rupee (5), and enter the east door.


Play the Song of Time to remove the Time Blocks, then equip the Iron Boots and Zora Tunic. Sink down and avoid the Blade Trap in the middle of the floor. Wander around, killing the four Shell Blades with your Longshot.
The first Silver Rupee is simply in the middle, around the Blade Trap (1). The next two are along the west wall. Stand in line of sight with the target, the Silver Rupee between you. You should go right through it (2) and land onto the next one (3).
Do the same thing to get the one on the east wall (4), then take off the Iron Boots and float to the roof of this room, where the last one (5) awaits you.


Lava Room – Float across to the door on the left and head south.

In this room, we have a Beamos and two Dinalfos. I suggest immediately throwing a Bomb at the Beamos so it’s out of the way.
These Dinalfos are exactly like the Lizalfos… The only difference I can tell is that they don’t wait for you (take turns) if you Z target one of them like most other enemies. Running and quickly slashing them up is the easiest way to defeat them.
As soon as they’re dead, the barred door opens and a chest appears containing a Small Key [8].


We are back at the entrance and right in the center of this room, Navi will fly over and turn green. You can Play the Song of Storms to make a fairy appear. At long last, enter the center room with all the locked doors.

You should have eight total keys at this point. If you entered from the lava room, you’ll need a total of 9 keys, but if you enter from the entrance room, you only need 7. But, where is the 9th key? Once arrive at this area from the entrance room, enter the door on the left.
Before venturing onward, use the Lens of Truth and look at the ceiling directly to your left. There’s a hole that you can climb up the grating to get to a secret room with the final key [9].


Climb back down and go through all of the remaining doors on the left side to eventually wind up in the center and claim the prize: the Ice Arrows. There are several other small chests along the way, but none are very interesting. When you’re done playing around, exit the mini-dungeon.


14.4 Ganon's Castle
We’re finally ready for the big showdown. I suggest filling your bottles with two fairies and two Blue Potions from the Magic Hag’s Shop. Teleport to the Temple of Time and make your way to Ganon’s Castle.
Ganon’s Castle Area – Approach the obvious path that would lead to the castle if there was one, which will start a short scene where Rauru speaks telepathically to you. He explains that there are “six evil barriers” inside that need to be taken care of before they the sages can help you defeat Ganondorf. Ooo, shiny! They all create a fancy bridge of light for you to walk on. Once you’re ready, enter the evil lair.


Entrance – As soon as you enter, run down the steps and straight up to the door, ignoring the Beamos entirely. Enter the door.
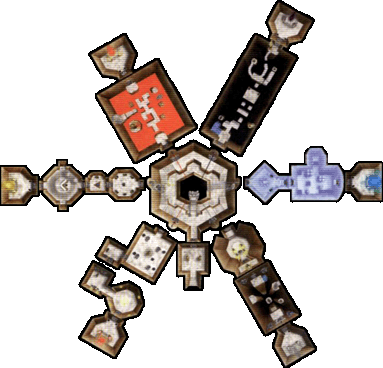
Main Room – Welcome to the main room of the castle. The center tower that leads upwards is surrounded by a magical shield that will hurt you if you approach it. Naturally, the different colored energy beams that feed it represent each of the six elements in the game. Outside of needing an item from the Shadow Barrier to complete two of the other elements, it doesn’t really matter what order you tackle the trials, but we need to destroy the barrier for all of them before we can proceed to the tower.
Before we tackle that though, I want to mention there’s a secret “shop” in here where you can stock up on arrows, shields, fairies, etc… It’s hidden in this main room, directly below the bridge leading to the tower in the wall. Use the Lens of Truth to see through the illusion and you’ll find a small room with several Business Scrubs and fairies. Good to know.


Main Room – I strongly suggest doing Shadow first, which is the purple. You’ll see why in a moment, so head on through.
Shadow Cavern – As soon as you start, shoot a Fire Arrow at the unlit torch on the lone platform on your right. This causes blocks to temporarily appear. You can open a nearby chest if you’d like, but nothing of great importance. Run along the blocks, avoiding the Green Bubble, until you get to the far platform. Be very careful with the Like Like, cause it can spit you into the pit and you’ll have to start the room over again.


Once it’s dead, shoot the unlit torch on either side of the room to make the blocks appear again. Jump to the next platform. Shoot the torch on this side of the room again if needed, and jump along the blocks on the right side down to the switch, which makes a large chest appear on the big platform. Use your Longshot on it to quickly get back up. Open the chest to find the Golden Gauntlets. This is why we went the Shadow route first.


Now, use your Lens of Truth to see an invisible path leading to a rusty switch. Work your way over there and smash the switch with the Megaton Hammer, opening the next door. Use your Longshot on the unlit torch, or go the long way around using the Lens of Truth to take the invisible path in the middle, and go through the door.


Shadow Barrier – In this final room, smack the jars if you need arrows or magic, then shoot a Light Arrow at the golden sphere. This destroys the magical barrier blocking the Sage of Shadow, Impa, from using her powers. She’ll then teleport you back to the main room.


Before we venture on, there’s something special we can do with our new found Gauntlets. Exit Ganon’s Castle entirely, and in this outdoor area, go all the way left to find a very large, silver pillar lodged against the wall. Go up to it and press A. Link will grab it and heave it over his shoulders, tossing it and making it lodge itself in the hillside. Wish I could do that… Enter the last Great Fairy Fountain.


Inside, play Zelda’s Lullaby as always to make the Great Fairy of Courage appear. She gives you the best upgrade of the game: defense. Now you will only take half the amount of damage. This’ll make the final stretch a little easier, hmm? Go back into the castle.

Main Room – Once again, it doesn’t matter which order you do the barriers in, I just did Shadow first to get the upgrade. I like to do them in the order of the temples. That being said, next up’s the Forest Barrier, which is green.
Torch Room – As soon as you enter, you’ll be confronted by a Wolfos. Nothing to fret over. Once he’s taken care of, we’ll have to light all the torches in the room. There are four in the center and one above the door. Use Din’s Fire and/or Fire Arrows to light them all.


Silver Rupee & Fan Room – This room is fairly tricky. Be careful not to fall into any of the pits, or you’ll have to start all over again. First off, equip the Hover Boots, as they’ll be helpful for the entire room. Next, play the Song of Time while facing the Rupee directly on your left.
Wait until the fan is blowing, then step into it getting the first Rupee in the process (1). You’ll land on a platform in the middle on the left side. Throw a Bomb at the Beamos in the center to kill it. Run over to the small platform with the switch on it, landing atop it. Turn around and Longshot to the target on the platform we were just on, collecting the second (and most confusing) Rupee (2).


Use the center pillar to get to the other side of the room (3), then head towards the barred door (4). Climb up and wait till the fan on your right stops blowing, then snag the final Rupee (5). Go through the door.
Forest Barrier – Smack the jars to refill some magic, then shoot a Light Arrow at the barrier just like before, allowing the Sage of Forest (Saria) to use her powers. Shooooosh!

Main Room – The Fire Barrier, which is red, is next on the list. We’ll have to equip the Goron Tunic for this one.
Lava Room – This is one of the most frustrating rooms, because you can easily fall in the lava and have to start the room over again. Most of the platforms in this room, including the main, zig-zagging one in the center, will sink in the lava when you stand on them.
The trick here is to use the Hover Boots at all times, as it will prevent the center platform from sinking! Use this to your advantage if it works for you, since it can make this room MUCH easier!
Jump to the middle platform, then onto the square block on the right to get the first Rupee (1). Quickly jump back on and go around to the opposing platform (which doesn’t sink). Try to jump up between the sweeps of fire, climb up and circle around the backside (2).


Jump back onto the middle platform, ignore the Red Bubbles, and work your way to the far end of the left side of the room where there’s another sinking block that has a recovery heart on it. Jump to this one, then onto the skinny platform, which is safer that way. Climb up and use the Golden Gauntlets that we got from the Shadow Barrier to toss the giant pillar. Snag the Rupee that was underneath (3).


Jump down and onto the center platform, then run across the way and climb onto the solid platform. Kill the Torch Slug real quick, but DON’T get the rupee yet. Instead, jump over to the pillar that we tossed and at this point, if you have them on, take off the Hover Boots. Jump onto the sinking block to get the rupee and then jump back (4).
Now collect the silver rupee that is next where the torch slug was (5). If you get the rupee on the sinking platform last, it will show an animation of the gate unlocking, but during that animation, you might sink into the lava.
Put the Hover Boots back on and jump back onto the zigzagging platform. Pull out the Longshot and hit the target by the door. Once you have managed it, go through the door.


Fire Barrier – Grab the goodies in the jars and shoot the barrier with a Light Arrow to unleash the fury of the Fire Sage, Darunia.

Main Room – The Water Barrier (blue) is one of the two on the lower level, so it should be easy to find.
Blue Fire Cavern – Watch out for the stalactites hanging from the ceiling in this room. Run forward to make two Freezards appear. These particular ones will move across the room before blowing their icy breath at you, so take advantage of that to slaughter each while they’re sliding across the floor.


Once both are dead, the door opens. Slash the stalagmites and snag a bottle of Blue Fire. Use it on the Red Ice barrier blocking the door. Before heading through the door, be sure to grab some more Blue Fire as we’ll need it up ahead.
There’s two small chests in here as well… The one on the right is a recovery heart, while the one on the left is a frost trap.
Ice Block Cavern – In this room, we have to move ice blocks in order to get to the upper ledge. First of all, move the block farthest from the door towards the giant snowball, then into the hole.
Now move the block closest to the door you came from to the snowball, then to the other one, and finally to towards the ledge with red ice.


Climb up and use the Blue Fire to melt the Red Ice barrier, then use the Megaton Hammer to smash the rusty switch. Go through the door before you run out of time.


Water Barrier – Slash the jars and shoot the golden orb with a Light Arrow. The Sage of Water (Ruto) salutes you alike all the other Sages and zips you back to the main room.

Main Room – Next up is the Spirit Barrier (orange).
Armos Room – In this first room, use Bombs to kill the Beamos and Longshot up to get the Silver Rupee in mid-air. For the rest of the rupees, you can pull back on the Armos statues to sneak in and get the Rupees nearest the wall. Once you get them all, go through the next door.


Bombchu Puzzle – First, kill the two Torch Slugs in here. In the Nintendo 3DS version of the game, there is a crystal switch here that drops a treasure chest. In the Nintendo 64 version, it is located right on the other side of the fence and you have to perform a spin attack to hit it. Open the chest to get some Bombchus.
Now we have a little puzzle: We have to hit the switch on the far side of the room, but we can’t shoot arrows through the slits in the bars. Face the crystal switch that’s far off, aligning yourself with the hole above the bars, then whip out a Bombchu. If you line it up properly, it will smack right into the statue and blow up.


Sunlight Barrier – Run left and you’ll find yourself surrounded by Sun Faces, except, no sun! Look up and you’ll see there’s a cobweb blocking the light. Use a Fire Arrow to burn it away. NOTE: If you never got Fire Arrows, you can still solve this puzzle. In the previous area there are two torches. If you perfectly line yourself up, you can shoot an arrow so it picks up some fire from the torch and burns the cobweb.
With that out of the way, reflect light with your new Mirror Shield on the Sun Face that is just around the corner to the left from where you entered the room. The others are all traps of Wallmasters. Go through the door.


Spirit Barrier – You know the drill: collect the goodies in the jars and shoot a Light Arrow at the sphere to unleash the power of the Sage of Spirit (Nabooru).

Main Room – At long last, the final barrier is blocked by a giant silver obelisk. You should already have the Golden Gauntlets at this point, so run up to it and toss it behind you. Nifty.
Trap Room – In this room, immediately whip out your Lens of Truth. Shoot the Skulltula in the center of the room with your Hookshot or Fairy Bow to kill it instantly. Next, without moving, try to shoot the three invisible Keese that are also in the room.


Once they’re all dead, a small chest appears in the room containing a Small Key. I suggest ignoring the other chests, half of them are ice traps. If you really must though, the ones that contain goodies are the same ones that the Keese were sitting on…
Lullaby Room – This room is pathetic. Simply play Zelda’s Lullaby on the Triforce symbol to make a small chest appear containing the Small Key. Enter the door.
Rolling Boulder Room – Now it gets a little tricky… This small, circular room has two rolling boulders in it that constantly get in the way. There’s two holes on the left and right sides of the room containing Silver Rupees (1+2). The platform in the middle has three cubbies in which reside two more (3+4), and the final Silver Rupee is above the center platform (5), simply stand in the middle and use the Longshot.


The most important thing about this room is to not get hit by the boulders. Reason being because they start out both going clockwise around the room, as soon as you hit one though… They both bounce off each other making this deadly cycle that can make this room much harder. Once you manage it, head through the door.
Light Barrier – This room is… Empty? Use the Lens of Truth to see the wall where the barrier would be is fake. Run through into the TRUE barrier room. Smash the jars and shoot a Light Arrow at the sphere to release the Sage of Light (Rauru).


Main Room – Once all six barriers are down, the shield surrounding the central pillar dissipates. Before we head on through, I suggest stocking up on some Fairies if you don’t have any. Let’s head on in, shall we?
Run on through this first hallway, ignoring the Fire Keese.
Dinalfos Room – As the name of the room would suggest, we have to kill the two Dinalfos before the door will open. They should be easy for you at this point, just remember that these particular enemies fight you both at the same time, regardless of targeting. Enter the door and go up the lonely stairs.


Stalfos – Boss Key Room – In this room, we have two Stalfos we have to defeat. If you’re not quick enough, the other will jump back up. The best way to defeat them is to get close while holding up your shield, which makes them lower their guard, and stab them quickly. Once they’re both defeated, open the chest that appears for the Boss Key. Go through the door and climb another set of stairs.


Iron Knuckle Room – This room has two Iron Knuckles, a black and white one. They only come to life if you smack them, so I suggest only taking one at a time. If you have the Biggoron Sword, use that, as it will make this battle much faster. Yet another set of stairs, which leads to the Boss Door. The organ is getting louder… Head on through.


Boss Room – This room has lots of jars containing Arrows and Magic. It’s actually part of the boss room, so try not to smash all of them; I know it’s tempting. 😉
Enter the next door and head up the stairs. The music is very clear and loud now… Okay, THIS is the final door.
As you enter the final room, you’ll see Ganondorf was the one playing the organ all along while Zelda is still trapped in her crystal prison. Both of your Triforce parts resonate in your hands, healing you, and Ganondorf begins his bad guy ramblings, which is actually quite little compared to most Zelda games.
As a final act of plain meanness, he sends evil waves at you that prevents Navi from getting close. Translation: you can’t target for this entire battle. I hope you brought some fairies, you may need them for this battle.


As soon as the battle begins, run away! He slams the ground with his first attack, getting rid of the blocks closest to the center platform. This battle reminds me of the “Don’t Break The Ice” game, except he’s trying to break it. All of his attacks have the potential to remove some of the blocks in the room, making it harder to get to the center. Don’t linger too long on the center platform, as this will cause Ganondorf to use his punching attack, which has quite the range.
The King of Evil’s primary attack is to toss an energy orb at you, which does four full hearts of damage! You can simply avoid it or use the Mirror Shield to block it, but in order to harm Ganondorf, you have to smack it with your sword to toss it back at him. It is very similar to the Phantom boss of the Forest Temple. Just time the slash and knock the ball back at him until he’s stunned for a moment…
Once Ganondorf is stunned pull out a Light Arrow and shoot him with it, bringing him down the ground floor. Quickly jump over and slash away with your Sword. Once he recovers, quickly run back to one of the corner platforms.


Ganondorf’s last attack is to raise his hands in the air and collect this nasty, puke-colored green or black swirlies, depending on the version of the game you’re playing, that he shoots out in the form of lightning balls that zig-zag towards you. Your shield is no good against this attack, but it can be avoided by running at the last second. However, you can shoot him with a Light Arrow while he’s charging it up, or simply charge a Spin Attack and release it to reflect the energy orbs back at him!
Throughout the fight, you can use the Hover Boots to get to the center platform, to assure you don’t fall. If you use your regular boots, you can perform a jump attack when you leap over to Ganondorf, dealing some extra damage. Since two of his attacks kill the blocks, it may be smart to stay in the corners, as those blocks cannot fall.
That’s pretty much all there is to this battle. It’s fairly difficult in that it’s odd to get used to, but like all the bosses, once you get the hang of it, they can be defeated quickly. Using the Biggoron’s Sword will make this process much faster. Remember: if at any time you start running low on Magic or Arrows, jump down into the lower portion of the room. He won’t attack you down here. Smash the jars for goodies and climb back up.


For veterans, there’s a trick to stand in the center and being prepared to fall back onto the climbable part of the center platform, avoiding Ganondorf’s attacks, as well as being close by every time you have a chance to stun him. Doing it this way allows Ganondorf to be defeated within thirty seconds, easily.
Once he’s been defeated, you’ll witness a short scene in which Ganondorf will voice his astonishment, then cough up either blood or throw up, depending on the version of the game you’re playing. The original game used “red” while for later versions, as well as the Master Quest, it was changed to green. I assume because it was deemed too violent for younger players. He’ll then scream and glow, causing the whole room to fall apart.
You’ll appear on the roof with a defeated dark wizard and the princess, who is released from her crystal prison. She comments on his stupidity for a moment before the tower begins to… crumble! Quickly follow Zelda down the ramp and through the door she opens. This next set of rooms requires you to simply follow Princess Zelda back down the castle. You’ll pass back through familiar rooms and it’s all fairly straight forward. Try to avoid getting hit by the falling rocks and keeping following Zelda.


Stalfos Room – Approach Zelda twice and flames will surround her. Oh no! The two Stalfos from earlier will reappear, and once again, if you don’t defeat them quick enough, the other will come back. After they’re both gone, Zelda leaves behind some Recovery Hearts for you.
Back outside, jump off the ledge (again, careful to stay close) and go through the door she opens.
Main Room – Once you reach the main room, you’ll find a ReDead on the bridge that can give you trouble. Try to ignore the enemy and just continue on through. This leads to a final set of stairs, also covered in flaming rocks. Once you get to the exit, you’re out for good.


Enjoy the cool scene in which the tower sinks into itself. You’d think with all that rubble flying everywhere, they’d kinda get hit or squished…
In what remains of the ruins, just Zelda, Link and Navi are left, grinning away at the devastation. Suddenly a loud sound like something falling will resound throughout the empty place… After you regain control of the hero, go investigate. As soon as you get close to the pile of stuff, another scene begins. Fire surrounds the area and Ganondorf flies out of the ruins, rasping hard as he uses the Triforce of Power to transform himself into a hideous pig monster with a pot belly. Oh no’s!!!!


As soon as you start the battle, Ganon will smack the Master Sword out of your grasp and outside the barrier. Why doesn’t Zelda just toss it back? Anyway, we’ll have to make due until then… This boss is actually very simple and can be defeated with most of your other weapons and items, so that’s a good thing. His only attack is to slash you with his sword, which can easily be dodged or rolled to avoid.
It becomes obvious very quickly that Ganon’s weak point is his brightly colored tail, which can be smacked with anything to hurt him. It’s getting to his backside that’s the problem. There are two methods to do this…
The first, and by far the most effective way, is to simply roll through his legs. Simply run right up to him and attempt to roll right between his legs to get to his backside. From there, quickly use either your Megaton Hammer or the Biggoron’s Sword to deliver a direct attack to his tail. Once you hit him once, run away before he can turn around and swipe at you. It’s as simple as that. Just rinse and repeat until this first phase is over with.


The alternative way to defeat him is by first stunning him. There are several effective ways to doing this.
4 Ways To Stun Him:
- Deku Nut (shortest stun)
- Longshot (short stun)
- Din’s Fire (long stun)
- Light Arrow (longest stun)
After stunning him, you can quickly do some side hops to get to Ganon’s backside. While targeting his tail, you can then hit the tail with a Deku Nut, the Longshot, an Arrow, or if you are close enough, one of your melee weapons.


While Navi doesn’t have any useful information to speak of for this battle, her targeting is very user friendly and intelligent. If he’s facing you, it’ll automatically target his face, but if he’s turned to you, it’ll target his tail, meaning you can shoot his tail with an Arrow for example if you’re far enough to one side or behind him…
Both of those methods, ranged or rolling, work well. Surprisingly, for a last boss, he has a lot of weaknesses. If you begin running low on stuff, you can lure him to attack any of the “ruins” nearby. Each drop a separate item: fairies, magic jars, bombs and arrows. Also, using Nayru’s Love for this battle might not be a bad idea if you’re having trouble with it.
Suffice to say, after a good ten hits or so, Ganon will fall to the ground, temporarily dropping the fiery barrier. Quickly run and get the Master Sword before he gets back up. Return to finish him off, though, this time he’ll be a little faster. Just keep doing what you’ve been doing and after another ten hits or so, he’ll fall down once again.


NOTE: During this phase, you have to hit him with the Master Sword. Even though you can equip the Biggoron’s Sword again, you cannot finish Ganon off with it. You can weaken him, but it will never trigger the final blow, unless you attack him with the Master Sword.
Once you finally manage to knock him down, Zelda will stun him for a bit. Quickly equip the Master Sword and slash it at Ganon’s head, then sit back and enjoy the show…


14.5 Credits
WARNING: SPOILERS! – After the final strike, Ganon will stand up and slash around. Zelda quickly summons a ball of light and calls upon the Sages to seal the evil beast. You’ll witness a cool scene in which they all glow for each of the elements, then form a vacuum of light… Oooo…
Ganondorf then floats in the Sacred Realm, vowing that one day he’ll get out and slaughter everyone. Anyone sensing an upcoming game or eleven?


At long last, it’s just Zelda and Link. She explains that she never intended to “open the door” for Ganondorf to get into the Sacred Realm, or to bring you along for this wild adventure.
In order to set things right, you have to give her the Ocarina of Time back and put the Master Sword back in the pedestal of time… Aww, this seems so sad…


From here on out, it’s simply credits and several scenes of the happiness across Hyrule. You’re a hero, dude. At long last, it’ll show Link leaving the Master Sword in the Pedestal of Time, followed by a short scene in which Link and Zelda meet again in the royal garden to warn them about Ganondorf before he entered the Sacred Realm. Ahh, time paradoxes. Just love ’em, don’t ya? Congratulations, you beat the game!


- Chapter 1 – Inside The Great Deku Tree
- Chapter 2 – Princess of Destiny
- Chapter 3 – The Mighty Collection
- Chapter 4 – Dodongo’s Cavern
- Chapter 5 – Inside Jabu-Jabu’s Belly
- Chapter 6 – Timely Appearance
- Chapter 7 – Forest Temple
- Chapter 8 – Fire Temple
- Chapter 9 – Ice Cavern
- Chapter 10 – Water Temple
- Chapter 11 – Bottom of the Well
- Chapter 12 – Shadow Temple
- Chapter 13 – Spirit Temple
- Chapter 14 – Ganon’s Castle
