- Chapter 1 – Inside The Great Deku Tree
- Chapter 2 – Princess of Destiny
- Chapter 3 – The Mighty Collection
- Chapter 4 – Dodongo’s Cavern
- Chapter 5 – Inside Jabu-Jabu’s Belly
- Chapter 6 – Timely Appearance
- Chapter 7 – Forest Temple
- Chapter 8 – Fire Temple
- Chapter 9 – Ice Cavern
- Chapter 10 – Water Temple
- Chapter 11 – Bottom of the Well
- Chapter 12 – Shadow Temple
- Chapter 13 – Spirit Temple
- Chapter 14 – Ganon’s Castle
11.1 Song of Storms
Kakariko Village – After completing the Water Temple, as soon as you enter Kakariko Village, you’ll witness a scene in which Kakariko is in flames. You find Sheik grimly ready to face the boss of the upcoming Shadow Temple, coming out of the well where it was sealed. Great place to keep something evil right? In your water supply…
After getting beat up, you’ll awaken and Sheik will recite more poetry, after which she teaches you the Nocturne of Shadow. Too bad we couldn’t teleport to this town earlier! Would have been nice before. *grumble grumble*


Although we can technically enter, and even complete the Shadow Temple now, there’s a mini-dungeon we have to tackle beforehand to get a very useful item.
Kakariko Village – We previously acquired the Song of Storms shortly after we got the Hookshot. However, there has been no required use for the Song up until this point. So if you haven’t gotten it, now is the time to do so. The game doesn’t directly guide you in this direction at this point.
Enter the Windmill in Kakariko Village and speak with Guru-Guru, the furious guy playing his music box. He’ll rant about how some “stupid kid” came here seven years ago and played “that song” which screwed up the windmill. Whip out your Ocarina and he’ll teach it to you. *snicker*


11.2 Return to Childhood
Our next mission is inside the Bottom of the Well. However, you can only enter this mini-dungeon as a child. So play the Prelude of Light and return to the Temple of Time. Place the Master Sword in the pedestal to return yourself to Young Link.


It has been awhile since we have been a child and now that we have the Song of Storms, there are some optional goodies for us to collect.
There are a few more things we can get as a child, so return to the Temple of Time and place the Master Sword back in the pedestal.

Hyrule Castle – Go back to Hyrule Castle and make it past all the guards once again, just as you did before. Once you make it by all of the guards and you are almost at the area where you woke up Talon with the Cucco, you’ll notice a small tree in the corner. When you walk by it, the Shard of Agony starts to chime. Stand next to this tree and play the Song of Storms to make a hole appear. Completely logical… Fall down it and bomb the wall on your left to find a Gold Skulltula.
In the area just outside Hyrule Castle, there is a tree in the corner of the gate. Stand next to it and play the Song of Storms. Drop down the hole, bomb the wall on the left, and collect the Skulltula.Optional: Gold Skulltula #78


Zora’s River – Next, go to Zora’s River and go to mid point where there are logs sticking out of the water. Get on the one closest to “land” and stand on the square mark. Whip out your Ocarina to make frogs appear.
First, play the Song of Storms to instantly be rewarded with a Heart Piece. That was easy. Next, play all of your other, non-teleport songs. For each they’ll reward you with fifty Rupees. Man, these things are so worthless now, especially since most of it goes to waste in your overflowing wallet.
Once they’re all fully grown, whip out your Ocarina again to play a little game. You have to press the button for each frog that has a fly above its head. If you’re too slow or pick the wrong one, you have to start over again. The songs they make you play are somewhat random so you just have to think quick. Once you finally get to the end, they’ll reward you with another Heart Piece.
At Zora’s River as a child, near the center of the map, step on the nearby log that sticks out into the water. Pull out your Ocarina to get five Frogs to appear. Play the Song of Storms and you’ll be rewarded with a Piece of Heart.Heart Piece #31


At Zora’s River as a child, when you meet the five frogs, play Zelda’s Lullaby, Saria’s Song, Epona’s Song, Sun’s Song, and the Song of Time. Each time one of the frogs will grow in size. Once all five frogs are grown, you can play a game of Simon says where you have to quickly press the right button, depending on where the butterfly appears, over the frogs head. The pattern is as follows. Nintendo 3DS Version – L, X, Y, R, X, Y, R, L, R, L, R, Y, X, L
Nintendo 64 Version – A, C-left, C-right, C-down, C-left, C-right, C-down, A, C-down, A, C-down, C-right, C-left, AHeart Piece #32


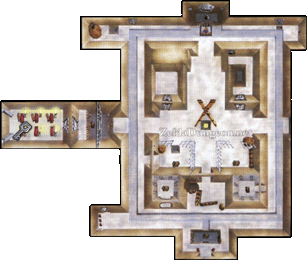
11.3 Bottom of the Well

Navi will continually harass you now about going in the well, but in the future, it’s blocked off. Return to the past and… well… the well is full of water. I don’t think this part is very clear, but the windmill draws the water from the well.
Once inside the windmill, go stand before Guru Guru and play the Song of Storms. This will cause it to go haywire just like it did in the future, and also make his reaction to you in the future make more sense now. The water from the well will drain dramatically, giving you access to the next mini-dungeon. Sweet.
Go back outside, climb down it and head on through.


Entry – As soon as you enter, crawl through the hole then go down the ladder. A big Skulltula will block your path. Wait until its back is to you and defeat it. After he’s defeated, check out the skeleton nearby if you’d like… The entire dungeon is filled with fake walls and you can walk through the wall that is straight ahead.


NOTE: The primary treasure of the Bottom of the Well is the Lens of Truth and we can get this dungeon item fairly early on. Once we acquire it, we can leave the dungeon without even visiting the majority of the rooms. That said, this is a full-blown mini-dungeon, complete with a Compass, Dungeon Map, and multiple Skulltulas. Thus, this guide will first acquire the Lens of Truth and all of the optional content will be found thereafter.
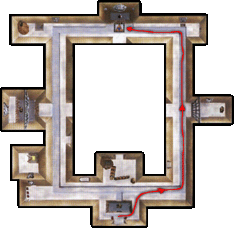
Main Room – This large room is shaped like a doughnut, with a hidden room right in the middle. There are hidden holes in the ground all over the place and you can easily fall down into the Basement if you are just wandering around. If at any point you do fall into the Basement, jump down a few paragraphs to the section titled Basement.
We want to make our way to the complete opposite side of this room. Run forward and you’ll find a small stream of water. Take the path to the right and just follow the stream. As long as you stay on this water path, you will not fall down a hole. There is a massive Green Bubble that circles through the area as well. You can easily stun it with a boomerang and then defeat it if you’d like.
Just stay on the water path until you are at the opposite side of the room where you will find a Triforce symbol on the ground. Whip out your Ocarina and play Zelda’s Lullaby. This will cause the water in the dungeon to drain, giving us access to some near areas.


We now want to make our way back to where we first entered this large room. Again, stay on the outer path where the water use to be to avoid falling down into the Basement. At the entrance of this room, now that the water is gone, you can jump down into the small pit. Open the small chest if you’d like to get some bombs and then crawl through the small hole.


Watch out for the Skulltula hanging from the ceiling. After killing it, climb up the vines and go through the door to take on the mini-boss of the Bottom of the Well.
Dead Hand Room – Ack! Here you’ll find a creepy new enemy called Dead Hand. Let one of the hands grab you, then mash the A and B buttons to get free. Wait for the body to get close and it will lean down towards you. Use your sword to smack the head once it’s about to bite you. Dead Hand will eventually walk away and burrow underground. Repeat the whole process once again. While creepy and intimidating, he’s not that hard at all and you can easily defeat this enemy without getting hit.


Once he’s defeated, open the large chest that appears to find the Lens of Truth!


Well that’s it. If you want to leave the dungeon, just go right ahead as we got what we need. However, if you want to get all the goodies including the Skulltula tokens, keep following along.
Right away let’s put that Lens of Truth to use. If you use it you will find there is another treasure chest hidden within this room. Open it up to get a Gold rupee!


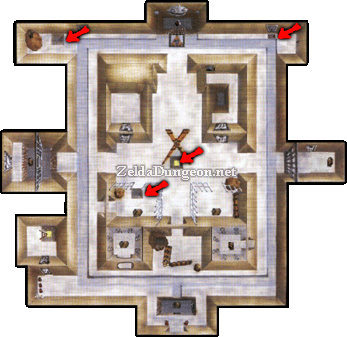
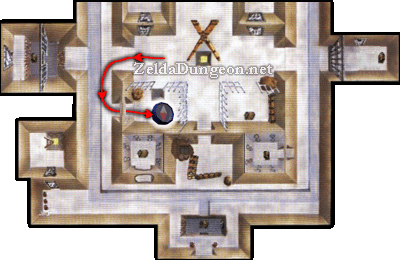
Main Room – Make your way back to the large main room with rectangular path along the perimeter. Now that we have the Lens of Truth, we can see where all the fake walls are located. First things first we want to head down to the Basement to get the Dungeon Map. While there are a few different holes that you can fall down, the one right in the center of the room is your best bet. Use the Lens of Truth to find the central area with the X-Shaped poles. From there drop down into the Basement.


Basement – This large basement cavern splits into four paths that all lead to dead ends. Two of the paths have absolutely nothing nothing of interest. One of the other paths leads to a location where Navi will turn green. You can play the Sun’s Song to summon a fairy.
The path we want to take is the one on the far right, with the two burning torches. Use Bombs on the two boulders blocking the way, then use the Sun’s Song to stun the ReDead. This eventually loads to a treasure chest that contains the Dungeon Map.


After snagging the map, go back to the main part of the Basement with the green poison water. It would be a good idea to kill the lone ReDead here so it doesn’t bother you. Snag the three Silver Rupees near the planks and then climb up the ladder. Snag the Rupee here and go up the second ladder. Collect the final Silver Rupee to open the door. Go through and it’ll close behind you.
At any point if you fall back down into the Basement, you’ll have to do this again to make your way back up.


Main Room – If you go to the center… room… inside the main room, you’ll see a large chest in one of the fenced in alcoves. Using your Lens of Truth, you can see there’s a pit blocking the entrance though. Don’t try jumping across, it won’t work. Just look around inside that alcove and you’ll notice one of the side walls is fake. Walk around the outside and go in to snatch the Compass. Go back the safe way now 😉


Main Room – Now, it’s time to round up some Small Keys. We’ll tackle the oddball one first. On the west side of the dungeon is a pit with metal grating over it, which was filled with water before. Jump down and open the small chest if you’d like, then climb the wall and go through the door.
Coffin Room – As you enter this room filled with traps, you should kill the Gibdo first. Use the Sun’s Song to stun it to make it a lot easier.


After that, we need to open the coffins by lighting the torches that are beside them using Deku Sticks. There are enemies inside them, along with goodies. The casket in the southwest corner of the room has the Small Key in it. The rest of them have some Keese and even a Gibdo. Grab the small key and return to the main room.

Main Room – Now, you’ll see on your map that there are two chests hidden in each corner of the southern parts of the main room, within the walls. If you walk around the perimeter of the room, using the Lens of Truth, you’ll see little alcoves with chests. Open them both to get two Small Keys.


Main Room – In the center of the main room is two small rooms we’ve ignored thus far. Inside each of their locked doors are Skulltulas.
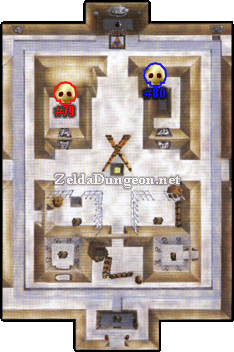
Skulltula Room – Left – The room on the left simply has a lone Deku Baba in here… and some killer pots. I suggest using your shield to run forward and deflecting the projectiles before assaulting the plant. Snag your prize and head to the other room.
In the center room of the Bottom of the Well, there are two locked doors. The room on the left has a Deku Baba and some flying pots. The Skulltula can be found along the back wall.Optional: Gold Skulltula #79


Skulltula Room – Right – Once you enter the room, stand by the door and use your weapons to defeat the many Keese from a distance. After that, use your Lens of Truth to see the invisible walkway to the other side so you can claim your prize.
In the center room of the Bottom of the Well, there are two locked doors. The room on the right has a bunch of Keese. Defeat them and then use the Lens of Truth to find the path that leads to the Skulltula.Optional: Gold Skulltula #80


Main Room – In the northeast corner of the main room there is a small hole you can crawl through. Do so to find a locked door. Use your last Small Key on it.
Pit Room – This room is filled with vicious pits and several Fire Keese. First equip your Hylian Shield so they don’t burn your other shield, and then use the Lens of Truth to get closer. It’s easiest to simply let the Keese hit your shield, then slash them to defeat them.


Using the Lens of Truth, throw a Bomb at the Beamos to kill it. If you lost your Deku Shield to the Fire Keese, the small chest in the corner contains a new one. How convenient. Maneuver to the other side and go through the door.
Like Like Cage – It can be hard to move around in this small room and the Like Like will probably eat you at least once. I suggest circling around it, targeting him and then stabbing it quickly. Try to keep your distance and finish off the enemy. If the Like-Like gobbled up your Hylian Shield, or if you lost your Deku Shield in the previous room, the treasure chest here will have a replacement shield for you. Snag the Skulltula on the wall.
At the top-right corner of the Bottom of the Wall, crawl through the small hole and use a key on the locked door. Carefully navigate through this room, avoiding the invisible pits. In the next room with the Like-Like, the Skulltula can be found on the wall.Optional: Gold Skulltula #81


That’s pretty much it. However, if you are a completionist and want to collect the rest of the goodies, there are three more small chests to find, all within the main room.
- In the Northwest Corner, toss a bomb onto the rubble on the ground to reveal a treasure chest that contains some Deku Nuts.
- In the center room, there is cage on the right side guarded by a Skulltula. Defeat it to find a chest containing some Deku Nuts.
- When you first enter the main room, on the left side there is some rubble on the ground. Blow it up with your bombs and drop down the hole to find a chest that contains some Bombchus.


11.4 Lens of Truth Goodies
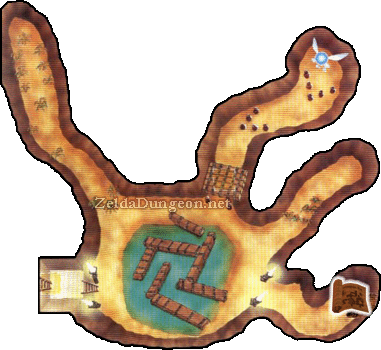
Our next destination is the Shadow Temple as an Adult, but there is one more heart piece we can get now that we have the Lens of Truth. Return to the Hyrule Town Market as a child and play the Sun’s Song to make it nighttime. We want to play the Treasure Chest game, which is located on the side of the market that leads back to Hyrule Field.
The game progresses you through various rooms where you open one of two chests, each time getting a 50% chance to go on or lose. The odds are certainly not in your favor and it’s nearly impossible to win. That is of course, unless you cheat.


Pay the man the Rupees, then use your new Lens of Truth in each room to see what’s inside the chests before actually opening them. Make your way to the very end to get a Heart Piece.
Using the Lens of Truth, play the Treasure Chest game in the Market at nighttime. The Lens of Truth will allow you to see which treasure chest holds the Small Key, so you can never fail at the game. After a making it through a series of rooms, acquire the Heart Piece.Heart Piece #33


- Chapter 1 – Inside The Great Deku Tree
- Chapter 2 – Princess of Destiny
- Chapter 3 – The Mighty Collection
- Chapter 4 – Dodongo’s Cavern
- Chapter 5 – Inside Jabu-Jabu’s Belly
- Chapter 6 – Timely Appearance
- Chapter 7 – Forest Temple
- Chapter 8 – Fire Temple
- Chapter 9 – Ice Cavern
- Chapter 10 – Water Temple
- Chapter 11 – Bottom of the Well
- Chapter 12 – Shadow Temple
- Chapter 13 – Spirit Temple
- Chapter 14 – Ganon’s Castle
