- Chapter 1 – Inside The Great Deku Tree
- Chapter 2 – Princess of Destiny
- Chapter 3 – The Mighty Collection
- Chapter 4 – Dodongo’s Cavern
- Chapter 5 – Inside Jabu-Jabu’s Belly
- Chapter 6 – Timely Appearance
- Chapter 7 – Forest Temple
- Chapter 8 – Fire Temple
- Chapter 9 – Ice Cavern
- Chapter 10 – Water Temple
- Chapter 11 – Bottom of the Well
- Chapter 12 – Shadow Temple
- Chapter 13 – Spirit Temple
- Chapter 14 – Ganon’s Castle
2.1 Leaving Kokiri Forest
Upon returning to the village, you are immediately stopped by Mido, who jumps to the conclusion that YOU killed the Great Deku Tree. Before you can get a word in, he leaves. Jerk! Since there’s nothing to do here at the moment, go ahead and leave via the exit on the opposite side of the village.
You’ll then witness a short clip in which Link runs across the bridge leading to Hyrule Field and Saria pops out of nowhere to say goodbye. Aww, so sad… As a parting gift, she gives him the Fairy Ocarina, a mystical instrument that allows you to play magic songs throughout your journey. Sweet. After that, Link decides to run away. Give her a hug or something, man!


As soon as you exit, you’ll witness a short clip giving you an overview of the field. The castle on the opposite side is our goal. When you regain control, head around the corner and- DOH! The owl who interrupts you is named Kaepora Gaebora, and he will speak to you endlessly about various matters. Basically, he just reaffirms that you need to go to Hyrule Castle and explains that you have a map, even out here. When he’s done talking, make sure you select the bottom option: No, I DON’T want to hear it again! Nintendo swaps his responses just to frustrate us throughout the game…


Once he flies away, start running towards the castle (use your mini-map to head straight there). If you’re quick and head straight there, you’ll make it there before nightfall. If you dilly-dally and explore even a little bit, you probably won’t make it before night and the drawbridge will raise, locking you out. If you stray off the path at nighttime, you’ll encounter a new enemy: Stalchildren. If you don’t want to face them, you can just wait on the road (they don’t appear if you do). At sunrise, the drawbridge will finally lower for you.


NOTE: At this point there is a LOT that you can do before heading off to meet Princess Zelda. While some portions of the world are still blocked off, you already have access to the Lost Woods, Gerudo Valley, Lake Hylia, Lon Lon Ranch, and Kakariko Village. All these locations (that we haven’t been to yet) have several heart pieces, gold skulltulas and other items that you can collect, even right now. However, while we can access these areas and get these goodies now, the main storyline objectives in each region are still blocked off, and it would be a long trip out of the way. So to optimize your path, this guide will be collecting all these goodies in the upcoming chapters. Don’t worry, we’ll eventually get it all!
Head into the heart of the Market. There’s nothing required in the Market at the moment, but there are some optional goodies. Talk to people if you like, but then go to the opposite side of the area and follow the road.
2.2 Castle Town Market
There is nothing in this section that is required, so skip ahead to section 2.3 to continue onward with the main quest.
Once you enter the Market, immediately enter the first door you come to on the overhead view screen. This is a guardhouse where the soldier on duty is supposed to be watching the crates and jars to make sure nobody busts them up. Fortunately for us, he’s bored, so he’ll let you tear the place to shreds. =D This is a great place to get Rupees early on, but more importantly, one of the crates in the back of the room next to the guard contains a Gold Skulltula.Optional: Gold Skulltula #4


Next we want to head over to the Shooting Gallery in the main part of town. It will require at least 20 rupees, so now is a good time to stock up. You can go in and out of the guardhouse if you’d like, but there are also some cool secret rupees just by the draw bridge.
If you move carefully, you can climb up the drawbridge that is located just outside of Castle Town. If you climb up to the very top of the chain and then jump towards the center of the bridge, you can find a red rupee. You can do this on both sides of the bridge to get 40 rupees. There is actually a third hidden red rupee in the center of the bridge. This one requires you to first roll and then jump off the chains. You want to stand a little bit away from the edge of the wall as well. This one is a bit more difficult to get, but the 40 rupees should be fairly easy.


Enter the main part of the Market and make your way over to the Shooting Gallery. It is indicated by the bulls eye right above the doorway.
Shooting Gallery – The owner of this shop has big lips as well as a big prize if you can complete his little challenge. The goal of the game is to shoot all of the Rupees that come out. It’s the same pattern each time, so it should be plenty easy to remember. Just take into account that your Deku Seeds take a little bit to travel for the moving ones.
If you get almost all of them, you can play again for free. Only perfect scores get prizes, and only the first prize is anything other than the usual 50 Rupees. All in all, a pretty easy mini-game. Keep playing until you score a perfect and you’ll be rewarded with a Deku Seed Bullet Bag, allowing you to carry up to 40 seeds for your Slingshot.


Next, continue onward beyond the Market, heading towards Hyrule Castle.
2.3 Hyrule Castle
As soon as you enter, head forward to- DOH! It’s that stupid owl again! Kaepora Gaebora assures you that you are going in the right direction, then explains that in some areas, like towns and inside houses, time stands still, while outside (in areas like this or Hyrule Field) time will move regularly. So if you want to wait until day or night, you’ll have to leave town. Good to know I guess.
Once you enter the area that leads to Hyrule Castle, there is tree to the left. Roll into the tree and the Skulltula will fall out.Optional: Gold Skulltula #5


If you walk around this area you’ll find that the area is littered with guards. While we can climb the nearby vines and sneak by them, we first need to get an item. Turn around and return to the Market. You may notice someone who was there before, is now missing. Where’d she go?
Turn back around again and head back towards the Castle a second time. Walk over to the vines and you’ll find the red haired girl here, named Malon. Talk to her to learn that she’s from Lon Lon Ranch, located in the center of Hyrule Field. Her father, Talon, went to Hyrule Castle to deliver some crates of Lon Lon Milk, but she assumes he fell asleep. As long as you’re on your way there, you could wake him up if you find him, right? The obvious conclusion is to give you… an egg…


With potential omelette in hand, climb up the vines again and follow the cliff until you get to the end, then jump off on the other side of the gate (rather than go towards the guard). Once down there, turn to face the castle. You’ll see that there are two guards on the path to the right, so we can’t go that way. Instead, climb up between the two guards on the right and the single guard up top on the left. You should easily be able to make it between them without being noticed.
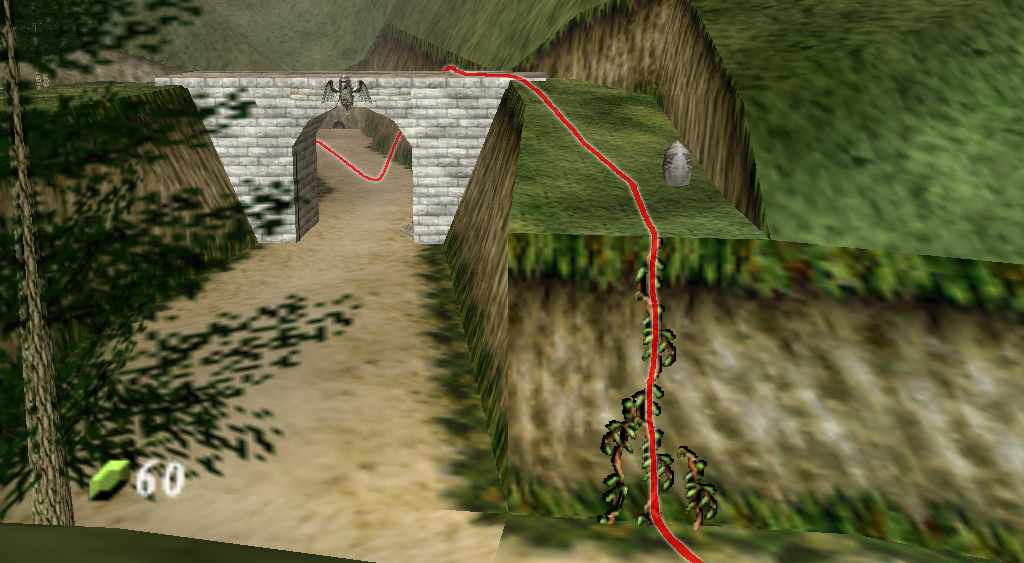


Stay to the left (don’t go on the bright road) and you’ll come to another gate with two guards at either side. On the left, however, are some suspicious looking vines (or stones on the N64 version) sticking out of the cliff here. Walk up to them and you’ll find they’re climbable. Get up top, then jump down on the other side.

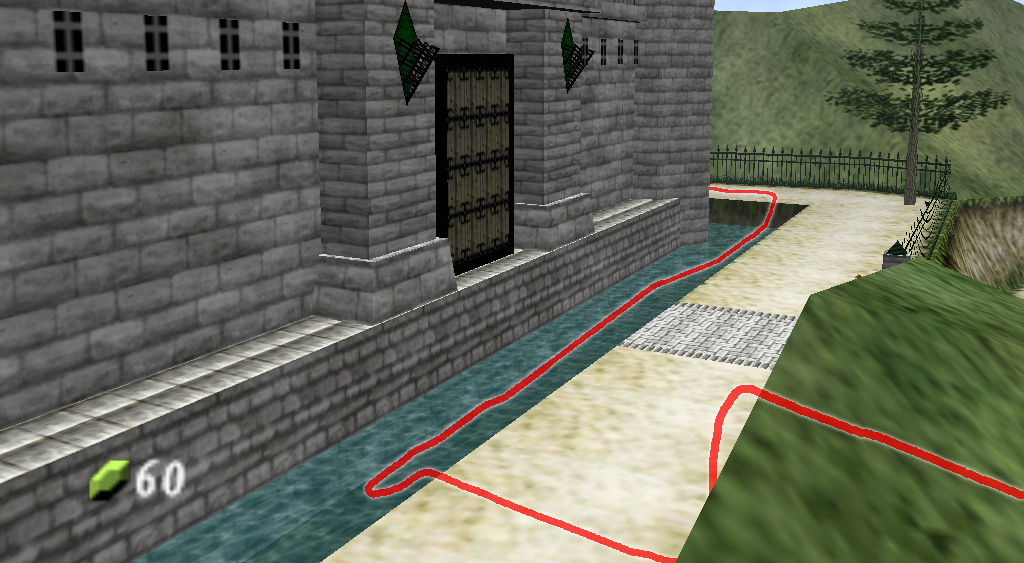
In this final area, there are still those two guards at this gate to deal with… So jump into the moat instead and swim along, collecting Rupees along the way. Once you get to the far corner, climb out and continue the rest of the way until you find Talon sleeping away.


Most likely, it took you longer than a day to do this, in which case, the Weird Egg would have hatched into a Cucco. If it hasn’t hatched yet, just wait around until it does. Put it on a C button and use it while standing next to Talon to wake him up. Speak to him after he gets up to verify what Malon told you earlier about the milk delivery and the fact that he fell asleep. Upon learning that Malon asked you to find him, he runs away screaming out of fear of his own daughter. Strange, strange man.


Once he’s gone, grab the crates and push and pull them into the water. The second one will snap right on top of the first, giving you the added height you need to jump to the water flow coming from within the castle. From here, you can crawl through this hole into the inner walls! (NOTE: The following section must be done during the daytime. If you try to crawl through the hole at night, two guards will immediately catch you and prevent you from going further.)
This area is littered with guards. Surely they could find better ways of keeping watch than making circles around the topiaries and flowers… I can see it now, one turning to the other and profusely declaring: “No way in HELL are people taking these royal blooms!”
Obviously, the goal is to make it through without getting caught. You can stand behind them, but not to either side. Wait until they are either on the opposite side of a fountain, statue, topiary, or are simply walking away from you to make your move.


After you’ve passed the final obstacle, simply turn left and head on into the quiet part of the gardens. In this new area, there are no guards at all, so you can relax. Before talking with Zelda on the other side of the area, check out the cameo pictures in the window on the right side. =D
Anyway, go speak with the princess to engage the perhaps the lengthiest conversation in the history of the Zelda series to this point. After a quick exchange of names, she’ll give away her family’s deepest secrets. As we already knew, after the goddesses left the land of Hyrule, a portion of the power remained in the form of three magical triangles known as the Triforce. What she reveals now is that whoever gains the Triforce will be granted any wish they desire, which could change the fate of Hyrule for the next hundred years.


After being allowed a peep show at the creepy Gerudo man she was spying on, she will recruit you to retrieve the remaining Spiritual Stones to get to Sacred Realm with her before Ganondorf does. She also gives you a “letter,” which you can use to show whoever cares that you have her royal authority.
When you’re ready to go, head for the exit, where you’ll be greeted by Zelda’s nursemaid, a ninja of sorts who’s loyal to the royal family. She believes the young lady’s visions and will help you throughout your quest. For the start of this meeting, she teaches you your first song: Zelda’s Lullaby.


After that, Impa will then lead you outside the castle and point you towards Kakariko Village. After a quick flash of light, you are left to seek out your next objective. Unfortunately, before we really do scale Death Mountain, there are a few other things we need to accomplish that she didn’t mention…
- Chapter 1 – Inside The Great Deku Tree
- Chapter 2 – Princess of Destiny
- Chapter 3 – The Mighty Collection
- Chapter 4 – Dodongo’s Cavern
- Chapter 5 – Inside Jabu-Jabu’s Belly
- Chapter 6 – Timely Appearance
- Chapter 7 – Forest Temple
- Chapter 8 – Fire Temple
- Chapter 9 – Ice Cavern
- Chapter 10 – Water Temple
- Chapter 11 – Bottom of the Well
- Chapter 12 – Shadow Temple
- Chapter 13 – Spirit Temple
- Chapter 14 – Ganon’s Castle
