
OotLord1003
Young Link
- Joined
- Mar 31, 2010
- Location
- CA
Hey Everyone! I have got some requests on how to make signatures that either pop out, or color in manga (see my sig for details).
So here is a quick tutorial on how to do so.
STEP 1: BACKGROUND
1. So first, go to new, and make the size 400x130
http://i873.photobucket.com/albums/ab296/OotLord1003/1.jpg
2. Now we are going to make a background, so pick your specific colors that you want.
http://i873.photobucket.com/albums/ab296/OotLord1003/2.jpg
I'm using a red/black color. So make your foreground color "911919"
http://i873.photobucket.com/albums/ab296/OotLord1003/3.jpg
And your background color "1b0000"
http://i873.photobucket.com/albums/ab296/OotLord1003/4.jpg
3. Then take your blend tool, and drag your line strait up (or down)
It should look like this. (TIP: Hold ctrl for a strait line)
http://i873.photobucket.com/albums/ab296/OotLord1003/5.jpg
4. Now we are going to put a nice design on the background.
I'm using some downloaded brushes, you can get these "http://browse.deviantart.com/resources/applications/gimpbrushes. To put these into gimp (courtesy of lozzykate) Once you have downloaded the brushes that you like, you then have to install them into GIMP. Before you do that though, you have to unzip the ZIP folders that you downloaded.
When you click on you folder that you saved, you need to unzip it.. To unzip it, right click on the folder, click extract all, then click extract. Once you have an unzipped folder. Now, once your folder is unzipped select all of them (Ctrl + A)
Now, what you are going to do then is copy everything. To do that, hit Ctrl + C on your keyboard.
From there, you are then going to go to Start > Computer > OS (C: ) > Program Files > GIMP-2.0 > share > gimp > 2.0 > brushes.Once you are there, you then hit Ctrl + V on your keyboard to paste the files into your brushes folder.
Now, I am using one called "Axeraider70 Winter Breeze" You can get it here.
5. Now, click on your brushes
http://i873.photobucket.com/albums/ab296/OotLord1003/6.jpg
Then MAKE A NEW LAYER and make your design.
http://i873.photobucket.com/albums/ab296/OotLord1003/7.jpg
6. Now copy the Layer
http://i873.photobucket.com/albums/ab296/OotLord1003/8.jpg
Then right click on the copied layer, then hit "alpha to selection"
You should then get a "Marching Ants" Effect. Like so.
http://i873.photobucket.com/albums/ab296/OotLord1003/9.jpg
7. Then go to Select > Grow, and grow by two.
http://i873.photobucket.com/albums/ab296/OotLord1003/10.jpg
Then hit Select > Feather and make this value 2.000
http://i873.photobucket.com/albums/ab296/OotLord1003/12.jpg
8. Then change your Foreground color to "d54c4c"
http://i873.photobucket.com/albums/ab296/OotLord1003/13.jpg
and your background color white. Then use your blend tool and you should come out with something like this.
http://i873.photobucket.com/albums/ab296/OotLord1003/14.jpg
STEP 2: STARTING THE SIG
Now we are going to start the Manga portion of this sig.
1. Make a new image with the settings of 400x500 (transparency)
http://i873.photobucket.com/albums/ab296/OotLord1003/15.jpg
2. Then merge the background together by pressing (Ctrl + M)
Then press (Ctrl + A) then (Ctrl + C) and go to the new image and press (Ctrl + V).
Then make a new layer. http://i873.photobucket.com/albums/ab296/OotLord1003/16.jpg
3. For this signature, I'm using a page from the Zelda OoT manga. You can get this picture here.
Then insert it as a new layer. http://i873.photobucket.com/albums/ab296/OotLord1003/17.jpg
4. Now take your Free Select tool and select all around Link, like so. (This may take awhile)
http://i873.photobucket.com/albums/ab296/OotLord1003/19.jpg
Then press (Ctrl + I) and then press your delete key.
Now delete any other blank areas http://i873.photobucket.com/albums/ab296/OotLord1003/q.jpg
It should now look like this. http://i873.photobucket.com/albums/ab296/OotLord1003/w.jpg
STEP 3: COLORING IN THE MANGA
1. The Hat: Now, select his hat http://i873.photobucket.com/albums/ab296/OotLord1003/t.jpg
Then go to Color > Colorize and Use these settings, I'm using red to match the background, but you can use what you want. http://i873.photobucket.com/albums/ab296/OotLord1003/y.jpg
2. Belt: Brown http://i873.photobucket.com/albums/ab296/OotLord1003/u-1.jpg
Gold http://i873.photobucket.com/albums/ab296/OotLord1003/o-1.jpg
Skin Go to Colors > Color Balance http://i873.photobucket.com/albums/ab296/OotLord1003/i-1.jpg http://i873.photobucket.com/albums/ab296/OotLord1003/i-1.jpg
Highlights http://i873.photobucket.com/albums/ab296/OotLord1003/s-1.jpg
Midtones http://i873.photobucket.com/albums/ab296/OotLord1003/a-1.jpg
Shadows http://i873.photobucket.com/albums/ab296/OotLord1003/d-1.jpg
Eyes http://i873.photobucket.com/albums/ab296/OotLord1003/f-1.jpg
Hair
Midtones http://i873.photobucket.com/albums/ab296/OotLord1003/g-1.jpg
Highlights http://i873.photobucket.com/albums/ab296/OotLord1003/h-1.jpg
Shadows http://i873.photobucket.com/albums/ab296/OotLord1003/j-1.jpg
Master Sword http://i873.photobucket.com/albums/ab296/OotLord1003/k-1.jpg
Sheild Use the Magic Wand Tool...(I can't remember the name) and Select around the Edge then go to Colors > Brightness and Contrast.
Make it these settings http://i873.photobucket.com/albums/ab296/OotLord1003/z-1.jpg
Then go to Edit > Stroke Selection. Then use these settings http://i873.photobucket.com/albums/ab296/OotLord1003/x-1.jpg
Make Sure to do Boots, ears, sheath, and tunic!
It should now look like this. http://i873.photobucket.com/albums/ab296/OotLord1003/c-1.jpg
STEP 4: TEXT
Now let's make some cool text!
1. You may type in whatever you want, but I'm using something different.
http://i873.photobucket.com/albums/ab296/OotLord1003/v-1.jpg
Now choose your text, and copy the layer.
The go to select > grow and grow by two, then use your blend tool to make a cool background.
http://i873.photobucket.com/albums/ab296/OotLord1003/b-1.jpg
Then, duplicate the text, then right click and hit alpha to selection.
Then fill with black, the go to filters > Blur > Gaussian Blur, and make this value 10.
Then set the opacity on the shadow layer to 60. Then Merge the text layers down.
It should then look like this.
http://i873.photobucket.com/albums/ab296/OotLord1003/n-1.jpg
2. Now we are going to give the text a nice gloss.
So then select the rectangular select tool with these settings.
http://i873.photobucket.com/albums/ab296/OotLord1003/leh.jpg
Then hit alpha to section and select about this amount of you text.
http://i873.photobucket.com/albums/ab296/OotLord1003/get-1.jpg
Make a new layer, then make your foreground color white, and select your blend tool.
Make the gradient set to transparency. http://i873.photobucket.com/albums/ab296/OotLord1003/the-1.jpg
I did it to both sides, but it should come out like this.
http://i873.photobucket.com/albums/ab296/OotLord1003/ry-1.jpg
STEP 5: THE FINAL STEPS
1. Now, press Ctrl + M to merge all your layers.
http://i873.photobucket.com/albums/ab296/OotLord1003/wyrsd-1.jpg
2.The right-click on the layer and hit Alpha to selection. Then make a new layer.
http://i873.photobucket.com/albums/ab296/OotLord1003/ctguio-1.jpg
Then go to select > grow and grow by two. Then make your foreground color a red and press (Ctrl + ,)
4. I also added a lens flare, you can do so by going to Colors > Lighting Effects > Lens flare.
3. Then go to File > Save as.. and name it, AND SAVE AS A PNG other wise it won't be transparent in the background.
The result should turn out like this.
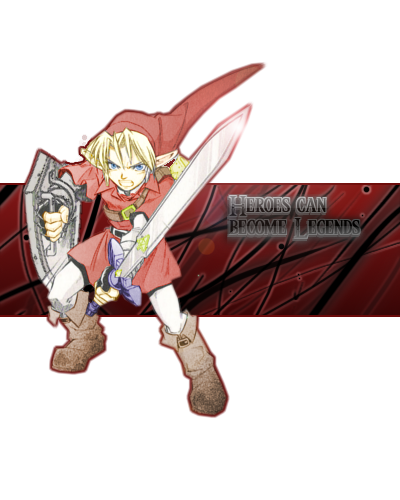
I hope you likes this tutorial, if you would like more, comment or PM me.
Bye, and Happy Gimping!
So here is a quick tutorial on how to do so.
STEP 1: BACKGROUND
1. So first, go to new, and make the size 400x130
http://i873.photobucket.com/albums/ab296/OotLord1003/1.jpg
2. Now we are going to make a background, so pick your specific colors that you want.
http://i873.photobucket.com/albums/ab296/OotLord1003/2.jpg
I'm using a red/black color. So make your foreground color "911919"
http://i873.photobucket.com/albums/ab296/OotLord1003/3.jpg
And your background color "1b0000"
http://i873.photobucket.com/albums/ab296/OotLord1003/4.jpg
3. Then take your blend tool, and drag your line strait up (or down)
It should look like this. (TIP: Hold ctrl for a strait line)
http://i873.photobucket.com/albums/ab296/OotLord1003/5.jpg
4. Now we are going to put a nice design on the background.
I'm using some downloaded brushes, you can get these "http://browse.deviantart.com/resources/applications/gimpbrushes. To put these into gimp (courtesy of lozzykate) Once you have downloaded the brushes that you like, you then have to install them into GIMP. Before you do that though, you have to unzip the ZIP folders that you downloaded.
When you click on you folder that you saved, you need to unzip it.. To unzip it, right click on the folder, click extract all, then click extract. Once you have an unzipped folder. Now, once your folder is unzipped select all of them (Ctrl + A)
Now, what you are going to do then is copy everything. To do that, hit Ctrl + C on your keyboard.
From there, you are then going to go to Start > Computer > OS (C: ) > Program Files > GIMP-2.0 > share > gimp > 2.0 > brushes.Once you are there, you then hit Ctrl + V on your keyboard to paste the files into your brushes folder.
Now, I am using one called "Axeraider70 Winter Breeze" You can get it here.
5. Now, click on your brushes
http://i873.photobucket.com/albums/ab296/OotLord1003/6.jpg
Then MAKE A NEW LAYER and make your design.
http://i873.photobucket.com/albums/ab296/OotLord1003/7.jpg
6. Now copy the Layer
http://i873.photobucket.com/albums/ab296/OotLord1003/8.jpg
Then right click on the copied layer, then hit "alpha to selection"
You should then get a "Marching Ants" Effect. Like so.
http://i873.photobucket.com/albums/ab296/OotLord1003/9.jpg
7. Then go to Select > Grow, and grow by two.
http://i873.photobucket.com/albums/ab296/OotLord1003/10.jpg
Then hit Select > Feather and make this value 2.000
http://i873.photobucket.com/albums/ab296/OotLord1003/12.jpg
8. Then change your Foreground color to "d54c4c"
http://i873.photobucket.com/albums/ab296/OotLord1003/13.jpg
and your background color white. Then use your blend tool and you should come out with something like this.
http://i873.photobucket.com/albums/ab296/OotLord1003/14.jpg
STEP 2: STARTING THE SIG
Now we are going to start the Manga portion of this sig.
1. Make a new image with the settings of 400x500 (transparency)
http://i873.photobucket.com/albums/ab296/OotLord1003/15.jpg
2. Then merge the background together by pressing (Ctrl + M)
Then press (Ctrl + A) then (Ctrl + C) and go to the new image and press (Ctrl + V).
Then make a new layer. http://i873.photobucket.com/albums/ab296/OotLord1003/16.jpg
3. For this signature, I'm using a page from the Zelda OoT manga. You can get this picture here.
Then insert it as a new layer. http://i873.photobucket.com/albums/ab296/OotLord1003/17.jpg
4. Now take your Free Select tool and select all around Link, like so. (This may take awhile)
http://i873.photobucket.com/albums/ab296/OotLord1003/19.jpg
Then press (Ctrl + I) and then press your delete key.
Now delete any other blank areas http://i873.photobucket.com/albums/ab296/OotLord1003/q.jpg
It should now look like this. http://i873.photobucket.com/albums/ab296/OotLord1003/w.jpg
STEP 3: COLORING IN THE MANGA
1. The Hat: Now, select his hat http://i873.photobucket.com/albums/ab296/OotLord1003/t.jpg
Then go to Color > Colorize and Use these settings, I'm using red to match the background, but you can use what you want. http://i873.photobucket.com/albums/ab296/OotLord1003/y.jpg
2. Belt: Brown http://i873.photobucket.com/albums/ab296/OotLord1003/u-1.jpg
Gold http://i873.photobucket.com/albums/ab296/OotLord1003/o-1.jpg
Skin Go to Colors > Color Balance http://i873.photobucket.com/albums/ab296/OotLord1003/i-1.jpg http://i873.photobucket.com/albums/ab296/OotLord1003/i-1.jpg
Highlights http://i873.photobucket.com/albums/ab296/OotLord1003/s-1.jpg
Midtones http://i873.photobucket.com/albums/ab296/OotLord1003/a-1.jpg
Shadows http://i873.photobucket.com/albums/ab296/OotLord1003/d-1.jpg
Eyes http://i873.photobucket.com/albums/ab296/OotLord1003/f-1.jpg
Hair
Midtones http://i873.photobucket.com/albums/ab296/OotLord1003/g-1.jpg
Highlights http://i873.photobucket.com/albums/ab296/OotLord1003/h-1.jpg
Shadows http://i873.photobucket.com/albums/ab296/OotLord1003/j-1.jpg
Master Sword http://i873.photobucket.com/albums/ab296/OotLord1003/k-1.jpg
Sheild Use the Magic Wand Tool...(I can't remember the name) and Select around the Edge then go to Colors > Brightness and Contrast.
Make it these settings http://i873.photobucket.com/albums/ab296/OotLord1003/z-1.jpg
Then go to Edit > Stroke Selection. Then use these settings http://i873.photobucket.com/albums/ab296/OotLord1003/x-1.jpg
Make Sure to do Boots, ears, sheath, and tunic!
It should now look like this. http://i873.photobucket.com/albums/ab296/OotLord1003/c-1.jpg
STEP 4: TEXT
Now let's make some cool text!
1. You may type in whatever you want, but I'm using something different.
http://i873.photobucket.com/albums/ab296/OotLord1003/v-1.jpg
Now choose your text, and copy the layer.
The go to select > grow and grow by two, then use your blend tool to make a cool background.
http://i873.photobucket.com/albums/ab296/OotLord1003/b-1.jpg
Then, duplicate the text, then right click and hit alpha to selection.
Then fill with black, the go to filters > Blur > Gaussian Blur, and make this value 10.
Then set the opacity on the shadow layer to 60. Then Merge the text layers down.
It should then look like this.
http://i873.photobucket.com/albums/ab296/OotLord1003/n-1.jpg
2. Now we are going to give the text a nice gloss.
So then select the rectangular select tool with these settings.
http://i873.photobucket.com/albums/ab296/OotLord1003/leh.jpg
Then hit alpha to section and select about this amount of you text.
http://i873.photobucket.com/albums/ab296/OotLord1003/get-1.jpg
Make a new layer, then make your foreground color white, and select your blend tool.
Make the gradient set to transparency. http://i873.photobucket.com/albums/ab296/OotLord1003/the-1.jpg
I did it to both sides, but it should come out like this.
http://i873.photobucket.com/albums/ab296/OotLord1003/ry-1.jpg
STEP 5: THE FINAL STEPS
1. Now, press Ctrl + M to merge all your layers.
http://i873.photobucket.com/albums/ab296/OotLord1003/wyrsd-1.jpg
2.The right-click on the layer and hit Alpha to selection. Then make a new layer.
http://i873.photobucket.com/albums/ab296/OotLord1003/ctguio-1.jpg
Then go to select > grow and grow by two. Then make your foreground color a red and press (Ctrl + ,)
4. I also added a lens flare, you can do so by going to Colors > Lighting Effects > Lens flare.
3. Then go to File > Save as.. and name it, AND SAVE AS A PNG other wise it won't be transparent in the background.
The result should turn out like this.
I hope you likes this tutorial, if you would like more, comment or PM me.
Bye, and Happy Gimping!
Last edited:
 ;)")